
6 Essential Plant Parenting Hacks for Natural & Thriving Gardens
Gardening is more than just a hobby; it’s a journey of nurturing life, a rewarding endeavor that connects us with nature. While many gardeners invest significant emotional and financial resources into their green spaces, it’s entirely possible to achieve stunning results without relying on expensive, chemical-laden products. Embracing natural, eco-friendly methods not only saves money but also promotes a healthier environment for your plants, pets, and family. Thanks to innovative creators like Blossom on YouTube, simple plant parenting hacks can transform your gardening routine, making it more sustainable and enjoyable. Let’s explore six ingenious, all-natural tips that will help your plants thrive, from seed to maturity.
Unlock Your Garden’s Potential with Everyday Items: The Materials You’ll Need
One of the beauties of these hacks is that they utilize common household items, turning waste into valuable resources for your garden. Before we delve into the step-by-step directions, gather these simple materials:
- Cinnamon (ground)
- Paper towels
- Banana peels
- Water
- Hydrogen peroxide (3%)
- A sturdy stick or skewer
- Tampon (unscented)
- Eggshells
- Orange peels
Revolutionize Your Plant Care: Step-by-Step Natural Hacks
1. Boost Seed Germination & Prevent Fungal Issues with Cinnamon
Starting seeds can be a delicate process, often plagued by damping-off disease caused by fungi. This natural hack provides an excellent, organic solution to protect your vulnerable seedlings and encourage robust growth from the very beginning.
How It Works:
Cinnamon isn’t just a delightful spice; it’s also a powerful natural fungicide. Applying ground cinnamon to your seeds creates a protective barrier, inhibiting the growth of harmful fungi that can cause seeds to rot before they even have a chance to sprout. Furthermore, the warmth and moisture provided by this method create an ideal microclimate for rapid germination, significantly improving your chances of success and giving your plants a healthy head start.
Directions:
- Prepare Your Seeds: Begin with your dry seeds. Ensure they are free from any debris.
- Apply Cinnamon: Lightly coat your seeds with a dusting of ground cinnamon. You don’t need a thick layer; a fine dusting is sufficient to provide fungicidal benefits.
- Create a Germination Chamber: Lay a single sheet of paper towel flat. Carefully arrange your cinnamon-coated seeds on one half of the paper towel, ensuring they are spaced out evenly.
- Seal and Moisten: Fold the other half of the paper towel over the seeds. Gently spray the entire paper towel until it is thoroughly damp, but not dripping wet.
- Darkness and Patience: Place the moistened paper towel in a dark, warm location (e.g., inside a cupboard or a drawer). Check on them daily, ensuring the paper towel remains moist by spritzing with water if needed.
- Ready to Plant: After approximately 5 days, you’ll likely observe tiny sprouts emerging from your seeds, indicating they are ready to be carefully transplanted into soil. This pre-germination step significantly increases your success rate, giving your plants a healthy head start.
2. Enrich Your Soil with Homemade Baked Banana Peel Compost
Instead of tossing those nutrient-rich banana peels, transform them into a potent, eco-friendly compost for your garden. Banana peels are a treasure trove of essential nutrients, particularly potassium, which is vital for flower and fruit development, strong root systems, and overall plant vigor. They also contain smaller amounts of phosphorus, calcium, and magnesium, all beneficial for plant health.
How It Works:
Baking the banana peels dries them out and makes them brittle, allowing for easy crumbling. This process breaks down some of the organic material, making the nutrients more readily available to your plants once added to the soil. Potassium, phosphorus, and calcium found in banana peels contribute to healthier, more productive plants, all while reducing kitchen waste and promoting a circular economy in your home and garden.
Directions:
- Collect Banana Peels: Don’t discard your banana peels after enjoying the fruit. Save them until you have a good quantity.
- Prepare for Baking: Preheat your oven to 350°F (175°C). Lay the banana peels flat on a baking sheet. You can also dry them in direct sunlight or with a food dehydrator if you prefer not to use the oven.
- Bake Until Dry: Bake the peels for about 30 minutes, or until they are completely dry, crispy, and dark brown. The goal is to remove all moisture, making them easy to pulverize.
- Cool and Crumble: Allow the baked peels to cool completely. Once cool, they should be very brittle. You can then easily crumble them into small pieces using your hands, a mortar and pestle, or a food processor for a finer texture.
- Apply to Plants: Sprinkle the crumbled banana peel compost around the base of your plants, gently working it into the top layer of the soil. This slow-release fertilizer will gradually deliver vital nutrients directly to the root zone, promoting lush foliage and abundant blooms. It’s particularly beneficial for flowering plants, fruit-bearing trees, and any plant that appreciates a potassium boost, such as roses, tomatoes, and peppers.
3. Banish Pests Naturally with a Hydrogen Peroxide & Water Solution
Pesky insects can quickly turn a thriving plant into a struggling one. Before reaching for harsh chemical insecticides, try this simple, highly effective homemade solution that’s safe for your plants and the environment. This mixture helps control common soil-borne pests and provides an oxygen boost to roots, addressing multiple plant health concerns simultaneously.
How It Works:
Hydrogen peroxide (H2O2) is a mild antiseptic and oxidizing agent. When mixed with water and poured into the soil, it rapidly breaks down into water and oxygen. This release of oxygen is crucial: it can suffocate soil-dwelling pests like fungus gnat larvae, mealybugs, and spider mites, which thrive in low-oxygen environments. Furthermore, the oxygen aerates the soil, promoting healthier root development and preventing root rot by creating an environment less hospitable to harmful anaerobic bacteria. It also has mild fungicidal properties, helping to combat various soil-borne pathogens.
Directions:
- Prepare the Solution: In a clean container, mix equal parts of regular tap water and 3% hydrogen peroxide. For example, if you use 1 cup of water, add 1 cup of 3% hydrogen peroxide. Always use a 1:1 ratio for this concentration to avoid harming your plants.
- Apply to Soil: Carefully pour this diluted solution directly into the soil of your plant, just as you would with regular watering. Ensure the soil is evenly moistened. For best results, allow the top inch or two of soil to dry out before application, as this will ensure the pests are actively targeted.
- Observe and Repeat (if necessary): You might notice a slight fizzing sound as the hydrogen peroxide reacts with organic matter in the soil, releasing oxygen. This is normal and indicates the solution is working. Apply this solution sparingly, perhaps once every few weeks, for persistent pest issues, or as a preventative measure. It’s particularly effective against fungus gnats and can help deter other small soil insects. Always test on a small, inconspicuous part of the plant first if you are unsure of its reaction.
4. Master Watering: The Simple Stick Test for Perfect Hydration
Overwatering and underwatering are two of the most common causes of plant demise. Guessing when to water can be tricky, as the surface of the soil can often dry out much faster than the deeper layers. This simple stick test provides an accurate, no-fuss way to determine your plant’s hydration needs without expensive gadgets, helping you prevent both root rot and drought stress.
How It Works:
The stick test helps you assess the moisture level deep within the soil, not just the surface. By inserting a stick and observing what comes out, you can accurately gauge whether the soil is still damp, indicating no need for water, or completely dry, signaling it’s time for a drink. This method accounts for varying soil types and pot sizes, which influence how quickly water drains and evaporates, making it a reliable universal technique.
Directions:
- Find Your Tool: Grab a clean, sturdy stick, a wooden skewer, a chopstick, or even a pencil. The key is to use something that can penetrate deep into the soil and will show moisture marks.
- Insert Deeply: Gently insert the stick deep into the soil of your plant, approximately two-thirds of the way down into the pot, ensuring you avoid damaging major roots. For very deep pots, use a longer stick to reach the bottom layers.
- Assess Moisture: Carefully pull out the stick.
- If it comes out clean and dry: This indicates that the soil is parched, and your plant is definitely thirsty. The absence of soil particles and moisture means the roots are likely dry. It’s time for a good, thorough watering.
- If it comes out with moist soil particles stuck to it: This means there’s still plenty of moisture deep in the pot, and your plant is adequately hydrated. Hold off on watering for now to prevent overwatering, and recheck in a day or two.
- Regular Check: Make this a routine check before each watering session. This proactive approach will help you prevent both overwatering and underwatering, ensuring your plants receive just the right amount of moisture for optimal health and growth. Adjust the frequency of this test based on your plant’s specific needs, environmental conditions, and the season.
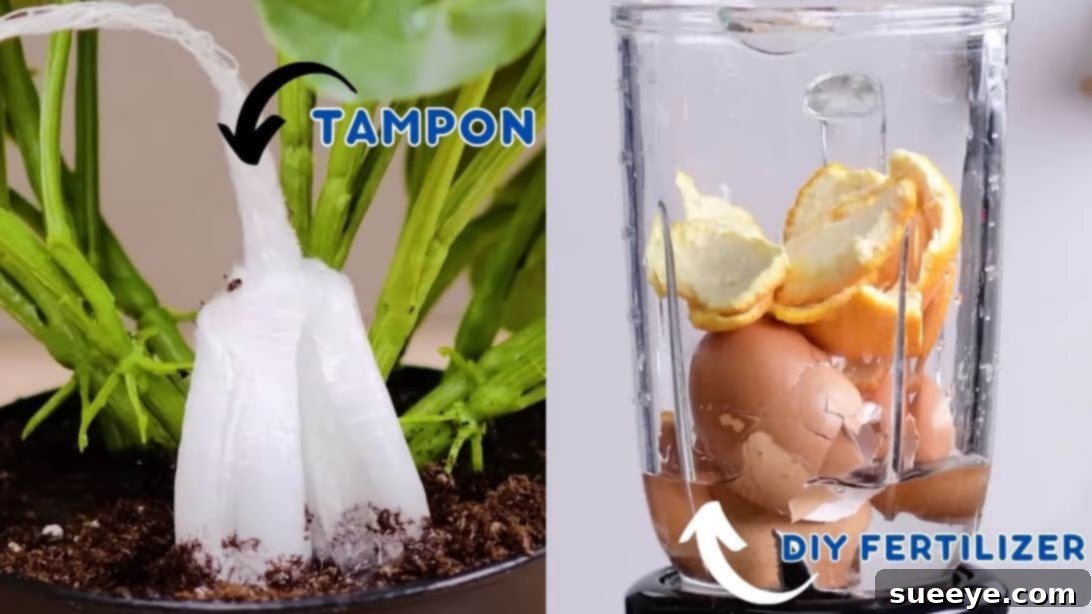
5. Rescue Overwatered Plants with an Unsung Hero: The Tampon
Accidentally overwatered your precious plant? Don’t panic! Excess water can quickly lead to root rot, a silent killer for many houseplants, by depriving roots of oxygen. This surprising hack offers a quick and effective solution to absorb surplus moisture and save your plant from drowning, giving it a second chance at life.
How It Works:
Tampons are specifically designed for maximum absorbency, making them remarkably effective for wicking away excess water from saturated soil. By drawing out standing water, they help prevent the anaerobic (oxygen-deprived) conditions that lead to root rot, where harmful bacteria and fungi can proliferate. This rapid removal of moisture allows the soil to dry out more quickly, restoring a healthy environment for your plant’s roots to breathe and recover.
Directions:
- Identify Overwatering: Signs of overwatering include yellowing leaves (especially lower leaves), wilting despite wet soil, a general droopy appearance, and a musty smell from the soil. The soil will also feel consistently soggy.
- Insert the Tampon: Gently insert an unscented tampon (applicator removed, if applicable) into the overwatered soil. Push it down a few inches, close to the center of the pot, or until it feels snug. For larger pots or severely overwatered plants, you can insert multiple tampons at various points.
- Allow to Absorb: Leave the tampon in place for several hours, or until it has visibly expanded and absorbed a significant amount of water. You’ll notice it becoming heavier and fuller.
- Remove and Monitor: Once saturated, carefully remove the tampon and discard it. Monitor your plant closely over the next few days. You might need to repeat the process if the soil is still excessively wet, or if the plant shows continued signs of stress. This hack is a great temporary fix while you adjust your watering schedule for the long term, ensuring your plant receives only the water it needs.
6. Craft Your Own Nutrient-Rich Fertilizer from Kitchen Scraps
Why buy expensive chemical fertilizers when you can create a powerful, all-natural version right in your kitchen? This hack utilizes eggshells and orange peels, turning common waste products into a fantastic source of essential nutrients for your plants, promoting robust growth and vibrant health sustainably.
How It Works:
Eggshells are an excellent source of calcium carbonate, crucial for strong cell walls, preventing blossom end rot in fruiting plants (like tomatoes and peppers), and improving overall plant structure. Orange peels, on the other hand, contain a wealth of beneficial nutrients including nitrogen, phosphorus, and potassium, along with micronutrients. Their citrus oils can also act as a natural insect repellent, discouraging pests like aphids and ants. Blending these scraps with water creates a nutrient-rich liquid that’s easily absorbed by plants, delivering a holistic boost to their health and vitality.
Directions:
- Collect Scraps: Save your eggshells (rinse them thoroughly to remove any egg residue) and orange peels. The fresher the peels, the more potent their oils.
- Combine in Blender: Place a handful of clean eggshells, a few orange peels, and about 1-2 cups of water into a blender. Adjust the water amount to achieve a desired consistency.
- Blend Until Smooth: Blend the mixture on high until it forms a smooth, somewhat liquid consistency. You want the eggshells to be finely pulverized into a gritty paste or liquid, ensuring their calcium content is readily available.
- Apply as Fertilizer: Pour this nutrient-rich liquid directly into the soil around your plants. The calcium from the eggshells will strengthen plant structure and prevent nutrient deficiencies, while the balanced nutrients from the orange peels will promote healthy growth, vibrant foliage, and potentially deter pests. This homemade fertilizer is an outstanding way to give your plants a natural boost and reduce kitchen waste simultaneously, contributing to a more sustainable gardening practice. Apply every few weeks during the growing season.
Embrace Sustainable Gardening with These Clever Hacks
Gardening doesn’t have to be complicated or expensive. By incorporating these six ingenious plant parenting hacks into your routine, you can cultivate a thriving garden using natural, everyday items. From giving your seeds a strong start with cinnamon to creating nutrient-rich compost and fertilizers from kitchen scraps, these tips empower you to care for your plants sustainably and effectively.
Not only will you save money by avoiding store-bought chemicals, but you’ll also foster a healthier environment for your plants, the beneficial insects, and the planet as a whole. Experiment with these methods, observe how your plants respond, and enjoy the satisfaction of a flourishing garden nurtured by your own natural touch. Happy gardening, and may your plants always thrive!
*All image credit belongs to Blossom via YouTube. Follow and subscribe to their channel for more inspiring gardening and DIY content!