
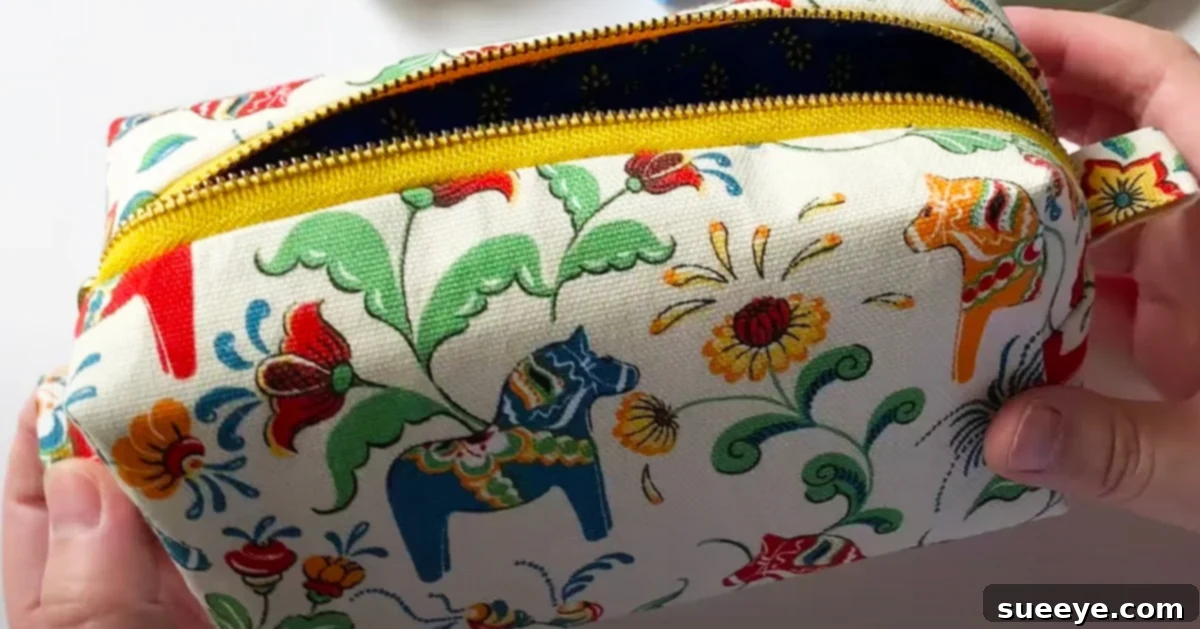
Sew Your Own Zipper Box Pouch: A Comprehensive DIY Guide
In a world overflowing with mass-produced items, there’s a unique satisfaction that comes from creating something with your own hands. A zipper box pouch is not just a practical accessory; it’s a canvas for your creativity and a testament to your burgeoning sewing skills. These versatile little bags are indispensable for keeping life organized, whether tossed into a larger purse, packed for a trip, or simply used to tidy up your desk. From makeup to stationery, charging cables to small craft supplies, a well-made zipper box pouch offers a stylish and secure home for all your miscellaneous essentials.
While ready-made pouches are widely available, the appeal of a handmade one is undeniable. Imagine a pouch crafted from your favorite fabric, perfectly sized for your needs, and featuring a design that truly reflects your personality. It’s a project that’s not only incredibly rewarding but also surprisingly accessible for beginners. We’re particularly inspired by the clear and detailed instructions provided by the Keiko Olsson Sewing Channel, which showcases a vibrant and functional zipper box pouch. Keiko’s approach ensures that no step is overlooked, making it an excellent resource for anyone eager to embark on this creative journey.
Beyond personal use, a handmade zipper box pouch makes an incredibly thoughtful gift. Picture crafting a unique organizer for a loved one, selecting fabrics that resonate with their taste or hobbies. It’s a present that speaks volumes about the care and effort you’ve invested. So, let’s dive into the world of DIY sewing and discover how you can create your very own custom zipper box pouch.
Why Sew Your Own Zipper Box Pouch? Endless Benefits and Creative Freedom
Embarking on a sewing project like a zipper box pouch offers a multitude of advantages that go far beyond just having a new storage item. It’s an opportunity to save money, express your style, and even develop valuable skills.
Unmatched Personalization and Style
One of the most compelling reasons to sew your own pouch is the complete creative freedom it offers. Tired of generic designs? With DIY, you’re the designer! You can select any fabric imaginable – from vibrant florals and quirky patterns to sophisticated solids and elegant textures. Coordinate it with your favorite handbag, match it to your home decor, or even use themed fabrics for special occasions or gifts. Want to add a personal touch? Consider incorporating embroidery, fabric paint, appliqué, or a custom zipper pull. This level of customization is simply not possible with store-bought alternatives, allowing you to create a truly unique accessory that perfectly suits your aesthetic.
Versatility for Every Need
The functionality of a zipper box pouch is virtually limitless. Its structured, rectangular shape makes it ideal for a wide array of uses:
- Makeup Bag: Keep your cosmetics organized and prevent spills in your purse.
- Pencil Case: Perfect for students, artists, or anyone who needs to carry pens, markers, and small stationery items.
- Travel Organizer: Neatly store toiletries, chargers, cables, or small gadgets while on the go.
- Craft Supply Holder: Ideal for sewing notions, crochet hooks, knitting needles, or small art supplies.
- First Aid Kit: Assemble a compact emergency kit for your car, bag, or home.
- Toy Pouch: A great way to keep small toys, LEGO bricks, or game pieces contained.
By choosing different sizes and fabric types (e.g., a waterproof lining for toiletries), you can tailor your pouch to any specific purpose.
Cost-Effective and Eco-Friendly
Buying multiple specialized pouches can quickly add up. Sewing your own, especially if you utilize fabric scraps from other projects, can be significantly more economical. Furthermore, it’s an excellent way to reduce textile waste by repurposing remnants or upcycling old garments into something new and functional. It’s a small step towards a more sustainable lifestyle.
Skill Development for All Levels
This project is fantastic for beginner sewers. It introduces fundamental techniques such as cutting fabric accurately, working with interfacing for structure, installing a zipper (a skill many find intimidating but is actually quite manageable), and creating boxed corners. Each step builds confidence and lays the groundwork for more complex projects in the future. Even experienced sewers will appreciate the quick satisfaction and opportunity for creative expression this project offers.
The Joy of Gifting Handmade
A handmade zipper box pouch is more than just a gift; it’s a token of affection and time spent. Whether it’s for a birthday, holiday, or just a thoughtful gesture, a personalized pouch demonstrates a level of care that money can’t buy. Imagine your mom, who constantly buys small pouches, receiving a beautifully sewn one from you – it would undoubtedly become a cherished item.
Gathering Your Essential Sewing Supplies
Before you begin sewing, ensure you have all the necessary materials and tools. Preparation is key to a smooth and enjoyable crafting experience. While the specific dimensions for this project are provided by Keiko Olsson, understanding the purpose of each item will help you in future sewing endeavors.
Fabric Selections
- Front Fabric (2 pieces, 28cm x 17cm [11″ x 6.7″]): This is the exterior fabric that will be visible. Choose a medium-weight cotton, quilting cotton, or even a lightweight canvas for durability and ease of sewing. Consider a fun print or a sophisticated solid that speaks to your style.
- Lining Fabric (2 pieces, same as front): This fabric forms the interior of your pouch. While the original suggests using the same fabric as the front, you can opt for a contrasting color or pattern to add a delightful surprise when the pouch is opened. A smooth cotton works well here.
- 8cm [3″] Square Fabric (2 pieces): These small squares are often used for zipper tabs or end tabs, which create a neat finish at the ends of the zipper and make it easier to open and close the pouch. They can match either the exterior or interior fabric, or be a third coordinating print.
- Bias Tape or Piece of Lining Fabric: This is used to finish raw edges, particularly the zipper ends, for a clean, professional look. Pre-made bias tape is convenient, but you can also make your own from a coordinating piece of lining fabric.
Structural Support
- Interfacing: This is a crucial element for giving your pouch structure, body, and durability. There are various types of interfacing (fusible, sew-in, lightweight, medium-weight). For a zipper box pouch, a medium-weight fusible interfacing is often recommended as it adheres easily with an iron and provides a nice firmness without being too stiff.
Hardware
- 25cm [10″] Zipper: The heart of your pouch! A nylon coil zipper is often recommended for beginners as it’s easier to sew over than metal zippers. Choose a color that complements your fabric choices.
Essential Tools
- Iron and Ironing Board: Essential for pressing seams, attaching fusible interfacing, and getting crisp finishes. Don’t underestimate the power of a good press!
- Sewing Machine: Any basic sewing machine capable of a straight stitch and a zig-zag stitch will suffice. Ensure it’s threaded correctly and you have a fresh needle.
- Scissors: Sharp fabric scissors are a must for precise cutting. Keep them separate from paper scissors!
- Ruler or Measuring Tape: For accurate measuring and cutting of your fabric pieces. A clear quilting ruler and rotary cutter can make this process even faster and more precise.
- Pins or Fabric Clips: To hold fabric pieces together before sewing.
- Thread: All-purpose polyester thread that matches or complements your fabric colors.
- Seam Ripper: Every sewer needs one for those inevitable “oops” moments.
- Chalk or Fabric Marker: For marking lines on fabric, especially when creating boxed corners.
A Comprehensive Guide to Crafting Your Zipper Box Pouch
With your materials gathered, it’s time to bring your zipper box pouch to life. While the initial steps are universal, we highly recommend following a detailed visual guide like the one from the Keiko Olsson Sewing Channel for precise measurements and techniques. Below, we’ll outline the general process you’ll undertake.
1. Preparation is Key: Cutting and Interfacing
Accuracy in cutting is the foundation of a well-made pouch. Carefully cut all your fabric pieces according to the provided dimensions (28cm x 17cm for main and lining, 8cm squares for tabs). Once your main fabric pieces are cut, lay your front fabric pieces with the design facing down. Following the interfacing manufacturer’s instructions, place the fusible interfacing on the backside (wrong side) of the front fabric and press it firmly with a hot iron. This step is critical for giving your pouch structure and body, preventing it from being flimsy.
2. Assembling the Main Fabric Pieces
Once your interfacing is fused, place the two front fabric pieces right sides together. Sew a 1 cm (approximately 3/8 inch) seam allowance from the bottom edge to attach them. After sewing, leave about 5mm (approximately 1/4 inch) from your seam and carefully trim the excess fabric along this line. This reduces bulk and helps the seam lie flat when pressed open. Press this seam open for a clean finish.
3. Mastering the Zipper Installation
Attaching the zipper is often seen as the most challenging part, but with patience and a zipper foot on your sewing machine, it becomes quite manageable. You’ll typically sandwich the zipper between your main fabric and lining fabric, sewing along the zipper tape. The 8cm square fabric pieces are folded and sewn onto the ends of your zipper to create neat zipper tabs. These tabs not only give a professional finish but also make the zipper easier to grip and protect the raw edges of your fabric.
4. Constructing the Pouch Body
Once the zipper is securely attached, you will typically bring the remaining raw edges of your main fabrics and lining fabrics together. You’ll sew around the perimeter of the pouch, leaving an opening in the lining fabric (usually the bottom) for turning the pouch right side out later. Remember to sew with a consistent seam allowance (e.g., 1 cm or 3/8 inch) and backstitch at the beginning and end of each seam for reinforcement. It’s crucial to open the zipper halfway before sewing these side seams. This ensures you can turn the pouch right side out easily later and prevents the zipper from getting caught in your side seams.
5. Defining the Box: Creating the Corners
The “box” in zipper box pouch comes from this clever technique. To create the corners, you will pinch each corner of your sewn pouch (main fabric and lining fabric separately) so that the side seam meets the bottom seam, forming a triangular shape. You’ll then measure and mark a line perpendicular to the seam, often around 3-4cm (1.2-1.6 inches) from the corner point. Sew along this marked line, creating a new seam that “boxes out” the corner. Trim the excess fabric beyond this seam. Repeat this for all four corners (two on the main fabric, two on the lining). This is what gives the pouch its three-dimensional, structured shape.
6. The Grand Reveal: Turning and Finishing
Once all your corners are boxed, it’s time for the magical reveal! Reach through the opening you left in the lining and gently pull the entire pouch right side out. Carefully poke out all the corners and seams to ensure they are crisp and well-defined. Finally, hand-stitch or machine-stitch the opening in the lining closed. Give your newly created pouch a final press with the iron, and marvel at your handmade creation.
For a detailed, step-by-step visual tutorial that walks you through each precise cut and stitch for this specific design, be sure to follow along with the rest of Keiko Olsson Sewing Channel’s tutorial on YouTube. Her clear instructions will guide you to a perfect finish.
Tips for a Professional Finish and Enduring Quality
To ensure your zipper box pouch looks professional and stands the test of time, keep these tips in mind:
- Press, Press, Press: Ironing seams after each sewing step makes a huge difference in the final appearance. It helps seams lie flat and gives your pouch a crisp, tailored look.
- Consistent Seam Allowance: Maintaining an even seam allowance throughout your project is crucial for pieces to fit together correctly and for the overall symmetry of the pouch.
- Clip Corners and Grade Seams: Before turning the pouch right side out, clip the corners diagonally (without cutting through the stitching) to reduce bulk. For thicker seams, “grade” them by trimming one side of the seam allowance slightly shorter than the other.
- Understitching for Clean Linings: After attaching the lining to the main fabric (especially around the zipper), sewing a line of stitching through the lining and seam allowance very close to the seam can help the lining stay neatly tucked inside.
- Use a Walking Foot: If you’re working with thicker fabrics or multiple layers, a walking foot attachment for your sewing machine can help feed the fabric evenly, preventing puckering and shifting.
- Test Your Zipper: Always test your zipper on a scrap piece of fabric if you’re new to zipper installation. This helps you get a feel for your machine’s settings and build confidence.
Personalizing Your Pouch: Creative Ideas for Customization
Once you’ve mastered the basic zipper box pouch, the possibilities for customization are endless:
- Vary the Size: Experiment with different dimensions to create mini pouches for coins or earrings, or larger ones for craft projects or travel essentials.
- Add a Wrist Strap or Handle: Attach a small loop of fabric or a D-ring with a detachable strap for easy carrying.
- Internal or External Pockets: Integrate slip pockets inside the lining for smaller items, or add a zippered pocket to the exterior for extra security.
- Embellishments: Consider adding decorative topstitching, a fabric tag with your handmade label, or even some embroidery for a truly unique touch.
- Mix and Match Fabrics: Use different coordinating fabrics for the main body, bottom, and top sections for a patchwork effect.
Conclusion: The Joy of a Handmade Creation
Overall, sewing your own zipper box pouch is a fantastic and rewarding project for anyone interested in DIY and crafting. Not only is it a practical item that offers endless utility for organization, but it also allows for immense creative expression. You’ll save money compared to purchasing multiple store-bought options and gain the profound satisfaction of saying, “I made this!” Whether for personal use or as a heartfelt gift for someone special – perhaps using their favorite colors or a charming fabric design – a handmade zipper box pouch is a treasure. So, gather your materials, fire up your sewing machine, and embark on this delightful journey of creating something beautiful and functional with your own hands. Happy sewing!