
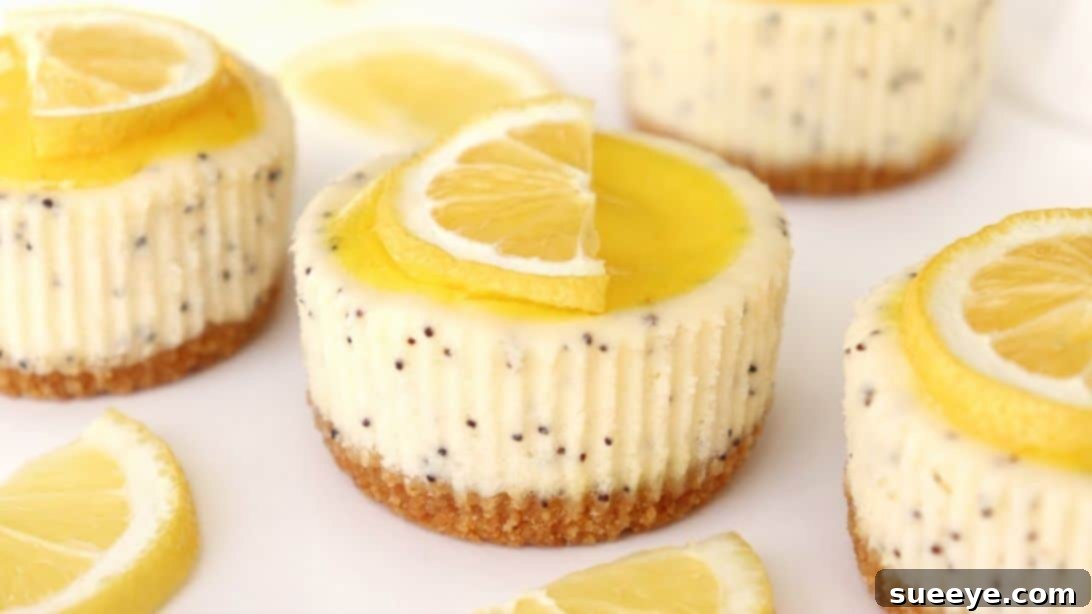
Delightful Mini Lemon Cheesecakes: Your Ultimate Guide to a Zesty Dessert
Prepare to elevate your dessert game with these absolutely delightful mini lemon cheesecakes. Inspired by the incredible recipe from Top Tasty, these individual treats are destined to be the shining star of any gathering. Imagine a perfectly buttery, crumbly crust providing the ideal foundation for an exquisitely creamy, rich cheesecake filling, all crowned with a vibrant, zesty lemon topping that truly awakens the palate. This recipe has become an absolute staple in our home, a go-to dessert that consistently impresses family and friends, leaving everyone asking for the recipe. They’re not just delicious; their individual portions make them elegant, easy to serve, and incredibly appealing, promising a burst of sunshine in every bite.
Why These Mini Lemon Cheesecakes Are a Must-Try
There’s a special charm to mini cheesecakes that goes beyond their undeniable cuteness. They offer a perfect single-serving portion, making them ideal for parties, potlucks, or simply a sophisticated dessert after dinner. Say goodbye to messy slicing and uneven portions! The intricate combination of textures and flavors in this particular recipe is simply unmatched: the satisfying crunch of the biscuit base, the smooth, velvety texture of the lemon-infused cream cheese filling, and the bright, tangy burst from the luscious lemon curd topping. It’s a symphony of sweet and tart that refreshes and satisfies without being overly heavy. Plus, the visual appeal, especially with a fresh lemon slice garnish, is simply stunning, making them look far more complicated to create than they actually are. They are a true testament to how simple ingredients can come together to create something truly extraordinary.
Essential Ingredients for Your Zesty Creation
Crafting these heavenly mini lemon cheesecakes requires a few key components. We’ve broken down the ingredients into three distinct sections: the crunchy base, the luscious cheesecake filling, and the bright, tangy topping. Using high-quality ingredients, especially fresh lemon juice and full-fat cream cheese, will make a noticeable difference in the final taste and texture of your cheesecakes. Ensure all dairy and eggs are at room temperature for the best results in your filling.
For the Buttery Crust:
- 7 ounces (approx. 200g) of Digestive Biscuits or Graham Crackers: These provide a classic, subtly sweet, and buttery base. Their fine crumb texture is perfect for holding together and offering a delightful contrast to the creamy filling.
- 1/3 cup (approx. 75g) of Unsalted Butter, Melted: The butter acts as the binding agent, fusing the biscuit crumbs together to create a firm, flavorful, and sturdy crust. Unsalted butter is preferred to allow precise control over the overall saltiness of your dessert.
For the Creamy Lemon Cheesecake Filling:
- 17.6 ounces (approx. 500g) of Full-Fat Cream Cheese, Softened: Room temperature cream cheese is absolutely crucial for achieving a smooth, lump-free filling. Full-fat cream cheese delivers the best creamy texture and rich, decadent flavor that is characteristic of a truly exceptional cheesecake.
- 6.8 ounces (approx. 200ml) of Heavy Cream (or Double Cream): This ingredient significantly contributes to the luxurious creaminess and richness of the cheesecake filling. Ensure it’s cold before mixing for optimal texture.
- 1/2 cup + 1/4 cup (approx. 180g) of Granulated Sugar: This carefully measured amount of sugar sweetens the cheesecake to perfection, creating a harmonious balance against the tartness of the lemon.
- 1 tablespoon of All-Purpose Flour: A small but mighty amount of all-purpose flour plays a vital role in stabilizing the cheesecake batter, helping to prevent dreaded cracks during the baking and cooling process.
- 1 tablespoon of Corn Starch (Cornflour): Similar to flour, corn starch is a thickening agent that aids in creating a perfectly smooth, dense, and uniform consistency in your cheesecake filling.
- 2 Medium Eggs, Room Temperature: Eggs are essential for providing structure and richness to the cheesecake. Like cream cheese, ensuring they are at room temperature promotes better emulsion with the other ingredients, leading to a smoother batter.
- 1 teaspoon of Poppy Seeds (Optional): These tiny seeds add a delightful visual speckled effect and a subtle, nutty crunch that beautifully complements the bright lemon flavor. They are purely optional, so feel free to omit if not preferred.
For the Zesty Lemon Topping:
- 1/3 cup (approx. 80ml) of Freshly Squeezed Lemon Juice: This is where the vibrant, tangy lemon flavor truly shines. Always opt for freshly squeezed juice over bottled for the best taste.
- 1/3 cup (approx. 80ml) of Water: Helps to slightly thin the lemon juice, ensuring the topping has the perfect pourable and spreadable consistency.
- 1 Egg Yolk: The egg yolk is key for richness and acts as a natural emulsifier and thickener, giving the topping a luscious, glossy finish and smooth texture.
- 1 tablespoon of Corn Starch (Cornflour): Essential for transforming the liquid ingredients into a beautiful, spoonable, curd-like consistency for the topping.
- 1/2 teaspoon of Turmeric Powder: While optional, turmeric is used here purely for natural coloring, imparting a brighter, more appealing golden-yellow hue to the lemon topping without significantly altering its delicate flavor.
- 1/2 tablespoon of Unsalted Butter: Added at the end of the cooking process, butter provides a silky smooth texture and a beautiful, professional sheen to the finished lemon topping.
- Thin Lemon Slices or Zest (Optional) for Garnish: Perfect for adding a final elegant touch, emphasizing the lemon flavor, and making your mini cheesecakes visually pop.
Yield: This recipe typically yields approximately 12 delightful mini cheesecakes, perfect for sharing.
Essential Equipment You’ll Need:
- Standard 12-cup muffin tin
- Paper muffin liners or reusable silicone baking cups
- Food processor (highly recommended for fine crumbs) or a sturdy zip-top bag and rolling pin
- Several mixing bowls (at least 2 large and 1 medium)
- Electric mixer (handheld or stand mixer) or a robust whisk for the filling
- Small saucepan for preparing the lemon topping
- Rubber spatula and a spoon for mixing and serving
- Small glass or measuring cup for pressing the crusts
Step-by-Step Guide: Crafting Your Mini Lemon Cheesecakes
Follow these detailed instructions carefully to ensure your mini lemon cheesecakes turn out perfectly creamy, zesty, and utterly irresistible. Precision in each step will lead to a truly professional-looking and tasting dessert that will impress all who try them.
Step 1: Prepare the Crust Foundation
Begin by preparing your biscuit crumbs, which form the sturdy base of your cheesecakes. Place the 7 ounces of digestive biscuits (or graham crackers) into a food processor. Pulse and blend on high speed until they are finely ground into uniform crumbs, resembling coarse sand. It’s important to achieve a fine consistency for a cohesive crust. If you don’t have a food processor, you can place the biscuits in a sturdy zip-top bag and crush them thoroughly with a rolling pin or the bottom of a heavy pan until very fine. Once crushed, transfer these fine crumbs to a medium-sized mixing bowl, ready for the next step.
Step 2: Combine Crust Ingredients
Pour the 1/3 cup of melted unsalted butter directly into the bowl with the biscuit crumbs. Mix thoroughly with a spoon or your hands until all the crumbs are evenly coated and moistened by the butter. Take your time with this step, ensuring every crumb is saturated. The mixture should resemble wet sand and hold together when pressed firmly in your hand. This ensures a stable and flavorful crust that won’t crumble apart when your cheesecakes are enjoyed.
Step 3: Form the Cheesecake Bases
Line your standard 12-cup muffin tray with paper muffin liners. This crucial step is not only for easy removal of the finished cheesecakes but also helps them maintain their shape. Scoop an even amount of the biscuit mixture into the bottom of each liner – approximately 1.5 to 2 tablespoons per cup. Using the bottom of a small, clean glass, a measuring cup, or even your thumb, firmly press the crumbs down into a compact, even layer at the bottom of each liner. Compacting the crust well is vital; it creates a sturdy foundation that won’t fall apart when you bite into the luscious cheesecake filling.
Step 4: Craft the Creamy Cheesecake Filling
In a large mixing bowl, combine the softened full-fat cream cheese, heavy cream, and granulated sugar. Using an electric mixer on medium speed (or a robust whisk and considerable arm strength), beat the mixture until it becomes wonderfully smooth, thick, and thoroughly combined, with no lumps of cream cheese remaining. Periodically scrape down the sides of the bowl to ensure everything is incorporated. Next, gently sprinkle in the 1 tablespoon of all-purpose flour and 1 tablespoon of corn starch. Continue to mix on low speed just until they are fully incorporated into the mixture, being extremely careful not to overmix. Finally, gently beat in the 2 room-temperature eggs and the optional 1 teaspoon of poppy seeds. Mix only until just combined and smooth, stopping as soon as the last streaks of egg disappear. Over-mixing at this stage can incorporate too much air, which can lead to unsightly cracks in your baked cheesecakes.
Step 5: Fill the Crusts with Luxurious Filling
Carefully pour the creamy cheesecake filling over the prepared biscuit crusts in the muffin tin. Aim to fill each liner to about three-quarters full, ensuring an even distribution of the filling among all the cups for uniform baking. Gently tap the muffin tin on your counter a few times. This simple action helps to release any trapped air bubbles within the filling and allows it to settle evenly, contributing to a smoother final texture.
Step 6: Bake to Golden Perfection
Preheat your oven to 320°F (160°C). Once your oven has reached the correct temperature, carefully place the muffin tin with the filled cheesecakes into the center rack of the oven. Bake for approximately 25 minutes. The cheesecakes are perfectly done when the edges appear set and slightly firm, and the centers have only a slight, gentle jiggle when the tin is carefully shaken. It’s crucial to avoid overbaking, as this can lead to dry cheesecakes and undesirable cracks. Once baked, turn off the oven and leave the cheesecakes inside with the oven door slightly ajar for about 15-20 minutes. This gradual cooling method helps prevent cracking by allowing the temperature to decrease slowly. After this, remove them from the oven and let them cool completely on a wire rack at room temperature before proceeding to the next step.
Step 7: Prepare the Zesty Lemon Topping
While the cheesecakes are cooling, prepare the vibrant lemon topping. In a small saucepan over medium heat, combine the 1/3 cup of fresh lemon juice, 1/3 cup of water, 1 egg yolk, 1 tablespoon of corn starch, and the 1/2 teaspoon of turmeric (if using for its natural color enhancement). Whisk constantly and vigorously to prevent any lumps, particularly from the corn starch, and to ensure even cooking. Continue stirring until the mixture begins to thicken and reaches a gentle boil. Once it has thickened to a consistency similar to a thin pudding or custard, remove the pot from the heat. Stir in the 1/2 tablespoon of unsalted butter until it is fully melted and smoothly incorporated. The butter will give the topping a beautiful gloss and a silky smooth finish. Set aside to cool slightly to a warm room temperature before using.
Step 8: Assemble and Chill for Optimal Flavor
Once both the mini cheesecakes and the lemon topping have cooled down completely (they should be cool to the touch), it’s time for the final assembly. Spoon a generous amount of the zesty lemon topping over the top of each mini cheesecake, spreading it gently and evenly to cover the entire surface. For an extra touch of elegance and visual appeal, you can place a thin lemon slice or sprinkle some fresh lemon zest on top of each cheesecake. This garnish also helps to visually highlight the key lemon flavor. Once topped, carefully transfer the muffin tin to the refrigerator and chill for a minimum of 2 to 3 hours. Chilling is an essential step to allow the cheesecakes to fully set, firm up, and for all the delightful flavors to meld beautifully. For the absolute best results and a truly firm texture, overnight chilling is highly recommended.
Step 9: Serve and Savor!
After the chilling period, your irresistible mini lemon cheesecakes are ready to be enjoyed! Carefully remove them from the muffin tin by gently lifting the paper liners. Arrange them aesthetically on a platter and serve immediately. These delightful treats are perfect on their own, offering a complete flavor experience, or can be accompanied by a light dollop of freshly whipped cream or a few fresh berries (like raspberries or blueberries) for an added touch of color and contrasting flavor. Prepare for an abundance of compliments and inevitable requests for the recipe – these individual lemon cheesecakes are truly irresistible and sure to become a cherished part of your dessert repertoire!
Tips for Achieving Cheesecake Perfection
To ensure your mini lemon cheesecakes are consistently outstanding, with perfect texture and flavor, keep these expert tips in mind. Following these guidelines will significantly improve your baking success and help you avoid common cheesecake pitfalls:
- Room Temperature Ingredients are Non-Negotiable: Always ensure your cream cheese and eggs are at room temperature before you begin mixing. This is absolutely vital for achieving a smooth, lump-free filling that mixes evenly and bakes consistently. Cold ingredients will lead to a lumpy batter and an unevenly baked cheesecake.
- Do Not Overmix the Filling: While mixing the cream cheese and sugar, beat until smooth and creamy. However, once you add the eggs, mix only until just combined and smooth. Overmixing incorporates too much air into the batter, which can cause cheesecakes to puff up excessively in the oven and then tragically crack as they cool.
- Gradual Cooling is Your Best Friend: Sudden temperature changes are the primary culprit for cracks in cheesecakes. The method of turning off the oven and leaving the door ajar allows for a slow, gentle cool-down. This gradual reduction in temperature greatly reduces the risk of unsightly cracks forming on the surface of your beautiful cheesecakes.
- Fresh Lemon Juice for Superior Flavor: For the most vibrant, authentic, and truly zesty lemon flavor, always use freshly squeezed lemon juice for both the cheesecake filling and the topping. Bottled juice, while convenient, simply won’t compare in terms of brightness and natural tang.
- Press Crust Firmly and Evenly: A well-compacted crust is a sturdy crust. Take the time to use a flat-bottomed object, like a small glass or measuring cup, to press the biscuit crumbs firmly and evenly into the muffin liners. This prevents the crust from crumbling and ensures a pleasant texture with every bite.
- Turmeric for Color, Not Flavor: Remember that the turmeric in the topping is used purely for enhancing the natural yellow color of the lemon. If you prefer, you can omit it entirely, or use a tiny drop of yellow food coloring instead to achieve a similar visual effect without any change to the taste.
Creative Variations and Customizations
While this classic mini lemon cheesecake recipe is perfect as is, feel free to unleash your inner baker and experiment with these delicious variations to make it uniquely your own. Cheesecakes are wonderfully versatile, offering endless possibilities for flavor exploration:
- Explore Different Crusts: Instead of traditional digestive biscuits or graham crackers, try using ginger snaps for a warm, spicy kick, shortbread cookies for an even richer, buttery foundation, or even chocolate wafers for a delightful contrasting flavor profile.
- Luscious Berry Swirl: For an added layer of fruity goodness, gently swirl a spoonful of your favorite raspberry, strawberry, or blueberry jam into the cheesecake filling before baking. The vibrant fruit will create a beautiful visual and a burst of complementary flavor.
- Zesty Lime Cheesecakes: Easily transform this recipe by substituting all the lemon juice and zest with fresh lime juice and zest for a wonderfully tangy and aromatic lime version. A sprinkle of grated lime zest on top makes for a perfect garnish.
- Tropical Coconut Infusion: For a delightful tropical twist, add about 1/4 cup of finely shredded coconut to the crust mixture. You can also incorporate a teaspoon of coconut extract into the cheesecake filling to amplify the exotic flavor.
- Aromatic Spiced Topping: Enhance the lemon topping with a pinch of aromatic spices. A tiny bit of ground cardamom or a whisper of freshly grated ginger can add an unexpected and sophisticated layer of complexity.
- Garnish Galore: Beyond simple lemon slices, get creative with your garnishes! Consider fresh berries (such as raspberries, blueberries, or sliced strawberries), a dollop of fluffy whipped cream, a sprinkle of toasted coconut flakes, or even a delicate drizzle of melted white chocolate for an extra touch of indulgence.
Storage and Make-Ahead Tips
These mini lemon cheesecakes are fantastic for making ahead, making your entertaining stress-free and allowing you to enjoy your guests without last-minute kitchen duties. Proper storage also ensures they remain fresh and delicious:
- Refrigeration: Once fully chilled and topped, store any leftover mini cheesecakes in an airtight container in the refrigerator. They will maintain their freshness, texture, and exquisite flavor for up to 3-4 days.
- Freezing for Longer Shelf Life: For longer storage, you can freeze baked cheesecakes. For best results, freeze them without the lemon topping, as the texture of the topping can change slightly upon thawing. Place them on a baking sheet until frozen solid, then transfer to a freezer-safe bag or airtight container. They can be stored in the freezer for up to 1 month. To serve, thaw them overnight in the refrigerator, then add the freshly made lemon topping.
- Prepare Components Separately: To streamline your baking process, you can prepare certain components in advance. The biscuit crust can be pressed into liners and refrigerated for up to a day before baking. The cheesecake filling can be made an hour or two in advance and kept chilled. The lemon topping can be prepared a day ahead and stored in the fridge; just give it a good whisk before spooning onto your cooled cheesecakes.
Frequently Asked Questions (FAQs)
Q: Can I use different types of biscuits for the crust?
A: Absolutely! While digestive biscuits or graham crackers are traditional and highly recommended for their classic flavor, feel free to experiment with other crunchy cookies. Shortbread, ginger snaps, vanilla wafers, or even chocolate wafers can create unique and delicious crust variations. The key is to crush them finely and mix them well with melted butter to ensure a firm, cohesive base.
Q: Why did my mini cheesecakes crack during baking or cooling?
A: Cracking is a common concern with cheesecakes and is usually attributed to overbaking or sudden temperature changes. To prevent this, ensure you don’t overmix the batter (which incorporates too much air). Bake only until the edges are set with a slight jiggle in the center, and most importantly, allow them to cool gradually in the oven with the door ajar before transferring them to a wire rack. Using room temperature ingredients also helps achieve a more stable batter.
Q: Can I make these cheesecakes without poppy seeds?
A: Yes, the poppy seeds are entirely optional. They are included primarily for their subtle visual appeal and to add a very mild, pleasant textural element. Omitting them will not affect the core flavor or the creamy texture of the cheesecake, so feel free to leave them out if they are not to your preference or if you don’t have them on hand.
Q: How can I tell when the cheesecake filling is perfectly baked?
A: The perfect doneness for cheesecake filling is crucial. The edges of the cheesecake should appear set and slightly firm, while the very center might still have a slight, delicate jiggle when you gently shake the muffin tin. This slight jiggle indicates that it is cooked through but will continue to set as it cools. Overbaking, on the other hand, will result in a dry texture and potential cracking.
Q: Is fresh lemon juice essential, or can I use bottled lemon juice?
A: For the brightest, most authentic, and vibrant lemon flavor that truly makes these cheesecakes shine, freshly squeezed lemon juice is highly recommended for both the filling and the topping. Bottled lemon juice often contains preservatives and can have a duller, sometimes slightly bitter, or less intense taste that simply won’t give your cheesecakes the same zesty punch and natural freshness.
Q: Can I skip the turmeric in the lemon topping?
A: Yes, you can absolutely skip the turmeric in the lemon topping. The turmeric is added solely for its natural yellow coloring properties, which enhance the visual appeal of the lemon topping by giving it a brighter, more vibrant hue. It doesn’t significantly alter the taste. If you prefer, you can omit it completely or use a tiny drop of yellow food coloring instead if you desire a more intense yellow.
Your Go-To Mini Lemon Cheesecake Recipe Awaits!
This mini lemon cheesecake recipe is more than just a dessert; it’s an experience of bright flavors, luxurious textures, and delightful presentation, all neatly packaged in an individual serving. Whether you’re a seasoned baker looking for your next showstopper or just starting your culinary journey, these cheesecakes are surprisingly simple to master and guaranteed to impress even the most discerning palates. The harmonious combination of the rich, buttery biscuit crust, the smooth, tangy cream cheese filling, and the vibrant, zesty lemon topping creates a balance that is truly unforgettable. So, gather your ingredients, follow these detailed steps, and prepare to delight your taste buds and those of your loved ones with these exquisite individual treats. Happy baking, and get ready for a dessert that everyone will adore!