
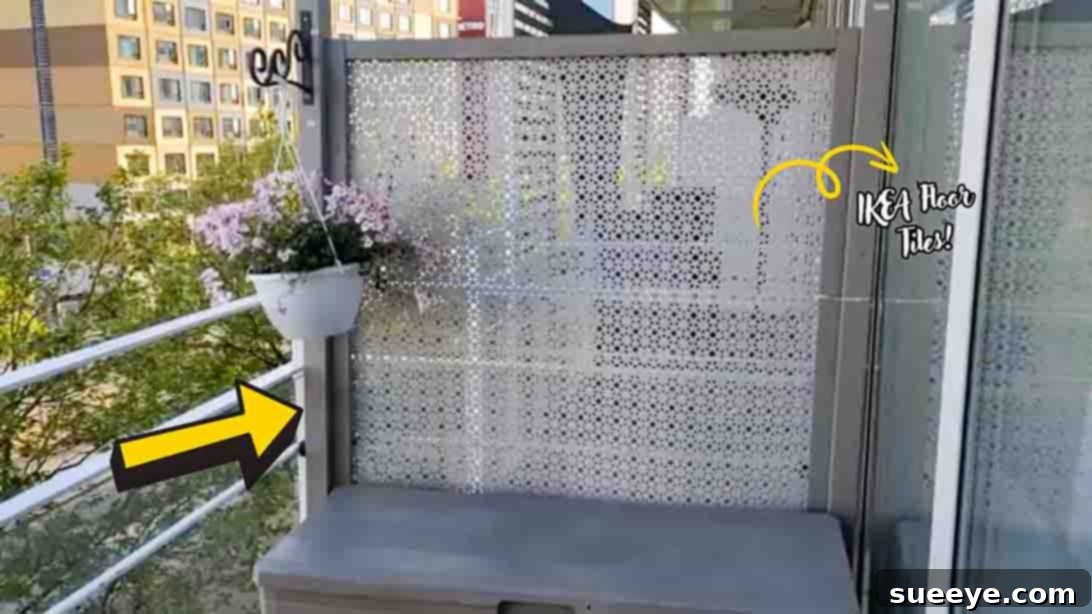
Are you dreaming of transforming your outdoor space into a serene, secluded retreat? Whether you seek a private corner for quiet contemplation, a stylish screen to shield your patio from curious glances, or a touch of modern design flair for your backyard, an outdoor privacy wall offers the perfect blend of functionality and aesthetics. This comprehensive guide will show you how to construct a stunning and affordable DIY outdoor privacy wall using versatile IKEA floor tiles, inspired by the creative insights from A Corner In Europe on YouTube. Get ready to elevate your garden or patio with a custom privacy solution that’s surprisingly simple to build.
Creating an outdoor oasis doesn’t have to be complicated or expensive. With IKEA’s durable and easy-to-assemble Altappen floor decking, you can craft a personalized privacy screen that reflects your style without breaking your budget. This project is ideal for both seasoned DIY enthusiasts and beginners, offering immense satisfaction as you watch your vision come to life. Say goodbye to exposed outdoor areas and hello to a beautiful, private sanctuary where you can relax, entertain, and enjoy the great outdoors in peace.
RELATED: How to Make a DIY Faux Living Plant Wall
In this detailed tutorial, we’ll walk you through every step of constructing your own stylish outdoor privacy wall. From selecting the right materials and planning your design to the actual build and adding personalized touches, we’ve got you covered. Imagine a modern minimalist screen, a rustic charm accent, or a vibrant, eclectic backdrop for your plants – this project allows you to tailor your privacy wall to perfectly match your outdoor decor. The joy of building something impactful with your own hands, while significantly enhancing your outdoor living experience, is truly unparalleled.
Why Choose an IKEA Altappen Privacy Wall?
The choice of IKEA Altappen floor decking for this DIY privacy wall project is not accidental. These tiles offer several compelling advantages that make them a popular choice for outdoor enhancements:
- Affordability: IKEA products are renowned for their budget-friendly pricing, making this project accessible without compromising on quality or style.
- Ease of Assembly: Altappen tiles are designed for simple, interlocking assembly, dramatically reducing the complexity and time required for construction. Their click-together system is intuitive and requires no special tools for basic assembly.
- Durability: Made from durable materials, Altappen floor decking is designed to withstand various outdoor elements, ensuring your privacy wall remains attractive and functional for years to come.
- Aesthetic Versatility: The clean, slatted design of the Altappen tiles provides a modern and elegant look that complements a wide range of outdoor aesthetics, from contemporary to more traditional settings.
- Customization Potential: While the tiles themselves offer a consistent look, the wooden frame and surrounding decor provide endless opportunities for personalization, allowing you to create a truly unique feature.
Compared to traditional fencing options, which can be costly and labor-intensive to install, or the slow growth of natural hedges, a DIY IKEA Altappen privacy wall offers an immediate, cost-effective, and highly customizable solution to your outdoor privacy needs.
Materials for Your DIY Privacy Wall
Gathering all your materials before you begin will ensure a smooth and efficient building process. Here’s what you’ll need for your sturdy and stylish outdoor privacy wall:
- IKEA Altappen Floor Decking: The star of your project. The number of tiles will depend on the desired size of your privacy wall. It’s always wise to purchase a few extra for cuts or mistakes.
- Wooden Frame: This will form the structural backbone of your privacy wall. Opt for pressure-treated lumber (e.g., 2×3 or 2x4s) as it’s specifically designed for outdoor use and resistance to rot and insects. Ensure the wood is straight and free of major defects.
- Outdoor-Grade Screws: Use stainless steel or galvanized screws (e.g., wood screws, deck screws) to prevent rust and ensure a strong, long-lasting hold, especially important for outdoor exposure.
- Saw: A hand saw, circular saw, or miter saw will be necessary for cutting the wooden frame components and any Altappen tiles that need trimming. Choose the saw you are most comfortable and proficient with.
- Duct Ties (or alternatives): Used for initially securing your finished privacy wall to an existing structure like a rail. For a more permanent or robust attachment, consider heavy-duty zip ties, U-brackets, or specialized fence brackets.
- Measuring Tape and Pencil: Essential for accurate measurements and marking cuts.
- Drill/Driver: To pre-drill pilot holes (highly recommended to prevent wood splitting) and drive in screws efficiently.
- Safety Gear: Always prioritize safety. Wear work gloves, safety glasses, and hearing protection when operating power tools.
Step-by-Step Guide: Building Your Outdoor Privacy Wall
Step 1: Preparing Your Wooden Frame
The foundation of a robust privacy wall is a well-constructed frame. Begin by preparing your wooden frame according to your desired dimensions. If you are using pre-assembled wooden panels that have a removable middle section, as often seen in garden screens, carefully remove this middle part. This creates an open structure onto which your IKEA tiles will be attached. If you are building your frame from scratch, cut your pressure-treated lumber into the required lengths to form a sturdy rectangular or square frame. Ensure all joints are flush and secure, using screws to create a strong, stable base. For added durability, apply a weather-resistant wood sealant or paint to your frame, especially if it’s not pre-treated.
Step 2: Assembling and Attaching the Altappen Floor Tiles
Now, it’s time to bring the Altappen tiles into play. Lay your Altappen floor tiles on a flat surface, ensuring they are clean and dry. These tiles are designed to snap together effortlessly; simply align the interlocking edges and press firmly until they click into place. Continue this process until you have a section of tiles that approximates the size of your wooden frame opening. Before securing them, hold the assembled tile section against your frame. If the tiles are slightly larger than your frame, carefully measure and mark the excess on the side. Using your saw, make precise cuts to trim the tiles to perfectly fit within the frame. Once the tiles are cut to size and perfectly fitted, position them carefully within your wooden frame. Using your drill and outdoor-grade screws, attach the floor tiles securely to the wooden frame. Drive screws through the tile’s base into the frame at various points to ensure a firm, stable attachment. Space your screws evenly for a neat appearance and maximum hold.
Step 3: Installation and Final Touches
With your Altappen privacy wall fully assembled, it’s time for installation. Carefully transport the finished wall to its desired location in your outdoor space. Whether it’s along your patio, near a seating area, or defining a garden path, ensure the placement is strategic for maximum privacy and aesthetic impact. If you are attaching it to an existing rail or fence, use duct ties (or for a more permanent solution, robust zip ties, metal U-brackets, or even L-brackets screwed into the frame and the existing structure) to secure it firmly. Make sure it’s plumb (vertically straight) and stable. Once secured, you can enhance its appearance by decorating the sides with vibrant plants, climbing vines, or hanging planters. This not only adds a touch of natural beauty but also cleverly conceals any visible ties or fasteners. Alternatively, the sleek design of the Altappen tiles looks fantastic unadorned. Your quick, easy, and stylish DIY outdoor privacy wall is now complete, ready to offer you tranquility and beauty!
Benefits of Your New DIY Privacy Wall
Investing your time and effort into this DIY outdoor privacy wall yields a multitude of advantages that go beyond just aesthetic appeal:
- Enhanced Privacy: The primary benefit is creating a secluded environment, allowing you to enjoy your outdoor space without feeling exposed to neighbors or passersby.
- Aesthetic Upgrade: The modern and clean lines of the IKEA Altappen tiles instantly elevate the visual appeal of any outdoor area, adding a touch of contemporary elegance.
- Cost-Effective Solution: Building it yourself with readily available materials like IKEA tiles is significantly more affordable than hiring professionals or purchasing pre-made high-end privacy screens.
- Customization and Personalization: You have complete control over the size, placement, and decorative elements, ensuring the privacy wall perfectly matches your unique style and needs.
- Windbreak and Shade: Depending on its placement, your privacy wall can also offer protection from harsh winds or provide partial shade, making your outdoor space more comfortable.
- Increased Property Value: Well-designed and maintained outdoor features can contribute positively to your home’s curb appeal and overall value.
- DIY Satisfaction: There’s immense pride and satisfaction in stepping back and admiring a functional and beautiful feature you’ve created with your own hands.
Customization and Design Ideas
While the Altappen tiles provide a fantastic base, the real fun begins with customization. Here are some ideas to make your privacy wall truly unique:
- Vertical Garden: Attach small planters or shelves to the frame to create a stunning vertical garden, perfect for herbs, succulents, or colorful annuals.
- Lighting: Integrate outdoor string lights, solar-powered lanterns, or LED strip lights along the frame to create a magical ambiance during the evenings.
- Artistic Elements: Hang weather-resistant outdoor artwork, decorative mirrors, or wind chimes to add personality and visual interest.
- Built-in Shelving: Add narrow shelves for decorative items, small potted plants, or even a convenient spot for your drink while relaxing.
- Color Pop: Paint or stain the wooden frame in a color that complements your existing outdoor decor or adds a vibrant contrast.
- Combination Materials: Experiment with combining the Altappen tiles with other materials like lattice panels, corrugated metal, or even clear acrylic for varied textures and light play.
Maintenance Tips for Longevity
To ensure your DIY outdoor privacy wall remains beautiful and functional for years, a little maintenance goes a long way:
- Regular Cleaning: Periodically wipe down the Altappen tiles with a damp cloth to remove dirt, dust, and pollen. For tougher stains, use a mild soap solution.
- Frame Inspection: Annually inspect the wooden frame for any signs of wear, rot, or insect damage. Reapply wood sealant or paint as needed to protect it from the elements.
- Hardware Check: Tighten any loose screws or fasteners on both the frame and where the wall is attached to ensure stability.
- Plant Care: If you’ve added plants, ensure they are regularly watered and pruned, and check for any signs of disease or pests. Keep climbing plants from growing too aggressively into the structure.
- Winterization (if applicable): In colder climates, consider covering your privacy wall during winter months to protect it from harsh weather conditions, especially if it’s freestanding or particularly exposed.
Safety First: Important Considerations
Embarking on any DIY project requires attention to safety. Always:
- Wear Protective Gear: Gloves, safety glasses, and hearing protection are crucial when cutting wood or using power tools.
- Use Tools Correctly: Familiarize yourself with how to safely operate any saws or drills you are using. Read instruction manuals and follow manufacturer guidelines.
- Secure the Wall Properly: Ensure your privacy wall is firmly anchored to prevent it from tipping over in strong winds or accidental bumps, which could cause injury or damage. If it’s a freestanding structure, consider burying posts or using heavy bases.
- Lift with Care: The assembled wall can be heavy. Get help when lifting and moving it into place to avoid back strain or injury.
- Check for Utilities: Before drilling or digging, especially if you plan to install permanent posts, verify there are no underground utilities (water, gas, electricity) in your intended area.
Conclusion: Your Private Oasis Awaits
Crafting your own DIY outdoor privacy wall with IKEA Altappen tiles is an incredibly rewarding project that significantly enhances the comfort and beauty of your outdoor living space. It’s an accessible, affordable, and highly customizable solution to a common outdoor dilemma. By following these detailed steps, you can confidently create a stylish and functional feature that offers both seclusion and a touch of personalized elegance. Remember, A Corner In Europe on YouTube provides excellent visual guidance to help you along the way.
Imagine enjoying your morning coffee in a serene, private garden or hosting evening gatherings on a patio that feels like your exclusive retreat. This DIY project empowers you to transform your vision into reality, adding lasting value and enjoyment to your home. So, gather your materials, embrace your inner DIY spirit, and embark on building the perfect outdoor privacy wall that will serve as a cherished part of your personal oasis for years to come!