
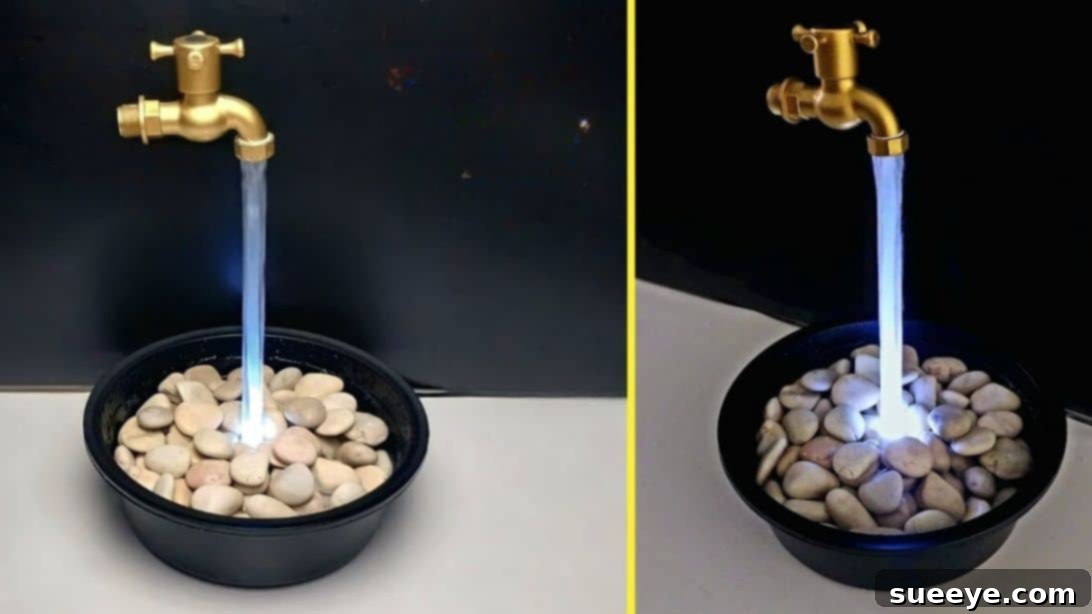
Create a Magical DIY Floating Fountain for Your Garden
Imagine a serene evening in your garden, the gentle murmur of water filling the air, and a beautifully illuminated faucet seemingly suspended mid-air, pouring water into a tranquil basin below. This isn’t a scene from a fantasy movie; it’s a project you can bring to life in your own backyard! This DIY floating fountain, inspired by the ingenious design from Galeri Saturasi, is a truly eye-catching water feature that promises to impress guests and enchant children. It’s a captivating illusion that appears to defy gravity, making it the perfect centerpiece for any outdoor space.
The “floating faucet” phenomenon often sparks a question in everyone’s mind: “Where is the water coming from?” The secret lies in a clever arrangement of pipes and a submersible pump, creating a continuous loop that gives the magical impression of a tap floating freely in the air, endlessly supplying water. This article will guide you through every step of creating this stunning water feature, ensuring your garden becomes a beacon of wonder and relaxation.
What is a Floating Fountain and How Does It Work?
A floating fountain, particularly the “magic faucet” variant, is an optical illusion that makes it appear as if a faucet is suspended in mid-air, producing a continuous stream of water without any visible source. The enchantment truly comes alive when you realize there’s no visible support or plumbing connecting the faucet to anything above. So, how is this magic achieved?
The ingenuity of this design lies in a simple yet effective closed-loop water system. A submersible pump, hidden within the fountain’s basin, circulates water upwards through a transparent or disguised pipe. This pipe runs directly into the faucet. The water then flows out of the faucet’s spout and cascades back down into the basin. Small, strategically placed holes or a clever design within the faucet allow the water to flow *around* the central support pipe as it descends, completely obscuring the pipe from view. The continuous flow of water creates a shimmering column that perfectly conceals the mechanism, giving the illusion of a faucet defying gravity. When combined with LED lighting, the effect is even more dramatic, especially at night.
RELATED: If you love unique water features, check out this guide on a DIY Vanishing Waterfalls Planter Pot Fountain for more inspiration!
Why Build Your Own Floating Fountain?
Creating your own floating fountain offers a plethora of benefits beyond just aesthetic appeal:
- Unique Garden Focal Point: Unlike conventional fountains, the “magic faucet” design is truly a conversation starter, making your garden stand out.
- Cost-Effective: Building a DIY fountain is often significantly cheaper than purchasing a pre-made, elaborate water feature from a store, giving you more bang for your buck.
- Customization Opportunities: You have full control over the design, from the faucet style and basin material to the type of lighting and decorative stones, allowing you to match it perfectly with your garden’s aesthetic.
- Soothing Ambiance: The gentle sound of flowing water is naturally calming and can help mask unwanted noises, creating a more peaceful and relaxing outdoor environment.
- Nighttime Beauty: With integrated LED lighting, your fountain transforms into a glowing spectacle after dusk, adding a magical glow to your evenings.
- Sense of Accomplishment: There’s immense satisfaction in creating something beautiful and functional with your own hands.
- Engaging for All Ages: Kids and adults alike will be fascinated by the optical illusion, adding an element of fun and wonder to your garden.
Easy DIY Floating Fountain Materials
Gathering the right materials is the first crucial step to ensure a smooth and successful project. Most of these items can be found at local hardware stores, plumbing supply shops, or online retailers. Choose quality materials to ensure durability and a long-lasting fountain.
- Plastic Water Faucet: A decorative, lightweight faucet is ideal. Ensure it has a design that can accommodate the internal pipe.
- Aquarium Pipe: Diameter 0.472441 inches (12 mm) – This will be the hidden support and water conduit. Clear or frosted pipe works best.
- 1/4 inch Hose: A flexible hose to connect the pump to the main pipe.
- Valve Socket AW 1/2 inch SDL: Used for creating a secure connection point.
- Basin: Diameter 9.84252 inches (25 cm) – Choose a sturdy, waterproof basin. Plastic, ceramic, or metal are suitable. You can adjust the size based on your preference.
- PVC Sheet: For creating custom seals and supports.
- LED Eagle Eye Lights: Diameter 0.629921 inches (12mm), 12 volt – These small, powerful LEDs are perfect for illuminating the water flow.
- Used Paint Bucket: The bottom part will be repurposed for structure and concealment.
- Mini Submersible Pump: DC 12 volt – Essential for circulating the water. Ensure it has enough lift (head height) for your chosen faucet height.
- Connector Female DC: For powering the LED lights.
- Adaptor 12 Volt DC: To power both the pump and the LEDs (ensure it has sufficient amperage for both).
- Stones: Decorative stones to cover the internal components and add aesthetic appeal.
- Silicone Rubber Sealant: Crucial for creating waterproof seals. Look for outdoor-grade, flexible sealant.
- Instant Glue (Super Glue): For quick, strong bonds.
- Spray Paint (Gold, Black): To customize the faucet and basin.
Essential Tools You’ll Need
Having the right tools on hand will make the construction process much easier and safer. Don’t skip on safety gear!
- Drill and Drill Bits: Various sizes for making holes in plastic, PVC, and the basin.
- Utility Knife or PVC Cutter: For precisely cutting PVC sheets and hoses.
- Sandpaper: Fine-grit sandpaper for preparing surfaces for paint.
- Measuring Tape or Ruler: For accurate measurements.
- Marker Pen: For marking cut lines and drill points.
- Safety Glasses: Always wear eye protection when drilling or cutting.
- Gloves: To protect hands during painting and sealing.
- Pliers: May be useful for holding small parts or tightening connections.
- Wire Strippers/Crimpers: If you need to connect electrical wires for the LEDs or pump.
Step-by-Step Guide: How to Make a Floating Fountain
Follow these detailed instructions carefully to bring your magical floating fountain to life. Remember to take your time and ensure each step is completed thoroughly for the best results.
Step 1: Preparing the Faucet for the Illusion
The faucet is the star of the show, so its preparation is key. Begin by lightly sanding the entire surface of your plastic faucet. This crucial step creates a rough texture, allowing the spray paint to adhere much better and last longer. Once sanded, clean off any dust. Apply several thin, even coats of gold spray paint, allowing each coat to dry completely before applying the next. This will give it a rich, metallic finish. Next, carefully remove the tip (aerator) of the faucet. You’ll then need to cut the tube on the very bottom of the faucet. Enlarge this newly created hole to perfectly fit the 12mm aquarium pipe. The fit should be snug, but don’t force it. Finally, cut four small indentations or slots evenly spaced around the inside of this opening. These indentations are critical; they will allow the water to flow back down around the central pipe once it exits the faucet. Insert the aquarium pipe into the modified faucet, ensuring it goes in securely.
Step 2: Assembling the Pipe and Hose Connection
Take your 1/2 inch SDL valve socket. Drill a hole on one side of this socket that is just large enough for your 1/4 inch hose to pass through snugly. Now, insert the valve socket onto the other end of the aquarium pipe (the end opposite the faucet). Next, thread the 1/4 inch hose *inside* the aquarium pipe, and then out through the hole you just drilled in the valve socket. This creates the internal channel for the pump’s water supply. With all components in place, it’s time to seal. Use a generous amount of silicone rubber sealant to fill any gaps between the valve socket, the aquarium pipe, and the hose. This ensures a watertight connection, preventing leaks and maintaining optimal water pressure for the fountain effect. Allow the sealant to cure completely as per the manufacturer’s instructions.
Step 3: Preparing the Fountain Basin
Just like the faucet, preparing the basin will enhance its appearance and durability. Lightly sand the entire surface of your 25 cm diameter basin to promote paint adhesion. Clean off any dust or debris. Apply several thin, even coats of black spray paint to the basin. Black is an excellent choice as it helps to conceal the internal components (pump, pipes, wires) and creates a dramatic contrast for the illuminated water. Ensure each coat dries before applying the next. A smooth, even finish will significantly improve the overall look of your fountain.
Step 4: Integrating the LED Lights and Sealing
This step brings the magical glow to your fountain. Cut two circular pieces from your PVC sheet, each approximately 0.787 inches (2 cm) in diameter. On one of these PVC circles, drill a hole that perfectly matches the top part of your 12mm LED eagle eye light. Insert the eagle eye LED into this hole. Next, carefully cut a small notch or hole on the valve socket – this is where the LED’s electrical cord will pass through. Secure the LED-equipped PVC circle to the valve socket using instant glue. To ensure full waterproofing and secure the LED in place, apply silicone rubber sealant around the edges where the PVC circle meets the valve socket, and around the LED’s base. Take the second PVC circle and use it to seal the other side of the valve socket, again using instant glue and then reinforcing with silicone sealant. This creates a waterproof enclosure for your valve socket and integrates the lighting seamlessly.
Step 5: Finalizing the Hose and Pipe Connection
Now, take the PVC sheet ring (which might be the second one from Step 4, or another piece if needed) and slide it onto the loose end of the 1/4 inch hose. Then, carefully insert this end of the hose into the main aquarium pipe. The PVC ring acts as a spacer or a securement point. Once positioned correctly, cut any excess hose, ensuring it reaches comfortably to where your pump will be placed without being too long or too short. Apply generous amounts of silicone rubber sealant around this connection point to create a strong, watertight seal. This step completes the internal water pathway from the pump to the faucet, ensuring there are no leaks along the main support column.
Step 6: Preparing the Paint Bucket Base
The used paint bucket will serve as a sturdy base and a means to conceal the pump and connections. Cut off the bottom part of the paint bucket. This section will be placed upside down over the main pipe structure. Once the bottom is separated, create six evenly spaced holes around its side. These holes will allow water to flow freely into the area where the pump is located, ensuring it remains fully submerged. Additionally, cut a larger hole in the center of the paint bucket bottom – this hole should be sized to fit snugly around the aquarium pipe, allowing it to pass through while keeping the bucket section stable.
Step 7: Installing the Pump and Base
This is where the heart of your fountain is installed. Connect your mini submersible pump to the end of the 1/4 inch hose, ensuring a tight fit. You may need a small hose clamp for added security, though a tight friction fit often suffices. Position the pump at the bottom of your black-painted basin. Use waterproof glue or sealant to secure the pump firmly to the basin’s floor. Next, drill a small hole in the basin itself for the pump’s power cord (and the LED light cord, if separate). Thread the cords through this hole. Apply silicone sealant around the hole to prevent water leakage. Now, carefully place the prepared bottom of the paint bucket (from Step 6) over the aquarium pipe, right side down (so the cut edge is facing the basin’s bottom). This piece will rest on the bottom of the basin, covering the pump and providing a stable base for the decorative stones.
Step 8: Final Assembly, Water, and Decoration
With all the internal plumbing and electrical components in place, it’s time for the grand finale. Reassemble the faucet onto the top end of the aquarium pipe, ensuring it’s securely attached and straight. Fill your basin with water, making sure the submersible pump is fully submerged. Add your decorative stones, arranging them carefully to completely cover the pump, the paint bucket base, and all internal hoses and wires, leaving only the central pipe and faucet visible. The stones not only hide the mechanics but also add weight and aesthetic appeal. Once the stones are in place, ensure the faucet is firmly attached to the top of the main pipe. Plug in your adapter, and watch your magical floating fountain come to life! Adjust the water level if necessary to ensure optimal flow and full submersion of the pump.
Understanding the “Magic” in Detail
The illusion of the floating faucet is a masterful play on perspective and the properties of water. The core principle is a closed-loop system where water is continuously recycled. The submersible pump draws water from the basin and pushes it up through the narrow 1/4 inch hose, which is cleverly housed inside the larger, rigid 12mm aquarium pipe. This aquarium pipe acts as the invisible support column for the faucet. Once the water reaches the faucet, it exits the spout and cascades downwards. The small indentations or strategically designed openings within the faucet ensure that this descending sheet of water completely envelops and hides the central aquarium pipe. The continuous, smooth flow of water creates an opaque curtain, effectively making the support structure disappear from plain sight. The added LED lights further enhance this illusion, especially in low light, as they illuminate the waterfall itself, distracting the eye from any underlying mechanics. It’s a brilliant example of simple engineering creating an extraordinary visual effect.
Customization Ideas for Your Unique Floating Fountain
While the basic design is impressive, there’s ample room to personalize your floating fountain to truly reflect your style:
- Faucet Variety: Experiment with different faucet styles – vintage, modern, animal-shaped – to match your garden’s theme.
- Basin Makeover: Instead of a painted plastic basin, consider a ceramic pot, a galvanized tub, or even a carved stone bowl for a more natural or rustic look.
- LED Color Play: Use color-changing LEDs or different colored lights to create various moods. Red for warmth, blue for cool tranquility, or green for a forest feel.
- Aquatic Companions: If your basin is large enough, introduce small aquatic plants like water lilies or even a few goldfish (ensure proper filtration and oxygenation if adding fish).
- Decorative Elements: Beyond stones, add polished river rocks, sea glass, miniature figurines, or waterproof fairy lights around the base for extra charm.
- Solar Power: For an eco-friendly option, look for a 12V submersible pump and LED kit designed for solar power, eliminating the need for an electrical outlet.
- Height Variations: Adjust the length of your aquarium pipe to create a taller or shorter floating effect. Just ensure your pump can handle the increased lift for taller designs.
Maintenance Tips for Your Floating Fountain
To keep your magical floating fountain sparkling and functioning perfectly, some regular maintenance is essential:
- Keep Water Levels Optimal: Check the water level daily, especially in hot weather, as water will evaporate. Ensure the pump is always fully submerged to prevent burnout.
- Regular Cleaning: Periodically drain and clean the basin to remove algae, debris, and mineral buildup. A soft brush and mild soap (rinse thoroughly!) will suffice.
- Algae Prevention: Add a small amount of fountain-safe algaecide to the water to prevent unsightly green growth. Alternatively, ensure your fountain receives some shade.
- Pump Maintenance: Clean the pump’s intake filter regularly to prevent clogs and maintain strong water flow. Refer to your pump’s manual for specific cleaning instructions.
- Winterization (for colder climates): Before the first hard freeze, drain the fountain completely. Remove the pump, clean it, and store it indoors in a bucket of distilled water or a dry, protected place. Cover or bring the basin indoors to prevent cracking.
- Check for Leaks: Occasionally inspect all sealed connections for any signs of leakage and reapply sealant if necessary.
Safety Considerations
Working with water and electricity requires careful attention to safety:
- Electrical Safety: Always connect your fountain to a Ground Fault Circuit Interrupter (GFCI) protected outlet. This is crucial for preventing electrical shocks.
- Water and Wiring: Ensure all electrical connections are waterproof and properly insulated. Keep adapter and connector away from direct water exposure.
- Tool Usage: When drilling, cutting, or sanding, wear appropriate personal protective equipment, including safety glasses and gloves.
- Children and Pets: While a fountain is lovely, always supervise small children and pets around water features. Ensure the stones are large enough not to be a choking hazard.
- Stable Placement: Position your fountain on a flat, stable surface to prevent it from tipping over, especially when filled with water.
Unleash the Magic in Your Garden
Building this DIY floating fountain is more than just a craft project; it’s an opportunity to create a truly enchanting and relaxing feature for your garden. The blend of simple mechanics and clever design results in an awe-inspiring illusion that will be the talk of your neighborhood. With detailed instructions and a little dedication, you can transform an ordinary corner of your yard into a magical oasis. So gather your materials, follow these steps, and prepare to enjoy the soothing sounds and captivating sight of your very own “magic faucet” floating fountain. Share your creations and inspire others to add a touch of wonder to their outdoor living spaces!