
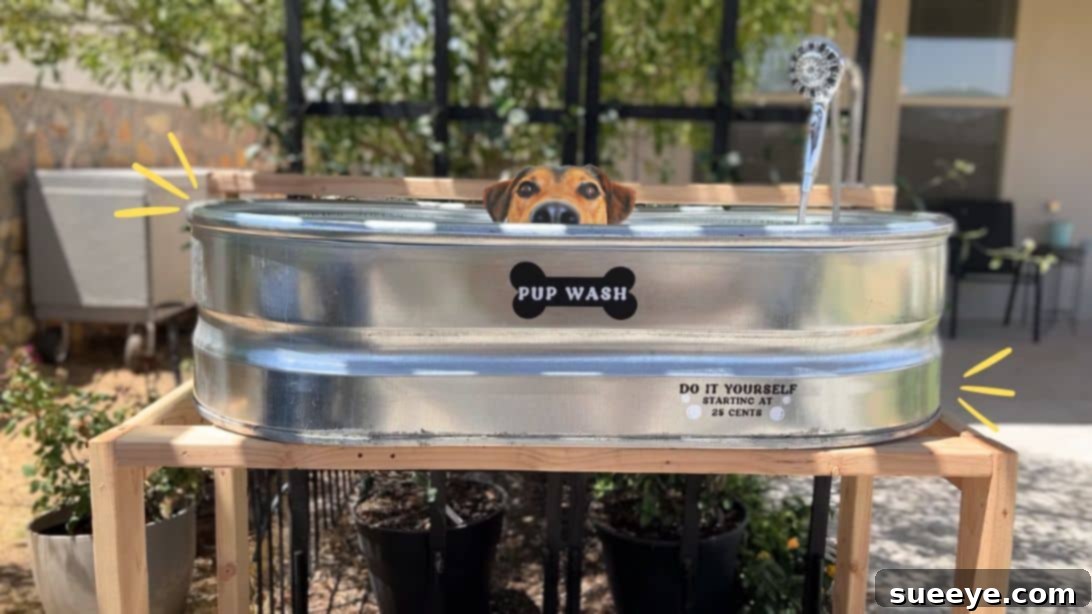
Build Your Own DIY Raised Dog Wash Station: A Comprehensive Guide
As devoted dog owners, we understand the joys and challenges that come with keeping our furry companions clean and happy. While daily walks and playtime are essential, so is a regular bath. However, the traditional methods—wrestling a muddy dog in a human bathtub or bending uncomfortably over a sink—can often be a messy, strenuous, and less-than-ideal experience for both you and your pet. Imagine a dedicated space, perfectly designed for canine comfort and owner convenience. That’s precisely what a DIY raised dog wash station offers.
This ultimate guide will walk you through creating a comfortable, functional, and aesthetically pleasing dog wash station right in your home or yard. Inspired by innovative creators like Creating Home by Nicole’s detailed tutorial, we’ll delve into everything you need to know to build a robust and practical setup. Forget the backaches and bathroom cleanups; it’s time to elevate your dog bathing routine to a spa-like experience!
Why a Dedicated Dog Wash Station is a Game Changer for Pet Owners
A custom-built dog wash station isn’t just a luxury; it’s a practical investment in your pet’s hygiene and your own well-being. Here’s why it’s a game-changer:
- Ergonomic Comfort: No more bending, kneeling, or straining your back. A raised station brings your dog to a comfortable working height, making bath time easier and more enjoyable for you. This is especially beneficial for owners with mobility issues or large dog breeds.
- Mess Containment: Keep the dirt, suds, and splashing water confined to one designated area. Unlike bathing in your shower or tub, a dedicated station minimizes mess, protecting your bathroom from muddy paw prints and wet fur.
- Stress-Free for Dogs: The spacious design allows your dog to move around freely, reducing anxiety often associated with cramped spaces. A stable, non-slip surface provides security, making the experience less intimidating for your furry friend.
- Optimal Drainage: Engineered with proper drainage, these stations ensure water is efficiently removed, preventing standing water and making post-bath cleanup a breeze.
- Convenient Accessibility: With a built-in shower head and easy access to water, all your bathing tools are within reach, streamlining the entire process.
- Durability and Longevity: Constructed with robust materials, your DIY station will withstand frequent use, offering a long-lasting solution for your pet’s grooming needs.
- Cost-Effective Grooming: While professional grooming is excellent, regular home baths in your own station can significantly cut down on grooming expenses over time, providing a convenient alternative for in-between visits or for dogs who prefer familiar surroundings.
Whether you live in a spacious house with ample outdoor area or a smaller apartment where every square inch counts, a DIY dog wash station can be tailored to fit your environment and specific needs. It’s a thoughtful gift that shows your dogs how much you care, providing them with a clean, comfortable, and consistent bathing routine.
You might also find these resources helpful for maintaining a fresh home with pets: 6 Ways to Get Rid of Dog Odor and How to Make a DIY Untippable Dog Bowl For Less Than $10.
Planning Your Ultimate Dog Wash Station
Before gathering your materials and cutting your first piece of wood, thoughtful planning is essential. Consider these key aspects to ensure your dog wash station meets all your expectations:
- Location: Where will your station be placed? If indoors, ensure proper ventilation and access to a water source and drain. A utility room, garage, or even a spacious laundry room can work. For outdoor stations, consider proximity to a garden hose and a natural drainage area.
- Size Matters: The dimensions provided in this guide are ideal for many medium to large dogs, allowing them ample space to turn around comfortably. If you have a smaller breed, you might adjust the dimensions slightly. For giant breeds, you may need to scale up the design. Always measure your dog while standing to determine the appropriate length, width, and height for the tub itself.
- Water Source & Drainage: Will you connect to a permanent water line or use a garden hose adapter? For drainage, consider a simple hose to a floor drain or garden, or explore more elaborate plumbing for indoor setups.
- Safety Features: Non-slip surfaces are paramount. The stock tank naturally provides some grip, but adding non-slip tape or a rubber mat is highly recommended to prevent slips and falls, keeping your dog safe during bath time.
- Material Durability: Wood for the frame should ideally be treated for moisture resistance, especially if the station will be used outdoors or in a humid indoor environment. All fasteners and hardware should be rust-resistant.
Easy Raised Dog Wash Station Materials
This project utilizes readily available materials, making it accessible even for beginners. Here’s what you’ll need to construct your robust dog wash station:
- 6 – 10 ft 2 x 4 Wood Planks: These will form the sturdy frame of your station. The exact number of planks depends on the length of each piece and your desired dimensions, but having a little extra is always wise. Opt for pressure-treated lumber if the station will be exposed to significant moisture or outdoor elements, as it resists rot and insect damage.
- Stock Tank – Approximately 4 x 2 x 1 ft: This serves as the primary wash basin. Stock tanks are ideal due to their durable construction, generous size, and ability to hold water. Their smooth, galvanized finish is easy to clean.
- Shower Head: A handheld shower head with a flexible hose is highly recommended. This allows you to easily direct water flow and rinse all areas of your dog, providing maximum control and minimizing splashing.
- Shower Arm: This pipe connects to your water source and holds the shower head in place. Ensure it’s long enough to extend over the stock tank for convenient use.
- Non-slip Tape: Absolutely essential for safety! Apply this to the bottom of the stock tank to prevent your dog from slipping and feeling insecure, which can lead to fear of bathing.
- Garden Hose Adapter – 3/4 inch FH x 1/2 inch FIP: This crucial piece allows you to connect a standard garden hose (your water supply) to the shower arm, converting the threaded sizes for a secure fit.
- 2 1/2″ Wood Screws: Use exterior-grade, rust-resistant screws for maximum durability and strength in assembling the wooden frame.
- Silicone Sealant: High-quality, waterproof silicone (e.g., bathroom/kitchen sealant) will be used to seal any gaps and adhere non-slip strips to the tank, preventing water leakage and adding stability.
- Teflon Tape (Plumber’s Tape): An indispensable item for plumbing connections. Wrap this tape around threaded pipe joints to create a watertight seal, preventing leaks around the shower arm and adapter.
Gathering all your materials beforehand will ensure a smooth and efficient building process. Always prioritize quality for longevity and safety.
How to Make Your DIY Raised Dog Wash Station: Step-by-Step Instructions
Follow these detailed steps to construct a durable and convenient dog wash station. Remember to take your time, measure accurately, and prioritize safety.
Step 1: Preparing Your Wood – The Cut List
Precision in cutting is key for a sturdy frame. Using a miter saw or circular saw, carefully cut your 2×4 wood planks according to the following dimensions. Double-check your measurements before making each cut:
- 2 pieces of 2 x 4 – 43″: These will serve as the robust back legs, providing height and stability to the station.
- 2 pieces of 2 x 4 – 30″: These form the front legs, ensuring the station has an ergonomic slope for drainage or just a comfortable working height.
- 4 pieces of 2 x 4 – 48″: These are critical for the main frame. Two pieces will form the top and bottom supports for the back, and two for the front, defining the length of your wash station.
- 6 pieces of 2 x 4 – 16″: These shorter pieces serve multiple purposes: two for the top side supports, two for the bottom side supports (connecting the front and back frames), and two as middle supports for added stability under the stock tank.
Ensure all cuts are clean and square for optimal assembly.
Step 2: Assembling the Leg Frames – Building the Foundation
Now, let’s create the front and back leg assemblies that will form the vertical structure of your wash station. This step is about connecting the horizontal supports to the vertical legs:
- Take your two 30″ front legs. Attach one 48″ piece (front bottom support) between them, ensuring it’s flush with the bottom.
- Then, attach another 48″ piece (front top support) between the front legs, positioning it roughly 16 inches from the top. The exact height will depend on your stock tank and desired overall height, but ensure it leaves enough room for the tank to sit securely on the top side pieces (which will be added in Step 3).
- Repeat this process for the back legs, using the two 43″ back legs and the remaining two 48″ pieces (back top and back bottom supports).
Use your 2 1/2″ wood screws for all connections, pre-drilling pilot holes to prevent wood splitting. Make sure the middle pieces (horizontal supports) are at the same height on both the front and back leg assemblies, as this will ensure a level base for your stock tank.
Step 3: Connecting the Frame – Creating the Sturdy Structure
With the front and back leg assemblies ready, it’s time to connect them and form the complete, rigid frame of your dog wash station. This is where the side supports come into play:
- Using four of your 16″ 2x4s, attach two as “top side pieces” connecting the top 48″ horizontal pieces of the front and back frames. These will directly support the edges of your stock tank.
- Attach the remaining two 16″ 2x4s as “bottom side pieces,” connecting the bottom 48″ horizontal pieces of the front and back frames. This creates a strong, rectangular base.
- Next, add the two remaining 16″ 2x4s as “middle supports” by attaching them perpendicular to the 48″ top front and back horizontal pieces. These should run across the width of the frame, providing additional stability and support directly underneath the center of your stock tank.
- Finally, take a 2×4 piece cut to the same length as the width of your dog washer (the 48″ dimension, or slightly less to fit inside the back frame if preferred) and attach it to the back top legs. This piece will serve as a sturdy support for your shower arm and plumbing.
Ensure all connections are secure with 2 1/2″ wood screws. The goal here is to create a robust, wobble-free frame. You can refer to the image below for visual guidance on how the frame comes together.
Step 4: Preparing and Placing the Wash Tub – Drainage and Stability
Now that your frame is complete, it’s time to prepare the stock tank for its role as the wash basin:
- Drill Drainage Holes: Carefully drill a couple of small holes (e.g., 1/2 inch to 1 inch in diameter) in the lowest point of the bottom of the stock tank for efficient drainage. The number and size of holes can vary based on how quickly you want water to drain. Ensure these holes are positioned where the water will naturally collect.
- Place the Tank: Gently lift and place the prepared stock tank onto the top supports of your assembled wooden stand. Make sure it sits securely and is centered within the frame.
- Apply Non-Slip Silicone Strips: For added safety and to prevent the tank from shifting, apply several long strips of waterproof silicone sealant to the underside of the tank, where it makes contact with the wooden frame. Allow the silicone to cure according to the manufacturer’s instructions before heavy use. Importantly, ensure these silicone strips do not cover the drainage holes you just drilled.
- Add Non-Slip Tape: For your dog’s safety, firmly attach strips of non-slip tape to the inside bottom surface of the stock tank. This provides crucial traction for your dog’s paws, preventing slips and building their confidence during bath time.
This step ensures your wash station is stable, safe, and ready for water. Observe the image below to visualize the tank placement and preparation.
Step 5: Installing the Water System – Shower Power for Your Pup
The final step brings the water to your station, making it fully functional. This involves a few simple plumbing connections:
- Drill Hole for Shower Pipe: In the upper section of the back support piece you added in Step 3, carefully drill a hole large enough to accommodate the diameter of your shower arm pipe. Position it strategically for optimal shower head placement over the stock tank.
- Insert the Shower Arm: Thread the shower arm through the newly drilled hole from the front. Secure it in place if your shower arm kit includes a flange or mounting bracket.
- Attach Adapter and Shower Head: Apply several wraps of Teflon tape (plumber’s tape) clockwise around the threads of the shower arm and the garden hose adapter. This ensures a watertight seal. Connect the garden hose adapter to the back end of the shower arm. Then, attach your chosen shower head to the front end of the shower arm, also using Teflon tape on its threads.
- Connect the Hose: Finally, attach your garden hose to the garden hose adapter. Ensure this connection is snug and leak-free.
Once all connections are made, slowly turn on your water supply and check for any leaks. Tighten connections as needed. Your DIY raised dog wash station is now complete and ready for its first furry customer!
Maintaining Your DIY Dog Wash Station
To ensure your new dog wash station remains in excellent condition and serves you and your pets for years to come, consider these maintenance tips:
- Regular Cleaning: After each use, rinse the stock tank thoroughly to remove any soap residue and loose fur. A quick wipe-down can prevent dirt buildup.
- Drainage Check: Periodically check the drainage holes to ensure they are clear of debris, allowing water to flow freely.
- Inspect the Frame: If your station is outdoors or in a humid environment, regularly inspect the wooden frame for any signs of wear, rot, or loose screws. Tighten as necessary.
- Non-Slip Surface: Ensure the non-slip tape or mat remains effective. Replace it if it starts to peel or lose its grip.
- Plumbing Check: Occasionally check all plumbing connections for any signs of leaks or corrosion. Re-tape or tighten if needed.
Conclusion: Your Ultimate DIY Dog Wash Station Awaits
Congratulations! You’ve just embarked on a journey to create a truly beneficial addition to your home and pet care routine. Building your own DIY raised dog wash station is more than just a project; it’s an investment in the comfort and cleanliness of your beloved canine companions, while simultaneously making your life as a pet owner much easier and more enjoyable. Say goodbye to messy bathrooms, aching backs, and stressful bath times. With this custom-built station, every wash becomes a more pleasant, efficient, and bonding experience.
We hope this comprehensive guide, inspired by the practical ingenuity of creators like Nicole, empowers you to tackle this rewarding project with confidence. Gather your materials, follow the steps, and soon you’ll have the ultimate pet grooming solution right at your fingertips. Get ready to enjoy sparkling clean pups and a newfound ease in your pet care routine!