
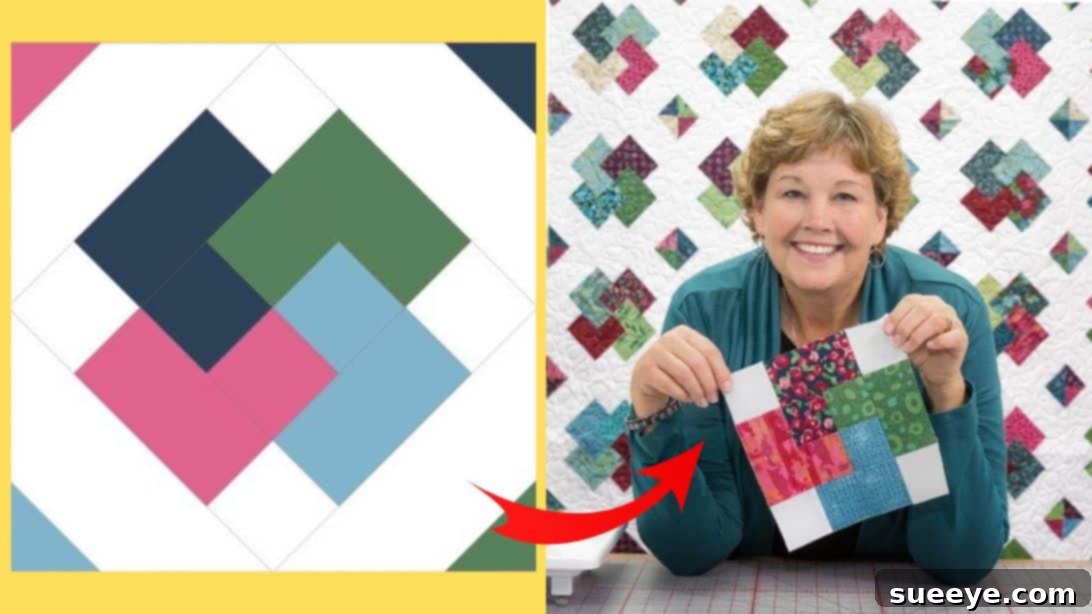
Mastering the Card Trick Quilt Block: Your Comprehensive Guide to a Dazzling Design
The “Card Trick” quilt block is a true marvel in the quilting world, renowned for its captivating optical illusion that makes it appear as if fabrics are weaving in and out of each other. While its intricate design might initially intimidate some quilters, the truth is, with the right approach, this stunning block is surprisingly accessible. Thanks to the simplified techniques championed by experts like the Missouri Star Quilt Company on YouTube, creating your own Card Trick quilt has never been easier or more enjoyable.
This comprehensive tutorial will guide you through every step, transforming what seems like a complex pattern into a straightforward and rewarding project. We’ll dive deep into precise cutting, careful piecing, and effective pressing to ensure your Card Trick blocks come together beautifully, achieving that signature three-dimensional effect. Prepare to be amazed at how quickly you can master this beloved design and add a touch of magic to your quilting repertoire. Let’s gather our materials and begin this exciting journey into the world of Card Trick quilting!
Why the Card Trick Quilt Block is a Quilter’s Delight
The Card Trick block, often referred to as a magic trick in fabric, is a fantastic way to showcase your chosen fabrics, playing with contrasts and complementary colors to enhance its unique illusion. It’s a classic pattern that never goes out of style, offering endless possibilities for color combinations and quilt layouts. Whether you’re aiming for a vibrant, playful quilt or a sophisticated, subdued masterpiece, the Card Trick block provides the perfect canvas. Its visual depth makes it a showstopper, and mastering it will undoubtedly boost your confidence in tackling more intricate patterns in the future. The satisfaction of seeing the “trick” come to life is truly unparalleled.
Essential Materials for Your Card Trick Quilt Project
Before we begin piecing, let’s ensure you have all the necessary tools and fabrics. Having everything organized and ready will make the process smoother, more efficient, and ultimately more enjoyable. High-quality tools and thoughtfully chosen fabrics are the foundation for a successful and beautiful quilt.
- Fabric Strips: You’ll need a variety of fabrics to create the illusion. Choose at least six different fabrics, ensuring good contrast between them for the best visual effect. Consider a mix of prints and solids, or a consistent color palette with varying shades and values (light vs. dark) to enhance the three-dimensional appearance.
- White Background Fabric: A consistent background fabric, typically white, cream, or a light solid, is crucial for making the “card trick” elements pop. This helps define the shapes, creates negative space, and enhances the illusion of intertwining fabrics.
- Scissors or Rotary Cutter and a Cutting Mat: For precise and efficient cutting. A sharp rotary cutter and a self-healing cutting mat are highly recommended for quilters, as they ensure accuracy and save a significant amount of time compared to traditional scissors.
- Needle and Thread: A good quality sewing machine needle suitable for quilting (e.g., universal or topstitch) and an all-purpose polyester or 100% cotton thread that matches or blends with your chosen fabrics.
- Quilting Ruler: A transparent quilting ruler with clear markings is indispensable for accurate measuring and cutting. A long ruler (e.g., 6.5″ x 24″) is versatile, but smaller square rulers (e.g., 6.5″ or 12.5″) are also very useful for squaring up blocks.
- Sewing Machine: A reliable sewing machine with a ¼” seam allowance foot is ideal for maintaining consistent seams, which is absolutely critical for accurate block construction and ensuring all pieces fit together perfectly.
- Iron and Ironing Board: Essential for pressing seams accurately after each sewing step. Proper pressing helps your blocks lie flat, keeps the fabric from distorting, and ensures that points and seams match up precisely when joining units.
Step-by-Step Directions: Crafting Your Card Trick Quilt Block
This tutorial breaks down the seemingly complex Card Trick block into manageable steps, focusing on precision and clarity at every turn. We’ll start by carefully preparing the individual components, then systematically assemble them into the final dazzling block, watching the optical illusion take shape before our eyes.
Part 1: Preparing Your Fabric Pieces and Constructing the Central Unit
Accuracy in cutting is paramount for the Card Trick block’s optical illusion to truly shine. Take your time with this initial step to ensure all pieces are cut to the exact dimensions specified. Even slight inaccuracies here can impact the final look of your block.
Step 1.1: Initial Fabric Cuts
From your chosen collection of 6 different “card” fabrics, you will cut two primary sizes of squares. Remember to use a rotary cutter and ruler for the most precise results:
- Cut six 4½” x 4½” squares. These larger squares will form significant parts of your block’s central design and its outer structure.
- Cut six 2½” x 2½” squares. These smaller squares will be used strategically to create corner units and contribute to the “trick” effect by creating a sense of depth.
For your background fabric (e.g., white or cream), you will also need to cut specific rectangles:
- Cut four 2½” x 4½” background fabric rectangles. These will be essential for framing and defining elements within your block, making certain colors stand out.
Step 1.2: Assembling the Central Four-Patch Unit
Begin by selecting four matching 4½” squares from your prepared “card” fabrics. These will form the core of your Card Trick block. Arrange these four squares in a 2×2 grid on your cutting mat or design wall until you are happy with their color placement. This 2×2 arrangement will become the very center of your block, so consider how the colors interact and contribute to the overall visual flow.
- Take the two squares from the top row of your chosen arrangement. Place them right sides together, ensuring the edges are aligned perfectly.
- Sew these two squares together along one side with a precise ¼” seam allowance. Maintain this seam allowance consistently for all steps.
- Repeat this process for the two squares from the bottom row, sewing them together with a ¼” seam allowance.
- Carefully press the seams open or to one side, according to your preference. Pressing seams open often helps reduce bulk, especially in areas with many seams converging.
- Now, take the two sewn pairs. Place them right sides together, making sure the center seams nest perfectly to create a neat intersection in the middle.
- Sew these two pairs together with a ¼” seam allowance to complete your 4-patch central unit.
- Press the final seam open or to one side. This central unit should now measure 8½” x 8½” (assuming your initial squares were 4.5″ and all seam allowances were exactly ¼”). Square it up if necessary.
Step 1.3: Adding the Rectangular Sides to the Centerpiece
Next, we’ll expand upon the central 4-patch unit by adding longer rectangular pieces to two opposite sides. These pieces will help frame the central unit and extend the block’s initial dimensions.
- From your remaining 4½” “card” fabric squares, select two that match. Cut each of these squares in half diagonally from corner to corner to yield four large triangles. You will only need two of these triangles for this specific step.
- Take two of your 2½” x 4½” background fabric rectangles.
- Place one background fabric rectangle right sides together with one of the colored fabric triangles you just cut. Align the raw edges precisely.
- Sew them together along the longer diagonal edge with a ¼” seam allowance. Repeat this for the other background rectangle and colored fabric triangle.
- Press the seams open. These units should now form a rectangle.
- Finally, attach one of these newly formed background/triangle rectangles to each of two opposite sides of your central 4-patch unit. Align the raw edges, sew with a ¼” seam allowance, and press the seams open.
This step begins to build out the block’s initial dimensions and prepares it for the crucial “card trick” corner elements that will bring the illusion to life.
Part 2: Crafting the “Trick” Corners and Final Block Assembly
This is where the magic truly happens, transforming simple shapes into a complex-looking illusion. Precision in this section is absolutely key to achieving the desired effect and ensuring the “cards” appear to interlock seamlessly.
Step 2.1: Creating the Half-Square Triangle (HST) Units for the Corners
For the distinctive “trick” corners, we will utilize a quick and easy method for making half-square triangles (HSTs). These units are fundamental to the Card Trick design.
- Grab your main white background fabric and cut one 7” x 7” square. This will serve as the base for your oversized HST units.
- Take two of your 2½” colored “card” fabric squares. Place one colored square on each of two diagonally opposite corners of the 7” white background square. Ensure the right sides of the fabrics are facing up.
- Using a fabric pen or pencil, draw a diagonal line from corner to corner across each of the colored squares. This line will serve as your precise sewing guide.
- Sew directly on this drawn line for both colored squares.
- Once sewn, trim the outer side of the colored squares ¼” away from the stitching line. Discard the trimmed fabric or save for scrap projects.
- Carefully press the corners open, pressing the seams away from the background fabric if possible, to reveal the colored triangles. You will now have a large square with two colored corners.
- Now, cut the entire piece in half diagonally, from the corner of one colored square to the opposite corner of the other colored square. You will now have two large half-square triangle units that feature a colored corner.
- Repeat this entire process (from step 1 to 7) with another 7” white background square and two more 2½” colored fabric squares to create two additional large HST units. You should now have a total of four identical HST units. These four units are critical for forming the “trick” effect in your block.
Step 2.2: Attaching the Corner Units to the Main Block
With your four unique corner HST units ready, it’s time to integrate them into your main block, completing the card trick illusion. This step brings all the prepared components together.
- Carefully arrange these four HST units around the remaining two unadorned sides of your central block. The pointed edges of the colored fabric within each HST unit should be facing outwards, creating the directional flow characteristic of the Card Trick pattern. Ensure your layout matches the desired “trick” effect.
- Sew one HST unit to each of the two remaining straight sides of the central block. Ensure perfect alignment before sewing.
- Press the seams open after each attachment. This ensures the block remains flat and accurate as it grows in size.
- Take the last two HST units. Attach them to the remaining two corners where they will meet the previously sewn HSTs and the central unit. This is the moment where the “trick” truly comes together, making the fabrics appear to weave.
- Sew with a ¼” seam allowance and press the seams carefully.
You should now have a completed Card Trick quilt block! Take a moment to admire the incredible illusion you’ve created with just simple fabric shapes.
Step 2.3: Squaring Up and Quilt Assembly
Once your Card Trick block is assembled, it’s crucial to square it up to a consistent size. This ensures all your blocks will fit together perfectly without distortion when you assemble the full quilt top.
- Using your quilting ruler and rotary cutter, carefully trim the outer sides of the square to even out the edges and ensure all corners are at a true 90-degree angle. A specialized square-up ruler can be incredibly helpful here. Aim for a standard block size, typically 12.5″ x 12.5″ unfinished (which will result in a 12″ x 12″ finished block after sewing).
- Repeat the entire process to make a few more of these stunning Card Trick blocks, following the same precise steps. Consistency is key for a cohesive quilt.
- Once you have a sufficient number of blocks for your desired quilt size (e.g., 9 blocks for a small throw, 12 for a larger one), arrange them on a design wall or floor to finalize your layout. Experiment with rotating blocks to create different patterns and illusions across your quilt top.
- Sew your blocks together into rows, carefully matching seams and maintaining that consistent ¼” seam allowance. Then, sew the rows together to complete your quilt top.
- Once the quilt top is complete, add batting and a backing fabric, then quilt as desired (whether by hand or machine quilting). Finish by binding the edges, and you’re done! Your magnificent Card Trick quilt is ready to be admired.
Pro Tips for Card Trick Quilt Success
Achieving a stunning Card Trick quilt involves more than just following steps; a few pro tips can significantly elevate your results and make the entire quilting process more enjoyable and less frustrating:
- Fabric Selection is Key: The magic of the Card Trick block lies heavily in contrast. Choose fabrics that clearly differentiate from one another. A strong contrast between the “cards” and the background, as well as distinct differences between the different “card” fabrics themselves, will make the illusion pop. Don’t be afraid to experiment with value (light vs. dark) to enhance the 3D effect.
- Pressing Matters: Pressing seams correctly and frequently after each sewing step is non-negotiable. It ensures your block lays flat, prevents bulky seams, and helps your points and intersections align accurately. Decide whether to press seams open or to one side, but maintain consistency within one block.
- Accurate Seam Allowance: A consistent ¼” seam allowance is the backbone of successful quilting. Invest in a ¼” foot for your sewing machine if you don’t have one, and always test your seam allowance on scrap fabric before starting your project. Even a tiny deviation can throw off your block’s size and make assembly challenging.
- Squaring Up: After constructing each major unit and the final block, take the time to square it up to your desired finished size. This step, though seemingly tedious, is critical for ensuring your quilt top comes together perfectly, preventing wavy borders or mismatched seams.
- Chain Piecing: To save time and thread, especially when making multiple identical units (like the smaller squares or pairs), use chain piecing. Sew multiple units consecutively without cutting the thread in between. This is faster, more efficient, and helps maintain a consistent workflow.
- Watch the Video Tutorial: For visual learners, watching the Missouri Star Quilt Company tutorial is highly recommended. Seeing the techniques in action can clarify any ambiguities in written instructions and provide valuable visual cues.
Unleash Your Creativity: Variations and Beyond with the Card Trick Block
While the traditional Card Trick block is captivating on its own, don’t hesitate to personalize your quilt and explore various creative possibilities. The beauty of quilting lies in its adaptability!
- Color Play: Experiment with different color schemes beyond the traditional. Try monochromatic palettes for subtle elegance, vibrant rainbow effects for a playful look, or themed fabric collections for a personalized touch. The illusion changes wonderfully with different color choices and fabric prints.
- Block Rotation: Once you have multiple blocks, try rotating them 90 or 180 degrees when laying out your quilt top. This can create secondary patterns and even more complex visual effects, adding another layer of interest to your design.
- Sashing and Borders: Consider adding sashing (strips of fabric between blocks) to emphasize each individual Card Trick block and give the eye a resting place. Decorative borders can also frame your quilt beautifully and provide an opportunity to incorporate additional fabrics or design elements.
- Size Variation: While this tutorial uses specific dimensions, the principles of the Card Trick block can be scaled up or down to create smaller mug rugs, larger bedspreads, or anything in between. Just remember to maintain the correct proportions for all your pieces when resizing.
Conclusion: The Easiest Way To Make A “Card Trick” Quilt – A Project You’ll Cherish
You’ve now walked through the comprehensive steps to create the stunning Card Trick quilt block, a design that has charmed quilters for generations. What once seemed complex is now achievable with clear instructions, a few precise cuts, and a bit of patience. This method, inspired by the fantastic tutorials from the Missouri Star Quilt Company, truly simplifies the process, making this intricate-looking block accessible to everyone from enthusiastic beginners to seasoned quilters.
Embrace the joy of seeing those fabric “cards” seemingly weave together, creating a beautiful illusion with every block you make. Each stitch brings you closer to a finished quilt that not only showcases your growing skill but also adds warmth, artistry, and a touch of magic to your home. So go ahead, make a few more blocks, stitch them together into a quilt top, and relish in the accomplishment of making a truly magical quilt. We hope this guide inspires you to create many Card Trick masterpieces! Happy quilting!
*All image credit belongs to Missouri Star Quilt Company via YouTube. Follow and subscribe to their channel for more inspiring tutorials and incredible quilting techniques!