
DIY Concrete Crack Repair: A Simple Guide for Sidewalks and Driveways After Mud Jacking
Concrete surfaces like driveways and sidewalks are essential components of any property, providing both functionality and aesthetic appeal. However, over time, these robust structures are susceptible to wear and tear, often manifesting as unsightly and potentially hazardous cracks. While various factors contribute to concrete cracking, one common scenario involves slabs that have undergone a process known as mud jacking (also referred to as slab jacking or concrete lifting). This technique, while effective in raising sunken concrete, frequently leaves behind surface cracks that demand attention. Fortunately, an ingenious DIY method, inspired by expert advice, offers a lasting and cost-effective solution to restore the integrity and appearance of your concrete.
This comprehensive guide will walk you through an innovative approach to repairing concrete cracks, particularly those resulting from ground movement or mud jacking. We’ll delve into the causes of concrete damage, explain why a flexible repair method is paramount, and provide a detailed, step-by-step process using readily available materials like minimally expanding foam and self-leveling caulk sealant. Get ready to transform your cracked concrete surfaces into safe, smooth, and visually appealing areas once again, enhancing your property’s value and curb appeal.
Understanding Concrete Cracks and the Impact of Mud Jacking
Before diving into the repair process, it’s crucial to understand why concrete cracks and how mud jacking can influence this phenomenon. Concrete, despite its strength, is not immune to movement and stress.
What Causes Concrete Cracks?
Several factors contribute to the formation of cracks in concrete driveways and sidewalks:
- Soil Settlement: The most common culprit, uneven settlement of the soil beneath the slab, creates voids and causes the concrete to sink and crack under its own weight or external loads.
- Freeze-Thaw Cycles: In colder climates, water seeps into microscopic pores and cracks. When it freezes, it expands, exerting pressure that widens existing cracks and creates new ones.
- Heavy Loads: Overloading concrete surfaces with excessively heavy vehicles or objects can exceed the slab’s structural capacity, leading to stress cracks.
- Poor Installation: Inadequate sub-base preparation, improper concrete mix, or insufficient control joints during installation can all contribute to premature cracking.
- Tree Roots: Aggressive tree roots growing beneath the slab can exert significant pressure, lifting and cracking the concrete above.
- Expansion and Contraction: Concrete naturally expands and contracts with temperature fluctuations. Without proper expansion joints, this movement can lead to internal stresses and cracking.
The Role of Mud Jacking in Concrete Deterioration
Mud jacking is a popular and effective method for lifting sunken concrete slabs. The process involves drilling small holes into the compromised slab and injecting a specialized “mud slurry” (typically a mix of cement, sand, soil, and water) beneath it. This slurry fills any voids, compacts the underlying soil, and exerts upward pressure, gently raising the concrete back to its original level. While highly beneficial for leveling uneven surfaces and mitigating trip hazards, mud jacking can inadvertently contribute to surface cracking.
The very act of lifting a heavy, rigid concrete slab, especially one that has already settled unevenly, creates immense stress. This stress often manifests as new cracks or exacerbates existing ones. Even if the slab is successfully leveled, the top concrete surface experiences movement during the lifting process, making it prone to developing hairline or more significant fissures. Therefore, while mud jacking solves the underlying settlement issue, the subsequent repair of these surface cracks becomes an essential step to achieve a complete and lasting restoration.
Why Immediate Repair is Crucial
Ignoring concrete cracks, regardless of their origin, is a costly mistake. Beyond diminishing your property’s curb appeal, unaddressed cracks can lead to more severe problems:
- Safety Hazards: Cracks create uneven surfaces and trip hazards, especially for children and the elderly.
- Water Intrusion: Cracks act as channels for water to penetrate beneath the slab. This water can erode the sub-base, leading to further settlement, new cracks, and even foundation damage. In freezing temperatures, trapped water will expand and cause frost heave, worsening the damage.
- Weed Growth: Weeds and grass can sprout through cracks, further widening them and making the concrete look neglected.
- Structural Deterioration: If left unsealed, cracks can allow moisture and chemicals to reach the rebar (reinforcing steel) within the concrete, leading to corrosion and compromising the slab’s structural integrity.
- Reduced Property Value: Cracked and damaged concrete surfaces can significantly detract from a home’s overall appearance and perceived value.
Introducing the Innovative DIY Concrete Crack Repair Method
Traditional concrete crack repair methods often involve rigid fillers that can crack again with the natural expansion and contraction of the concrete, or they might be complex and require professional expertise. However, a brilliant DIY approach, championed by experts like Mr. Hardware, offers a superior solution that is both effective and accessible for homeowners. This method leverages the unique properties of two key materials: minimally expanding foam and self-leveling caulk sealant.
The Power of Minimally Expanding Foam
The first hero of this repair method is a minimally expanding foam, specifically products like Touch-N-Foam Home Seal. Unlike aggressively expanding foams, which can distort or overfill, these specialized foams are designed for control and stability. When injected into cracks, they expand just enough to fill the void completely without creating excessive pressure. But their real genius lies in their flexibility.
Concrete is constantly moving due to temperature fluctuations. A rigid filler will eventually fail as the concrete expands and contracts, leading to renewed cracking. Minimally expanding foam, however, is elastic. It expands and contracts *with* the concrete, maintaining a tight seal and preventing the crack from reopening. This flexibility is crucial for long-term durability, especially in outdoor environments exposed to varying weather conditions. Furthermore, this foam acts as an excellent barrier against water intrusion, preventing further erosion of the sub-base.
The Protective Layer: Self-Leveling Caulk Sealant
While the foam provides the flexible filler, it requires protection from the elements, UV radiation, and foot traffic. This is where high-quality, self-leveling caulk sealant comes into play. Applied over the trimmed foam, this sealant creates a durable, weatherproof, and aesthetically pleasing top layer. Self-leveling caulk is specifically formulated to flow smoothly and evenly, settling into a flat, professional-looking finish without requiring much manual tooling.
The caulk shields the underlying foam from degradation, ensures a completely waterproof seal, and provides a surface that blends seamlessly with the surrounding concrete. The combination of flexible foam and a robust caulk sealant creates a repair that is not only strong and durable but also capable of adapting to the natural movements of your concrete, offering a lifespan of approximately five years or even longer with proper application and maintenance.
Essential Materials for Your Concrete Crack Repair Project
One of the appealing aspects of this DIY concrete crack repair method is its simplicity and the readily available nature of the required materials. Gathering everything before you begin will ensure a smooth and efficient repair process. Here’s a comprehensive list of what you’ll need:
- Minimally Expanding Foam Sealant (e.g., Touch-N-Foam Home Seal): This is the core material for filling the cracks. Ensure it’s rated for outdoor use and minimal expansion. You’ll likely get about 16 linear feet of coverage per can, but always check the product specifications based on your crack sizes.
- High-Quality Self-Leveling Caulk Sealant: Choose a polyurethane or silicone-based caulk specifically designed for concrete and outdoor use. Its self-leveling property is key for a smooth finish. Ensure it’s compatible with the foam you’re using.
- Utility Knife or Razor Knife: A sharp, heavy-duty utility knife or box cutter with a fresh blade is essential for precisely trimming the dried foam flush with the concrete surface.
- Wire Brush or Stiff Bristle Brush: Crucial for thoroughly cleaning the cracks, removing loose debris, dirt, and any vegetation.
- Vacuum Cleaner or Air Compressor: For removing fine dust and debris from the cracks after brushing, ensuring optimal adhesion for the foam.
- Caulk Gun: If your self-leveling caulk comes in standard cartridges, a reliable caulk gun will be necessary for smooth application.
- Work Gloves and Safety Glasses: Always prioritize personal safety when working with chemicals and sharp tools.
- Chisel or Screwdriver (Optional): Useful for prying out stubborn loose concrete pieces or old filler from within the cracks.
- Trowel or Tooling Stick (Optional): While self-leveling caulk typically doesn’t require much tooling, a small trowel or even a gloved finger can help guide it into very wide cracks or refine the edges if desired.
- Water and Hose (Optional): For initial cleaning of the concrete surface around the cracks, ensuring a clean working area.
Step-by-Step Guide: Repairing Concrete Cracks with Foam and Caulk
With your materials gathered, you’re ready to tackle those concrete cracks. Follow these detailed steps to ensure a successful and long-lasting repair:
Step 1: Thorough Preparation is Non-Negotiable
The success of any concrete repair hinges on meticulous preparation. This step ensures optimal adhesion and prevents future failures.
- Clean the Cracks: Begin by thoroughly cleaning all the cracks you intend to repair. Use a wire brush or stiff bristle brush to dislodge any dirt, loose concrete fragments, old caulk, or vegetation (like weeds or moss). For particularly stubborn debris, a chisel or screwdriver can be used to carefully scrape it out.
- Remove Debris: Once brushed, use a shop vacuum or an air compressor to remove all fine dust and small particles. It’s crucial that the cracks are completely free of any loose material, as this will impede the foam’s ability to adhere properly.
- Ensure Dryness: The cracks must be completely dry before applying the foam. If you used water for cleaning, allow ample time for the concrete to dry, typically 24-48 hours, depending on humidity and temperature. Moisture can interfere with the foam’s curing process and adhesion.
This critical preparation phase creates a clean, stable surface for the repair materials to bond, laying the groundwork for a durable fix.
Step 2: Applying the Flexible Foam Filler
Now, it’s time to introduce the flexible heart of your repair.
- Prepare the Foam Can: Shake the can of minimally expanding foam thoroughly according to the manufacturer’s instructions. This ensures the contents are well mixed for proper expansion.
- Apply the Foam: Carefully spray the expandable foam into all your cleaned and dried cracks. Hold the can upside down (or as directed by the product) and slowly move along the crack, filling it from the bottom up. Aim for a consistent bead that adequately fills the crack but avoid grossly overfilling it, as trimming will be required. Remember that the foam will expand slightly, so don’t pack it in too densely. One can typically covers about 16 linear feet of average-sized cracks, but this can vary based on crack width and depth.
- Allow to Dry and Expand: This is a crucial step. The foam needs time to fully expand and cure. Refer to the product’s instructions for specific drying times, which can range from a few hours to overnight. Do not proceed to the next step until the foam is completely dry, firm, and has fully expanded. Trying to trim it too early will result in a messy and ineffective repair.
Step 3: Precision Trimming for a Seamless Finish
Once the foam is completely dry and firm, you’ll need to create a smooth, flush surface for the caulk.
- Trim Excess Foam: Using your sharp utility knife or razor knife, carefully cut away any excess foam that has expanded above the concrete surface. Hold the knife at a slight angle, or flat against the concrete, and trim the foam so it is flush with or slightly below the surrounding concrete surface. Be cautious not to cut into the concrete itself.
- Clean After Trimming: After trimming, use a brush or vacuum to remove any small foam bits or dust from the crack and surrounding concrete. A clean surface is essential for the caulk to adhere properly.
Step 4: Sealing the Repair with Self-Leveling Caulk
The final layer provides protection, durability, and a professional aesthetic.
- Prepare Caulk Gun: Load your self-leveling caulk cartridge into a caulk gun. Cut the tip of the caulk nozzle at a 45-degree angle, making an opening just wide enough to cover the trimmed foam and create a good seal.
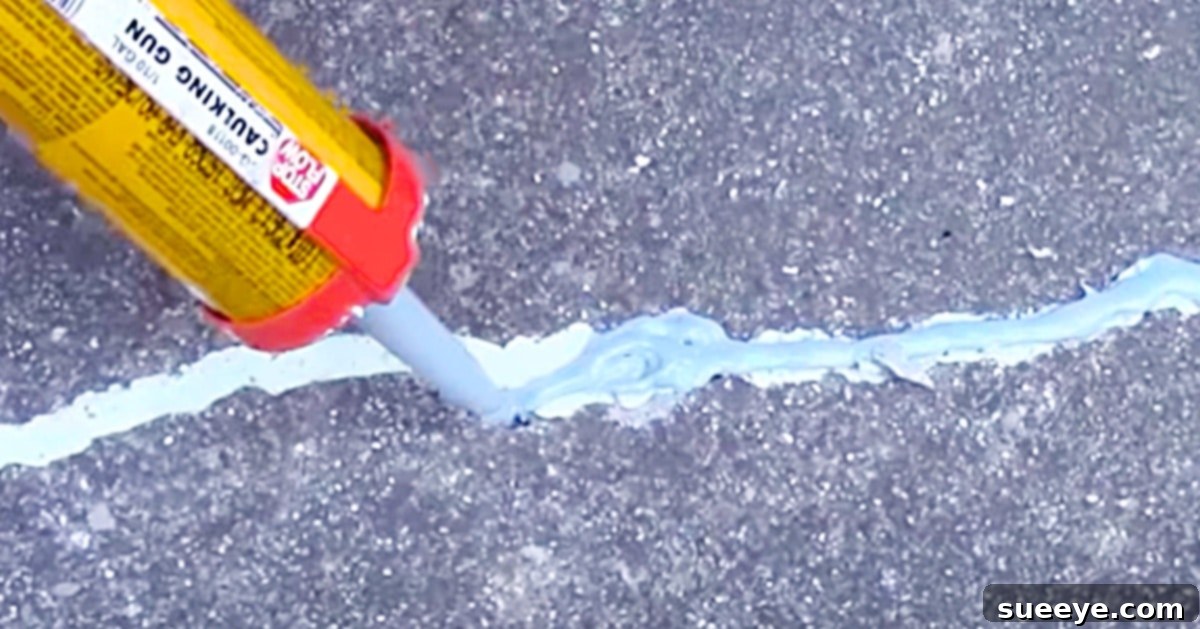
- Apply Caulk Sealant: Apply a continuous, even bead of self-leveling caulk sealant directly over the trimmed foam filler. The goal is to completely cover the foam, ensuring good contact with the concrete edges on both sides of the crack. The self-leveling property will help the caulk settle into a smooth, uniform surface. For very wide cracks, you might need to apply a slightly thicker bead.
- Allow to Cure: Once applied, allow the caulk to cure completely according to the manufacturer’s instructions. This typically means protecting it from foot traffic and moisture for at least 24-48 hours, or longer in cooler, humid conditions. Do not walk on or expose the repaired area to water until the caulk has fully cured.
Tips for Maximizing Your Concrete Crack Repair’s Lifespan
While the foam and caulk method is inherently durable, a few extra considerations can further extend the life of your repairs:
- Weather Conditions: Always perform repairs on a dry day with moderate temperatures. Avoid extreme heat, cold, or rainy conditions, as these can negatively impact the foam’s expansion and the caulk’s curing. Check product labels for ideal application temperature ranges.
- Don’t Rush Drying Times: Patience is a virtue in concrete repair. Rushing the drying and curing times for both the foam and caulk is the quickest way to compromise the repair’s longevity.
- Proper Storage of Materials: Store unused foam and caulk according to manufacturer instructions to ensure they remain viable for future touch-ups or projects.
- Regular Inspection: Periodically inspect your repaired cracks. While the method is designed for longevity (around five years or more), environmental factors can be harsh. Minor touch-ups with caulk can often prolong the overall lifespan of the repair.
- Consider Color Matching: Some self-leveling caulks come in various shades of gray or concrete-like colors. Choosing a color that closely matches your existing concrete can improve the aesthetic outcome.
The Enduring Benefits of This DIY Solution
Choosing this innovative foam and caulk method for your concrete crack repairs offers a multitude of advantages over traditional, more rigid solutions:
- Cost-Effective: Compared to hiring professionals for specialized crack repair or, worse, completely replacing sections of concrete, this DIY method is significantly more economical. The materials are readily available and affordable.
- DIY Friendly: The steps are straightforward and don’t require specialized tools or extensive experience, making it an accessible project for most homeowners.
- Exceptional Durability: The flexibility of the expanding foam allows the repair to move with the concrete, preventing future cracking that often plagues rigid fillers. This adaptability is key to its long-lasting performance.
- Weather Resistant: The combination of water-resistant foam and a protective caulk layer effectively seals cracks against moisture intrusion, preventing freeze-thaw damage and sub-base erosion.
- Enhanced Safety: By filling and sealing cracks, you eliminate trip hazards, making your sidewalks and driveways safer for everyone.
- Improved Aesthetics: A smooth, sealed crack repair significantly enhances the visual appeal of your concrete surfaces, contributing positively to your property’s curb appeal and overall value.
- Prevents Further Damage: Sealing cracks prevents water from reaching the sub-base and stops vegetation from growing through, thereby halting further deterioration of the concrete slab.
Conclusion: Reclaim Your Concrete Surfaces
Concrete cracks, whether they appear gradually over time or emerge after essential processes like mud jacking, are a common and frustrating problem for homeowners. However, with the right approach and a few simple materials, you can effectively address these issues, restoring both the safety and beauty of your property’s concrete surfaces.
The DIY method utilizing minimally expanding foam and self-leveling caulk offers an ingenious, durable, and cost-effective solution. By following the detailed steps outlined in this guide – from meticulous preparation to precise application and careful curing – you can achieve professional-quality results that will stand the test of time and the elements. This approach not only fixes the visible cracks but also creates a flexible, weather-resistant barrier that protects your concrete from future damage.
Don’t let cracked concrete detract from your home’s appeal or pose unnecessary hazards. Empower yourself with this excellent DIY technique. Give this method a try, and enjoy the renewed integrity and polished look of your sidewalks and driveways for years to come!