
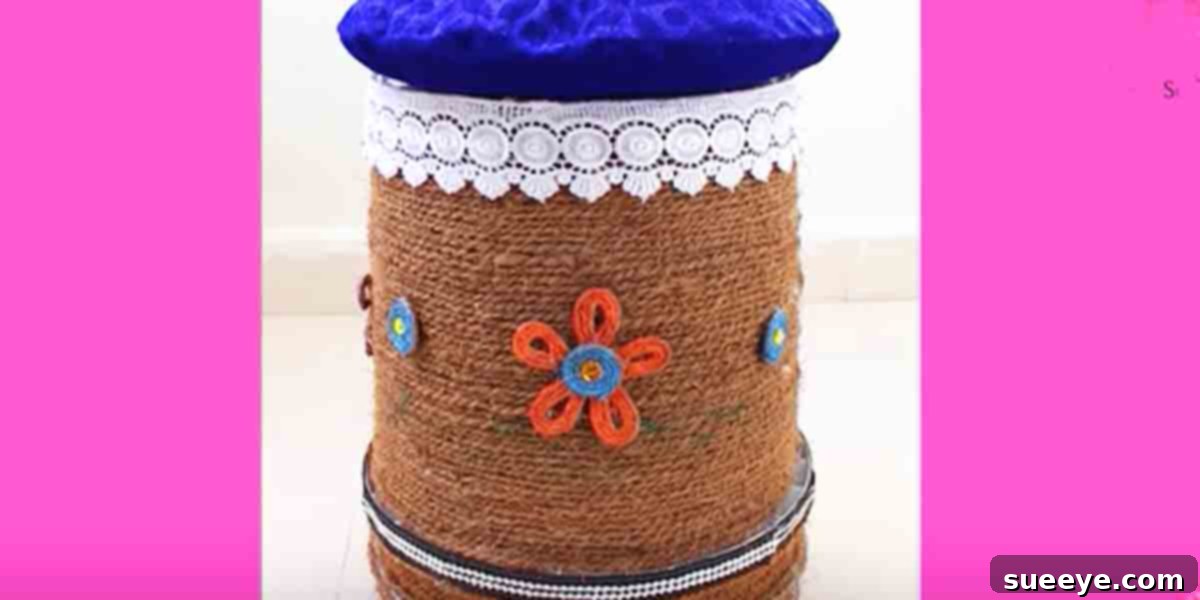
DIY Boho Chic Stool: Transform Old Paint Buckets into Stylish Seating Solutions
In the vast and inspiring world of home decor and DIY projects, certain ideas possess a unique magic, capable of captivating millions with their simplicity, ingenuity, and aesthetic appeal. One such viral sensation is the transformation of humble, old paint buckets into charming, bohemian-inspired sitting stools. This brilliant upcycling project has not only garnered widespread attention, captivating over five million viewers with its compelling tutorial, but has also become a beloved staple for crafters and interior enthusiasts alike. If you, like me, are drawn to distinctive designs, sustainable practices, and budget-friendly solutions, prepare to be inspired by this truly remarkable creation.
My own journey with this project began the moment I stumbled upon a picture of one of these stools. Its undeniable Bohemian charm, a perfect blend of artistic flair and cozy comfort, instantly resonated with my personal aesthetic. It felt like discovering a hidden gem – a piece that promises to infuse any space with personality and warmth. The sheer volume of engagement these tutorials receive is a testament to the project’s universal appeal, demonstrating how a creative vision can turn an everyday discarded item into a functional work of art. This isn’t just about making a stool; it’s about crafting a statement piece that reflects individuality and resourcefulness.
The Irresistible Appeal: Sustainability Meets Savings
What truly sets this DIY endeavor apart is its ingenious foundation in both eco-consciousness and cost-effectiveness. The core component of this stylish stool is an item often relegated to the recycling bin or landfill: an old paint bucket. By repurposing these buckets, we’re not only preventing waste but also actively participating in a cycle of sustainable living. This commitment to upcycling breathes new life into discarded materials, transforming them into beautiful, functional furniture pieces while keeping project expenses remarkably low.
The availability of materials makes this project incredibly accessible. Many of us have old paint buckets gathering dust in our garages, remnants of past home improvement adventures. For me, discovering a small collection of these forgotten containers instantly sparked excitement, turning potential clutter into valuable crafting resources. Even if your personal stash is empty, acquiring them is surprisingly easy. Local hardware stores, community groups, or even construction sites are often happy to give away empty buckets, making this an inclusive project for anyone eager to try their hand at crafting. This ease of material acquisition means that high-style decor doesn’t have to come with a high price tag.
Versatility Unleashed: Stools for Every Space and Style
One of the most compelling attributes of these DIY paint bucket stools is their exceptional versatility. They are not confined to a single decor style or function; rather, they can be customized to complement an array of interior themes. My home, for instance, thrives on an eclectic mix of patterns and vibrant colors, and these stools integrate seamlessly, enhancing the playful and artistic atmosphere. Their adaptability allows them to become a natural extension of your personal style, no matter how unique.
Enhancing Outdoor Living: Patio & Garden Seating
Imagine long summer evenings on your patio, surrounded by friends and family, with these charming stools providing additional seating. They are surprisingly sturdy and, with the right choice of weather-resistant fabrics and finishes, can brave the elements, adding a personalized touch to your outdoor sanctuary. I created several for my own patio, and they instantly elevated the space, making it feel more inviting and thoughtfully designed. They serve not only as comfortable seats but also as convenient surfaces for drinks, snacks, or a good book, perfectly blending functionality with outdoor aesthetic.
A Trendy Addition to Teenager’s Rooms
The appeal of these stools extends far beyond adult living spaces. They are an absolute hit with teenagers, proving to be both cool and incredibly practical. My own teenager quickly laid claim to one for her room, a testament to their youthful charm and adaptability. In a teen’s bedroom, where space is often at a premium and individuality is paramount, a custom-made stool offers flexible seating for guests, a unique side table for books and gadgets, or even a comfortable footrest. This project also presents an excellent opportunity for teens to engage in DIY, allowing them to personalize their space with a creation that truly reflects their evolving style and personality.
The Ultimate Solution for Effortless Extra Seating
Hosting gatherings often presents the familiar challenge of limited seating. These DIY stools offer a brilliant, charming solution to this common dilemma. While they may not rival the plush comfort of a luxurious armchair, they are undoubtedly a far more comfortable and stylish alternative to sitting on the floor! Their compact size ensures they can be easily tucked away when not in use and quickly deployed to accommodate additional guests. They infuse any gathering with a sense of informal charm, making everyone feel more relaxed and welcomed, even in a bustling environment where every seat counts. Their lightweight nature also makes them easy to move around as conversation flows and groups shift.
Beyond the Home: Classroom & Creative Workspace Applications
The utility of these versatile stools isn’t confined to residential settings. For educators, these durable, lightweight, and highly customizable stools are an inspired addition to any classroom. They can serve as flexible seating options in reading nooks, facilitate collaborative group work, or function as low tables for younger students. Their ease of movement and stackability make them incredibly practical for dynamic learning environments that require frequent rearrangement. Similarly, in creative studios, co-working spaces, or community centers, these stools provide adaptable seating that encourages interaction, fosters a relaxed atmosphere, and adds a touch of artistic flair.
Crafting Your Own Masterpiece: A Glimpse into the Process
While the original tutorial by Sonali offers comprehensive, step-by-step guidance, the general process of transforming a humble paint bucket into a delightful stool is remarkably accessible and deeply gratifying. The essence of DIY lies in the hands-on experience and the profound satisfaction derived from creating something beautiful and functional from scratch. Here’s a generalized overview of the creative journey you can expect when embarking on this rewarding project:
- Gather Your Essential Materials: Begin by collecting your thoroughly cleaned, empty paint buckets. You will also need sturdy upholstery foam for the seat cushion, a fabric of your choice (consider something durable and richly patterned for that quintessential boho vibe), batting for additional padding, a circular piece of wood or strong cardboard for the seat base, and decorative rope, macrame cord, or fabric strips for wrapping the bucket. Essential crafting tools will include sharp scissors, a hot glue gun, a staple gun, and a measuring tape.
- Construct the Comfortable Seat Cushion: Carefully cut your upholstery foam to the precise diameter desired for the top of your bucket. Create a robust and supportive base by cutting your wood or cardboard slightly larger than the foam. Wrap both the foam and the base with a layer of batting to ensure extra softness and to achieve a well-rounded shape. Finally, cover this assembly with your chosen fabric, neatly securing it underneath the base using a staple gun or a strong, reliable adhesive.
- Embellish the Bucket Base with Artistic Flair: This is where your personal style truly shines and the magic of transformation happens. Begin wrapping your paint bucket with your chosen material—be it sisal rope, colorful macrame cord, upcycled fabric strips, or rustic jute twine. Start from the bottom edge, applying hot glue in small, manageable sections as you tightly wind the material upwards around the bucket. Strive for consistent tension and complete coverage to create a seamless and professional finish. Feel free to experiment with varying colors, textures, and even braiding techniques to achieve your desired bohemian or eclectic aesthetic.
- Securely Assemble Your Custom Stool: Once the bucket base is fully wrapped and beautifully adorned, carefully place the prepared seat cushion securely on top. Depending on your design preference and the materials used, you can either use a strong adhesive to permanently attach the cushion, employ Velcro strips for a removable top (perfect for utilizing the bucket as discreet storage), or even create a fitted cover that holds it in place.
- Add Personal Finishing Touches: Step back and proudly admire your handcrafted creation! To further enhance its unique charm, consider adding decorative elements such as playful tassels, elegant fringes, unique buttons, or even hand-painted accents that reflect your artistic vision. The possibilities for customization are truly limitless, allowing each stool to tell its own story.
The instructions found in well-crafted tutorials, like the one by Sonali, are designed to be incredibly clear and user-friendly, guiding even the most novice crafters through each stage of the process. This ensures a successful, enjoyable, and deeply satisfying project, fostering both new skills and a sense of accomplishment.
Unleashing Your Inner Designer: Customization & Endless Inspiration
The profound beauty of this DIY project lies in its boundless potential for personalization. While the “Bohemian appeal” serves as a popular and inviting starting point, do not feel confined by it. These stools are incredibly adaptable and can be tailored to seamlessly integrate into virtually any interior design theme imaginable:
- Rustic Farmhouse Charm: Opt for natural jute twine or sturdy sisal rope for wrapping the bucket base, paired with a seat cushion upholstered in burlap, ticking stripe, or a distressed cotton fabric.
- Modern Minimalist Sophistication: Choose a sleek, single-color fabric for the cushion and a smooth, perhaps matte-finished, painted bucket base in a neutral tone like charcoal gray, crisp white, or soft beige.
- Coastal Chic Serenity: Incorporate natural-colored rope alongside vibrant nautical blues and crisp whites for the bucket wrap, complemented by a striped or seashell-patterned fabric cushion.
- Playful Kids’ Room Style: Utilize bright, engaging patterned fabrics for the cushion, perhaps adorned with whimsical pom-poms, colorful felt cutouts, or embroidered animal designs on the base.
- Industrial Edge & Urban Cool: Experiment by leaving sections of the metal bucket partially exposed, or wrap it with dark, heavy-duty fabrics, perhaps incorporating leather straps or metallic accents for a rugged appeal.
When planning your design, thoughtfully consider the existing color palette of your room, the textures that appeal to you most, and any specific patterns or motifs that speak to your individual style. Fabric selection is paramount – from luxurious velvet to durable canvas, intricate kilim prints to delicate macramé, each choice will dramatically transform the stool’s character. Embellishments such as braids, decorative beads, playful tassels, or even intricate hand-painted designs can add that extra layer of personality, making your stool truly one-of-a-kind.
Why This DIY Stool Deserves Your Creative Attention
In an era increasingly dominated by mass-produced consumer goods, there is profound and lasting satisfaction in creating something with your own hands. This DIY paint bucket stool project offers a multitude of benefits that extend beyond mere aesthetics:
- Sustainable Living Champion: It stands as a prime example of successful upcycling, significantly reducing waste and breathing new life into forgotten household items.
- Cost-Effective Decor Solution: Crafting these stools yourself is significantly more economical than purchasing comparable designer or boutique seating options.
- Embodied Personalization: Each finished stool becomes a unique and tangible reflection of your individual style, creativity, and craftsmanship.
- Versatile & Practical Functionality: These stools provide adaptable extra seating, serve as convenient side tables, or function as charming decorative accents in any room.
- Community & Skill Development: Engaging with comprehensive tutorials like Sonali’s connects you to a broader crafting community, fosters shared inspiration, and helps you develop valuable new DIY skills.
Ready to Embark on Your Next DIY Journey?
The widespread enthusiasm for this simple yet brilliantly executed DIY project is unequivocally well-deserved. It serves as a powerful testament to how creative thinking can effortlessly transform the ordinary into the extraordinary, proving definitively that beautiful, functional, and sustainable home decor does not require a hefty investment. So, if you’re eagerly searching for your next engaging craft project, or simply in need of an adorable and practical seating solution that perfectly blends charm with utility, now is the opportune moment to gather those paint buckets!
Seek out Sonali’s inspiring step-by-step tutorial (easily discoverable on popular video platforms by searching for “DIY paint bucket stool Sonali”) and prepare to unleash your inner artisan. You will be genuinely astonished at how quickly and effortlessly you can create darling, custom stools that infuse any space with warmth, unique character, and an irresistible touch of Boho chic. Happy crafting!