
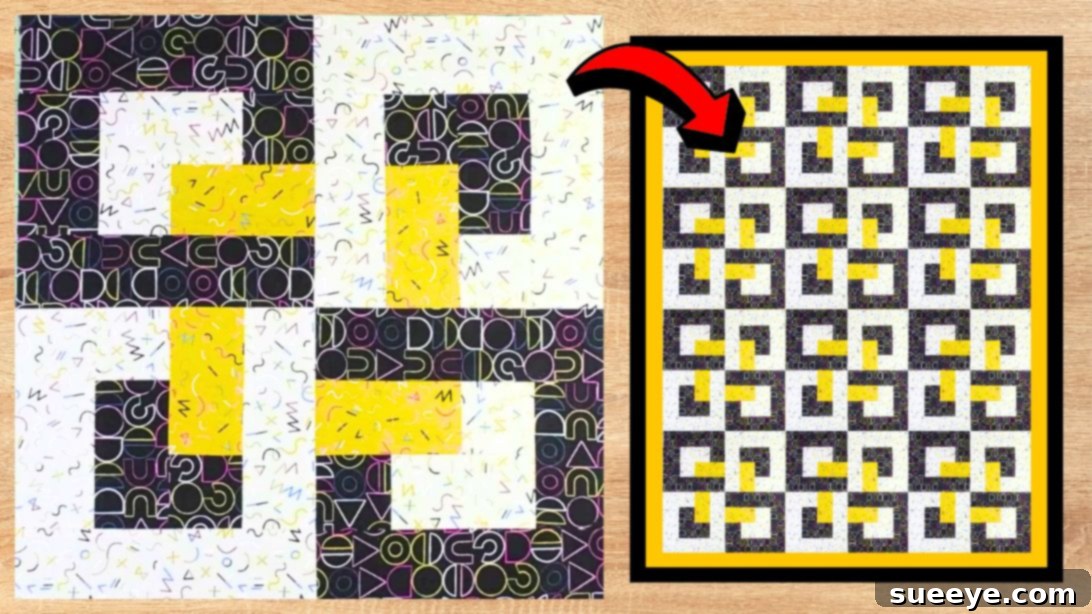
Master the Interwoven Quilt Block: A Stunning DIY Project with Free Pattern
Embark on a delightful quilting adventure by creating the mesmerizing Interwoven Quilt Block. This design, renowned for its intricate appearance, surprisingly comes together with remarkable ease, making it a fantastic project for both seasoned quilters and enthusiastic beginners. The exceptionally clear and engaging tutorial by the talented Carol Thelen on YouTube simplifies every step, transforming what might seem complex into an achievable and enjoyable crafting experience. This block is a perfect way to hone your precision piecing skills while producing a visually stunning piece of fabric art. Prepare to impress yourself and others with this captivating design – download the free pattern today and dedicate your weekend to bringing this beautiful Interwoven Quilt Block to life!
Why Choose the Interwoven Quilt Block for Your Next Project?
The Interwoven Quilt Block stands out in the quilting world due to its unique optical illusion. It masterfully creates the appearance of ribbons or fabric strips weaving over and under each other, lending incredible depth and dynamic movement to any quilt. This design is not merely aesthetically pleasing; it also serves as an excellent educational project. Working with this block helps quilters develop crucial skills such as accurate cutting, precise piecing, and consistent seam allowances, all of which are fundamental to high-quality quilting. Carol Thelen’s suggested color palette of background, black, and gold fabrics provides a striking contrast, enhancing the interwoven effect and giving the block an elegant, sophisticated finish. Whether you envision a stunning wall hanging, a decorative pillow, or a full-sized quilt, this block promises a satisfying process and impressive results.
Essential Materials for Your Interwoven Quilt Block:
Before you begin sewing, gathering all your materials will ensure a seamless and enjoyable quilting session. Precision in preparation directly translates to the beauty of your finished block. Refer to the pattern for specific yardage requirements, but the following general list will get you started:
- Background Fabric: Choose a light-colored solid or a subtle tone-on-tone print. This fabric will make your darker, more vibrant colors truly pop and define the negative space of the interwoven design. Approximately 1/4 yard should suffice for a single block.
- Black Fabric: Essential for creating the strong contrast that highlights the interwoven effect. A solid black is ideal, but a very dark charcoal or even a black-on-black print could work beautifully. Approximately 1/4 yard.
- Gold or Yellow Fabric: This vibrant hue adds a touch of warmth and luminosity, drawing the eye to the intertwining elements. Consider a rich gold for a luxurious feel or a bright yellow for a cheerful aesthetic. Approximately 1/4 yard.
- Marking Pen, Pencil, or Chalk: For accurately transferring pattern lines onto your fabric. Ensure it’s a fabric-specific marker that is easily removable, either by vanishing over time, washing out, or rubbing away.
- Quilting Ruler: A clear acrylic ruler (such as a 6.5″ x 24″ or a square ruler) is indispensable for precise measurements and straight cuts, especially when used with a rotary cutter.
- Scissors or Rotary Cutter and a Cutting Mat: A sharp rotary cutter paired with a self-healing cutting mat offers superior precision and speed, particularly for cutting multiple layers or long strips. Keep a good pair of fabric scissors handy for trimming threads and smaller pieces.
- Sewing Machine: A reliable sewing machine equipped with a 1/4-inch presser foot is crucial for maintaining consistent seam allowances, which is key to a square and flat quilt block.
- Needle and Thread: Use high-quality 100% cotton or polyester thread in a neutral color like white, light gray, or ecru, which will blend with most fabrics. A new, sharp quilting needle (e.g., size 80/12) is recommended for smooth stitching.
- Iron and Ironing Board: An iron is a quilter’s best friend! You’ll need it frequently for pressing seams open or to one side, which helps the block lie flat and ensures accurate alignment of subsequent pieces. A dry iron is often preferred, but steam can be used carefully.
- Free Pattern: Click here to download Carol Thelen’s detailed, printable pattern. This pattern contains all the specific cutting dimensions and diagrams essential for successful assembly. Print it out and keep it close by for reference.
Step-by-Step Directions for Crafting Your Interwoven Quilt Block:
Creating this stunning block involves careful cutting and precise piecing. Remember to maintain a consistent 1/4-inch seam allowance throughout the process and to press your seams meticulously after each step. For the most comprehensive visual guidance, refer to Carol Thelen’s exceptional video tutorial as you work through these instructions.
Step 1: Prepare and Piece the Initial Units
The foundation of your interwoven block relies on accurate cutting and the careful assembly of smaller components. The pattern you downloaded will specify precise dimensions for Patches A, B, C, and D, which correspond to different shapes and colors from your chosen fabrics. Take your time during this initial stage, as precision here will ensure the entire block comes together beautifully.
- Accurate Fabric Cutting: Begin by carefully cutting all your background, black, and gold fabrics according to the exact measurements provided in Carol Thelen’s pattern. Sort these cut pieces into clearly labeled piles for Patches A, B, C, and D. For instance, Patch C might consist of specific rectangles, while Patch D could be squares, each designated a particular color. Precision in this step is crucial for the final alignment of your block.
- Assemble First C & D Units (Background & Dark): Take two of your Patch C background rectangles and two of your Patch D dark (black) squares. Position one dark D square at the end of one background C rectangle, right sides together. Stitch them together using a consistent 1/4-inch seam allowance. Repeat this process for the second pair.
- Assemble Second C & D Units (Gold & Background): Next, select two Patch C gold rectangles and two Patch D background squares. Place one background D square at the end of one gold C rectangle, right sides together, and sew with a 1/4-inch seam. Repeat for the remaining pair.
- Press Seams Open with Care: After sewing these initial units, carefully take them to your ironing board. Gently press all the seams open. Pressing seams open helps to distribute the bulk of the fabric evenly, resulting in flatter units that are easier to align in subsequent steps and contribute to a crisp, professional finish for your quilt block.
- Join Gold and Black Units: Now, take the two units you created from the gold C rectangles and background D squares. Orient them as indicated in the pattern diagram and Carol’s video – this is key to forming the interwoven pattern. Sew these two units together, matching the seams precisely. Press this newly formed seam open.
- Join Black and White Units: Similarly, take the two units made from the black C rectangles and white D squares. Align them correctly according to the pattern and stitch them together. Once sewn, press this seam open as well, ensuring all fabric lies flat and smooth.
Step 2: Assemble the Main Quilt Block
With your precisely pieced initial units ready, it’s time to bring the full, distinctive interwoven pattern to life. This stage involves combining your smaller units with the remaining A and B patches to gradually construct the complete block. Remember, consistent pressing after each seam is crucial for achieving a flat and square finished product.
- Arrange and Sew Central Units: Carefully gather all the units you pieced together in Step 1. Arrange them on your work surface exactly as illustrated in Carol’s video and the pattern diagram. This specific arrangement is fundamental to forming the illusion of intertwining fabric. Once you are confident in the layout, sew these units together, taking care to match all seam intersections perfectly. As always, press all new seams open to reduce bulk and maintain a flat surface.
- Incorporate Patch C Fabric: Locate the designated positions on the sides of your assembled central unit where the Patch C fabric (likely rectangular strips, perhaps in your background color) should be attached. Pin these pieces in place, ensuring alignment, and then sew them. After each seam, immediately press it open. This habit of frequent pressing helps to set your stitches and keeps your block from warping or puckering.
- Attach Patch A to the Top and Bottom: Now, direct your attention to the top and bottom edges of your developing block. Take your Patch A fabrics (these are typically longer strips that frame the central design) and align them with the top and bottom. Stitch these securely into position. Following the sewing, press these seams open with precision.
- Add Patch B to the Remaining Sides: Identify the areas on the block’s remaining sides where Patch B fabrics are to be sewn. These patches often serve as additional framing elements or contribute to the overall dimension of the block. Attach them carefully, ensuring straight seams and proper alignment. After stitching, press the seams open, contributing to the overall stability and flatness of your block.
- Final Block Assembly and Pressing: With all the individual patches now sewn to the central units, the final step involves assembling these larger sections into the complete Interwoven Quilt Block. Follow the pattern instructions precisely for this final arrangement and stitching. Pay meticulous attention to matching all points and corners for a professional finish. As you sew these final seams, continue the practice of pressing after each one. This ensures your finished Interwoven Quilt Block is perfectly flat, square, and ready to be incorporated into a larger quilt, or proudly displayed as a standalone piece of exquisite fabric art.
Pro Tips for Quilting Success: Achieving Perfection
Even with clear instructions, a few professional tips can elevate your quilting experience and the quality of your finished Interwoven Quilt Block:
- Master Accurate Cutting: This cannot be overstated. A sharp rotary cutter, a non-slip ruler, and a self-healing mat are your best allies. Even a tiny deviation in your initial cuts can lead to significant alignment issues later. Always double-check your measurements before making that cut.
- Maintain a Consistent 1/4-Inch Seam Allowance: This is the golden rule of quilting. Your sewing machine might have a special 1/4-inch presser foot, or you can mark the exact 1/4-inch line on your machine bed with painter’s tape. Practice on scrap fabric until your seam allowance is perfectly consistent.
- Press, Don’t Iron: There’s a subtle but crucial difference. “Ironing” involves sliding the iron across the fabric, which can stretch and distort your carefully cut pieces. “Pressing” means lifting the iron and placing it down firmly on the seam, holding it briefly, and then lifting it straight up. This method respects the fabric’s grain and prevents distortion.
- Chain Piecing for Efficiency: If you’re making multiple blocks or have many identical units to piece, try chain piecing. Sew one seam, then without cutting the thread, feed the next two fabric pieces under the needle immediately. This saves time and thread, creating a chain of sewn units that you can cut apart later.
- Trim Threads as You Go: Get into the habit of trimming loose threads after each seam. Untrimmed threads can get caught in subsequent seams, creating unwanted bulk, or, worse, show through lighter fabrics in your finished block.
- Pre-wash Your Fabrics (Optional but Recommended): While some quilters prefer not to pre-wash, doing so eliminates potential fabric shrinkage and color bleeding, especially with vibrant or dark colors. If you decide not to pre-wash, consider using a color catcher in your first wash of the finished quilt.
- Take Mindful Breaks: Quilting, especially intricate piecing, requires focus and patience. If you feel tired or frustrated, step away from your machine for a short break. Returning with fresh eyes can often help you spot mistakes or find solutions more easily.
Transform Your Quilt Blocks into Masterpieces
Once you’ve successfully completed the beautiful Interwoven Quilt Block, a world of creative possibilities opens up! This single block can serve as a stunning centerpiece for a decorative pillow, a unique placemat, or even be framed as a piece of textile art for your wall. For ambitious quilters, creating multiple blocks allows you to assemble a full-sized quilt that showcases the mesmerizing interwoven pattern across a larger canvas. Don’t hesitate to experiment with different fabric combinations – imagine this design in soft pastels for a baby quilt, bold primary colors for a modern aesthetic, or festive holiday prints for a seasonal throw. The high-contrast nature of the interwoven design truly shines when vibrant and distinct fabrics are used, inviting you to delve into your fabric stash and explore new palettes.
This Interwoven Quilt Block tutorial offers more than just instructions; it provides a rewarding journey into the art of quilting, allowing you to develop essential skills while producing a visually captivating piece. We extend our sincerest gratitude to Carol Thelen via YouTube for her generosity in sharing this incredible pattern and her clear, inspiring teaching style. Her dedication to fostering a love for quilting in others is truly admirable.
If you thoroughly enjoyed crafting this quilt block and found Carol’s guidance invaluable, we wholeheartedly encourage you to visit her YouTube channel. There, you’ll discover a rich collection of other fantastic quilting tutorials, innovative project ideas, and expert tips that are sure to fuel your creative passion. Make sure to subscribe to her channel so you never miss out on her latest releases and can continue your quilting journey with an expert guide by your side!