
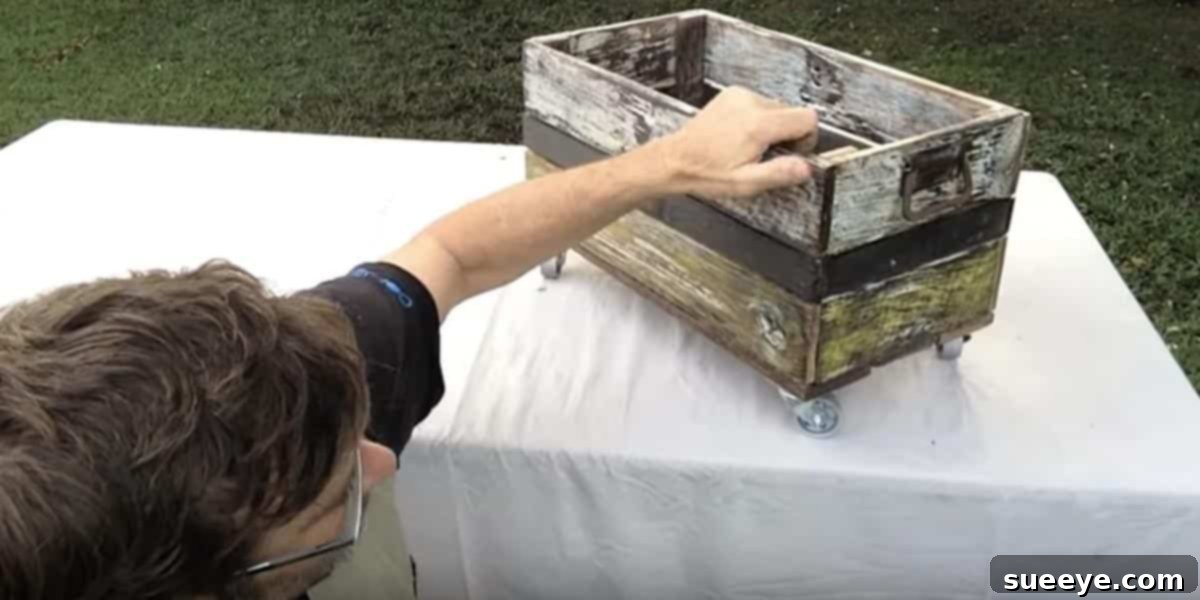
DIY Rustic Magazine Rack: Transform Old Wood into Stylish Home Organization
Most of us cherish the unique warmth and character that rustic elements bring to our home decor. Finding ways to infuse this charm without breaking the bank can be a delightful challenge, and we’ve discovered an absolutely brilliant solution that’s both economical and deeply satisfying. Imagine transforming forgotten pieces of old wood into a functional and aesthetically pleasing centerpiece for your living space. This DIY project is not just about building something; it’s about embracing sustainability, creativity, and the enduring beauty of handcrafted items.
The journey into this captivating DIY venture begins with a fascinating tutorial led by an engaging Australian artisan. His approach to upcycling old fence wood into a magnificent magazine rack is both innovative and inspiring. What truly captivates about this project is the authentic rustic aesthetic he so skillfully achieves. It’s a testament to how humble materials, with a bit of vision and effort, can be elevated into pieces that radiate character and history.
As the creator himself wisely points out, the versatility of this project extends beyond just fence wood. Pallet wood, readily available and often free for the taking, presents an equally fantastic alternative. The abundance and low cost of pallets make this DIY idea incredibly accessible, empowering almost anyone to embark on their own woodworking adventure and create something truly special for their home.
The Common Challenge: Taming Magazine Clutter
One of the most persistent organizational challenges many households face is managing the accumulation of magazines. They arrive in the mail with exciting new content, promising hours of relaxation and inspiration, but often end up in ever-growing stacks on desks, coffee tables, and countertops. This common scenario quickly leads to a cluttered environment, making it difficult to find a specific issue or maintain a tidy living space. The quest for an elegant yet practical storage solution is real, and this DIY magazine rack stands out as one of the most brilliant and aesthetically pleasing answers we’ve encountered.
Life’s demands often mean we don’t always have the immediate luxury of flipping through a new magazine the moment it arrives. They patiently wait for those precious moments of downtime – a quiet evening, a lazy weekend morning – when a magazine in hand becomes the perfect companion for relaxation. In the interim, however, these wonderful reads can contribute significantly to household disarray. Discovering this ingenious DIY solution online was like finding a perfect match; it addressed both the functional need for storage and the desire for decor that speaks to a rustic sensibility.
Design Elements That Elevate: Contrast and Convenience
Beyond its primary function, the design nuances of this magazine rack truly set it apart. The intentional inclusion of a darker piece of wood, carefully positioned to frame the entire structure, creates a stunning visual contrast. This thoughtful detail doesn’t just add interest; it elevates the piece from a simple storage unit to a genuine design statement, highlighting the inherent beauty of the reclaimed materials. This interplay of light and dark wood tones brings depth and sophistication to the rustic aesthetic.
Furthermore, the addition of wheels transforms this stationary item into a remarkably versatile and accessible piece of furniture. In any busy home, the ability to effortlessly move a storage solution from one room to another, or simply shift it aside for cleaning, is invaluable. This practical feature underscores the project’s commitment to not only style but also supreme functionality, ensuring that your magazines are always within reach, wherever you choose to relax.
Why Embrace DIY Rustic Decor?
The appeal of rustic decor lies in its ability to evoke a sense of warmth, history, and authenticity. It’s a style that celebrates natural textures, weathered finishes, and the beauty of imperfection. A DIY rustic magazine rack fits perfectly into this aesthetic, offering numerous benefits:
- Unique Character: Unlike mass-produced items, your handcrafted rack will possess a unique story and charm, making it a true conversation starter.
- Sustainability and Upcycling: Giving new life to old fence wood or pallet wood is an eco-friendly choice, reducing waste and promoting responsible consumption.
- Cost-Effectiveness: Reclaimed wood is often free or very inexpensive, allowing you to create high-quality decor on a modest budget.
- Personalized Touch: The ability to customize the finish, size, and details means your rack will perfectly complement your existing decor and personal style.
- Sense of Accomplishment: There’s immense satisfaction in creating something beautiful and functional with your own hands.
Sourcing Your Materials: The Hunt for Reclaimed Wood
The beauty of this project largely hinges on the use of reclaimed wood, specifically old fence panels or pallets. Finding these materials is often easier than you might think, but it does require a bit of awareness and, importantly, a focus on safety.
Tips for Finding Old Fence Wood:
- Local Demolitions/Renovations: Keep an eye out for houses undergoing fence removal or renovation. Always ask permission before taking any wood.
- Community Forums/Online Marketplaces: Websites like Craigslist, Freecycle, or local Facebook groups often have postings from people looking to get rid of old fencing.
- Landscaping Companies: Some landscaping businesses might have old fence sections they’ve removed from clients’ properties.
- Roadside Finds: Occasionally, you might spot usable fence wood put out for bulk trash collection. Again, verify it’s okay to take.
Tips for Finding Pallet Wood:
- Local Businesses: Many small businesses (especially those receiving regular shipments) are happy to give away pallets. Think hardware stores, nurseries, pet supply stores, and furniture stores.
- Construction Sites: Larger construction sites might have pallets, but always ask a site manager first.
- Online Resources: Similar to fence wood, check online marketplaces for “free pallets.”
- Safety First: When choosing pallets, look for “HT” (Heat Treated) stamps, which indicate they haven’t been treated with harmful chemicals (like Methyl Bromide, marked “MB”). Avoid pallets with spills or strong odors.
Preparing Your Reclaimed Wood for the Project
Once you’ve successfully sourced your materials, a few preparation steps are crucial to ensure your project is durable, safe, and looks its best.
- Cleaning: Reclaimed wood can be dirty, dusty, or even have old paint flakes. Use a stiff brush, soap, and water to thoroughly clean the wood. For more stubborn grime, a pressure washer can be highly effective. Allow the wood to dry completely.
- Inspection: Carefully inspect each piece for nails, screws, splinters, or any signs of rot or insect infestation. Remove all metal fasteners using a claw hammer or pliers.
- Sanding: Sanding is perhaps the most important step for achieving a smooth, splinter-free finish and preparing the wood for any stains or sealants. Start with a coarser grit (e.g., 80-100 grit) to remove rough spots and then progress to finer grits (e.g., 150-220 grit) for a smoother surface. This will also enhance the wood’s natural grain.
- Cutting & Measuring: Following the tutorial by Shane, carefully measure and cut your cleaned and sanded wood pieces according to the required dimensions for the magazine rack frame, sides, and base.
Beyond Magazines: Maximizing the Utility of Your Rustic Rack
While designed as a magazine rack, the inherent versatility and robust construction of this DIY piece mean its utility can extend far beyond just holding periodicals. Thinking creatively about its placement and contents can unlock even more organizational potential in your home.
- Book Nook Companion: Perfect for holding current reads, favorite novels, or children’s storybooks, keeping them tidy and accessible next to a cozy armchair or bed.
- Vinyl Record Storage: For music enthusiasts, this rack can be an ideal spot to display and store a curated selection of vinyl records, adding a vintage touch to your entertainment area.
- Craft Supply Organizer: Keep knitting projects, yarn, fabric swatches, or art supplies neatly contained and portable, making it easy to move your creative endeavors around the house.
- Kid’s Playroom Helper: A fantastic solution for organizing children’s picture books, coloring books, or even small toy sets, encouraging tidiness in a fun way.
- Entryway Catch-All: Positioned near the front door, it can serve as a stylish spot for mail, frequently used documents, small bags, or even leashes and pet supplies.
- Bathroom Towel Holder: In a rustic-themed bathroom, it could artfully store rolled hand towels or extra bath linens.
The adaptability of this DIY rustic rack truly makes it a valuable addition to any room, reflecting your personal style and functional needs.
Mastering the Build: A Step-by-Step Journey with Shane
To truly bring this vision to life, we highly recommend diving into the step-by-step tutorial provided by Shane, known as shaneconlan1. His clear, engaging instructions make the process approachable for DIY enthusiasts of all skill levels. From the initial cuts to the final assembly, Shane guides you through each stage with practical advice and visual demonstrations.
Pay close attention to how he skillfully integrates the darker piece of wood to create that captivating contrast, and how he ingeniously incorporates wheels for effortless mobility. These design choices are not merely aesthetic; they are foundational to the rack’s overall appeal and functionality. Watching a skilled craftsman execute these steps is an invaluable learning experience that builds confidence and ensures a successful outcome for your own project.
Personalizing Your Rustic Creation
While Shane’s design provides a fantastic blueprint, the beauty of DIY lies in its potential for personalization. Once the basic structure is complete, you have an open canvas to truly make the magazine rack your own:
- Staining: Experiment with different wood stains to achieve varying shades of rustic charm, from light oak to deep walnut, enhancing the natural grain.
- Painting: For a farmhouse chic or shabby chic look, consider painting the rack. Distress the paint lightly with sandpaper for an aged, weathered appearance.
- Sealing: A clear coat of polyurethane or varnish will protect the wood, especially if it’s placed in a high-traffic area or used outdoors (under cover).
- Hardware: Beyond the wheels, consider adding decorative handles, corner brackets, or other unique hardware to further personalize its character.
- Stenciling/Decals: Add a word, phrase, or simple design using stencils or decals for an extra touch of individuality.
- Size Adjustments: Don’t feel confined to one size. Adjust the dimensions to fit a specific space, or to accommodate larger items than magazines, such as art portfolios or children’s books.
Conclusion: Embrace the Joy of Upcycled Creation
In a world increasingly focused on sustainable living and mindful consumption, projects like this DIY rustic magazine rack offer more than just a functional item; they offer a philosophy. It’s about seeing potential in the discarded, valuing craftsmanship over mass production, and injecting personal history and creativity into your living space. This project is an invitation to slow down, engage your hands, and create something truly meaningful.
So, gather your tools, seek out that forgotten fence wood or those ubiquitous pallets, and prepare to embark on a rewarding journey. Watch Shane’s inspiring tutorial, absorb his wisdom, and then confidently begin crafting your very own rustic magazine rack. You’re not just building a piece of furniture; you’re creating an organizing tool that exudes charm, tells a story, and brings a delightful touch of rustic elegance into your home. The satisfaction of a decluttered space, adorned with a piece you crafted yourself, is a reward in itself. Happy building!