
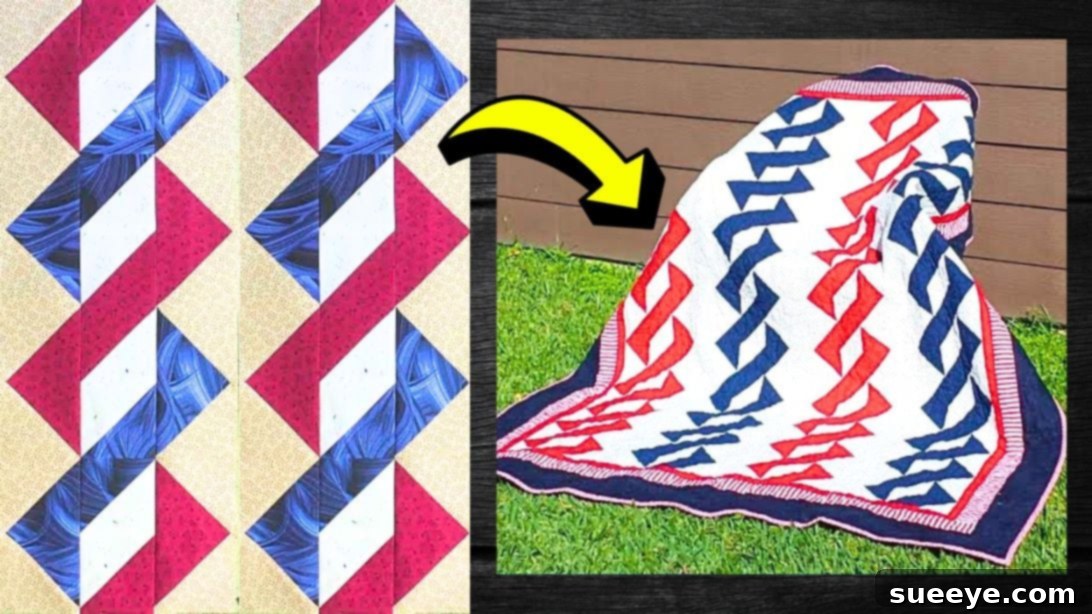
Easy Spiral Quilt Block Tutorial: Your Gateway to Stunning Quilts
Unleash your creativity and dive into the joyful world of quilting with a project that promises both visual charm and surprising simplicity. The “Spiral Quilt Block” is an absolute delight to construct, offering a dynamic and intricate appearance that belies its beginner-friendly nature. If you’ve been searching for a quilt pattern that combines fun, color, and a truly unique aesthetic, your quest ends here. This guide will walk you through every stitch, helping you create a block that’s perfect for adding a vibrant touch to any quilt.
One of the most appealing aspects of this spiral design is the freedom it offers in fabric selection. Whether you envision a kaleidoscope of bright, cheerful hues or a more subdued, sophisticated palette, you can personalize your quilt to perfectly match your style. Imagine a quilt adorned with these mesmerizing spirals, each block a testament to your newfound skills and artistic vision.
RELATED: Master the Twisted Log Cabin Quilt Block: A Companion Project
For those new to the art of quilting, the idea of tackling a project that looks this sophisticated might seem daunting. However, we assure you that the Spiral Quilt Block is designed with simplicity in mind. It’s an excellent way to practice fundamental piecing techniques without feeling overwhelmed. To ensure your success, this project comes complete with a complimentary downloadable pattern. Furthermore, a detailed video tutorial by the talented Carol Thelen on YouTube provides invaluable visual guidance, making the learning process even smoother. Get ready to transform fabric into art!
Why Choose the Spiral Quilt Block for Your Next Project?
The Spiral Quilt Block stands out for several compelling reasons, making it a fantastic choice for quilters of all levels, especially beginners:
- Visually Captivating Design: The optical illusion of a swirling spiral adds a modern and energetic feel to any quilt. It’s a true conversation starter!
- Beginner-Friendly: Despite its complex appearance, the construction relies on basic piecing techniques, making it an ideal stepping stone for those new to quilting. You’ll build confidence with every block.
- Versatile Fabric Choices: Experiment with contrasting colors to enhance the spiral effect, or use analogous colors for a more subtle, flowing design. The possibilities are endless, allowing you to personalize every project.
- Teaches Essential Skills: This block helps you master accurate cutting, precise stitching, and effective pressing – all crucial skills for any quilter.
- Quick to Assemble: Once you get the hang of the method, you’ll find these blocks come together relatively quickly, giving you a satisfying sense of accomplishment.
Gather Your Creative Arsenal: Materials for Your Spirals Quilt Block
Before you embark on your quilting adventure, ensuring you have the right tools and materials is paramount. High-quality supplies will not only make the process more enjoyable but also contribute to a more professional-looking finished product. Here’s a comprehensive list of what you’ll need:
- Dark Print Fabric: This will form a significant part of your spiral. Choose a fabric with good contrast to your lighter selections.
- Contrasting Dark Print Fabric: Another dark fabric, ideally with a different print or texture, to add depth and visual interest to your block.
- Medium Print Fabric: A fabric that bridges the gap between your dark and light tones, essential for creating the gradual spiral effect.
- Light-Volume Print Fabric: The lightest fabric in your palette, crucial for highlighting the “opening” of the spiral. Ensure it contrasts well with your dark fabrics.
- Marking Pen, Pencil, or Chalk: For accurately transferring pattern markings onto your fabric. A fine-tipped marker or tailor’s chalk is often preferred for precision.
- Sharp Scissors or Rotary Cutter and a Cutting Mat: Precision cutting is key in quilting. A rotary cutter with a self-healing mat offers speed and accuracy, especially when paired with a ruler. If using scissors, ensure they are sharp and dedicated to fabric.
- Quilting Ruler: A transparent acrylic ruler is indispensable for accurate measuring and cutting with a rotary cutter. Look for one with clear markings.
- Needle and Thread: High-quality polyester or cotton thread that complements your fabric colors. A good sharp needle (machine or hand sewing) is also essential.
- Iron, for pressing: Often underestimated, proper pressing is crucial for flat, accurate quilt blocks. Pressing involves lifting and lowering the iron, not sliding it.
- Sewing Machine: A reliable sewing machine will make quick work of your stitching. Ensure it’s in good working order and you have suitable needles for your fabric type.
- Free Pattern: Don’t forget to download the essential Spiral Quilt Block Pattern. This blueprint will guide your fabric cutting and assembly.
Step-by-Step Guide: How to Craft Your Easy Spirals Quilt Block
Now that you have all your materials ready, let’s begin the exciting journey of piecing together your Spiral Quilt Block. Remember, patience and precision are your best friends here!
Step 1: Preparing Your Fabric Pieces and Initial Stitching
Begin by downloading and printing the free pattern. This is your essential guide for accurate cutting. Carefully cut all your fabric pieces according to the pattern’s instructions, paying close attention to the specified shapes and sizes for each color. Once cut, group your fabric pieces by type and color to keep everything organized. This organization prevents mistakes and speeds up the process. Take one small dark print triangle and one small light-volume print triangle. Align them precisely with their right sides facing each other, ensuring all edges are perfectly lined up. Stitch along the designated seam line (typically a 1/4-inch seam allowance). The goal here is a straight, consistent seam.
Step 2: Pressing for Perfection and Repetition
After stitching, carefully flip the newly joined piece open. Take it to your iron and gently press the seam open or to one side, depending on your preference and the pattern’s suggestion. Proper pressing is critical for flat, accurate blocks. Once pressed, you’ll likely have some excess fabric around the edges. Carefully trim this unit to create a perfect square, as indicated in the pattern or video. This squaring-up process ensures all your block components are uniform. Repeat this exact process for all the remaining small dark print triangles and light-volume print triangles. Then, move on to the small dark triangles and contrasting dark triangles, repeating the same stitching, pressing, and trimming steps until all small units are formed.
Step 3: Creating Larger Fabric Units for the Spiral
Now, let’s combine your smaller units into larger components of the spiral. Take one of your large contrasting triangles. Place a small medium print triangle on each of its upper sides. Ensure these smaller triangles are positioned correctly to form part of the spiral’s curve. Lay them so their right sides are facing, and their edges are perfectly lined up. Stitch these pieces together with careful attention to your seam allowance. After stitching, flip the pieces open again and press them nicely. Good pressing at this stage will prevent bulky seams and ensure your block lies flat, which is essential for accurate assembly later on.
Step 4: Assembling the Full Quilt Block
Continue to repeat the process from Step 3 for all the remaining dark and medium triangles, creating all the necessary component units for your spiral block. As you create each unit, make sure to trim off any excess fabric to maintain precise dimensions. Once all your individual units are complete, it’s time for the exciting part: assembling the full quilt block! Arrange your block units exactly as shown in Carol Thelen’s video tutorial. This visual guide is invaluable for understanding the correct placement to form the spiral. Stitch the units together one at a time, typically working in rows. As you complete each seam, press it carefully before moving to the next. After stitching all the units within each row, align the rows and stitch them to each other, again making sure to press your seams as you go. This iterative pressing ensures a perfectly flat and square quilt block.
Tips for Success with Your Spiral Quilt Block
To ensure your Spiral Quilt Block turns out beautifully and you enjoy the process, keep these essential tips in mind:
- Maintain a Consistent Seam Allowance: A perfect 1/4-inch seam allowance is paramount in quilting. Invest in a 1/4-inch presser foot for your machine if you don’t have one; it makes a huge difference.
- Press, Don’t Iron: As mentioned, pressing involves lifting and placing the iron, allowing the heat and steam to set the fabric. Ironing (sliding the iron) can distort your fabric pieces, leading to inaccurate blocks.
- Starch is Your Friend: Using a light spray starch on your fabric before cutting can add stability, making it easier to cut and sew accurately, especially with bias edges.
- Chain Piecing: To save time, consider chain piecing. Stitch several units one after another without lifting your presser foot, creating a “chain” of connected pieces. Then, snip them apart.
- Test Your Tension: Before you start, always test your sewing machine’s tension on scrap fabric to avoid loose or tight stitches that can affect your seams.
- Color Contrast is Key: For the most dramatic spiral effect, select fabrics that offer strong contrast between the light and dark elements. Experiment with different color combinations to see what you love.
- Watch the Video Tutorial: Seriously, watch Carol Thelen’s video multiple times. Visual instruction can clarify steps and techniques far better than written words alone.
- Don’t Rush: Quilting is a journey, not a race. Take your time with each cut and stitch, especially as a beginner. Enjoy the process!
Beyond the Block: What’s Next for Your Spiral Quilt?
Once you’ve successfully completed your first Spiral Quilt Block, you’ll likely feel a wonderful sense of accomplishment and a desire to make more! Here are some ideas for taking your spiral blocks to the next level:
- Create a Full Quilt Top: Make multiple spiral blocks and arrange them in a grid. You can rotate alternating blocks to create an even more dynamic, interwoven pattern.
- Pillows and Cushions: A single spiral block makes a stunning focal point for a decorative throw pillow.
- Table Runners or Place Mats: Stitch a few blocks together in a row for a unique table runner, or use individual blocks for custom place mats.
- Wall Hangings: Frame a particularly beautiful spiral block or a small grouping for a charming piece of textile art to adorn your home.
- Experiment with Sashing and Borders: Add strips of fabric (sashing) between your blocks to give them breathing room, or frame your quilt top with decorative borders to enhance its size and visual appeal.
*All these images are credited to Carol Thelen via YouTube. Give her channel a visit and subscribe for more fantastic quilting tutorials!
Start Your Quilting Journey Today!
The Easy Spiral Quilt Block is more than just a sewing project; it’s an opportunity to create something beautiful, build your quilting skills, and express your unique style. With the free pattern, detailed steps, and Carol Thelen’s excellent video tutorial, you have everything you need to succeed. So, gather your fabrics, fire up your sewing machine, and prepare to be amazed by what you can create. Happy quilting!