
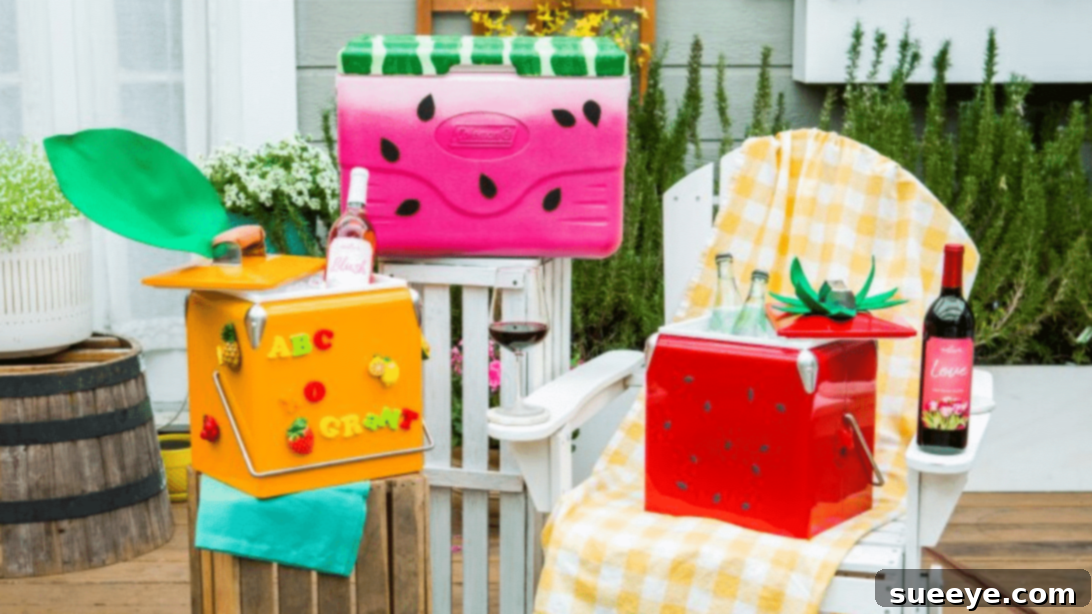
Summer parties and outdoor gatherings are synonymous with good company, delicious food, and, of course, plenty of refreshing drinks! Keeping beverages cool and easily accessible is crucial for a successful event, especially when your venue is a spacious backyard or a poolside oasis. Constantly trekking back to the kitchen for refills can interrupt the fun and flow of your party. The ultimate solution? Strategically placed beverage stations and reliable coolers. While coolers are incredibly effective at maintaining the chill of your drinks, their standard, often bland appearance might not always match the vibrant, festive atmosphere you’re trying to create.
Instead of settling for plain, ordinary ice chests, why not infuse them with some personality and pizzazz? This season, give your coolers a delightful makeover that perfectly aligns with your party’s theme or the joyous spirit of summer. Imagine turning functional beverage containers into adorable, eye-catching DIY fruit coolers – a guaranteed conversation starter and an instant aesthetic upgrade! This creative project is surprisingly simple, incredibly rewarding, and promises to add a unique touch to your next event. Prepare to impress your guests with these charming and practical additions.
RELATED: Looking for more creative cooler ideas? Check out this Easy DIY Floating Shark Cooler Tutorial!
Below, you’ll find a comprehensive, step-by-step guide to crafting your very own DIY fruit coolers. For a visual walkthrough that complements these written instructions, be sure to watch the insightful video tutorial provided by Hallmark Channel on YouTube. Let’s transform those ordinary coolers into extraordinary party essentials!
Why Transform Your Cooler? The Benefits of DIY Fruit Coolers
Before diving into the crafting process, let’s explore why a DIY fruit cooler is an absolute must-have for your next summer celebration. Beyond mere aesthetics, these custom coolers offer a blend of practicality, personality, and budget-friendliness:
- Enhance Party Aesthetics: A plain cooler can stick out like a sore thumb in a beautifully decorated party setting. A fruit-themed cooler, like our watermelon design, seamlessly integrates with your decor, adding a playful and cohesive touch. It transforms a functional item into a key decorative element.
- Personalized Touch: Store-bought themed coolers can be expensive and often lack originality. DIY allows you to express your creativity, tailor the design to your specific party theme, and even experiment with different fruit motifs beyond the classic watermelon, making your event truly unique.
- Budget-Friendly Decor: Repurposing an old cooler or giving an inexpensive new one a facelift is far more economical than purchasing specialized party coolers. All you need are a few cans of spray paint and some craft supplies, turning a potential eyesore into a highlight without breaking the bank.
- Fun and Engaging Project: This isn’t just about the end product; the process itself is an enjoyable crafting experience. It’s a fantastic solo project, a bonding activity with friends or family, or even a creative endeavor to get kids involved (with adult supervision for spray painting).
- Conversation Starter: Expect compliments and questions! Your unique fruit cooler is bound to catch the eye of your guests and serve as a delightful talking point, showcasing your attention to detail and creative spirit.
- Practicality Meets Style: You don’t have to sacrifice functionality for flair. These coolers will still keep your drinks perfectly chilled, ensuring refreshing beverages are always at hand, while looking fabulous doing it.
Materials You’ll Need for Your DIY Fruit Coolers
Gathering all your supplies before you begin ensures a smooth and uninterrupted crafting session. Here’s a detailed list of what you’ll need to create your vibrant fruit cooler:
- Cooler: The star of our project! Any size or shape will work, but a clean, smooth-surfaced plastic cooler will provide the best canvas for painting. Ensure it’s free of cracks or significant damage that could compromise its insulation. Give it a thorough cleaning before starting.
- Spray Paint:
- White Primer: This is essential for proper adhesion of subsequent paint layers and ensures your vibrant colors pop with true intensity. Do not skip this step for a professional and durable finish. Look for a primer suitable for plastic.
- Dark Pink (or Magenta): This will form the base of your watermelon’s flesh, creating the deeper, richer tone in your ombre effect. Choose a shade that evokes ripeness.
- Pink (Lighter Shade): Used to create a beautiful gradient with the dark pink, mimicking the natural variation in a watermelon’s interior. A vibrant, cheerful pink works best.
- Green: For the rind of your watermelon. Choose a fresh, appealing shade that complements the pinks. A medium to light green is usually ideal.
- Scissors: For cutting foam sheets into seed shapes and any other necessary craft tasks. A pair of sharp craft scissors will provide clean, precise cuts.
- Foam Sheets (Black): These will be cut into seed shapes. Craft foam (often called EVA foam) is inexpensive, readily available, and very easy to cut and glue, making it perfect for this detail.
- Hot Glue Gun and Glue Sticks: For securely attaching the foam seeds to your painted cooler. Ensure your glue gun is heated sufficiently for a strong bond.
- Painter’s Tape: Crucial for protecting areas you don’t want painted and for creating clean, crisp lines, especially when isolating the lid from the body during painting. Look for medium-tack tape to avoid damaging your primer.
- Dark Green Craft Paint: This acrylic paint, applied with brushes, will be used to create the distinctive stripes and veins on the watermelon rind, adding depth and realism to the design.
- Paint Brushes: A few sizes will be helpful. Include a fine-tip brush for intricate details like the stripes and a slightly wider flat brush if you prefer for some aspects of the green rind.
How to Make DIY Fruit Coolers: A Step-by-Step Guide
Now that you have all your materials, let’s bring your watermelon cooler vision to life! Remember to work in a well-ventilated area, preferably outdoors or in a garage with open doors, and lay down drop cloths or old newspapers to protect your workspace from paint overspray.
Step 1: Prepare and Prime Your Cooler for Painting
Thorough preparation is the absolute key to achieving a long-lasting and professional-looking finish. Begin by ensuring your cooler is spotlessly clean and completely dry. Any lingering dirt, dust, or grease can severely prevent the paint from adhering properly, leading to peeling or an uneven finish. Use soap and water, then rinse thoroughly and allow to air dry completely.
Once clean and dry, place your cooler on a protected surface in a well-ventilated area. Generously spray your entire cooler with the white primer paint. Apply thin, even coats, moving the can steadily from side to side to avoid drips and ensure uniform coverage. It is always better to apply two or three thin coats, allowing each to dry for the recommended time specified on the can’s instructions (usually 15-30 minutes between coats), rather than one thick coat. This strategy ensures complete coverage, excellent adhesion, and a solid base that will make your subsequent colors truly pop. Once the primer is fully dry to the touch, carefully remove the lid from the cooler. If your cooler lid is not detachable, use painter’s tape to meticulously cover and protect it from the pink paint you’re about to apply to the body of the cooler. This precise taping ensures a clean transition between the watermelon flesh and rind.
Step 2: Create the Vibrant Ombre Watermelon Flesh Effect
This step brings the delicious interior of the watermelon to life with a beautiful and dynamic ombre effect. With the lid removed or securely taped off, begin by holding your dark pink spray paint can about 8-12 inches away from the cooler. Start spraying the bottom third of your cooler’s body with the dark pink color. Apply even, controlled bursts, ensuring good, opaque coverage over this section. Allow this initial layer to become slightly tacky, usually for about 10-15 minutes.
Next, take your lighter pink spray paint. Hold this can slightly further away, perhaps 10-14 inches, and start spraying from the top of the cooler’s body, aiming slightly downward. As you move towards the middle section where the dark pink ends, spray in short, feathery bursts, moving your hand back and forth rapidly. The key here is to create a seamless gradient where the lighter pink subtly blends into the darker pink, creating a natural, juicy watermelon flesh appearance without harsh lines. Practice this technique on a piece of scrap cardboard first if you’re new to ombre spray painting. Once satisfied with the gradient, allow the entire body to dry completely. This might take several hours, or even overnight, depending on humidity and paint type. Patience here will prevent smudges.
Step 3: Add the Rind and Signature Seed Details
Once the pink ombre body is completely dry and cured, it’s time to work on the green rind and the iconic watermelon seeds. If you had previously removed the lid, carefully re-attach it now. If you taped it off, carefully remove the painter’s tape from the lid and prepare it for painting.
Now, take your green spray paint and apply it to the entire lid. Again, use thin, even coats to achieve a smooth, vibrant green rind effect. Ensure complete coverage, especially around the edges. Allow this green layer to dry thoroughly as per the paint manufacturer’s instructions. Once dry, take your dark green craft paint and a fine-tip brush. Paint organic, slightly wavy stripes across the lid, mimicking the natural patterns and veins found on a watermelon rind. These stripes don’t need to be perfectly uniform; a little variation adds to the realistic and handcrafted effect. Allow these painted stripes to dry completely.
Finally, for the seeds! Take your black foam sheets. Using your scissors, carefully cut out various tear-drop or oval shapes to resemble watermelon seeds. Make them in slightly different sizes for a more natural and authentic look. Once you have a good collection of seeds, use your hot glue gun to strategically attach them around the pink ombre body of the cooler. Position them as if they are embedded in the watermelon flesh, scattered artfully. Ensure each seed is firmly glued. Once the glue cools and sets, your magnificent DIY fruit cooler is complete and ready to chill your favorite beverages in style!
Tips for a Perfect DIY Fruit Cooler
To ensure your crafting experience is as smooth as possible and your finished cooler looks fantastic, consider these additional tips:
- Ventilation is Key: Always prioritize safety by working in a well-ventilated area, preferably outdoors, when using spray paint. Wearing a respirator or mask is also advisable to avoid inhaling fumes.
- Shake Cans Well: Before and frequently during use, vigorously shake your spray paint cans for at least a minute. This ensures the pigment is evenly mixed, guaranteeing consistent color application and preventing clogs.
- Maintain Optimal Distance: Hold the spray paint can about 8-12 inches away from the surface you’re painting. This distance is crucial for achieving an even coat, preventing heavy drips, and ensuring smooth coverage.
- Patience with Drying: Resist the urge to rush the drying process. Allowing each coat to fully cure for the recommended time prevents smudging, peeling, and uneven finishes, leading to a much more durable product.
- Test Colors: If unsure about your chosen spray paint colors or how they’ll blend, do a quick test spray on a piece of scrap cardboard or an inconspicuous area of an old container. This helps visualize the final look.
- Consider a Clear Sealant: For added durability and to protect your paint job from scratches, moisture, and UV fading, consider applying a clear, outdoor-safe sealant spray (like a clear coat or varnish) once all paint and glue have dried completely.
- Other Fruit Ideas: Don’t limit yourself to watermelon! You could adapt this technique to create a vibrant orange slice cooler (orange body, green stem on lid, no seeds), a zesty lemon cooler (yellow body, small green leaf), or even a playful kiwi cooler (light green body, dark green fuzzy rind, black oval seeds arranged in a circle).
Integrating Your Fruit Cooler into Your Summer Party
Your newly transformed fruit cooler isn’t just a container; it’s a statement piece that enhances your entire party atmosphere! Here are some ideas to make it a central and stylish part of your summer celebration:
- Themed Drinks: Fill your watermelon cooler with complementary beverages such as watermelon-infused water, a refreshing fruit punch, pink lemonade, or even iced tea. The visual appeal will make the drinks even more inviting.
- Designated Beverage Station: Position it prominently in your outdoor space. Pair it with disposable cups that match your theme, a sturdy scoop for ice, and perhaps some decorative fruit slices or mint sprigs for garnishes to create a full-service drink station.
- Photo Opportunity: Its charming and unique design makes it a fantastic, ready-made backdrop for party photos. Encourage guests to snap a picture with their drink next to your creative cooler for memorable social media shares.
- Kid-Friendly Zone: Use a smaller fruit cooler to hold kid-friendly juices, water bottles, or even individually wrapped snacks. This makes it easy and fun for little ones to serve themselves, adding a playful touch to their area.
- Complementary Decor: Enhance the overall fruit theme by pairing your cooler with matching fruit-themed plates, napkins, table runners, or even string lights shaped like fruits. Consistency in decor elevates the entire party experience.
*All images are credited to Hallmark Channel via YouTube. We encourage you to visit their channel and subscribe for more inspiring DIY projects and creative ideas!
Conclude Your Summer Style with DIY Fruit Coolers
Transforming an ordinary cooler into a vibrant, fruit-themed masterpiece is a fun, easy, and incredibly impactful way to elevate any summer celebration. Whether you’re hosting a casual backyard barbecue, a lively poolside party, a festive picnic, or any outdoor gathering, these DIY fruit coolers will not only keep your drinks perfectly chilled but also serve as delightful and eye-catching decorative elements. With just a few basic materials, a bit of creative effort, and a touch of patience, you can turn a purely functional item into a focal point that beautifully reflects the joy, freshness, and vibrant spirit of the season. So, gather your supplies, unleash your inner artist, and get ready to enjoy a summer filled with stylish sips and unforgettable, aesthetically pleasing memories!