
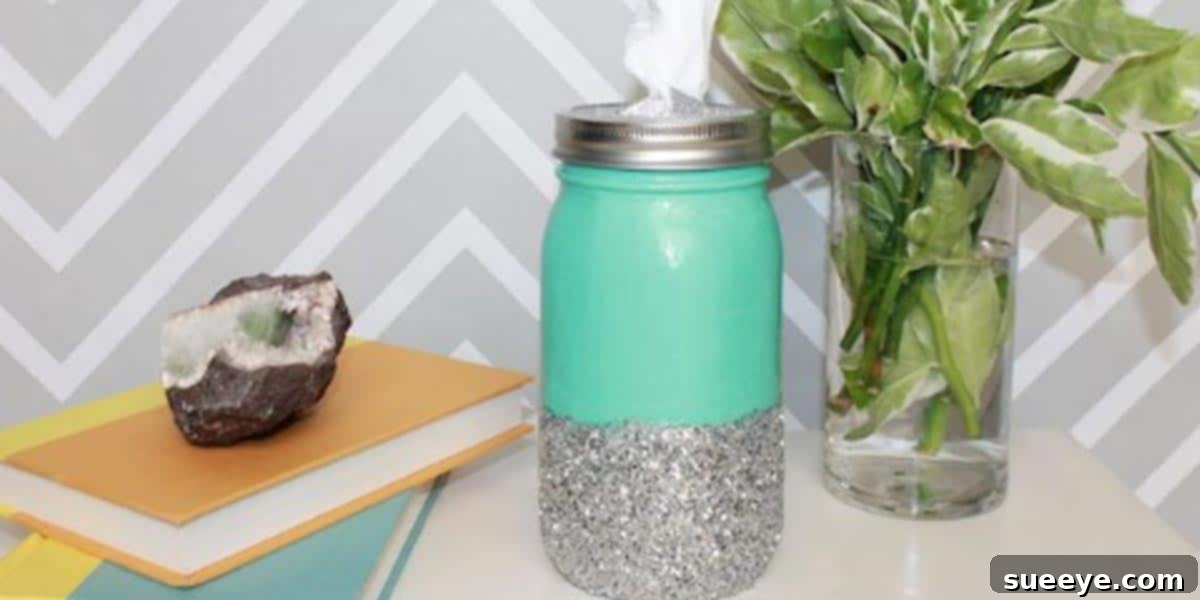
DIY Mason Jar Tissue Holder: Craft Your Own Stylish & Customizable Dispenser
Have you ever found yourself in the tissue aisle, meticulously searching for a box that doesn’t clash with your interior design, only to leave frustrated by the limited and often uninspiring options? It’s a common dilemma. Standard tissue boxes, despite their practical utility, rarely add to a room’s aesthetic. They often stand out, disrupting the visual harmony you’ve carefully cultivated in your home. But what if there was a way to integrate this everyday necessity seamlessly and beautifully into any space, making it a functional piece of art rather than an eyesore?
Look no further than the ingenious DIY Mason Jar Tissue Holder. This clever idea is a fantastic way to infuse personality and charm into your bathroom, bedroom, living room, or any area in your home. Forget wasting precious time in the tissue aisle trying to find that elusive matching box. With this super cute, customizable craft, you can design a tissue dispenser that perfectly complements your unique decor, reflecting your personal style and adding a delightful handmade touch. It’s an easy, budget-friendly project that promises to bring a fresh zing to your surroundings.
Why Opt for a DIY Mason Jar Tissue Holder? The Benefits Unveiled
Beyond simply solving the aesthetic problem of generic tissue boxes, creating your own Mason jar tissue holder offers a plethora of advantages that make it a worthwhile endeavor for any homeowner or crafting enthusiast:
- Unrivaled Customization: This is arguably the biggest draw. Unlike mass-produced tissue box covers, a DIY approach gives you complete creative control. You can choose the exact paint color, scrapbook paper pattern, fabric texture, and embellishments to ensure your holder flawlessly matches your existing decor, a specific room theme, or even a seasonal celebration.
- Budget-Friendly Decor Solution: Mason jars are typically inexpensive, and many of the other materials required for this project might already be lurking in your craft cupboard. This makes it a highly economical way to update your home decor without breaking the bank.
- Eco-Conscious Crafting: Repurpose and give new life to old Mason jars that might otherwise gather dust or end up in recycling. It’s a wonderful way to contribute to a more sustainable lifestyle by upcycling and reducing waste.
- Adds Instant Charm and Character: Mason jars inherently evoke a sense of rustic, farmhouse, vintage, or shabby chic charm. Incorporating them into your decor instantly adds warmth, character, and a cozy, inviting feel to any room.
- A Personal Touch to Your Home: There’s immense satisfaction and pride in displaying items you’ve crafted with your own hands. Each DIY piece tells a story and makes your home feel more personal, unique, and reflective of who you are.
- Versatile Placement: These charming holders aren’t confined to the bathroom. Their stylish appeal makes them suitable for bedrooms, living rooms, home offices, nurseries, and even guest rooms, enhancing any space they occupy.
- Engaging Craft Project: This project is accessible to crafters of all skill levels, from beginners to experienced DIYers. It’s a relaxing and rewarding activity that allows you to unwind and explore your creativity.
Essential Materials: What You’ll Need to Get Started
Gathering all your supplies before you begin will ensure a smooth and enjoyable crafting experience. Here’s a detailed list of what you’ll need, along with some tips for choosing the best options:
- Mason Jar: A wide-mouth Mason jar is paramount for this project. The wider opening makes it significantly easier to insert a stack of tissues and allows for smooth dispensing. Pint (16 oz) or quart (32 oz) sizes are most commonly used; choose based on how many tissues you wish to store and the desired height of your dispenser.
- Mason Jar Lid Components: You’ll need both the flat metal insert (often called the lid disk) and the screw band (the ring). The flat insert will be modified to create the tissue opening, and the screw band will hold it in place.
- Scissors: A good pair of sharp scissors is essential for cleanly cutting scrapbook paper, fabric, or other decorative elements.
- Scrapbook Paper: This is where your decorative vision comes to life! Select a scrapbook paper with a pattern, color, or texture that perfectly aligns with your home’s decor. Consider using fabric scraps, wallpaper samples, or even custom-printed designs for truly unique effects.
- X-acto Knife (or Craft Knife): Crucial for making precise cuts, especially when creating the opening in the metal lid insert. Always use this tool with extreme caution and on a protected surface.
- Glue Stick: An acid-free glue stick is ideal for smoothly adhering scrapbook paper to the metal lid. It provides a clean finish and minimizes wrinkles. For more durable adhesion or for decoupaging the jar itself, consider Mod Podge.
- Paint Brush: A flat brush or foam brush works well for applying craft paint evenly to the glass jar. Have a smaller, finer brush on hand for any detail work.
- Craft Paint: Multi-surface acrylic paint is highly recommended as it adheres beautifully to glass and offers excellent coverage. Choose a color that complements your scrapbook paper and overall room aesthetic. Alternatively, glass-specific spray paint can provide a very smooth and even base coat.
- Facial Tissues: Any standard brand of facial tissues will work. You’ll be removing them from their original box and folding them to fit inside the jar.
- Optional Embellishments (for added flair):
- Glitter: For a dazzling touch, apply glitter with Mod Podge for a secure, long-lasting sparkle.
- Ribbon, Twine, or Lace: Wrap around the neck of the jar or secure with hot glue for extra texture and decorative appeal.
- Washi Tape: Offers a quick and easy way to add patterns, stripes, or borders.
- Stencils: Use stencils to apply intricate designs or monograms to a painted jar.
- Distressing Medium/Sandpaper: For a rustic, shabby chic, or vintage appearance on painted jars.
- Clear Sealant: A clear acrylic spray sealer or Mod Podge (especially Mod Podge Outdoor for humid environments) can protect your finished creation.
- Self-Healing Cutting Mat: An absolute must-have when using an X-acto knife to protect your work surface and ensure clean cuts.
Step-by-Step Guide: Crafting Your Perfect Mason Jar Tissue Dispenser
Now that you have all your materials, let’s dive into the fun part! Follow these detailed instructions carefully to bring your beautiful and functional Mason jar tissue holder to life.
- Prepare and Clean Your Jar: Begin by thoroughly washing your Mason jar and all components of its lid (flat insert and screw band) with soap and water. Ensure they are completely dry before moving on. Any residue or dust can prevent paint and glue from adhering properly.
- Paint the Jar (Optional, for Customization): If you desire a colored jar, now is the time to paint. Apply a thin, even coat of your chosen multi-surface acrylic paint to the exterior of the Mason jar using your paint brush. For opaque coverage, you will likely need two or three thin coats. Allow each coat to dry completely – typically 30 minutes to an hour – before applying the next. This patience prevents drips and ensures a smooth, professional finish. If you’re going for a distressed look, you can gently sand areas once the paint is fully cured.
- Design the Lid Opening: Take the flat metal insert of your Mason jar lid. Using a pencil, carefully draw a narrow rectangular or oval shape in the very center of the lid. This will be the slot from which your tissues emerge. The opening should be slightly wider than a single tissue when folded, allowing for easy, single-tissue dispensing.
- Cut the Tissue Slot: Place the lid insert on your self-healing cutting mat. With your X-acto knife, meticulously cut along the pencil outline you just drew. Do not try to cut through the metal in one pass; instead, make several shallow, controlled passes until the piece is cleanly removed. Once cut, you can use a small file or a piece of fine-grit sandpaper to smooth any sharp or rough edges around the opening.
- Decorate the Lid Insert with Scrapbook Paper: Take your chosen scrapbook paper. Trace the entire circular shape of the lid insert onto the back of your paper. Then, precisely trace the tissue opening you just cut into the metal lid onto the paper, ensuring it’s centered within the larger circle. Carefully cut out the outer circular shape with scissors and the inner tissue slot with your X-acto knife.
- Adhere Paper to Lid: Apply a generous, even layer of glue stick (or Mod Podge) to the top side of your metal lid insert, covering it entirely. Carefully align the cut scrapbook paper over the metal lid, making sure the tissue openings match perfectly. Gently press the paper down, smoothing out any air bubbles or wrinkles with your fingers or a clean, soft cloth. Allow the glue to dry completely according to the product instructions.
- Assemble the Lid: Once the decorated paper is securely dry on the flat lid insert, place this insert back into the Mason jar screw band.
- Prepare the Tissues for Dispensing: Remove a stack of facial tissues from their original box. For a continuous feed, gently fold about 20-30 tissues (depending on your jar size and tissue thickness) in half or thirds lengthwise. As you fold, tuck the end of one tissue into the fold of the next, creating an interlocking chain. This ensures that when you pull one tissue, the next one automatically pops up, ready for use.
- Load the Mason Jar: Carefully place your prepared, folded stack of tissues into the Mason jar.
- Secure the Lid: Pull the very top tissue from your stack up through the opening in your decorated lid. Then, screw the entire lid assembly (screw band with the decorated insert) onto the Mason jar until it is snug. Avoid overtightening.
- Add Optional Embellishments: If you wish to add glitter, apply a thin layer of Mod Podge to areas you want to sparkle and sprinkle glitter over it. Once dry, seal with another layer of Mod Podge to prevent shedding. You can also tie ribbons, twine, or attach other decorative elements around the neck of the jar or onto the painted surface for a truly personalized finish.
Unleash Your Creativity: Inspiring Customization Ideas
The beauty of the DIY Mason Jar Tissue Holder lies in its boundless potential for personalization. Don’t limit yourself to just paint and paper; explore these ideas to create a tissue dispenser that is truly a reflection of your style:
- Themed Decors: Tailor your holder to specific room themes. For a coastal vibe, use blue paint, sandy-toned paper, and perhaps glue on a small seashell. For a farmhouse aesthetic, opt for distressed white or cream paint, burlap, or buffalo plaid patterns.
- Seasonal & Holiday Flair: Create multiple holders to swap out with the seasons or holidays. Think vibrant spring florals, spooky Halloween silhouettes, warm autumnal leaves, or festive winter wonderland designs adorned with snow-like glitter.
- Decoupage Masterpiece: Instead of just paper on the lid, decoupage the entire jar with intricate fabric scraps, beautiful printed napkins, vintage newspaper clippings, or even cherished family photos for a unique collage effect. Seal everything with multiple coats of Mod Podge.
- Stenciling & Freehand Art: After painting the jar, use stencils to add elegant patterns, a monogram, inspiring quotes, or geometric designs. If you have artistic flair, freehand paint delicate flowers, abstract shapes, or simple borders.
- Textural Elements: Enhance the tactile appeal by wrapping the jar with various textures. Twine, jute, lace, ribbon, or fabric strips can be hot-glued around the jar’s neck or body for added depth.
- Chalkboard Paint Section: Paint a portion of the jar with chalkboard paint. This allows you to write changing messages, names, inspiring words, or delightful doodles with chalk, adding an interactive element.
- Ombre Effect: Achieve a sophisticated gradient by blending two or more paint colors seamlessly from the bottom to the top of the jar. This technique offers a subtle yet stunning visual appeal.
- Frosted or Etched Glass Look: For a more subtle, elegant finish, use glass etching cream (following safety instructions carefully) to create permanent frosted designs or patterns on a clear glass jar.
- Glow-in-the-Dark Accents: For a playful touch, especially in a child’s bedroom or nursery, use glow-in-the-dark paint for stars, moons, or whimsical patterns that come alive at night.
Placement Perfection: Where to Showcase Your Stylish Dispenser
Once your beautifully crafted Mason jar tissue holder is complete, you’ll discover how effortlessly it enhances various spaces throughout your home, transforming them with its unique charm:
- The Bathroom: This is the classic location, and for good reason. It provides a much more appealing alternative to a cardboard tissue box. Match it to your bath linens, tile, or vanity for a cohesive look.
- The Bedroom: A perfect addition to a nightstand, dresser, or bedside table. It’s particularly practical during allergy season or when you’re battling a cold, and adds a cozy, personalized element to your private sanctuary.
- The Living Room: Place it discreetly yet accessibly on a coffee table, end table, or bookshelf. Unlike a standard box, it will blend seamlessly with your other decorative items, enhancing the room’s overall aesthetic.
- The Home Office/Study: Keep it on your desk for convenience, adding a touch of personal flair and organization to your workspace without being an eyesore.
- The Nursery or Child’s Room: Customize it with playful colors, whimsical animal themes, or even the aforementioned glow-in-the-dark elements for a fun, functional, and adorable addition.
- The Kitchen: Surprisingly useful for quick clean-ups, spills, or runny noses, especially in open-concept living spaces where it can complement kitchen decor.
- The Guest Room: A thoughtful and elegant touch for visitors, making them feel more welcomed and cared for with a personalized item.
Tips for Success and Maintaining Your Handmade Creation
To ensure your DIY Mason jar tissue holder lasts and continues to look its best, keep these helpful tips in mind:
- Start Clean: Always begin with a thoroughly cleaned and dried jar and lid. This ensures optimal adhesion for all paints, glues, and embellishments, preventing peeling or flaking later on.
- Thin Coats Rule: When painting, apply multiple thin coats rather than one thick one. This prevents drips, ensures even coverage, and results in a more professional, durable finish.
- Patience is a Virtue: Allow ample drying time for each layer – paint, glue, glitter, or sealant. Rushing this step can lead to smudges, bubbles, or a less durable final product.
- Protect Your Workspace: Use a self-healing cutting mat for all X-acto knife work, and lay down newspaper, a drop cloth, or old towels when painting to protect your surfaces.
- Seal for Durability: If your jar is painted or decoupaged, especially if it will reside in a high-moisture area like a bathroom, apply a clear protective sealant. A clear acrylic spray sealer or Mod Podge Outdoor are excellent choices for added longevity and resistance.
- Gentle Cleaning Only: To clean your finished tissue holder, gently wipe it with a damp cloth. Avoid submerging it in water, placing it in a dishwasher, or using harsh abrasive cleaners, as these can damage the paint, paper, or sealant.
- Easy Refilling: When it’s time to refill, simply unscrew the lid, place a fresh, folded stack of tissues inside, and thread the top tissue through the opening before screwing the lid back on.
Beyond the Tissue Box: Embracing the Joy of DIY Home Decor
This Mason jar tissue holder project is more than just a clever solution for storing tissues; it’s an excellent entry point into the rewarding world of DIY home decor. Engaging in craft projects offers a multitude of personal and practical benefits:
- Unleash Your Creativity: Crafting provides a fantastic outlet for expressing your unique style and artistic inclinations, turning abstract ideas into tangible objects.
- Sense of Accomplishment: There’s an incredible feeling of pride and satisfaction that comes from completing a project with your own hands, especially when it results in a functional and beautiful item for your home.
- Create a Unique Home: DIY decor ensures your living space is truly one-of-a-kind. It will be filled with pieces that reflect your personality and tell a story, making your home feel more authentically ‘you.’
- Stress Relief and Mindfulness: Many people find the repetitive and focused nature of crafting to be incredibly therapeutic and meditative, offering a welcome escape from the stresses of daily life.
- Develop New Skills: Each new project is an opportunity to learn and hone new skills, from painting techniques and precision cutting to decoupaging and material handling.
- Meaningful Gifts: Handmade items like this tissue holder also make thoughtful, personalized gifts for friends and family, showing you put time and effort into their present.
Conclusion: Embrace the Beauty of Handmade in Your Home
The days of tolerating uninspired, mass-produced tissue boxes are officially over. With the power of DIY and the humble Mason jar, you can effortlessly transform a simple necessity into a captivating piece of home decor. This project not only offers a practical, eco-friendly, and budget-conscious solution but also opens up a world of creative possibilities, allowing you to infuse every nook and cranny of your home with your unique personality and charm.
Whether your aesthetic leans towards rustic elegance, sleek modern minimalism, vibrant bohemian whimsy, or cozy farmhouse chic, a Mason jar tissue dispenser can be custom-tailored to perfectly match your vision. So, gather your materials, ignite your imagination, and embark on this delightful crafting journey. Your refreshed home, brimming with handmade beauty, and your grateful nose (during sniffle season!) will undoubtedly thank you for it. Happy crafting!