
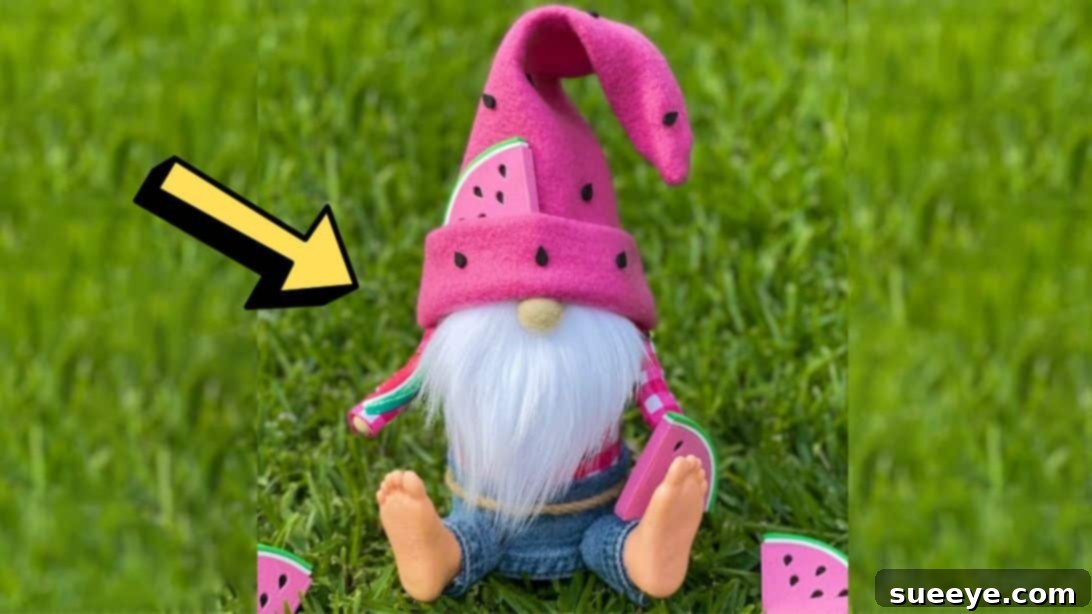
Craft Your Own Adorable DIY Watermelon Gnome: A Perfect Summer Decor Project
Welcome to the wonderful world of DIY crafting, where imagination meets tangible beauty! This summer, infuse your home with a splash of vibrant fun and irresistible charm by creating your very own **DIY Watermelon Gnome**. This delightful craft project, inspired by the talented Patti J. Good on YouTube, is designed to be surprisingly straightforward yet incredibly rewarding. Imagine a whimsical gnome, adorned with the refreshing colors of a watermelon, gracing your shelves, mantelpiece, or even your garden patio. It’s an ideal way to celebrate the sunny season and add a handmade touch to your seasonal decorations.
Whether you’re a seasoned crafter or just dipping your toes into the DIY realm, this project promises an enjoyable experience. The steps are easy to follow, and the satisfaction of seeing your adorable watermelon gnome come to life is truly unparalleled. Not only is it a fantastic personal project, but these charming gnomes also make heartwarming, personalized gifts for friends and family. Let’s gather our materials and embark on this creative journey to craft a summer masterpiece that will bring smiles and a touch of magic to any space!
Essential Materials for Your Watermelon Gnome Project
Before diving into the crafting process, it’s crucial to gather all your materials. Having everything neatly laid out will make the creative flow seamless and enjoyable. Here’s a comprehensive list of what you’ll need, along with a few tips for selection:
- Fabric for the Body: 1 piece of 9″ x 11″ fabric. Choose a sturdy fabric that holds its shape well, perhaps a cotton or linen blend in a neutral color that complements your watermelon theme.
- Fabric for the Arms: 2 pieces of 3″ x 7″ fabric. This can match your body fabric or offer a subtle contrast.
- Jean Fabric for Legs: 2 pieces of 3″ x 1¾” jean fabric. Denim adds a lovely texture and a touch of rustic charm to the gnome’s legs.
- Jean Fabric for Lower Body’s Pants: 1 piece of 2½” x 13″ jean fabric. This wider strip will form the “pants” or lower covering for the gnome’s body, giving it a finished look.
- Fleece for the Hat: 1 piece of 12″ x 15″ fleece. Fleece is an excellent choice for the hat due to its softness, slight stretch, and ability to hold shape. Consider a vibrant red or green for the watermelon theme, or a contrasting color for added flair.
- Styrofoam Discs: 2 pieces of 1″ x 3″ styrofoam discs. These will form the stable base of your gnome’s body.
- Non-Woven Fabric: 9″ x 24″ non-woven fabric. This fabric will be used to create the core structure of the gnome’s body, providing a surface for other fabrics and stuffing.
- Pipe Cleaner: A few pieces for shaping the arms and other details.
- Polyfill: Ample polyfill for stuffing the gnome’s body, arms, and hat, giving it a plump and cuddly feel.
- Faux Fur for the Beard: A piece of faux fur. Select a color that appeals to you – white, grey, or even a whimsical color to match the watermelon theme. The texture adds a lot of character.
- Bead for the Nose: One wooden bead or a large pearl bead. The size should be proportional to your gnome.
- Dowel Sticks: ¼” x 6″ dowel sticks. These provide internal support for the gnome’s legs.
- Miter Cutter: For precisely cutting the dowel sticks. If you don’t have one, sharp utility cutters or a small saw will work.
- Small Foam Twist Curlers: A few small foam twist curlers. These innovative items will be used to give structure to the gnome’s arms and legs.
- Hot Glue Gun and Glue Sticks: An essential tool for quickly and securely assembling your gnome. Always exercise caution when using a hot glue gun.
- Cricut (Optional): While a Cricut machine can be useful for cutting intricate felt patterns (like watermelon seeds or slices), it is not strictly necessary. You can easily cut felt shapes by hand.
- Felt Fabric: Various colors of felt for decorative elements, especially for creating watermelon slices and seeds. Green, red, and black felt will be perfect.
- Pattern: Don’t forget to download the essential pattern! Click here to download the pattern.
Step-by-Step Guide: Crafting Your Watermelon Gnome
Now that you have all your supplies ready, let’s begin the fun part – assembling your charming watermelon gnome! Follow these detailed instructions carefully for the best results.
Step 1: Constructing the Hat and Body Foundation
Our gnome’s journey begins with its most iconic features: the whimsical hat and sturdy body. Precision in these initial steps lays the groundwork for a beautiful finished product.
- Prepare the Hat Fabric: Take your 12″ x 15″ fleece fabric. Fold it in half lengthwise. Starting from the tip of the folded side, cut a gentle curve, extending it down to about the 4-inch mark on the open side of the fabric. This creates the classic gnome hat cone shape.
- Form the Hat Cone: Open the curved fleece piece. Apply a thin line of hot glue along one of the long curved edges. Carefully bring the opposite long curved edge over and press them together to form a cone shape. Hold firmly until the glue is dry and secure.
- Create the Hat Cuff: Once the hat cone is stable, fold the bottom edge of the hat upwards by approximately 2 inches. Apply a small amount of hot glue on the inside to secure this fold, creating a neat cuff. For an even cleaner finish, turn the hat inside out before folding the bottom edge upward by an inch and gluing it in place. This technique hides the raw edge beautifully.
- Construct the Gnome Body Core: Take your 9″ x 24″ non-woven fabric. This will form the internal structure of the gnome.
- Attach Styrofoam Base: At one end of the non-woven fabric, place one of the 1″ x 3″ styrofoam discs. Apply hot glue to the disc and to the fabric, then carefully roll the disc tightly within the fabric. Repeat with the second styrofoam disc, placing it adjacent to the first one, securing it with glue as you roll. These discs will provide a stable, weighted base for your gnome. Ensure the ends of the fabric are securely glued to prevent unraveling. This tightly rolled structure is the gnome’s core body.
- Cover the Body: Take your 9″ x 11″ body fabric. Apply hot glue to one long edge of this fabric and begin wrapping it around the non-woven body core. Ensure the fabric is smooth and taut as you wrap, securing the edges with hot glue. This forms the outer skin of your gnome’s body.
- Stuff the Body: Once the outer fabric is securely attached, begin filling the top portion of the body with polyfill. Stuff it firmly but evenly to create a well-rounded, plump gnome belly. Gather the open top end of the fabric tightly around the polyfill and secure it with a strong piece of string or a rubber band, tying it off securely to prevent the stuffing from coming out. This gathered area will be where the hat, beard, and arms are attached.
- Prepare Dowel Sticks for Legs: Take your ¼” x 6″ dowel sticks. Using a miter cutter or sharp utility cutters, carefully sharpen one end of each stick to a point. Then, cut each dowel stick to a length of approximately 2 inches. Set these aside; they will be used for the gnome’s legs.
Step 2: Assembling Legs, Beard, Arms, and Finishing Details
With the hat and body foundation complete, it’s time to bring your gnome to life with its characteristic features. This step focuses on adding the legs, defining the lower body, attaching the beard, creating the arms, and finally, embellishing with watermelon motifs.
- Prepare the Legs: Take your small foam twist curlers. Cut each curler to a length of about 1.5 inches. Carefully insert the sharpened end of one of your pre-cut 2-inch dowel sticks into the center of each foam curler piece. The dowel stick will provide rigid support within the foam, forming the core of the gnome’s foot and lower leg.
- Cover the Legs with Denim: Take your 2 pieces of 3″ x 1¾” jean fabric. Wrap one piece tightly around each foam curler and dowel stick assembly. Secure the denim fabric with hot glue, ensuring it covers the foam and creates a neat, boot-like appearance for the gnome’s feet.
- Attach the Legs to the Body: Locate the bottom edge of the gnome’s main body. Apply a generous amount of hot glue to the top, uncovered end of the dowel stick (where it emerges from the denim-covered foam curler). Carefully insert and press these leg assemblies into the base of the gnome’s body. Hold them in place until the glue sets firmly, ensuring the gnome can stand upright.
- Create the Lower Body’s Pants: Take the 1 piece of 2½” x 13″ jean fabric. Apply hot glue along one long edge and begin wrapping it around the lower part of the gnome’s body, just above where the legs are attached. This creates the illusion of the gnome wearing pants or a tunic, neatly covering the transition between the body and legs. Secure the ends with glue at the back.
- Define the Waist (Optional but Recommended): For added character, wrap a piece of rope or twine snugly around the gnome’s waist area, just above the “pants” and below the gathered top of the body. Tie it nicely into a knot or a bow, adding a rustic decorative touch and further defining the gnome’s shape.
- Attach the Fur Beard: Take your faux fur. Using the downloaded pattern, carefully cut out the beard shape. Remember to cut from the back of the fur with a craft knife or the tip of sharp scissors to avoid cutting too many fur fibers. Apply hot glue to the top edge of the fur beard and firmly attach it to the front of the gnome’s body, just below the gathered neck area. Ensure it’s centered and visually appealing.
- Create and Attach the Arms: Take the remaining foam twist curlers and cut them to your desired arm length. Insert a short piece of pipe cleaner into each foam curler for flexibility and poseability. Wrap each foam curler/pipe cleaner assembly with your 3″ x 7″ arm fabric, securing with hot glue to create the gnome’s arms. Apply hot glue to one end of each arm and attach them to the sides of the gnome’s body, just below the gathered neck and on either side of the beard. You can slightly bend the pipe cleaner to give the arms a natural, welcoming pose.
- Add the Nose: Glue the bead you selected for the nose directly onto the top edge of the fur beard, centered between where the eyes would be (though gnomes typically don’t have visible eyes under their hats). This gives the gnome its signature facial feature.
- Place the Hat: Gently slide the prepared fleece hat onto the gnome’s head. Adjust its position to your liking – some gnomes wear their hats low, almost covering their noses, while others have them tilted back slightly. Once you’re happy with the placement, apply a few small dots of hot glue to the inside rim of the hat and press it onto the gathered top of the gnome’s body to secure it permanently.
- Embellish with Watermelon Slices: Now for the watermelon magic! Using your felt fabric (red, green, and black), cut out small watermelon slice shapes according to the pattern or freehand. You can cut green rinds for the edges and tiny black “seeds” to glue onto the red felt. Once assembled, attach one larger watermelon slice accent to the gnome’s hat. For an extra touch of cuteness, you can attach another smaller watermelon slice to one of its arms, as if the gnome is holding it or simply showcasing it.
*All images for this tutorial are credited to Patti J. Good via YouTube. We highly recommend visiting her channel and subscribing for more inspiring and easy-to-follow DIY craft tutorials!
Bringing Summer Joy Home with Your DIY Watermelon Gnome
Congratulations! You’ve successfully crafted your very own adorable DIY Watermelon Gnome. This project is more than just a craft; it’s a way to infuse your living space with personality, warmth, and the joyful spirit of summer. Each gnome, being handmade, possesses a unique charm and character that store-bought decorations simply cannot replicate.
Your new watermelon gnome is perfectly suited to brighten up any corner of your home. Place it on your kitchen counter to add a festive touch to meal prep, set it on a bookshelf in your living room as a whimsical focal point, or let it greet guests from your entryway console. Its vibrant colors and playful design make it an instant mood booster, reminding everyone of sunny days and sweet summer treats.
Beyond personal decor, consider making a few more of these delightful gnomes as thoughtful gifts. A handmade watermelon gnome can be a wonderful present for birthdays, housewarmings, or as a simple “thinking of you” gesture to bring a smile to a loved one’s face. The effort and creativity you put into it will surely be appreciated.
We hope this comprehensive tutorial has inspired you to get crafting and unleash your inner artist. Remember, the beauty of DIY lies in the freedom to customize and personalize. Feel free to experiment with different fabric patterns, hat colors, or even add other summer-themed embellishments like tiny sunglasses or a beach ball. The possibilities are endless!
So, embrace the season, enjoy your crafting, and let your handmade watermelon gnome be a delightful symbol of summer fun and creativity in your home. Happy crafting!