
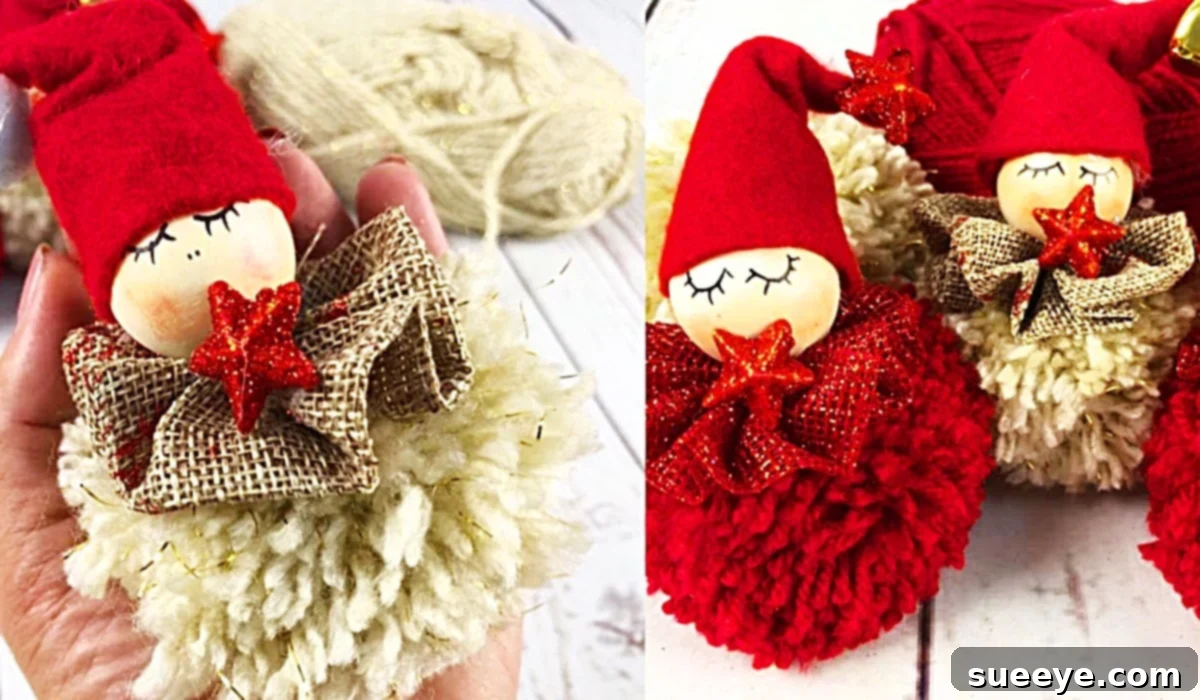
DIY Pom-Pom Angels: A Charming Guide to Handmade Christmas Decorations
The holiday season is a truly magical time, filled with warmth, joy, and the undeniable charm of handmade decorations. There’s a special allure in adornments crafted with love, bringing a unique and personal touch to your home that mass-produced items simply can’t replicate. Among the myriad of Christmas crafts, pom-pom projects consistently stand out for their delightful simplicity, incredible versatility, and sheer adorableness. As an avid crafter who loves knitting and crocheting, I always find myself with an abundance of yarn on hand, making pom-poms a fantastic, go-to method for adding decorative flair to any project.
This year, my festive crafting journey led me to a truly delightful idea: crafting charming pom-pom angels. I was instantly captivated by a gorgeous pom-pom angel video tutorial by Creative Mamy on YouTube, and I knew right away that this was a Christmas project I had to try. What makes pom-pom crafts so universally appealing is their low barrier to entry. You don’t need a lot of specialized materials or complex technical instructions. Instead, you can approach these projects with a sense of calm and creative freedom, transforming simple yarn into charming festive figures with complete ease and absolutely no drama. Let’s embark on this creative journey together and learn how to make these beautiful, serene angels that will undoubtedly add a touch of handmade elegance and whimsy to your holiday decor.
Why Craft Pom-Pom Angels for the Holidays?
Beyond their undeniable cuteness and simple charm, pom-pom angels offer a host of compelling benefits that make them a perfect holiday crafting choice. They are more than just pretty ornaments; they embody the spirit of the season through thoughtful creation:
- Budget-Friendly Decor: Often utilizing leftover yarn scraps and other inexpensive craft supplies, these angels are an economical and sustainable way to decorate your home without breaking the bank.
- Limitless Customization: With an endless palette of yarn colors, various bead options, and a plethora of embellishments, each angel can be a unique reflection of your personal style, a specific holiday theme, or even inspired by loved ones.
- Relaxing and Mindful Activity: The repetitive and rhythmic motion of making pom-poms and then carefully assembling the pieces can be incredibly therapeutic. It offers a peaceful and meditative break from the often-hectic pace of holiday preparations, allowing for a moment of calm creativity.
- Wonderful Family Project: This craft is simple enough for older children to assist with (under appropriate supervision, especially when using a hot glue gun), making it a fantastic opportunity for a multi-generational family activity that fosters bonding and creates cherished lasting memories.
- Versatile Display Options: Pom-pom angels aren’t limited to just hanging on the Christmas tree! They can beautifully adorn garlands, wreaths, mantelpieces, or even serve as delightful package toppers, unique place card holders, or thoughtful handmade gifts that carry a personal touch.
Essential Materials For Your Charming Pom-Pom Angels:
Gathering your supplies is the exciting first step in any crafting adventure. For these adorable pom-pom angels, you’ll need a few basic items, many of which you might already have tucked away in your craft stash, making this an accessible project for everyone:
- Yarn: This is the absolute star of our project! Opt for soft, medium-weight acrylic or wool yarn. Classic white, serene cream, or gentle pastel shades are perfect for achieving a traditional angel aesthetic. However, don’t hesitate to experiment with metallic yarns or brighter, bolder colors for a more contemporary or whimsical twist. You’ll need enough to create one main, fluffy pom-pom for each angel.
- Wooden Beads: These will gracefully form the angel’s head. Look for smooth, round wooden beads, typically ranging from 1 to 1.5 inches (2.5-3.8 cm) in diameter, depending on the desired scale of your angel. Natural wood tones offer a rustic charm, but you can also paint them beforehand with acrylic craft paint for a more stylized or personalized look.
- A Black Fine-Tip Marker (e.g., Sharpie): Absolutely essential for drawing delicate and expressive facial features like eyes and a sweet, simple mouth onto the wooden beads. A permanent marker ensures the details won’t smudge.
- Some Blush (or Pink Pastel/Chalk): A tiny, subtle dab of blush applied to the cheeks of your angels gives them an irresistible rosy glow, instantly adding warmth, character, and a touch of endearing sweetness.
- A Felt Sheet: This material is ideal for crafting the angel’s hat. Felt is wonderfully easy to cut, holds its shape well, and crucially, doesn’t fray, ensuring a neat finish. White, gold, silver, or a color that beautifully complements your chosen yarn would be excellent choices.
- Small Decorative Bells: These delightful embellishments add a whimsical jingle and appealing visual interest. Tiny silver or gold bells are perfect for imparting a festive and celebratory touch to your angels.
- Some Burlap Ribbon (or similar decorative trim): Used for creating a charming, rustic-inspired collar around your angel’s “neck.” For alternative looks, consider using delicate lace, elegant satin ribbon, or even thin fabric strips to match your chosen aesthetic.
- Sharp Scissors: A good pair of sharp scissors is indispensable for precisely cutting yarn, felt, and ribbon. A sharp pair will make the crucial step of trimming your pom-poms much easier and result in a tidier finish.
- Hot Glue Gun and Glue Sticks: These are vital for securely attaching the head, hat, collar, and all the decorative embellishments. (As always, please exercise caution and use a hot glue gun with adult supervision, especially with children present).
Step-By-Step Directions To Create Your Pom-Pom Angels:
Inspired by the fantastic and easy-to-follow Creative Mamy video tutorial, let’s meticulously walk through the process of bringing these adorable pom-pom angels to life. This comprehensive guide breaks down each stage into clear, easy-to-follow steps, ensuring a smooth, enjoyable, and ultimately successful crafting experience for everyone.
Step 1: Crafting the Perfect Pom-Poms for the Angel’s Body
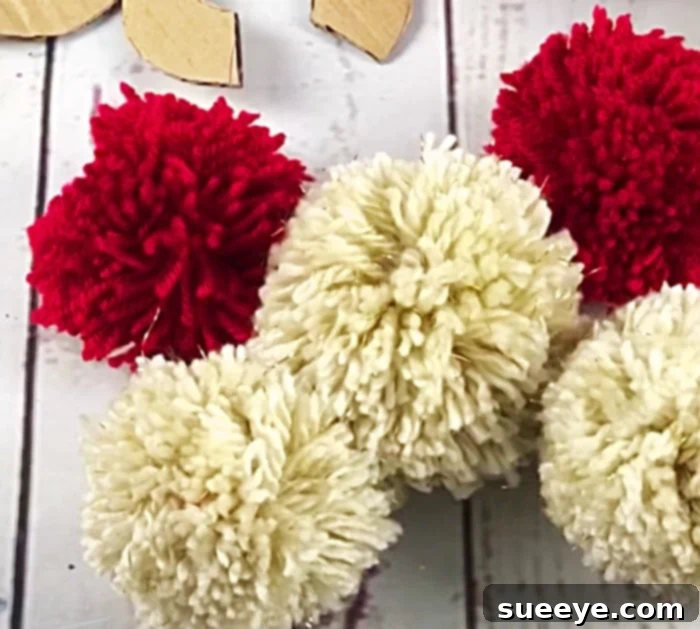
The foundation of your delightful angel is its fluffy, round pom-pom body. You’ll need to create one well-formed pom-pom for each angel you plan to make. There are several popular and effective methods for crafting pom-poms:
- Pom-Pom Maker Tool: These specialized plastic tools are incredibly user-friendly and consistently produce dense, perfectly spherical pom-poms with minimal effort. Simply follow the manufacturer’s instructions for winding, cutting, and tying.
- Cardboard Templates: A classic DIY method. Cut two identical ‘C’ or doughnut shapes from sturdy cardboard. Wrap your chosen yarn tightly and evenly around both ‘C’s until you’ve achieved the desired thickness and density. Once sufficiently thick, carefully cut the yarn along the outer edge of the ‘C’s. Then, take a separate piece of yarn and tie it tightly between the two cardboard pieces, securing the center of your pom-pom before removing the cardboard.
- Fork Method (for smaller pom-poms): This is a great technique for crafting petite pom-poms. Wrap yarn numerous times around the tines of a regular dining fork. Slide a separate piece of yarn tightly through the middle gap of the tines, tying it securely. Then, carefully slide the wrapped yarn off the fork and cut through all the loops.
Regardless of the method you choose, ensure your pom-pom is dense and beautifully full. Once tied and removed, carefully trim all the yarn loops to create a uniform, spherical shape. Don’t be shy about giving it a good “haircut” to achieve that perfect fluffy, neat look!
Step 2: Preparing the Angel’s Sweet Face
Now, let’s infuse personality into your angels by creating their endearing faces on the wooden beads.
- Select one smooth wooden bead for each angel you are crafting.
- Using your fine-tip black marker (such as a Sharpie), very carefully draw two simple dots for eyes and a small ‘V’ shape or a gentle, upward curve for the mouth. This is your chance to experiment with different expressions – some angels can be smiling joyfully, others serene, and some might even have peacefully closed eyes.
- Once the ink has dried completely (this is important to prevent smudging), take a clean cotton swab or your fingertip and apply a tiny, subtle smudge of blush to each “cheek” area on the bead. This step adds an utterly irresistible rosy glow, making your angels appear even sweeter, more charming, and delightfully lifelike.
Step 3: Assembling the Angel’s Body and Head
It’s now time to gracefully connect the fluffy pom-pom body with the sweet, expressive wooden bead head.
- Carefully identify the tie-off point of your pom-pom. This is typically an ideal and secure spot to attach the head, as the yarn strands are most tightly bound here.
- Apply a generous yet controlled dot of hot glue to the very top center of your pom-pom.
- Carefully and gently press the wooden bead onto the hot glue, ensuring it sits firmly and perfectly upright. Hold it steadily in place for a few seconds until the glue has adequately set and cooled. For an extra layer of reinforcement, you can also thread a long piece of strong yarn through the bead hole and then tie it securely to the pom-pom’s central tie-off point before applying glue.
Step 4: Designing and Attaching the Angel’s Hat
A quaint little hat will complete the angel’s charming ensemble. This is where your felt sheet comes into play.
- Cut a small circle or a semi-circle from your chosen felt sheet. For a classic conical hat, you’ll want to cut a wedge from a circle and then roll and glue it into a cone shape. For a simpler, rounded cap, a smaller circle that can be gathered at the top works perfectly. The precise size will, of course, depend on the diameter of your wooden bead head.
- Apply a thin line of hot glue around the inner rim of the felt hat. Carefully place it onto the angel’s head, ensuring it securely covers the top of the bead. Hold it gently until the glue firmly sets.
- For an additional touch of whimsy, you can glue a tiny pom-pom (created from a small amount of leftover yarn) or a miniature decorative bell to the very tip of the hat.
Step 5: Adding the Decorative Collar and Bells
These thoughtful final embellishments are what truly elevate your pom-pom angels from cute to absolutely captivating.
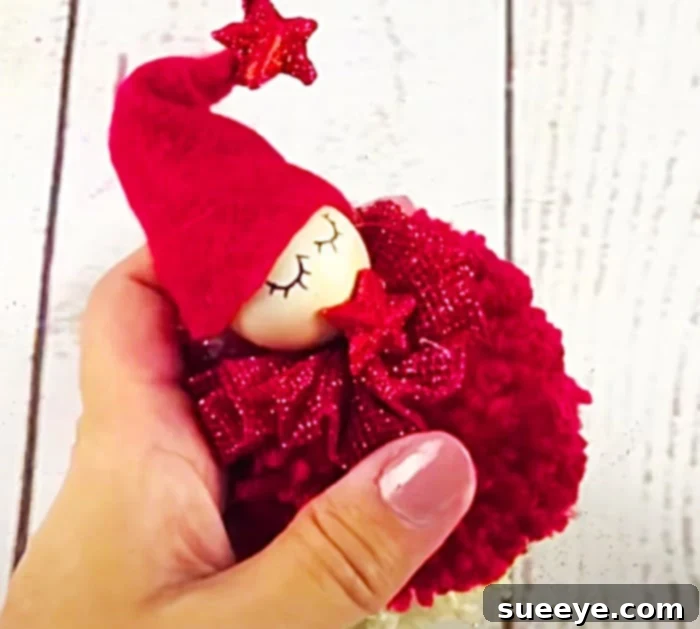
- The Collar: Take a short strip of burlap ribbon (or your preferred decorative trim). Measure it carefully to fit comfortably around the “neck” area where the wooden bead meets the pom-pom, allowing for a slight overlap. Secure the ends together at the back with hot glue, or glue it directly onto the angel. The rustic texture of burlap provides a lovely, tactile contrast to the soft, fluffy yarn.
- Decorative Bells: Utilize hot glue to attach one or more small bells. You have several placement options: a single bell can be placed at the bottom center of the pom-pom body, a few bells could be strung along the edge of the collar, or even one can be charmingly suspended from the tip of the hat. The gentle jingle will add a delightful and festive auditory element to your decorations.
Step 6: Finishing Touches and Hanging Loop (Optional)
Give your newly crafted angel a final, thorough check-over to ensure everything is perfect.
- Carefully trim any stray yarn threads from the pom-pom body or any visible excess hot glue strings for a clean and polished finish.
- If you intend to hang your angel on a Christmas tree, a festive garland, or anywhere else, thread a loop of thin yarn, invisible fishing line, or a fine metallic thread through the very top of the hat or the back of the angel’s head. Secure this loop firmly with a small knot and, for added peace of mind, a tiny dab of hot glue.
Expert Tips for Perfecting Your Pom-Pom Angels:
To ensure your pom-pom angels are as charming and well-made as possible, consider these expert tips:
- Yarn Choice Matters Immensely: For the fluffiest, most luxurious pom-poms, always choose yarns that are inherently soft, have a good amount of loft, and are easy to work with. Avoid overly thin or slippery yarns, as they can be challenging to manage and may result in less dense or shapeless pom-poms.
- Strive for Uniformity (if desired): If you are creating a set of angels for a cohesive display, try your best to make your pom-poms roughly the same size and density. Meticulously trim them with sharp scissors to ensure they are consistently round and evenly shaped.
- Ensure Secure Attachments: While hot glue is your best friend here, use it judiciously but effectively. Ensure that each component – the head, hat, collar, and any bells – is firmly and securely attached. For an extra layer of security when attaching the head, you can thread a long piece of yarn through the center of the pom-pom and then through the bead, tying it off at the top before adding a spot of glue.
- Personalize Facial Expressions: Don’t be afraid to unleash your creativity and give each angel a truly unique personality! A slightly different eye shape, a subtle change in the mouth’s curve, or even varied eyebrow angles can make a remarkable difference in their individual charm.
- Experiment with Colors and Themes: While classic white and gold angels are timeless and beautiful, consider making angels in colors that perfectly match your specific holiday decor theme. Think gentle pastels for a whimsical, dreamy touch; deep reds and greens for a rich, traditional feel; or even bold metallics and geometrics for modern elegance.
Creative Variations and Display Ideas for Your Angels:
The true beauty of DIY crafts lies in their incredible adaptability and potential for personalization. Here are some inspiring ideas to further customize your pom-pom angels and display them creatively throughout your home:
- Winged Wonders: Although this tutorial focuses on a simpler, elegant design, you can easily add beautiful wings to your angels. Cut delicate wing shapes from felt, sparkly craft foam, glitter cardstock, or even iridescent pipe cleaners and securely glue them to the back of the pom-pom body.
- Explore Different Textures: Instead of burlap, consider using fine lace for a delicate, vintage-inspired look for the collar, or a sumptuous velvet ribbon for a touch of undeniable luxury and sophistication.
- Accessorize with Finesse: Elevate your angels with tiny bows, miniature faux flowers, sparkling sequins, or a dusting of fine glitter for extra shimmer and charm. A small halo crafted from delicate gold wire or a pipe cleaner would also be a truly lovely and traditional addition.
- Varying Sizes for a Family of Angels: Create a charming “family” of angels by making pom-poms in different sizes. A larger angel could serve as a focal point or centerpiece, with smaller ones acting as delightful accompanying ornaments or accents.
- A Festive Garland of Angels: String multiple angels together on a piece of rustic twine, elegant ribbon, or fishing line to create a truly festive and eye-catching garland for your mantelpiece, doorway, stair railing, or even across a window.
- Thoughtful Gift Toppers: Attach a beautifully crafted pom-pom angel to the top of a wrapped present for a heartfelt, memorable, and unique gift embellishment that shows extra care.
- Charming Tabletop Vignettes: Arrange several of your handmade angels on a decorative tray, nestled among twinkling fairy lights, faux snow, and sprigs of evergreen for a captivating and charming Christmas vignette that brightens any surface.
Final Thoughts on Your Handmade Holiday Decor
Creating these delightful pom-pom angels is so much more than just a craft; it’s a wonderful opportunity to infuse your holiday season with deep personal meaning, heartfelt effort, and undeniable handmade beauty. They are indeed so cute and incredibly relaxing to make, transforming simple, humble materials into cherished keepsakes that will be admired for years to come. Whether they are gracefully adorning your Christmas tree, gracing a shelf with their serene presence, or lovingly given as thoughtful gifts, these adorable angels will undoubtedly bring boundless smiles and an abundance of festive cheer to everyone who beholds them.
So, gather your colorful yarn, unleash your innate creativity, and immerse yourself in the delightful and rewarding process of making your very own charming pom-pom angels. Happy crafting, and may your holiday season be thoroughly filled with warmth, immense joy, and an abundance of beautiful handmade treasures!