
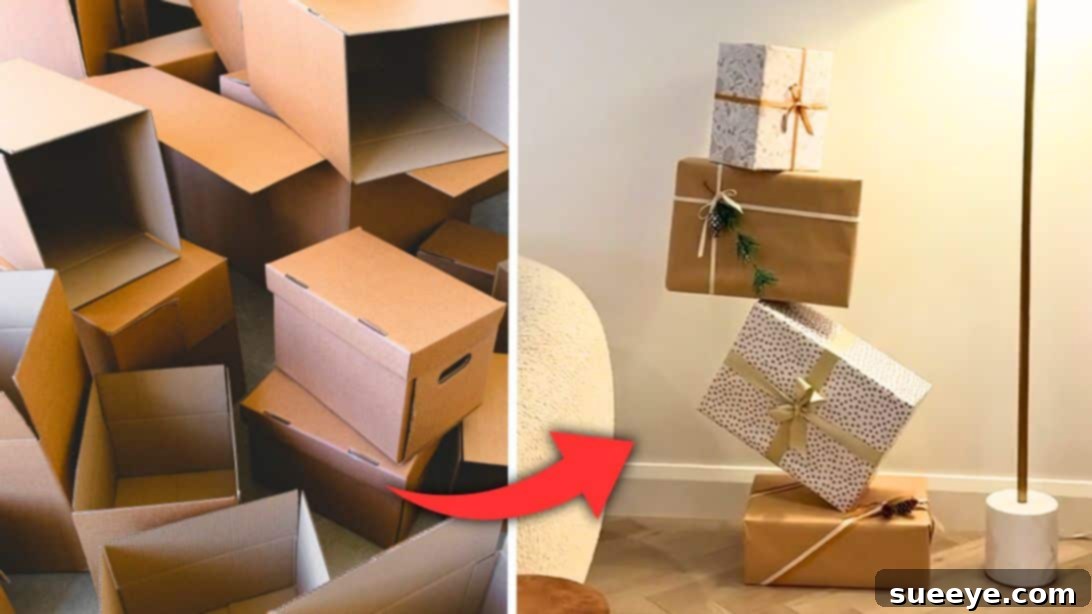
In today’s fast-paced world, online shopping has become an indispensable part of our daily lives. The convenience of having almost anything delivered right to your doorstep is undeniable, especially for those with demanding schedules. However, this modern convenience often comes with an unspoken consequence: a growing pile of cardboard boxes. While these boxes might seem like mere waste destined for the recycling bin, they hold incredible potential for creative reuse. Instead of discarding them, imagine turning these humble packaging materials into something truly spectacular for the holiday season.
This festive guide will show you how to transform those everyday cardboard boxes into an enchanting display of “floating” Christmas gifts. Inspired by brilliant ideas shared across social media, particularly from creators like piamuehlenbeck on TikTok, this DIY project offers a whimsical and sustainable way to elevate your holiday decor. It’s a fun, engaging craft that not only adds a magical touch to your home but also promotes eco-friendly practices by giving new life to otherwise discarded items. Get ready to impress your guests and infuse your space with a unique festive charm!
Beyond this captivating project, explore more creative ways to adorn your home for the holidays. For instance, discover how to craft a beautiful Hanging Christmas Ball Ornament or build your own charming DIY Tabletop Christmas Tree, complementing your floating gift display perfectly.
@piamuehlenbeck Magical DIY Decorations 🪄#christmas #homedecor #DIY #christmasdecor #christmasparty #diyproject #christmashack #christmastips #unboxing IB: @𝐆𝐚𝐛𝐫𝐢𝐞𝐥𝐚 & 𝐃𝐞𝐞✝️ 🥰
♬ original sound – Pia Muehlenbeck
Why Embrace DIY Christmas Decor This Holiday Season?
The allure of do-it-yourself (DIY) Christmas decorations goes far beyond mere cost savings. Engaging in holiday crafts offers a unique blend of benefits that enhance the festive spirit in profound ways. Firstly, it allows for unparalleled personalization. Unlike mass-produced ornaments, handmade decor reflects your individual style, family traditions, and cherished memories. This means your home will not only be beautifully decorated but will also tell a story that is uniquely yours.
Moreover, DIY projects like these floating Christmas gifts are a fantastic way to practice sustainability. By repurposing items like cardboard boxes, you actively reduce waste and contribute to a greener holiday season. It’s a mindful approach to decorating, turning what would otherwise be trash into treasured art. This eco-conscious effort aligns perfectly with the spirit of giving back, not just to loved ones, but also to our planet.
Finally, crafting together can be a wonderful family activity. It provides an opportunity to bond, create lasting memories, and unleash creativity in a fun, collaborative environment. The sense of accomplishment and pride that comes from displaying something you’ve made yourself is incredibly rewarding. So, this year, choose to infuse your home with warmth, character, and a touch of eco-friendly magic through DIY Christmas decor.
The Magical Appeal of Floating Christmas Gifts
Imagine walking into a room and seeing beautifully wrapped presents seemingly suspended in mid-air, defying gravity with a whimsical charm. This is the enchanting effect of the floating Christmas gifts display. It’s more than just a decoration; it’s a conversation starter, a focal point that instantly draws the eye and sparks wonder among guests of all ages. The illusion of weightless gifts creates a magical atmosphere, reminiscent of Santa’s sleigh or a festive dreamscape.
This unique display offers incredible versatility for your holiday styling. Place it near your Christmas tree to add an extra layer of visual interest, or let it stand alone as a captivating centerpiece in your entryway, living room, or even at a holiday party. Its dynamic and unusual form makes it suitable for various themes, from traditional festive to modern minimalist. The element of surprise and delight it brings is unmatched, making your holiday decor truly unforgettable.
Before You Begin: Planning and Preparation for Your DIY Floating Gifts
To ensure your floating Christmas gifts project is both enjoyable and successful, a little planning goes a long way. Start by gathering all your materials in one place, ensuring you have a variety of box sizes to create visual depth and interest. Consider your desired color scheme for the gift wrappers and ribbons to match your existing holiday decor. Safety is paramount, especially when working with scissors, so always exercise caution. Thinking through your design and arrangement beforehand will help streamline the crafting process, making it a truly rewarding experience.
Easy Floating Christmas Gifts Materials: What You’ll Need
Creating this captivating display requires a few simple, readily available items. Most of these can be found around your home or easily purchased at a craft store, making this an accessible project for everyone.
- Sturdy Pole Stand: This is the backbone of your floating display. Opt for a stable stand, such as a metal or wood pole with a solid base, to ensure your creation remains upright and secure. The height can vary based on your desired display size.
- Assorted Cardboard Boxes: Collect various sizes of empty boxes from your online shopping. A mix of small, medium, and large boxes will add visual interest and depth to your “floating” arrangement.
- Festive Gift Wrappers: Choose a selection of wrapping papers that complement your holiday theme and color palette. Consider different patterns and textures for added visual appeal.
- Ribbons: A variety of ribbons, including wide, narrow, wired, or sheer, will add texture and elegance to your wrapped gifts. Don’t forget bows!
- Scissors: A sharp pair of scissors is essential for cutting cardboard, wrapping paper, and ribbons precisely.
- Strong Tape: Packaging tape and double-sided tape will be your best friends for securing boxes and wrapping paper neatly.
How to Make Floating Christmas Gifts: A Step-by-Step Guide
Step 1: Preparing the Foundation – The Base Box and Pole Integration
Begin by meticulously preparing your cardboard boxes. For enhanced stability, securely close all flaps of each box using strong packaging tape. Next, select the largest and sturdiest box to serve as your base. Measure the diameter of your pole stand with precision. Using your scissors, carefully cut a hole in the absolute center of the top surface of this bottom box. This hole should be just large enough for the pole to slide through snugly, ensuring a tight fit that prevents wobbling.
If your pole stand includes a broad base plate that needs to sit flush on the floor for maximum stability, you will also need to cut a larger access hole at the back of the bottom box. This allows the stand’s base to pass through, ensuring the box rests flat on the ground and perfectly conceals the pole’s support structure. The precision in this initial step is crucial for the overall stability and professional appearance of your floating gift display.
Step 2: Crafting the Illusion – Angling and Layering
Once your bottom box is securely positioned and integrated with the pole stand, it’s time to create the magical “floating” effect with the subsequent layers. Before cutting, visualize and decide on the arrangement of your remaining boxes. To achieve that captivating gravity-defying look, tilt the second box (and subsequent boxes) at varying angles, such as a 45-degree tilt, as you slide them onto the pole. Experiment with different orientations to find an arrangement that is visually dynamic and pleasing.
For each box, meticulously measure and cut a hole in the center that precisely matches the diameter of your pole. This snug fit is paramount to prevent the boxes from wobbling or sagging, ensuring they appear truly suspended. If you don’t have a dedicated pole stand, an innovative alternative involves using a sturdy plastic or wooden stick. To anchor this, attach heavy objects (like small weights, sandbags, or bricks wrapped in fabric) around the bottom end of the stick, effectively creating a makeshift stable base that won’t move.
Step 3: Festive Transformation – Wrapping and Adornment
Now comes the fun part – transforming your cardboard boxes into beautiful Christmas gifts! Before wrapping each box, ensure you have already cut the necessary hole for the pole (as instructed in Step 1 and 2). When wrapping, mark the exact location of this hole on the gift wrapping paper. This allows you to cut a neat, corresponding opening in the paper after wrapping, ensuring a clean and professional finish that doesn’t obstruct the pole. Wrap each box meticulously, focusing on crisp edges and seamless corners.
Once wrapped, elevate their festive appeal by adding ribbons and bows. Get creative with your adornments! You can use traditional satin bows, elegant wired ribbons, or even layer different types for a richer look. Consider adding small embellishments like faux berries, miniature ornaments, or a touch of glitter for extra sparkle. The choice of wrapping paper and ribbons can significantly influence the overall theme of your floating gift display, so choose wisely to match your holiday vision.
Step 4: Assembling the Masterpiece – Stacking and Securing
With all your beautifully wrapped boxes prepared, it’s time for the grand assembly. Carefully stack each wrapped box onto the pole, starting from the bottom and working your way up. Ensure that each box is oriented according to your pre-planned arrangement, maintaining the “floating” angles you designed. The key here is to meticulously align the holes in the wrapped boxes with the pole, ensuring a secure fit without damaging the wrapping paper.
As you stack, make sure the pole is completely concealed by the boxes. The magic of this display lies in the illusion that the gifts are suspended by unseen forces, not by a visible pole. Gently adjust each box to ensure it is stable and doesn’t tilt excessively. If any box feels loose, you might consider using a small amount of hot glue or double-sided tape discreetly placed around the pole’s entry point inside the box to secure it further. Step back and admire your handiwork – a stunning, gravity-defying stack of Christmas gifts ready to enchant your holiday guests!
Customization and Personalization: Make It Uniquely Yours
The beauty of DIY projects lies in the freedom to customize. Your floating Christmas gift display can be tailored to perfectly match your home’s aesthetic or a specific holiday theme. Consider a monochromatic color scheme for a sophisticated, modern look, or unleash a riot of festive colors for a whimsical, traditional feel. Incorporate LED string lights (battery-operated for safety and ease) by weaving them through the boxes or around the pole before stacking. This will add a soft, magical glow, especially enchanting in the evenings.
You can also vary the shapes and sizes of your cardboard boxes even more dramatically to create an abstract sculpture of gifts. Add small decorative elements like pinecones, sprigs of faux holly, or glittered ornaments to the top box or nestled between layers. Different textures of wrapping paper—from glossy metallics to rustic kraft paper—can also add depth. Don’t be afraid to experiment and infuse your personality into every detail, making your display truly one-of-a-kind.
Care and Storage for Future Holiday Seasons
One of the many advantages of creating durable DIY decorations is their reusability. To ensure your enchanting floating Christmas gifts can bring joy for many seasons to come, proper care and storage are essential. When the holidays conclude, carefully disassemble the stack by lifting each box off the pole. If you used any temporary adhesive like double-sided tape for extra security, remove it gently to avoid tearing the wrapping paper.
Store each wrapped box individually in a dry, cool place, ideally nested in a larger storage container to protect them from dust and damage. You might want to label the boxes (e.g., “top,” “middle,” “bottom”) or even take a quick photo of your assembled display before disassembly to aid in reassembly next year. With a little care, your magical floating gifts will be ready to reappear and dazzle for many festive occasions.
Conclusion: Crafting Memories, One Box at a Time
Creating your own DIY floating Christmas gifts is far more than just a craft project; it’s an opportunity to infuse your home with unique holiday charm, practice sustainability, and create cherished memories. From the satisfying act of transforming ordinary cardboard into extraordinary decor to the delight of seeing your vision come to life, this project embodies the true spirit of the festive season. It encourages creativity, promotes eco-conscious living, and provides a stunning visual centerpiece that will undoubtedly captivate everyone who sees it.
So, gather your materials, embrace your inner crafter, and embark on this wonderful journey. The magic of Christmas is often found in the personal touches and heartfelt efforts we put into our celebrations. Share your beautiful creations with friends and family, and let your unique floating gift display be a beacon of holiday joy and ingenuity. Happy crafting and happy holidays!