
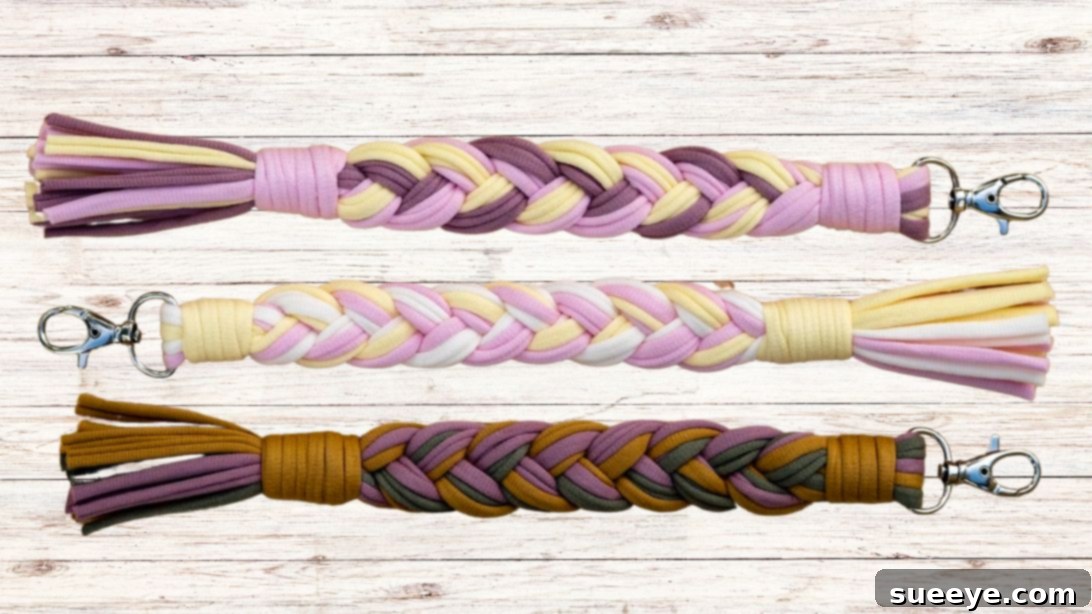
DIY Braided Keychain Tutorial: Create Colorful T-Shirt Yarn Accessories
In a world increasingly dominated by mass-produced items, there’s something uniquely charming and heartfelt about a handmade gift. These vibrant, braided keychains, crafted from soft t-shirt yarn, stand out as delightful tokens of affection for friends, thoughtful souvenirs for special events, or even as a promising venture for those looking to sell unique crafts online. Their simplicity belies their significant impact, offering a touch of personalized style to everyday essentials.
This comprehensive guide will walk you through the process of creating your very own braided keychains. Inspired by the creative ingenuity of Bantiite DIY on Youtube, we’ve expanded on the original concept to provide an even more detailed and accessible tutorial. Whether you’re a seasoned crafter or just starting your DIY journey, you’ll find everything you need to know right here. We’ll delve into selecting the perfect materials, provide step-by-step instructions with enhanced clarity, and offer valuable tips to elevate your creations. Get ready to transform simple yarn into beautiful, functional works of art that are sure to bring a smile to anyone’s face.
Why Make Your Own Braided Keychains? The Joy of Handmade Creations
Beyond their aesthetic appeal, crafting your own braided keychains offers a multitude of benefits. Firstly, it’s an incredibly satisfying creative outlet. The process of transforming raw materials into a tangible, beautiful object can be deeply therapeutic and rewarding. It allows you to express your personal style and creativity, making each keychain truly one-of-a-kind. For those who enjoy giving gifts, a handmade keychain carries an extra layer of thoughtfulness, showing the recipient the time and effort you invested. It’s a small, practical item that will be used daily, serving as a constant reminder of your bond.
Furthermore, these keychains are remarkably versatile. They can be customized with an endless array of color combinations, patterns, and embellishments to match individual preferences or specific themes. Planning a wedding or a special gathering? Braided keychains make memorable and inexpensive party favors or keepsakes. For the entrepreneurial spirit, handmade keychains represent an excellent opportunity to enter the world of online selling. Platforms like Etsy or local craft markets are perfect venues to showcase and sell your unique creations, turning a hobby into a potential source of income. This DIY project is not just about making a keychain; it’s about embracing creativity, giving thoughtful gifts, and potentially discovering a new passion or business venture.
Materials You’ll Need for Your T-Shirt Yarn Keychain Project
The beauty of this project lies in its simplicity and the accessibility of its materials. T-shirt yarn, the star of our show, is not only soft and pliable but also eco-friendly, often made from recycled fabric scraps. This makes it an ideal choice for durable yet comfortable keychains. Gather these essentials before you begin:
- Eight (8) pieces of T-shirt yarn, each 35.4 inches (approximately 90 cm) long, in various colors: The length is crucial for a substantial keychain, and having multiple colors allows for vibrant and eye-catching designs. Feel free to mix and match to create unique patterns. Ensure the yarn pieces are of similar thickness for a uniform braid.
- One (1) additional roll of T-shirt yarn (continuous length): This will be used for securing the ends of your keychain. Having it on a roll ensures you have enough length for tight, multiple wraps without worrying about running out. The color can match one of your braiding strands or provide a contrasting accent.
- Keychain clips (or key rings): Choose sturdy metal clips that can withstand daily use. Swivel lobster clasps are popular as they allow for easy attachment and detachment of keys. Ensure the opening is wide enough to accommodate the thickness of your bundled yarn.
- Crochet hook or knitting tool: A crochet hook (size 4mm-6mm is usually suitable) is essential for pulling yarn through tight loops, ensuring a secure and neat finish. A knitting tool or even a simple sturdy skewer can work as an alternative if the hook is primarily for pulling.
Before you start, lay out all your materials. This ensures everything is within reach and helps you visualize your color combinations for the braid.
Step-by-Step Guide: Crafting Your Braided T-Shirt Yarn Keychain
Follow these detailed instructions carefully to ensure a beautiful and durable finished product. Take your time with each step, paying attention to tension and neatness.
Step 1: Preparing Your Yarn and Keychain Clip
Begin by taking your eight pre-cut pieces of t-shirt yarn. Neatly fold them in half, ensuring all the ends align evenly. Once folded, carefully insert the keychain clip onto the folded middle section of the yarn bundle. Position the clip so it rests precisely at the fold, allowing the 16 yarn strands (8 doubled-up pieces) to hang freely and evenly on both sides of the clip. This step establishes the foundation for your keychain, so making sure the yarn is centered and balanced is important for the overall look.
Step 2: Securing the Yarn to the Keychain Clip with a Wrapped Knot
Now, take your continuous roll of t-shirt yarn. Unroll a significant length, but do not cut it from the roll yet. Hold the loose end of this continuous yarn against your bundle of 16 strands, just below the keychain clip. Begin wrapping the continuous yarn tightly around the bundled strands. Start from the top, just beneath the clip, and make five neat, overlapping loops downwards. Once you reach the bottom of your initial five loops, reverse direction and make another five loops going upwards, overlapping the previous ones. The goal is to create a dense, secure wrapping that firmly holds all the yarn strands in place and gives a clean finish below the clip. Ensure each loop is taut and lies flush against the previous one. After completing ten full wraps (five down, five up), cut the continuous yarn, leaving a tail of approximately 4-5 inches (about 10-12 cm). This allowance is crucial for the next step, which secures this wrapping permanently.
Step 3: Preparing for Braiding – The Foundation Loop
With the ten wraps securely in place, it’s time to lock the wrapping. Using your crochet hook, carefully insert it underneath all the wrapped loops at the top, where your wrapping began, making sure to go through the core of the yarn bundle. Take the tail end of the continuous yarn that you left as an allowance in Step 2. Hook this tail with your crochet hook and gently pull it through all the loops from the top down to the bottom. Once pulled through, tug firmly but carefully on this tail to tighten the entire wrapped section. This action cinches the wraps, preventing them from unraveling and creating a robust, professional-looking base for your braid. Trim any excess tail if it’s too long, leaving a small, neat end that blends into the keychain.
Step 4: The Art of Braiding – Creating the Main Body
To make braiding easier and to ensure consistent tension, it’s highly recommended to hook your keychain clip onto a stable object. This could be a hanger, a door handle, or even a sturdy clamp. Once secured, separate the 16 strands of t-shirt yarn into three distinct sections. The easiest way to do this is to have two sections with five strands each and one middle section with six strands, or simply aim for three roughly equal groups. Hold the left section with your left hand and the right section with your right hand, letting the middle section hang freely. Begin your braid by crossing the right section over the middle section. The right section now becomes the new middle. Next, take the left section and cross it over this new middle section. Continue this classic three-strand braiding process: right over middle, then left over middle. Maintain consistent tension with each cross-over to achieve a tight, even, and aesthetically pleasing braid. Continue braiding until you have used approximately three-quarters (3/4) of the yarn’s total length. This leaves enough unbraided yarn at the end for the final securing step.
Step 5: Finishing the Braid with a Secure Wrap
Once you’ve braided the desired length, it’s time to secure the end of the braid. Take your continuous t-shirt yarn again (the one you used for the top wrap). Similar to Step 2, begin wrapping this yarn tightly around the unbraided ends of your keychain, just below where your braid finishes. Create eleven (11) neat, overlapping loops, working your way from the bottom of the unbraided section upwards, ending at the top of the wrapped area, adjacent to the braid. As with the first wrap, ensure each loop is taut and uniform. After the eleven wraps, cut the continuous yarn, leaving an allowance of about 4-5 inches (10-12 cm). Use your crochet hook to insert it underneath the wrapped loops, starting from the bottom of the wrapped section. Hook the tail of the continuous yarn and pull it through all the loops, from bottom to top, to lock the wrapping in place. Pull firmly to secure, creating a mirror image of the top wrap. This double wrapping technique ensures both ends of your braid are robustly secured and give a polished, symmetrical look.
Step 6: The Final Trim – Perfecting Your Keychain
With both ends of your braid securely wrapped, the last step is to tidy up the loose ends. Gather all the remaining unbraided yarn strands at the bottom of your keychain. Using a sharp pair of scissors, carefully trim these ends so that they are all the same length. You can choose to cut them straight across for a clean, blunt finish, or create a slight angle or fringe effect for a more playful look. The important thing is to ensure they are uniform. This final trim adds a professional touch to your handmade keychain, completing your beautiful, braided accessory.
Tips for Crafting a Perfect Braided Keychain
Achieving a professional-looking keychain is all about attention to detail. Here are some extra tips to help you perfect your craft:
- Choosing the Right Yarn: While t-shirt yarn is recommended for its durability and texture, ensure your chosen yarn is consistent in thickness. Irregularities can lead to an uneven braid. For beginners, a slightly thicker yarn can be easier to handle.
- Maintaining Even Tension: This is perhaps the most critical aspect of braiding. Consistent tension throughout the process ensures your braid is uniform, tight, and neat. If one section is too loose or too tight, the entire braid will appear uneven. Practice makes perfect!
- Experimenting with Colors: Don’t shy away from bold color combinations. Bright, contrasting colors make the braid pop, while analogous colors create a more harmonious look. Consider using a color wheel to guide your choices.
- Secure Knotting: The wrapping at both ends of the keychain is vital for its longevity. Ensure your wraps are very tight and that the final pull-through with the crochet hook truly locks them in place. A loose wrap can unravel over time with daily use.
- Patience is Key: Especially if you’re new to braiding, take your time. Don’t rush through the steps. Enjoy the process, and you’ll be more satisfied with the final result. If you make a mistake, it’s often easy to gently undo a few braids and correct it.
Creative Ideas to Customize Your T-Shirt Yarn Keychain
Once you’ve mastered the basic braided keychain, the possibilities for customization are endless. Here are a few ideas to inspire your creativity:
- Adding Charms and Beads: Before you start braiding, string small beads onto some of the individual yarn strands. Alternatively, attach charms, tassels, or small metal embellishments to the keychain clip or the bottom fringe for extra flair.
- Varying Braid Patterns: While the three-strand braid is classic, experiment with other braiding techniques once you’re comfortable. A four-strand flat braid or even a round kumihimo-style braid could create a completely different look.
- Multi-Clip Keychains: Instead of a single keychain clip, use two or three smaller clips linked together, allowing you to attach different key sets or accessories.
- Personalized Tags: Attach a small, engraved wooden or metal tag with initials, a date, or a short message to make your gift extra special.
- Gift Packaging: Present your handmade keychains in a small, decorative pouch or on a custom-designed card. Thoughtful packaging enhances the perceived value of your handmade item, especially if you plan to sell them.
Selling Your Handmade Braided Keychains Online
If you’re considering turning your crafting hobby into a small business, braided t-shirt yarn keychains are an excellent product to start with. Here’s how you can approach selling them:
- High-Quality Photography: Take clear, well-lit photos of your keychains from multiple angles. Showcase different color combinations and how they look attached to keys or bags. Lifestyle shots can be very effective.
- Compelling Descriptions: Write engaging product descriptions that highlight the handmade quality, unique features, and the materials used. Emphasize their durability and potential as a personalized gift.
- Pricing Strategy: Calculate your material costs, the time invested (even if it’s a hobby, your time has value!), and research what similar items are selling for on platforms like Etsy. Price competitively but fairly.
- Branding: Develop a simple brand name and logo. This helps customers remember you and builds a consistent image for your products.
- Marketing: Utilize social media platforms like Instagram and Pinterest to share your creations. Engage with crafting communities and use relevant hashtags to reach a wider audience.
Conclusion: Embrace Your Creativity with DIY Keychains
Crafting these DIY braided keychains from t-shirt yarn is more than just a simple project; it’s an invitation to explore your creativity, create meaningful gifts, and even embark on an exciting entrepreneurial journey. With our detailed instructions and helpful tips, you now have all the knowledge to transform basic yarn into stylish, durable, and deeply personal accessories. Remember, each handmade item carries a piece of the maker’s heart and tells a unique story.
So, gather your materials, choose your favorite colors, and let your imagination take the lead. Whether you’re making them for yourself, for friends, or for sale, the process itself is a rewarding experience. Share your creations, inspire others, and enjoy the satisfaction of crafting something beautiful with your own hands. Happy braiding!