
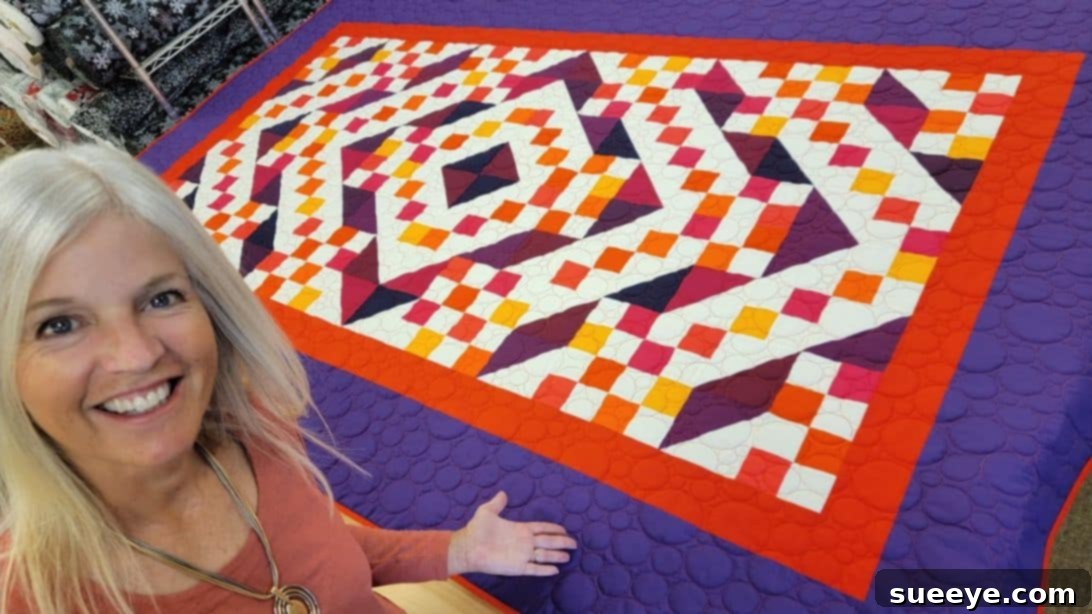
Embark on a delightful quilting journey with the captivating and surprisingly simple Plaza Quilt project, brought to life through the expert guidance of Jordan Fabrics on YouTube. This vibrant and visually stunning quilt might appear intricate at first glance, but it’s genuinely designed with simplicity in mind, making it an absolute joy for beginners and seasoned quilters alike. Many aspiring quilters, myself included, have felt a touch of intimidation when encountering complex patterns. However, Jordan Fabrics masterfully demystifies the process, transforming what seems like a challenging endeavor into an incredibly approachable and rewarding experience. Prepare to be amazed as you witness the ease with which beautiful fabric pieces come together to form a truly spectacular and personalized creation. This tutorial promises not only a gorgeous finished quilt but also a solid foundation in essential quilting techniques that will empower you for future projects. Dive in, try it for yourself, and discover the immense satisfaction of crafting a handmade masterpiece!
Why the Plaza Quilt is Perfect for Beginners
The Plaza Quilt stands out as an exceptional choice for those new to the art of quilting for several compelling reasons. Its design thoughtfully incorporates foundational quilting techniques such as Half-Square Triangles (HSTs) and Four-Patch blocks, presenting them in a manner that is easy to grasp and execute. Unlike patterns that require meticulous precision from the outset, the Plaza Quilt offers a forgiving learning curve, allowing beginners to build confidence with each stitch. The clear, step-by-step instructions provided by Jordan Fabrics eliminate guesswork, guiding you smoothly through every stage of the project. This accessibility means you can focus on mastering core skills without getting overwhelmed. Furthermore, the vibrant nature of the quilt allows for creative freedom in fabric selection, ensuring that your first project is not only educational but also a true reflection of your personal style. The joy of seeing colorful blocks rapidly transform into a cohesive and beautiful quilt top provides instant gratification, fueling your passion for future quilting adventures.
Materials and Tools for Your Plaza Quilt
Gathering the right materials and tools is the first essential step in any quilting project. For this magnificent Plaza Quilt, thoughtful selection will ensure both a smooth process and a beautiful outcome. Here’s a comprehensive list of what you’ll need, along with tips for choosing your fabrics:
- 10 Fat Quarters: These pre-cut fabric pieces (typically 18×22 inches) are perfect for adding a burst of color and variety to your quilt. Choose a diverse range of prints and solids that complement each other to achieve the vibrant “Plaza” effect. Consider patterns that include floral, geometric, or abstract designs.
- 2⅛ yards of Background Fabric: This fabric provides the canvas against which your colorful blocks will shine. A neutral color like white, cream, or a very light gray is often recommended to make the other fabrics pop, but don’t shy away from a subtle pattern if it enhances your chosen palette.
- ⅞ yard of Fabric, for the 1st Border: This inner border will frame your quilt top, providing a transition between the main blocks and the outer border. Select a fabric that either harmonizes with or subtly contrasts with your background and fat quarters.
- 2⅝ yards of Fabric, for the Outer Border: The outer border offers a grand finish to your quilt, giving it a polished and substantial feel. This fabric can be a continuation of a color from your blocks, or a bold statement piece that ties the entire design together.
- 6½ yards of Backing Fabric: The backing fabric is just as important as the front, adding comfort and durability. Choose a fabric that is wide enough to avoid piecing, or be prepared to sew two pieces together to cover the quilt’s entire back. Flannel or minky fabrics can add extra softness.
- ¾ yard of Binding Fabric: The binding is the final edge finish that encases the raw edges of your quilt. It should be durable and can either blend seamlessly with your borders or provide a crisp contrasting edge.
- Marking Pen or Pencil: Essential for drawing precise lines on your fabric for cutting and sewing. A disappearing ink pen or a chalk pencil works well.
- Rulers: Quilting rulers (preferably acrylic, with clear markings) are indispensable for accurate cutting. A large square ruler (e.g., 12.5″ or 15″) and a rectangular ruler (e.g., 6″x24″) will be highly beneficial.
- Scissors or Rotary Cutter and a Cutting Mat: While scissors can be used, a rotary cutter with a self-healing cutting mat is highly recommended for its speed and precision, especially when cutting multiple layers of fabric.
- Needle and Thread: High-quality cotton thread in a neutral color (like white, cream, or gray) is generally preferred for piecing, as it blends well with most fabrics.
- Sewing Machine: A reliable sewing machine is crucial for efficient and consistent stitching. Ensure it’s in good working order and you have a fresh needle.
- Pattern: The official Plaza Calico Carriage Quilt Designs pattern provides detailed diagrams and measurements. (Click here to download the pattern)
A Quick Note on Fabric Preparation: For best results, consider pre-washing and pressing all your fabrics before you begin cutting. This helps prevent shrinkage after the quilt is finished and ensures a smooth, wrinkle-free surface for accurate cutting and piecing.
Step-by-Step Directions for Your Colorful Plaza Quilt
Creating the Plaza Quilt is a journey of precision and creativity. Follow these detailed steps to bring your vibrant quilt to life, starting with meticulous preparation and progressing to the final touches.
Step 1: Crafting Half-Square Triangles (HSTs)
Half-Square Triangles are fundamental building blocks in quilting, offering incredible versatility in design. Mastering this technique early will serve you well in countless future projects. Begin by preparing your fabrics with utmost care. Firstly, ensure all fabrics are thoroughly pressed to remove any creases or wrinkles, providing a flat and stable surface for cutting and marking. Take one of your large background fabric squares and, using your marking pen or pencil and a ruler, carefully draw a diagonal line from one corner to the opposite corner. This line will serve as your guide. Next, take a corresponding large colored fabric square (from your fat quarters) of the same size. Place the background fabric square on top of the colored fabric square, with their right sides facing each other and all edges perfectly aligned. Pin them securely to prevent shifting during sewing. Now, with a precise scant quarter-inch seam allowance, sew a straight line down each side of the diagonal line you drew earlier. This means you will have two parallel stitch lines, one on either side of the drawn line. Once stitched, carefully cut the combined fabric unit in half directly along the marked diagonal line. When you open these two newly formed units, you will reveal two perfect Half-Square Triangles! To ensure a flat and professional finish, press the seam allowance towards the darker fabric side. This technique helps to reduce bulk where seams meet later in the assembly process, resulting in a smoother quilt top.
Step 2: Constructing Four-Patch Blocks
With your Half-Square Triangles neatly pressed and set aside, turn your attention to creating the charming Four-Patch blocks. These simple yet effective blocks add another layer of visual interest to your Plaza Quilt. Begin by gathering your small fabric squares. Take one colored square and one background square. Place them together with their right sides facing each other, ensuring that all edges are perfectly matched. Using your sewing machine, sew them together along one side with a consistent scant quarter-inch seam allowance. Once stitched, gently open the fabric unit and press the seam allowance towards the darker fabric to minimize bulk. Repeat this process with another pair of small fabric squares (one colored, one background) to create a second two-patch unit. Now you have two identical two-patch units. These will form the foundation of your Four-Patch block. The key to success here is consistent seam allowances and careful pressing, which will ensure your blocks lay flat and square.
Step 3: Assembling the Quilt Top and Finalizing Your Quilt
Now that you have your individual two-patch units ready, it’s time to bring them together to form the Four-Patch blocks and then assemble your entire quilt top. Take the second two-patch unit you just created and lay it on top of the first two-patch unit. Make sure their right sides are facing each other and the edges are perfectly aligned. Crucially, try to “nest” your seams, meaning the seam allowances of the two units should interlock slightly. This technique helps to create perfectly matched points and reduces bulk at the intersection. Sew these two units together along the common raw edge to join them. Once sewn, open the complete Four-Patch block and give it a good press, again guiding the seam allowance to one side or open, as per your preference, to achieve a flat finish. Repeat this entire process until all your remaining small squares are transformed into Four-Patch blocks. Now, refer to the Jordan Fabrics video tutorial or the pattern for the precise assembly layout. The Plaza Quilt design involves arranging your HSTs and Four-Patch blocks into two mirror-image sets. Carefully lay out your blocks on a design wall or on the floor to visualize the pattern and ensure correct placement. Once satisfied with your layout, begin sewing the blocks together into rows, and then sew the rows together to form the two main units. When you have both units complete, sew them together to create the central quilt top. Finally, to bring your project to a glorious completion, attach the first border, followed by the outer border, meticulously measuring and sewing to keep your quilt square. Next, create the quilt sandwich by layering your backing fabric, batting, and the finished quilt top. Quilt it as desired – whether with simple straight lines, intricate free-motion designs, or by hand for a traditional touch. The quilting process adds texture, stability, and character to your quilt. The very last step is to add the binding, which provides a clean, durable edge and truly finishes your magnificent Plaza Quilt. And just like that, you’re done! Stand back and admire your beautiful, handmade creation.
Tips for a Flawless Quilting Experience
Achieving a beautiful, professional-looking quilt involves more than just following steps; it requires attention to detail and patience. Here are some invaluable tips to help you on your quilting journey with the Plaza Quilt:
- Accuracy is Key: The “scant quarter-inch seam allowance” is crucial in quilting. This means your seam should be just a thread’s width less than a true quarter-inch. Practicing this will ensure your blocks come out the correct size and fit together perfectly.
- Press, Don’t Iron: While often used interchangeably, there’s a difference in quilting. “Pressing” involves lifting and placing the iron down, holding it briefly, rather than sliding it across the fabric. This prevents stretching and distortion of your fabric pieces and blocks.
- Trim Your HSTs and Four-Patch Blocks: After creating your Half-Square Triangles and Four-Patch blocks, it’s highly recommended to square them up to their exact finished size using a square quilting ruler and rotary cutter. This small step makes a huge difference in the overall accuracy and flatness of your quilt top.
- Use a Design Wall or Floor: Before sewing blocks into rows, lay out all your finished blocks on a design wall (a flannel-covered board) or a clean floor. This allows you to visualize the entire quilt top, check for color distribution, and ensure all blocks are oriented correctly before committing to stitching.
- Chain Piecing: To save time and thread, use chain piecing when sewing multiple identical units. Instead of cutting the thread after each unit, feed the next unit directly under the needle. You can then snip them apart later.
- Pinning: Don’t underestimate the power of pins! Pinning fabric pieces together, especially when joining rows or adding borders, helps to prevent fabric from shifting, ensuring seams match up precisely.
- Don’t Rush: Quilting is a meditative and enjoyable craft. Take your time with each step, especially with cutting and pressing. Rushing often leads to mistakes that are more time-consuming to fix.
- Listen to Your Machine: A well-maintained sewing machine is a happy machine. Clean your machine regularly, change your needle frequently (after every 8-10 hours of sewing, or when it starts skipping stitches), and use good quality thread.
Personalizing Your Plaza Quilt
While the Jordan Fabrics pattern provides a fantastic foundation, one of the greatest joys of quilting is the opportunity for personalization. The Plaza Quilt, with its inherent versatility, offers ample room to infuse your unique style:
- Fabric Selection: This is where your quilt truly comes alive. Experiment with different color palettes – a monochromatic scheme for subtle elegance, a vibrant rainbow for a playful look, or themed fabrics for a special occasion. Consider using fabrics from a single designer line for a cohesive feel, or mix and match for an eclectic charm.
- Contrast and Value: Pay attention to the contrast between your fat quarters and background fabric. A strong contrast makes the pattern pop, while a softer contrast creates a more blended, sophisticated look. The “value” (lightness or darkness) of your fabrics also plays a huge role in how the overall design appears.
- Quilting Designs: The quilting stitches you choose can dramatically alter the final look and feel of your quilt. Straight-line quilting can emphasize the geometric nature of the blocks, while free-motion quilting (like stippling, loops, or feathers) adds softness and texture. Consider hand quilting for a traditional, heirloom quality.
- Size Variations: The original pattern likely specifies a certain size, but you can easily adapt it. Adjust the number of blocks you make to create a smaller baby quilt, a table runner, or a larger bed quilt. Just remember to adjust your border and backing fabric requirements accordingly.
- Adding Embellishments: For a truly unique touch, consider adding small embellishments like embroidered details, decorative stitches, or even fabric paint after the quilting is complete. Be mindful that embellishments might affect the washability of the quilt.
Caring for Your Handmade Quilt
After investing your time, creativity, and love into creating your Plaza Quilt, proper care will ensure it remains a cherished item for years to come. Handmade quilts require a gentle touch, especially during washing and drying:
- First Wash: Your first wash is important for setting the stitches and allowing any residual dye to wash out. Use a mild, pH-neutral detergent and cold water on a gentle cycle. For very vibrant quilts, consider using a color catcher sheet to absorb any bleeding dyes.
- Washing Subsequent Times: For future washes, continue to use cold water and a gentle cycle. Avoid harsh detergents, bleach, or fabric softeners, as these can degrade the fabric and thread over time. If your quilt is very large, consider using a commercial-sized washing machine to avoid overcrowding and strain on the stitches.
- Drying: The best way to dry a quilt is to lay it flat on a clean surface or hang it over several lines (avoid hanging by just two corners, which can stretch it). If using a dryer, select a low-heat or air-fluff setting, and remove the quilt while it’s still slightly damp to prevent excessive wrinkling and shrinking. Over-drying can also be hard on the fabric fibers.
- Storage: When not in use, store your quilt in a cool, dry place away from direct sunlight, which can fade fabrics. Avoid storing in plastic bags for long periods, as this can trap moisture and cause mildew. Instead, use breathable cotton bags or simply fold and place it in a linen closet. Unfold and refold periodically to prevent permanent creases.
- Repairs: Accidents happen. If a seam comes loose or a fabric piece tears, address it promptly. Simple mending with a needle and thread can prevent further damage and keep your quilt looking its best.
Creating your own Plaza Quilt is more than just a craft project; it’s an opportunity to learn a timeless skill, express your creativity, and produce a beautiful, functional piece of art. With the guidance from Jordan Fabrics and these detailed instructions, you are well-equipped to embark on this rewarding endeavor. So, select your fabrics, set up your sewing machine, and prepare to be delighted by the process and the stunning outcome. Happy quilting! For more inspiring projects and expert tutorials, make sure to visit Jordan Fabrics’ YouTube channel and subscribe for an endless source of quilting wisdom and creativity.