
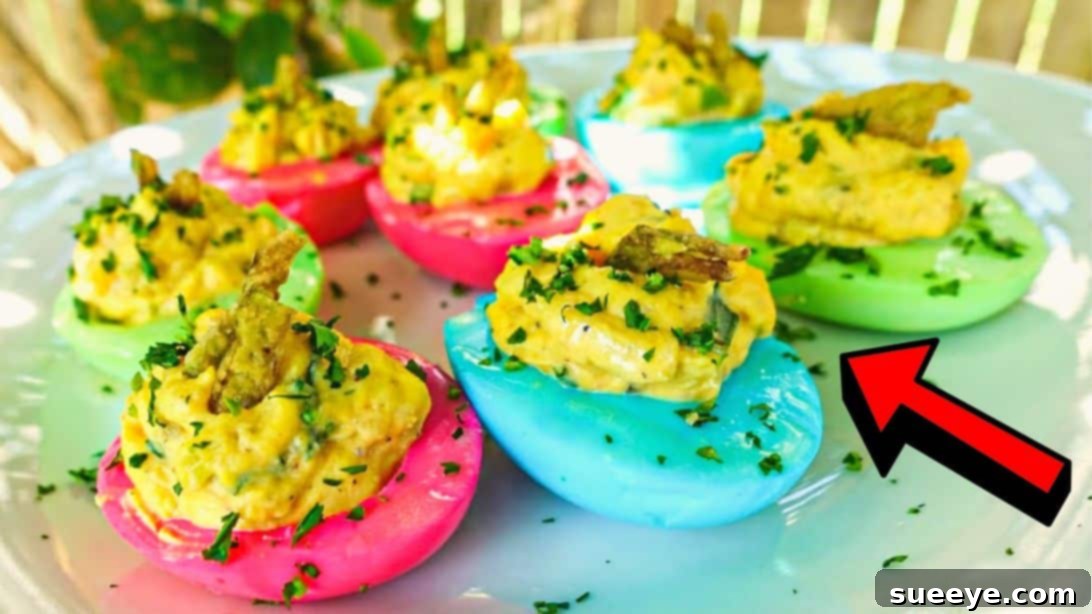
Transform your Easter gathering into an unforgettable celebration with a vibrant burst of color and flavor! These spectacular colorful deviled eggs, inspired by the creative genius of Mesha’s Corner on YouTube, are not just a treat for the taste buds but also a feast for the eyes. A timeless appetizer with a delightful modern twist, these deviled eggs are surprisingly easy to prepare, making them the perfect addition to any holiday table or spring celebration. Imagine the delight on your family’s faces as they discover a rainbow of creamy, savory goodness. What’s more, you can prepare them ahead of time, allowing the vibrant hues to truly set and creating a stunning centerpiece for your event. Whether you’re hosting a grand party or an intimate family brunch, this recipe for colorful deviled eggs is designed to impress and satisfy, offering a customizable flavor profile that even the pickiest eaters will adore. Let’s dive into crafting this festive and delicious appetizer!
Ingredients for Vibrant Deviled Eggs:
Creating these eye-catching and incredibly tasty deviled eggs requires a blend of fresh ingredients and pantry staples. The quantities provided are a guideline; feel free to adjust them to perfectly match your family’s preferences and palate. Remember, the quality of your ingredients directly impacts the final flavor, so opt for the freshest available.
- 8 large eggs (for best peeling results, use eggs that are a few days old)
- 4 tbsp creamy mayonnaise, or more for a richer, smoother filling
- 1 tbsp spicy Dijon mustard (adjust to your preferred level of tang and heat)
- 2 tbsp sweet relish (adds a delightful crunch and touch of sweetness)
- 2 tbsp pickled banana peppers, finely chopped, or more for a zesty kick
- 2 tbsp fresh scallions, finely chopped, for a mild oniony note
- ½ tsp onion powder (enhances the savory depth)
- ½ tsp garlic powder (adds a subtle aromatic warmth)
- 1 tbsp hot sauce (like Tabasco or Sriracha, for a touch of heat, optional)
- Salt and freshly ground black pepper, to taste (season generously)
- Crispy jalapeño slices, for a gourmet garnish and textural contrast
- Freshly chopped parsley, for a final pop of color and freshness
- Assorted food coloring, approximately 4 drops for every 1½ cups of water, or as needed to achieve your desired vibrant color intensity
Step-by-Step Guide to Crafting Colorful Deviled Eggs:
Step 1: Preparing Your Perfect Hard-Boiled Eggs
Achieving perfectly cooked and easily peelable hard-boiled eggs is the foundation of outstanding deviled eggs. Begin by carefully placing your eight large eggs in a single layer at the bottom of a medium-sized pot. Fill the pot with cold water, ensuring the eggs are submerged by at least an inch. Place the pot on your stove over medium-high heat and bring the water to a rolling boil. Once you observe vigorous bubbling, immediately cover the pot with a lid, then remove it from the heat. Allow the eggs to sit in the hot water, covered, for exactly 10 to 12 minutes. This method ensures a firm yet creamy yolk and prevents that unsightly greenish ring. After the resting time, quickly drain all the hot water from the pot. Immediately transfer the cooked eggs to a large bowl filled with ice water. This “ice bath” serves a crucial purpose: it stops the cooking process and causes the egg whites to contract, making them significantly easier to peel. Allow the eggs to cool completely in the ice bath for about 10-15 minutes.
Once cooled, gently tap each egg on a hard surface to crack the shell, then carefully peel away the shell under cool running water. The water helps to wash away small shell fragments and assists in separating the membrane from the egg white. Place the peeled eggs on a clean counter or cutting board lined with a paper towel. The paper towel will prevent the eggs from rolling and stabilize them for a clean cut. Using a sharp knife, carefully slice each egg in half lengthwise, ensuring a neat and even cut. Gently scoop out the bright yellow yolks and transfer them into a separate, clean mixing bowl. Keep the hollowed-out egg white halves organized and intact, as these will soon become your colorful vessels.
Step 2: Crafting the Creamy Yolk Filling and Vibrant Color Baths
Now it’s time to create the heart of your deviled eggs – the rich and creamy yolk filling. In the bowl containing the separated egg yolks, add the finely chopped scallions, sweet relish, and the zesty chopped pickled banana peppers. Incorporate the spicy Dijon mustard, your preferred amount of mayonnaise, and season generously with salt and freshly ground black pepper. Using a fork or a potato masher, thoroughly mix and mash all these ingredients together until the mixture is beautifully combined and achieves a smooth, creamy consistency. If you desire a touch of heat, now is the time to add the hot sauce. Continue to mix until the hot sauce is fully incorporated and the filling is uniform. Taste the mixture and adjust seasonings (more mayonnaise for creaminess, more mustard for tang, more salt/pepper for flavor) as needed. Set this flavorful filling aside.
Next, prepare your vibrant coloring stations. Arrange three separate bowls and fill each with approximately 1½ cups of cool water. Choose your desired food coloring shades – perhaps festive Easter pastels like pink, blue, and yellow, or bold primary colors for a striking contrast. Add about 4 drops of a different food coloring to each bowl of water. Stir each water bath thoroughly with a spoon until the color is uniformly distributed and the water is completely tinted. You can adjust the number of drops to achieve your desired color intensity; more drops will result in a deeper, more saturated hue. These colorful baths are where the magic truly happens, transforming ordinary egg whites into captivating canvases.
Step 3: Infusing Color, Piping, and Perfect Garnish
With your colorful water baths ready, it’s time to dye the egg whites. Gently place the hollowed egg white halves into each food coloring and water mixture, distributing them among the different colors. Ensure each egg white is fully submerged to achieve an even color. Allow the egg whites to soak for approximately 45 minutes. The longer they soak, the more intense and vibrant their color will become. Keep an eye on them, removing them when they reach your desired shade. Once colored, carefully remove the egg whites from their respective baths and place them cut-side down on a wire rack. Position this rack over a large container, baking sheet, or bowl to catch any excess drippings as they dry. It’s crucial to let the egg whites dry completely; this prevents any dilution of your delicious yolk filling and ensures a clean, vibrant presentation. This drying process can take anywhere from 30 minutes to an hour, depending on humidity.
While the egg whites are drying, prepare for piping the yolk mixture. Carefully transfer the prepared, creamy egg yolk filling into a piping bag fitted with a star tip for an elegant presentation, or simply use a sturdy Ziploc bag. If using a Ziploc bag, snip a small corner off the bottom to create an opening approximately ½ to ¾ inch wide. Once the colored egg whites are completely dry, take your piping bag and begin to pipe the yolk mixture into each colored egg white half. Create beautiful swirls or mounds, filling the cavity generously. For an extra touch of richness and shine, lightly brush the piped yolk mixture with a tiny amount of melted butter. This not only adds flavor but also gives a lovely sheen to your finished deviled eggs.
Finally, it’s time for the garnishes that elevate these deviled eggs from delicious to truly gourmet. Top each piped deviled egg with a few crispy jalapeño slices. These add a fantastic textural crunch and a subtle smoky heat that perfectly complements the creamy filling. For a final flourish and a burst of fresh color, sprinkle generously with freshly chopped parsley. The vibrant green of the parsley contrasts beautifully with the colorful egg whites and the yellow yolk filling, making your Easter deviled eggs an absolute showstopper. Arrange them artfully on a serving platter and prepare for compliments!
Tips for Crafting Perfectly Vibrant and Delicious Deviled Eggs:
Mastering the art of deviled eggs, especially colorful ones, involves a few key techniques and considerations. Here are some essential tips to ensure your Easter deviled eggs are always a hit:
- Choose the Right Eggs: Surprisingly, older eggs (about a week old) are much easier to peel than very fresh ones. The membrane has had time to separate slightly from the shell, preventing frustrating tears.
- Perfect Hard-Boiling: Avoid overcooking, which can lead to rubbery whites and a greenish-gray ring around the yolk. The “boil, cover, remove from heat, let sit” method ensures tender whites and creamy yolks every time.
- The Ice Bath is Crucial: Don’t skip the ice bath! It immediately stops the cooking process, which is essential for tender whites, and more importantly, it causes the egg whites to shrink slightly, making peeling incredibly easy.
- Gentle Peeling: Peel eggs under cool running water. The water helps to dislodge small shell fragments and creates a slippery surface, minimizing damage to the whites.
- Smooth Yolk Filling: For the creamiest filling, mash the yolks thoroughly before adding other ingredients. A fine-mesh sieve can be used to press yolks through for an exceptionally smooth texture, though a fork usually suffices. Ensure all ingredients are well combined and lump-free.
- Controlling Color Intensity: The longer the egg whites soak in the food coloring baths, the deeper and more saturated their color will be. For pastel shades, shorten the soaking time; for vivid colors, extend it up to an hour or even slightly longer.
- Complete Drying is Key: After coloring, allow the egg whites to dry completely on a wire rack. Any residual moisture can dilute your yolk filling or create a less appealing texture. Patience here pays off!
- Piping for Presentation: While a spoon works fine, using a piping bag (with or without a decorative tip) elevates the presentation significantly. A star tip creates beautiful, professional-looking swirls. Practice a few squeezes on a plate first if you’re new to piping.
- Make-Ahead Magic: You can prepare the egg white halves (color and dry them) and the yolk filling separately a day in advance. Store the colored whites in an airtight container in the refrigerator and the yolk filling in a sealed bag or container. Assemble just before serving for ultimate freshness.
- Food Safety First: Deviled eggs contain mayonnaise and dairy, so it’s crucial to keep them refrigerated until just before serving. They should not be left at room temperature for more than two hours.
Creative Variations & Customizations for Your Deviled Eggs:
While the classic colorful deviled egg recipe is a showstopper, one of its greatest strengths is its versatility. Don’t hesitate to experiment with different ingredients to tailor the flavors to your preference or theme. Here are some ideas to spark your culinary creativity:
- Spice It Up: Increase the hot sauce, or add a pinch of cayenne pepper, smoked paprika, or a dash of chili powder to the yolk mixture for a bolder kick.
- Herbal Infusion: Incorporate finely chopped fresh herbs like dill, chives, tarragon, or cilantro into the filling for an aromatic boost. These also add another layer of visual appeal.
- Mustard Medley: Experiment with different types of mustard. Honey mustard adds a sweet tang, while whole grain mustard offers a pleasant textural pop and a more robust flavor.
- Cheese Please: A tiny sprinkle of finely grated sharp cheddar or Parmesan cheese can add an unexpected depth of savory flavor to the filling.
- Healthy Swaps: For a lighter version, substitute half of the mayonnaise with plain Greek yogurt or a reduced-fat sour cream. This will maintain creaminess while cutting down on calories.
- Garnish Galore: Beyond crispy jalapeños and parsley, consider other garnishes. A sprinkle of paprika (sweet or smoked), a tiny sprig of fresh dill, thinly sliced radishes, a few capers, or even a small piece of cooked bacon can make a big difference in both taste and presentation.
- Kid-Friendly Fun: For younger guests, consider making a batch with milder ingredients – perhaps less mustard and no hot sauce. You could even use edible glitter or fun sprinkles on top of their deviled eggs for an extra whimsical touch.
- Mediterranean Twist: Add finely chopped sun-dried tomatoes, a hint of oregano, and garnish with a Kalamata olive slice for a Mediterranean-inspired flavor.
- Southwestern Style: Mix in a little finely diced avocado, a squeeze of lime juice, and a pinch of cumin, then garnish with a tiny cilantro leaf.
Serving and Storage Suggestions:
These colorful deviled eggs are best enjoyed chilled. Arrange them beautifully on a platter, perhaps with a bed of fresh spring greens for an added visual element. For optimal flavor and texture, serve within a few hours of assembly. If preparing in advance, keep the assembled eggs in an airtight container in the refrigerator for up to 2 days. The colored whites might slightly fade over time, but the flavor will remain excellent. If you’ve prepared the components separately, assemble them just before your event for the freshest and most vibrant results.
Make Your Easter Unforgettable with Colorful Deviled Eggs!
There you have it – a comprehensive guide to creating delicious and visually stunning colorful deviled eggs that are guaranteed to be the star of your Easter celebration or any festive gathering. This recipe, brought to us by the culinary ingenuity of Mesha’s Corner, transforms a classic appetizer into an extraordinary masterpiece. With their vibrant hues and irresistible creamy filling, these deviled eggs are more than just food; they are an experience, adding a touch of whimsy and elegance to your table. The simple steps, combined with our expert tips and creative variations, ensure that even novice cooks can achieve show-stopping results. So, gather your ingredients, unleash your creativity, and prepare to impress your guests with these delectable, make-ahead friendly, and absolutely gorgeous Easter deviled eggs. Your family and friends will surely remember this delightful and memorable addition to your holiday spread. Don’t forget to visit Mesha’s Corner on YouTube for more inspiring recipes and culinary adventures!