
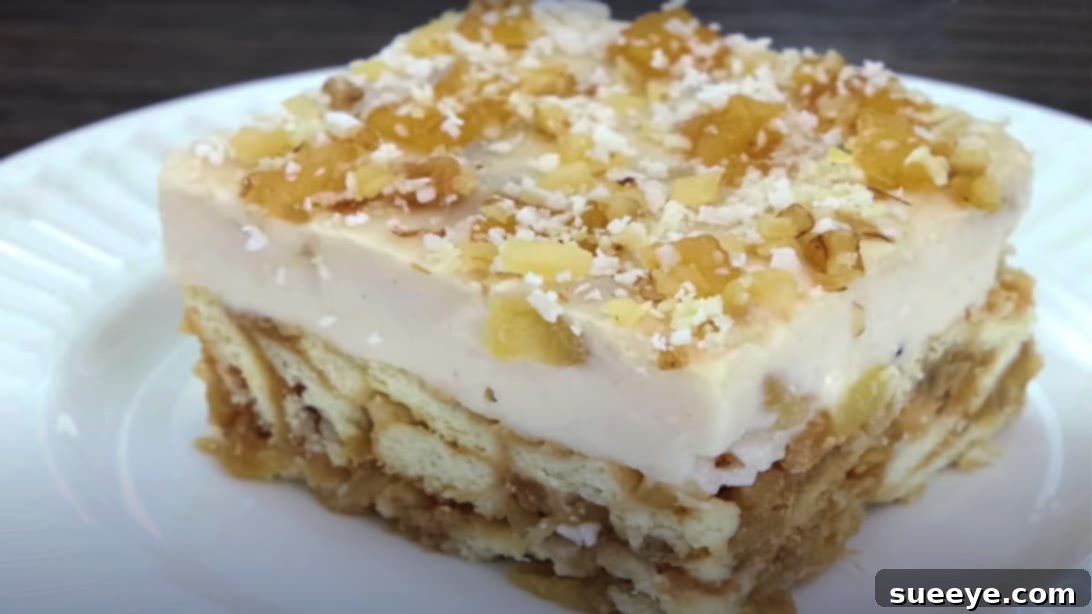
Easy No-Bake Apple Dessert: A Delightful Treat for Every Apple Lover
Are you a devoted fan of desserts, especially those featuring the crisp, sweet, and comforting flavor of apples? If so, get ready to discover your new favorite indulgence! We’re thrilled to share an incredibly simple yet utterly delicious recipe for a No-Bake Apple Dessert with Milk and Biscuits. This stress-free creation promises a delightful experience without ever needing to turn on your oven, making it perfect for both seasoned bakers and complete beginners.
Inspired by the fantastic culinary creations found on channels like Hands Touch on YouTube, this recipe is a testament to how easily you can whip up something truly special with common pantry staples. It’s a fantastic choice for those warm days when you want a cool, refreshing treat, or anytime you crave a quick, satisfying dessert without the fuss. Prepare to fall in love with its creamy texture, crunchy biscuit base, and the aromatic embrace of cinnamon-spiced apples.
Why Choose a No-Bake Dessert? The Ultimate Convenience
No-bake desserts have surged in popularity, and for good reason! Their convenience is unmatched, offering a host of benefits that make them a go-to for busy individuals and culinary enthusiasts alike. Opting for a no-bake recipe like this apple delight means:
- Time-Saving: Eliminate lengthy baking times and waiting for the oven to preheat. Most of the preparation involves simple mixing and chilling.
- Effortless Preparation: Often requiring fewer steps and specialized equipment, no-bake desserts are perfect for beginners looking to build confidence in the kitchen.
- No Oven, No Heat: Keep your kitchen cool, especially during summer months, by skipping the oven entirely. This is a game-changer when you want a refreshing treat without adding to the indoor heat.
- Versatility: Many no-bake recipes are incredibly adaptable, allowing for easy substitutions and variations based on your preferences or what you have on hand.
- Delicious Results: Don’t mistake simplicity for lack of flavor. No-bake desserts can be just as decadent and satisfying as their baked counterparts, delivering rich textures and vibrant tastes.
This particular No-Bake Apple Dessert perfectly embodies these advantages, proving that gourmet taste doesn’t always require complex techniques or extensive kitchen skills. It’s truly a sweet victory!
The Irresistible Charm of Apples in Desserts
Apples hold a special place in the world of desserts, and for good reason. Their unique combination of sweetness, tartness, and firm texture makes them incredibly versatile and a beloved ingredient in countless recipes. In this no-bake creation, apples shine as the star, contributing not just flavor but also a delightful chewiness that complements the creamy and crunchy elements perfectly.
- Natural Sweetness and Tartness: Apples offer a balanced flavor profile that can range from delightfully tart to wonderfully sweet, providing depth to any dessert. When cooked, their sugars caramelize, intensifying their natural sweetness.
- Texture Contrast: From crisp slices to soft, stewed pieces, apples provide a lovely textural contrast, especially when paired with creamy fillings and crunchy bases.
- Aromatic Qualities: Apples readily absorb and enhance the flavors of spices like cinnamon, nutmeg, and allspice, creating a warm, inviting aroma that is synonymous with comfort food.
- Nutritional Benefits: Rich in fiber, vitamins, and antioxidants, apples add a touch of wholesome goodness to your indulgence.
- Seasonal Availability: While available year-round, fresh apples are particularly abundant in the fall, making this dessert a wonderful way to celebrate the harvest season.
For this recipe, we’ll be using two different preparations of apples – grated and sliced – to build layers of flavor and texture, ensuring every bite is a delightful surprise.
Essential Ingredients for Your No-Bake Apple Delight
The beauty of this recipe lies in its simplicity and the accessibility of its ingredients. You likely have most of these items in your pantry already! Here’s what you’ll need:
Ingredients List:
- Milk: 1 cup (250 ml) – whole milk or any dairy/non-dairy alternative for creaminess.
- Cornstarch: 2 tbsp (14 gram) – the thickening agent for our creamy layer.
- Sugar: 5 tbsp (75 gram) – divided for different stages, sweetening both the apples and the milk mixture.
- Butter: 2 tbsp (30 gram) – unsalted is preferred for better flavor control, adding richness.
- Biscuits: 100 gram – plain tea biscuits, digestive biscuits, or even graham crackers work wonderfully for the base.
- Apples: 3 pieces – choose firm, sweet-tart varieties like Fuji, Honeycrisp, Gala, or Granny Smith for a tangier profile.
- Walnuts: A handful – chopped, for a delightful crunch and nutty flavor.
- Desiccated Coconut: A small amount – for garnishing and adding a tropical hint.
- Cinnamon Powder: ¼ tsp + 1 pinch – the indispensable spice that elevates apple desserts.
Understanding Key Ingredients:
Each component plays a crucial role in creating the perfect balance of flavors and textures:
- Milk & Cornstarch: These two form the backbone of our luscious, creamy pudding-like layer. Cornstarch, when heated with milk, thickens to a smooth consistency, providing the ‘pudding’ aspect without requiring eggs or complex tempering.
- Sugar: It’s not just about sweetness! Sugar helps tenderize the apples during cooking, drawing out their juices and allowing them to caramelize slightly, deepening their flavor. It also balances the tartness of some apple varieties and contributes to the overall dessert’s appeal.
- Butter: A small amount of butter adds incredible richness and a silky mouthfeel to both the cooked apples and the creamy milk layer. It helps carry other flavors and provides a luxurious touch.
- Biscuits: These humble cookies form the delightful crunchy base of our dessert. When combined with the cooked apple mixture, they soften slightly while retaining enough texture to provide an interesting contrast to the smooth top layer. Digestive biscuits or even plain vanilla wafers are excellent choices.
- Apples: The true star! Using both grated and sliced apples ensures a varied texture experience. Grated apples break down more easily, creating a softer, more integrated layer with the biscuits. Sliced apples, cooked separately, offer distinct tender pieces that add visual appeal and a different mouthfeel.
- Walnuts & Desiccated Coconut: These are primarily for garnish and texture. Walnuts add a wonderful earthy crunch and healthy fats, while desiccated coconut offers a delicate sweetness and exotic flavor. Feel free to substitute with other nuts like pecans or almonds, or skip the coconut if it’s not to your taste.
- Cinnamon: The quintessential spice for apples. Cinnamon’s warm, sweet, and woody notes perfectly complement apples, enhancing their natural flavors and adding a cozy, inviting aroma to the dessert.
Step-by-Step Guide: Crafting Your Easy Apple Dessert
Follow these detailed instructions to create your own irresistible No-Bake Apple Dessert. Remember, precise measurements and careful stirring are key to a perfect outcome!
Phase 1: Preparing the Biscuit & First Apple Layer
- Gather and Prepare All Ingredients: Before you begin, ensure all your ingredients are measured out and ready. This practice, known as “mise en place,” makes the cooking process smoother and more enjoyable. Peel all three apples.
- Break the Biscuits: Take 100g of your chosen biscuits and break them into small, irregular pieces in a large mixing bowl. You want some texture, so avoid crushing them into fine crumbs. Set this bowl aside.
- Grate and Cook Apples: Using a grater, grate two of the peeled apples (approximately 200g) directly into a non-stick pan. Place the pan over medium heat.
- Flavor the Grated Apples: To the grated apples, add 2 tablespoons of sugar, ¼ teaspoon of cinnamon powder, and 1 tablespoon of unsalted butter. Stir these ingredients continuously until they are well combined and the apples soften considerably. This process should take about 12-13 minutes. The apples will release their juices, then slowly absorb them back as they cook down and become tender and aromatic.
- Combine with Biscuits: Once the grated apple mixture is done and slightly cooled, transfer it into the bowl with the broken biscuits. Add 2 tablespoons of chopped walnuts. Using a spatula, stir everything together thoroughly until the biscuits and walnuts are evenly coated with the apple mixture.
- Form the Base Layer: Transfer this apple-biscuit mixture into a microwave-safe (or any serving) bowl or dish. Gently press and spread it evenly across the bottom to form your dessert’s base layer. Don’t press too hard; you want it firm but still crumbly. Set this aside to cool further.
Phase 2: Crafting the Creamy Milk Mixture & Second Apple Layer
- Prepare the Cornstarch-Milk Slurry: In a separate medium-sized bowl, combine 2 tablespoons of cornstarch with 1 cup of milk. Whisk thoroughly until the cornstarch is completely dissolved and there are no lumps. Set this aside.
- Slice the Remaining Apple: Take the last peeled apple and slice it into small, uniform pieces. These will be cooked briefly to add another layer of apple flavor and texture.
- Sauté Sliced Apples: Heat a clean pan over medium heat and melt 1 tablespoon of unsalted butter. Add the sliced apples and sauté for just 10-15 seconds. You want them to start softening but retain some shape.
- Sweeten and Spice Sliced Apples: Add 2 tablespoons of sugar and a pinch of cinnamon powder to the sliced apples. Continue to stir and cook on medium heat for about 8-10 minutes, or until the apple pieces become soft and translucent, and most of their juice has evaporated. The apples should be tender but still hold their shape.
- Set Aside Garnish: Once the sliced apples are cooked, set aside a small portion (about 2-3 tablespoons) in a separate bowl. These will be used for the final topping.
- Introduce the Milk Mixture: Reduce the heat to low. Stir the remaining cornstarch-milk mixture again to ensure the cornstarch hasn’t settled, then gradually add it to the pan with the cooked sliced apples. Add 1 tablespoon of sugar at this stage.
- Cook to Creamy Perfection: Stir continuously on low heat. The mixture will gradually thicken and transform into a luscious, creamy consistency. This usually takes a few minutes. Continue stirring until it’s thick enough to coat the back of a spoon. Be patient and keep stirring to prevent scorching or lumps.
- Layer the Creamy Mixture: Immediately transfer this warm, creamy apple-milk mixture over the prepared biscuit base in your serving dish. Carefully spread it evenly using a spatula, ensuring it covers the entire biscuit layer.
Phase 3: Finishing Touches and Chilling
- Garnish Beautifully: Now for the final decorative flourish! Evenly top the creamy layer with the small portion of cooked sliced apples you set aside. Then, sprinkle generously with additional chopped walnuts and desiccated coconut. This not only adds visual appeal but also provides another layer of texture and flavor.
- Chill to Perfection: This is a crucial step! Place the dessert in the refrigerator and allow it to cool and set for at least 3 hours. Chilling allows the creamy layer to firm up and the flavors to meld beautifully. For best results, an overnight chill is often ideal.
- Serve and Enjoy: Once thoroughly chilled and set, your delightful no-bake apple dessert is ready to be enjoyed! Slice into generous portions and savor every creamy, crunchy, and apple-infused bite.
Tips for Perfection and Delicious Variations
While this recipe is straightforward, a few tips can elevate your dessert to new heights. Don’t be afraid to get creative!
- Choosing the Right Apples: For a balance of sweetness and tartness, varieties like Fuji, Honeycrisp, Gala, or Pink Lady are excellent. If you prefer a tarter dessert, Granny Smith apples are a great choice.
- Biscuit Alternatives: Instead of plain biscuits, try ginger snaps for a spicy kick, shortbread for a buttery richness, or even gluten-free biscuits if catering to dietary needs. For a richer base, you can crush the biscuits finely and mix them with melted butter before pressing them into the dish.
- Spice It Up: Enhance the apple flavor by adding a tiny pinch of nutmeg or a whisper of ground cloves to the apples along with the cinnamon. A dash of vanilla extract in the milk mixture can also add depth.
- Nutty Variations: Swap walnuts for pecans, almonds, or even toasted hazelnuts for a different nutty crunch.
- Tropical Twist: If you love coconut, consider adding a tablespoon of coconut milk to the creamy layer for an extra hint of tropical flavor.
- Extra Creaminess: For an even richer creamy layer, you can replace a quarter cup of milk with heavy cream.
- Serving Suggestions: This dessert is wonderful on its own, but it also pairs beautifully with a dollop of whipped cream, a scoop of vanilla ice cream, or a light caramel drizzle.
- Storage: Store any leftovers in an airtight container in the refrigerator for up to 3-4 days.
No Bake Apple Dessert with 1 Cup Milk
This “No-Bake Apple Dessert with Milk and Biscuits” isn’t just a recipe; it’s an invitation to enjoy the simple pleasures of home cooking. Its ease of preparation, combined with its irresistible flavors and textures, makes it an ideal dessert for any occasion – from a casual family treat to an impressive potluck contribution. It’s a guaranteed crowd-pleaser that celebrates the humble apple in a refreshingly new way.
So, gather your ingredients, follow these simple steps, and prepare to delight your taste buds. This dessert proves that you don’t need fancy equipment or a lot of time to create something truly memorable. Enjoy the process, and most importantly, enjoy every delicious bite!