
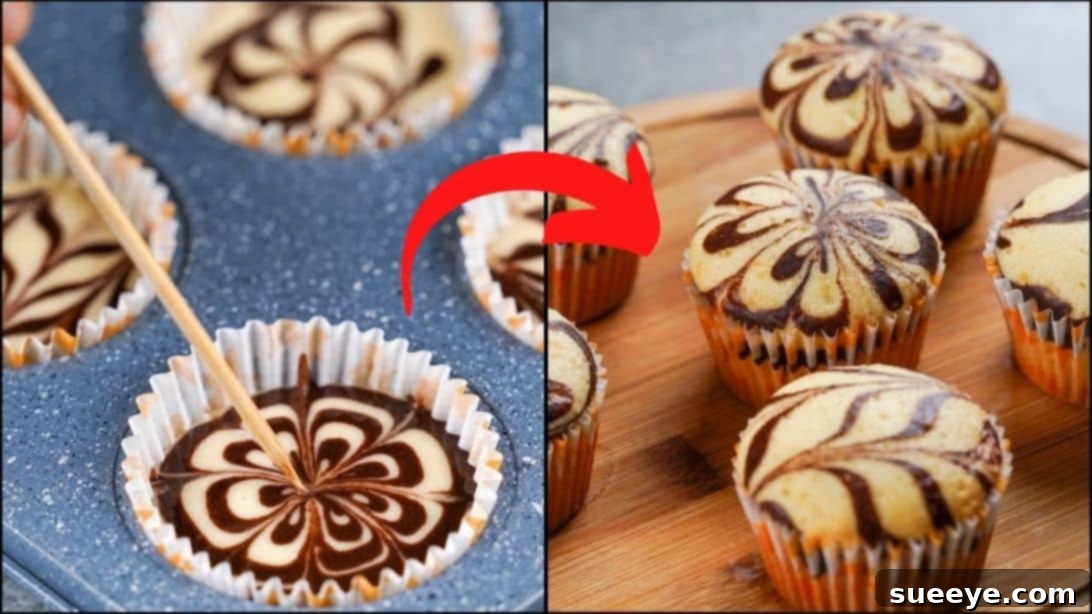
Embark on a delightful baking journey right from your kitchen with this incredible recipe for soft and fluffy marble cupcakes. Imagine biting into a delicate, moist cupcake with a beautiful swirl of vanilla and chocolate – a true feast for both the eyes and the palate! This isn’t just a treat; it’s a creative expression, offering endless possibilities for visual artistry with minimal effort. Thanks to the insightful tutorial from N’Oven – Cake & Cookies on YouTube, mastering this classic confectionery has never been easier or more enjoyable. Whether you’re a novice baker eager to expand your skills or an experienced home chef looking for a fun new project, these marble cupcakes are surprisingly simple to create, promising impressive results every time.
The magic of marble cupcakes lies in their striking appearance, achieved with nothing more than a simple stick or skewer. This technique allows you to create unique and captivating patterns, transforming each cupcake into a miniature edible masterpiece. Beyond their aesthetic appeal, these cupcakes boast an irresistibly soft and fluffy texture that melts in your mouth, making them an instant crowd-pleaser. They are perfect for any occasion – from casual family gatherings and afternoon tea parties to festive celebrations and potlucks. Prepare to impress your friends and family with these charming, homemade delights that taste as good as they look. Get ready to gather your ingredients and follow our comprehensive guide below, or watch the step-by-step video for a visual walkthrough of this exciting baking adventure.
Essential Ingredients for Your Marble Cupcakes
Creating these delightful marble cupcakes requires a careful selection of common pantry staples. Each ingredient plays a crucial role in achieving that perfect soft texture, balanced sweetness, and beautiful marbled effect. Before you begin, ensure all your ingredients are at room temperature, especially the eggs and milk, as this helps them emulsify better and results in a smoother, more uniform batter.
- 2 large eggs: Eggs provide structure, richness, and help bind the ingredients together. Using room-temperature eggs is vital for a light and airy batter, as they incorporate air more effectively when beaten.
- 1/2 cup of granulated sugar: Sugar not only sweetens the cupcakes but also contributes to their moisture, tenderness, and golden-brown crust. It also helps in aerating the eggs when creamed.
- 1/4 cup of vegetable oil: Oil keeps the cupcakes incredibly moist and tender, providing a different kind of richness compared to butter. It also helps achieve a fine, soft crumb that stays fresh longer.
- 1 teaspoon of vanilla essence: Vanilla is a foundational flavor enhancer in baking, adding a warm, aromatic note that complements both the vanilla and chocolate components of the marble cupcake.
- 1 cup of all-purpose flour: Flour is the main structural component of the cupcakes. Sifting it ensures a lump-free batter and helps incorporate air, leading to a lighter texture.
- 1 teaspoon of baking powder: This leavening agent is crucial for giving the cupcakes their rise and characteristic fluffy texture, ensuring they are light and airy rather than dense.
- 3 tablespoons and 1 teaspoon of milk: Milk adds moisture to the batter, creating a tender crumb and helping to activate the baking powder. Whole milk is generally recommended for the best flavor and richness.
- 1 teaspoon of unsweetened cocoa powder: Used to create the chocolate swirl, cocoa powder provides that distinct chocolatey flavor and color for the marble effect. Sifting it is key to prevent cocoa lumps in the batter.
Having all your ingredients measured and prepared (mise en place) before you start will make the baking process much smoother and more enjoyable, allowing you to focus on the fun parts, like creating those beautiful swirls!
Step-by-Step Guide to Baking Marble Cupcakes
Follow these detailed instructions carefully to ensure your marble cupcakes turn out perfectly soft, fluffy, and visually stunning. Patience and precision are your best friends in achieving bakery-quality results at home.
Step 1: Preparing the Egg and Sugar Base
Begin by cracking two large, room-temperature eggs into a spacious mixing bowl. Using an electric hand mixer or a stand mixer fitted with a whisk attachment, beat the eggs on medium-high speed for approximately one minute. This initial beating introduces air into the eggs, which is fundamental for a light and airy cupcake structure. Next, gradually add the 1/2 cup of granulated sugar to the beaten eggs while continuing to whisk. Increase the speed to high and continue beating for another 2-3 minutes, or until the mixture becomes pale yellow, significantly increases in volume, and achieves a fluffy, ribbons-like consistency. When you lift the whisk, the batter should fall back into the bowl in thick ribbons that slowly dissolve into the surface. This creaming process is vital for incorporating more air and creating a tender crumb.
Step 2: Incorporating Wet Ingredients
Once your egg and sugar mixture is light and voluminous, it’s time to introduce the remaining wet ingredients. Carefully pour in 1/4 cup of vegetable oil and 1 teaspoon of vanilla essence. Continue to mix on a low speed, just until these ingredients are fully combined. Be careful not to overmix at this stage; our goal is simply to integrate the liquids without deflating all the air we’ve painstakingly built up in the previous step. The oil contributes significantly to the cupcakes’ moisture and tenderness, ensuring they remain soft for days, while the vanilla essence infuses the entire batter with its classic, comforting aroma.
Step 3: Folding in Dry Ingredients and Milk
Now, we move on to building the body of your cupcake batter. Sift 1 cup of all-purpose flour and 1 teaspoon of baking powder directly into your wet mixture. Sifting is an important step as it aerates the flour, prevents lumps, and ensures even distribution of the baking powder. After sifting the dry ingredients, add 3 tablespoons of milk. Using a rubber spatula, gently fold all the ingredients together. Employ a ‘cut and fold’ technique: sweep the spatula from the bottom of the bowl upwards, turning the mixture over itself, then gently scrape down the sides. Continue folding until the batter is just combined and smooth, with no visible streaks of dry flour. The key here is to avoid overmixing, which can develop the gluten in the flour, leading to tough cupcakes. A perfectly mixed batter will be smooth, thick, and pourable.
Step 4: Preparing the Chocolate Swirl Batter
To create the distinct chocolate swirl, carefully scoop out about 2 to 3 tablespoons of your prepared vanilla batter into a separate small bowl. Into this small portion, sift 1 teaspoon of unsweetened cocoa powder. Sifting the cocoa powder is crucial to prevent any lumps from forming in your chocolate batter, ensuring a smooth and consistent color and texture. Next, add 1 teaspoon of milk to this mixture. Using a spoon or a mini whisk, mix thoroughly until the cocoa powder is fully incorporated, and you have a smooth, rich chocolate-colored batter. This small adjustment in liquid (the extra teaspoon of milk) helps maintain a similar consistency to the vanilla batter, which is important for achieving an even marble effect without one batter being too thick or thin compared to the other.
Step 5: Preparing the Muffin Tray and Filling Cupcake Liners
Before filling, prepare your muffin tray. Although you’ll be using cupcake liners, a light greasing of the muffin tin cavities with a little oil or non-stick spray can prevent the liners from sticking and make it easier to remove the cupcakes after baking. Line each cavity of a standard 12-cup muffin tray with paper cupcake liners. These liners are essential for easy handling, neat presentation, and keeping the cupcakes moist. Once the tray is ready, pour approximately three tablespoons of the plain vanilla batter into each lined cup. Aim to fill each liner about two-thirds full; this allows room for the cupcakes to rise without overflowing. After filling, gently but firmly thump the entire muffin tray on your countertop a couple of times. This simple action helps release any trapped air bubbles within the batter and ensures an even distribution, leading to a beautifully uniform and dome-shaped cupcake.
Step 6: Creating the Marble Effect
Now for the artistic part! Transfer your prepared chocolate mixture into a small piping bag. If you don’t have a piping bag, a small plastic zip-top bag with one corner snipped off will work just as well. Cut a tiny snip off one corner of the bag, creating a small opening. Gently squeeze dots or thin lines of the chocolate batter over the vanilla batter in each cupcake liner. You can create various patterns – simple dots, a zig-zag, or a few concentric circles. Don’t worry about perfection; the beauty of marble comes from its organic flow. Next, take a toothpick, a thin skewer, or even the tip of a small knife, and gently swirl it through the two batters. Move the stick in a figure-eight motion, or make small circular swirls to blend the chocolate and vanilla, creating that signature marble pattern. Be careful not to overmix, as this will cause the colors to blend completely rather than swirl. Less is often more when creating intricate marble designs.
Step 7: Baking and Cooling Your Cupcakes
Preheat your oven to 356°F (180°C). Ensuring your oven is fully preheated before placing the cupcakes inside is crucial for consistent baking and proper rise. Once the oven reaches the desired temperature, carefully place the muffin tray with your marbled cupcakes into the preheated oven. Bake for approximately 12 to 15 minutes. Baking times can vary depending on your oven, so it’s always a good idea to keep a close eye on them. To check for doneness, insert a toothpick into the center of a cupcake; if it comes out clean, they are ready. The tops should be golden brown and spring back lightly when gently touched. Once baked, remove the tray from the oven and let the cupcakes cool in the tray for about 5 minutes. This allows them to set slightly. Then, carefully transfer the warm cupcakes to a wire cooling rack to cool completely. Cooling on a rack prevents the bottoms from becoming soggy. Serve these beautiful, soft, and fluffy marble cupcakes once they are cool enough to handle, or cool them completely before frosting them with your favorite buttercream for an extra touch of indulgence. Enjoy the fruits of your delicious labor!
Soft and Fluffy Marble Cupcakes: Your Go-To Homemade Treat
Congratulations, you’ve successfully created a batch of gorgeous, soft, and fluffy marble cupcakes! This recipe proves that impressive baking doesn’t have to be complicated. With just a few simple steps and a bit of creativity, you can produce bakery-quality treats right in your own kitchen. The delightful contrast between the light vanilla and rich chocolate swirl, coupled with their incredibly moist and tender crumb, makes these cupcakes an absolute joy to eat. They’re not just a dessert; they’re an experience, perfect for brightening any day or celebrating any special moment.
Feel free to experiment with this recipe! You could try different flavor extracts in the vanilla batter, such as almond or orange, or even introduce a hint of coffee to the chocolate swirl for an elevated taste profile. For an extra touch of elegance, once cooled, these cupcakes can be adorned with a simple vanilla buttercream, chocolate ganache, or a dusting of powdered sugar. A few colorful sprinkles can also add a festive touch, making them ideal for birthday parties or holiday celebrations. Don’t hesitate to personalize your marble patterns; each swirl is unique, making every cupcake a tiny work of art.
Baking these marble cupcakes is more than just following a recipe; it’s about the joy of creation, the wonderful aromas filling your home, and the satisfaction of sharing something truly special with loved ones. Store any leftover cupcakes in an airtight container at room temperature for up to 2-3 days to maintain their freshness and moisture. We encourage you to try this fantastic recipe and share your beautiful creations. Happy baking!