
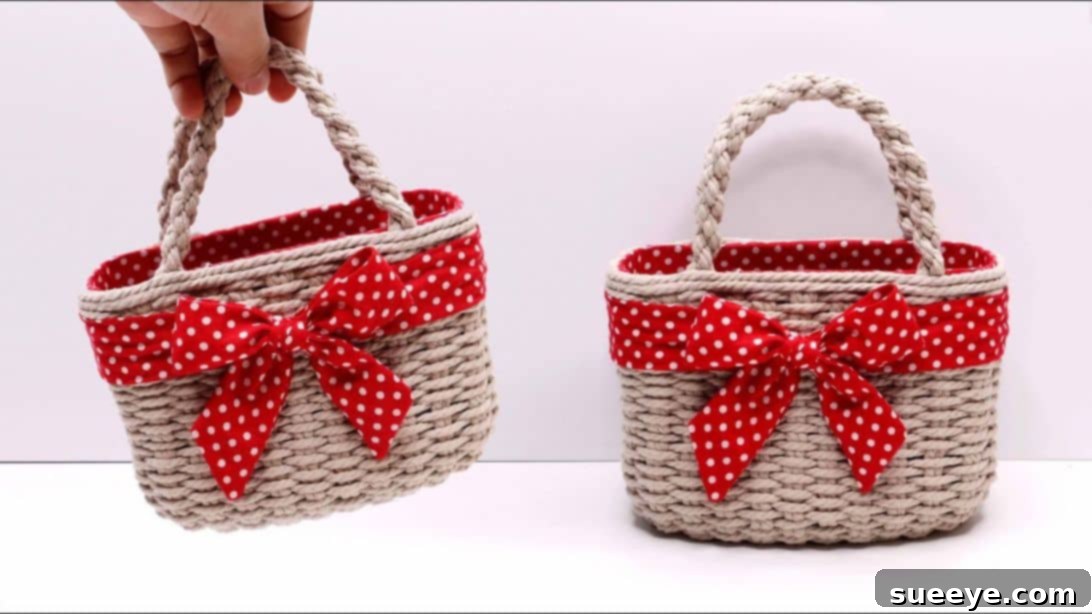
Welcome to the wonderful world of upcycling, where everyday items are transformed into beautiful and functional masterpieces! Today, we’re diving into an incredibly creative and eco-friendly project that will turn ordinary plastic bottles and simple ropes into stunning, handmade bags. This innovative DIY concept, brilliantly showcased by Lista Tsurayya, offers a fun and practical way to repurpose plastics, reduce waste, and unleash your inner artisan. Imagine crafting unique storage solutions for your small treasures, charming decorative pieces for your home, or even stylish, personalized gifts for loved ones. This comprehensive guide will walk you through every step, ensuring you have all the insights to create your very own recycled rope bag. Let’s embark on this sustainable crafting journey!
The Art of Upcycling: Transforming Plastic Bottles into Beautiful Rope Bags
In a world increasingly conscious of its environmental footprint, upcycling has emerged as a powerful movement, transforming discarded materials into valuable new products. This project is a testament to the potential of creative reuse, taking materials that might otherwise end up in landfills – plastic bottles and leftover ropes – and giving them a vibrant new purpose. Beyond its ecological benefits, this DIY rope bag project offers immense personal satisfaction. It’s an opportunity to engage in a mindful craft, develop new skills, and create something truly unique with your own hands. Whether you’re a seasoned crafter or a curious beginner, the simplicity and versatility of this project make it accessible and enjoyable for everyone.
Why Embrace This Eco-Friendly DIY Project?
Reduce, Reuse, Recycle: A Step Towards Sustainability
The core appeal of this project lies in its environmental impact. Plastic pollution is a global crisis, and by choosing to upcycle plastic bottles, you are actively participating in the solution. Each bottle transformed into a beautiful rope bag means one less item contributing to landfill waste or ocean pollution. This initiative promotes a circular economy, encouraging us to look at “waste” as a resource with untapped potential. By making conscious choices to repurpose materials, we contribute to a healthier planet and inspire others to adopt more sustainable practices.
Unleash Your Creativity and Craft Unique Accessories
Beyond its green credentials, this DIY project is a fantastic outlet for creativity. The combination of sturdy plastic, soft fabric, and tactile rope opens up a world of design possibilities. You can experiment with different rope colors, fabric patterns, and weaving techniques to create a bag that perfectly reflects your personal style. Imagine a vibrant rope bag for your craft supplies, a subtle, earthy-toned basket for your bedside table, or a playful, colorful creation for a child’s toys. Each handmade bag will carry a story, a testament to your ingenuity and dedication to sustainable living.
Cost-Effective and Accessible Crafting
One of the most appealing aspects of this project is its affordability. The primary materials – plastic bottles and cardboard – are often readily available in your home, waiting to be repurposed. Cotton fabric scraps can be sourced from old clothing or leftover projects, and cotton rope is an inexpensive craft store staple. This accessibility makes it an ideal project for anyone looking to engage in a rewarding hobby without a significant financial investment. It’s a testament to the idea that beautiful, functional items don’t require expensive supplies, just a little creativity and effort.
Essential Materials for Your Upcycled Rope Bag
Before diving into the crafting process, gather all your materials. Having everything at hand will ensure a smooth and enjoyable experience.
- Used Plastic Bottles: Opt for sturdy plastic bottles, such as those used for water or soda. Their consistent shape and rigidity will provide a stable base for your bag. Larger bottles will yield bigger bags, while smaller ones can become charming mini baskets. Clean them thoroughly and remove any labels before starting.
- Patterned Cotton Fabric: Choose a fabric that complements your desired aesthetic. Cotton is easy to work with and offers a variety of prints and colors. This fabric will be used for the inner lining and decorative elements, adding a touch of softness and visual appeal to your finished bag.
- Cotton Rope: The star of the show! Cotton rope is flexible, durable, and easy to weave. Consider different thicknesses and colors to add texture and visual interest. Natural unbleached cotton rope offers a rustic charm, while dyed ropes can introduce vibrant pops of color.
- Used Cardboard: A piece of sturdy cardboard from an old box will provide a firm base for the inside of your bag, ensuring it retains its shape and offers stability.
- Flannel: Soft flannel fabric will be used to create a cushioned bottom interior, giving your bag a professional and neat finish while protecting its contents.
- Sharp Blade or Utility Knife: Essential for cleanly cutting the plastic bottle. Always exercise extreme caution when using sharp tools and consider using a cutting mat for safety.
- Hot Glue Gun and Glue Sticks: Your primary adhesive for this project. A hot glue gun provides strong, instant adhesion, which is crucial for securing the fabric and rope in place. Ensure you have plenty of glue sticks on hand.
Step-by-Step Guide: Crafting Your Handmade Rope Bag
Step 1: Preparing Your Plastic Bottle Base
The foundation of your rope bag begins with the plastic bottle. Using a sharp blade or utility knife, carefully cut off the bottom part of your chosen plastic bottle. The height of this cut will determine the ultimate depth of your bag. Aim for a clean, even cut to ensure a stable and aesthetically pleasing base. If the edges are a little rough, you can gently sand them or trim them with scissors to create a smoother finish. Remember, safety first when handling sharp tools.
Step 2: Adding a Fabric Liner for a Polished Finish
To give your bag a neat interior and conceal the plastic edge, you’ll add a fabric liner. Apply a line of hot glue along the top edge of the *outside* of the cut plastic bottle. Carefully attach one end of your patterned cotton fabric to this glue line, pressing it firmly. Wrap the fabric around the bottle, ensuring it’s taut and smooth, and glue the side ends of the fabric together where they meet. Once the fabric is securely attached to the outside, flip the remaining fabric over the top edge and fold it inside the bottle. Secure the inner folded edge with more hot glue, creating a seamless and soft rim for your bag.
Step 3: Creating a Sturdy Base Insert
For added stability and a polished interior, we’ll create a cardboard base. Place the mouth of the cut plastic bottle onto a piece of used cardboard and trace its circumference. Cut out this traced circle from the cardboard. Now, take a piece of your chosen fabric, slightly larger than the cardboard circle, and center the cardboard on it. Glue the fabric securely around the edges of the cardboard circle, folding and neatening any excess. This fabric-covered cardboard circle will then be glued to the inside bottom of the plastic bottle, providing a firm, flat, and visually appealing base for your bag’s interior.
Step 4: Laying the Foundation: Attaching Vertical Ropes
This step initiates the distinctive rope design of your bag. Take one end of your cotton rope and secure it with hot glue to the very bottom center of the *outside* of the plastic bottle base. This will be your starting point. Now, measure a long strand of rope, roughly twice the desired height of your bag, and form a loop. Glue the base of this loop securely beside the first glued end at the bottom center of the bottle. Continue this process, forming and gluing equidistant loops all around the circumference of the bottle’s bottom edge. These vertical loops will serve as the warp threads for your weaving. Ensure they are evenly spaced and firmly attached. Once you have a full circle of loops, cut the rope.
Step 5: The Art of Weaving: Building the Bag’s Body
Now comes the truly creative part – weaving the body of your bag. Take a fresh, long strand of cotton rope. Begin by looping this rope through the vertical strands you just attached, starting from the bottom. For the first round, simply loop the horizontal rope over two vertical strands, then under the next two, and so on, working your way around the bottle. As you complete the first round, push the rope down firmly against the bottom edge. For the second round and subsequent rounds, alternate the weaving pattern. If you went “over two” in the previous round, go “under two” in this round for those same strands, creating a classic woven pattern. Continue this intricate weaving process, working your way upwards, until you reach the top edge of the plastic bottle. Ensure each round is snug and even for a beautiful, consistent texture.
Step 6: Crafting Durable and Stylish Handles
Every bag needs sturdy handles! For this, take a very long strand of rope and fold it in half. Tightly twist the two halves together to create a robust, thicker cord. Secure the ends with a dab of hot glue to prevent unraveling. Repeat this process to create a second identical twisted rope handle. Position these handles symmetrically on either side of your woven basket, using hot glue to firmly attach the ends of each handle to the top edge of the basket, blending them seamlessly with the existing fabric liner. You’ll notice some excess rope from the vertical loops protruding at the top – carefully cut these excess ropes, ensuring they are flush with the top edge of the fabric liner. To give a clean, finished look, take another piece of rope and glue it horizontally around the entire top edge, covering any raw ends of the fabric or cut ropes, and reinforcing the handle attachment points.
Step 7: Adding a Decorative Touch with a Fabric Ribbon
To infuse an extra touch of charm and personalization, create a simple ribbon from a contrasting or coordinating piece of your cotton fabric. Cut a long strip of fabric, approximately 1-2 inches wide, and tie it neatly around the basket, just below the handles. You can tie it in a simple bow or a more elaborate knot, allowing the ends to drape gracefully. This small detail can significantly enhance the overall aesthetic of your handmade bag, making it truly your own.
Step 8: Finishing the Interior with a Flannel Base
For a soft, protective, and professional finish inside your bag, you’ll add a flannel base. Cut an oval or circular piece from your flannel fabric, ensuring it’s slightly larger than the fabric-covered cardboard base you glued in Step 3. This will allow it to slightly curve up the sides of the interior. Apply hot glue to the underside of the flannel and carefully press it into place at the bottom of the bag, covering any visible glue lines or imperfections. This final touch provides a soft cushion for your items and completes the polished look of your upcycled rope bag.
Expert Tips for a Flawless DIY Rope Bag
To ensure your project is a resounding success, consider these expert tips:
- Choosing Your Materials Wisely: While cotton rope is recommended, feel free to experiment with other types like jute, hemp, or even braided yarn for different textures and looks. The fabric choice can completely transform the bag’s character, so select patterns and colors that speak to you.
- Mastering the Hot Glue Gun: Hot glue sets quickly, so work in small sections. Apply glue, then immediately press the material into place. For stronger bonds, hold the pieces together firmly for a few seconds. Always be mindful of the hot nozzle and molten glue to prevent burns.
- Patience and Precision are Key: Crafting is an art that rewards patience. Take your time with each step, especially when cutting the bottle and weaving the rope. Even spacing and consistent tension in your weaving will result in a much more attractive and durable bag.
- Personalizing Your Creation: Don’t stop at the basic design! Consider adding beads, embroidery, or even small charms to your bag. You could also use different colored ropes for distinct stripes or patterns in your weaving. The possibilities for personalization are endless.
Beyond the Bag: Variations and Creative Uses
This versatile technique isn’t limited to just making bags. Once you’ve mastered the basics, you can explore numerous variations:
- Different Sizes, Different Functions: Use smaller bottles for desk organizers or jewelry holders. Larger detergent bottles can become robust laundry hampers or toy storage bins.
- Experiment with Weaving Patterns: Explore different weaving techniques beyond the simple over-under. Basketry offers a rich array of patterns that can add complexity and beauty to your creations.
- Add Practical Closures: For a more secure bag, consider adding a zipper, a button-and-loop closure, or even a drawstring made from a coordinating fabric.
- Decorative Embellishments: Embellish your bags with fabric flowers, tassels made from leftover rope, painted designs, or even small mirrors for added flair.
- Upcycled Planters or Storage Bins: Without handles, these woven plastic bottle creations make charming indoor planters (add drainage holes!) or stylish storage bins for craft supplies, remotes, or kitchen essentials.
Conclusion: Embrace Sustainable Crafting with Your DIY Rope Bag
Creating beautiful bags from plastic bottles and ropes is more than just a craft project; it’s a statement. It’s an affirmation of creativity, sustainability, and the joy of making something with your own hands. This project, inspired by the ingenious Lista Tsurayya, transforms waste into wonder, offering a practical solution to plastic pollution while providing you with a unique, handmade accessory or storage item. We hope this detailed guide empowers you to embark on your own upcycling adventure. Gather your materials, follow these steps, and delight in the process of turning discarded plastics into cherished treasures. Happy crafting, and thank you for choosing to make a positive impact on our planet, one beautiful rope bag at a time!