
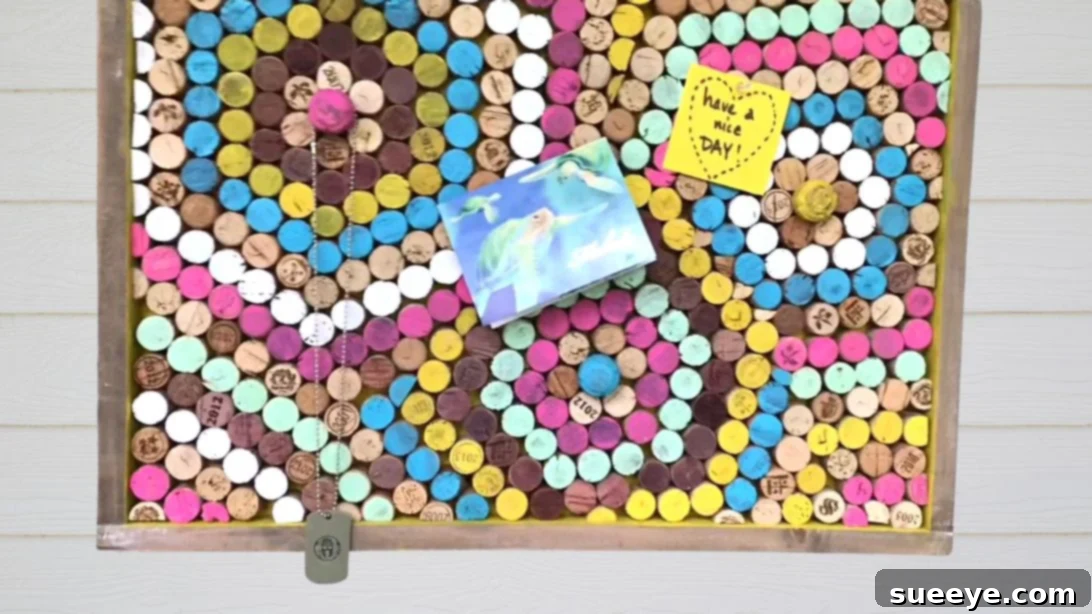
DIY Wine Cork Board: Repurpose, Organize, and Decorate with Style
Welcome to the ultimate guide for transforming your collection of cherished wine corks into a beautiful and incredibly useful piece of home decor! This craft project stands out as an exemplary method for repurposing wine corks, blending creativity with practicality. Imagine a vibrant board where you can elegantly hang your favorite necklaces, pin up important reminders for the week ahead, or simply display an inspiring quote to brighten your day. This ingenious DIY wine cork board idea comes courtesy of Kimo Craft on YouTube, a true artisan known for creating beautiful, fun, and accessible art projects that anyone can easily recreate at home. Join us as we dive into the instructions to craft your own unique and eco-friendly memo board.
Beyond its aesthetic appeal, this project offers a fantastic way to engage in sustainable crafting by giving new life to items that would otherwise be discarded. It’s an opportunity to create something truly personal, a functional piece of art that reflects your style while helping you stay organized. Whether you’re a seasoned crafter or a complete beginner, the steps are straightforward and the result is profoundly rewarding. Let’s gather our materials and embark on this exciting journey of transforming simple corks into a decorative and purposeful masterpiece.
Materials Needed:
Before we begin, ensure you have all the necessary items at hand. Having everything prepped will make the crafting process smooth and enjoyable.
- A generous collection of wine corks (the more, the merrier, allowing for design flexibility)
- 3 champagne corks (these will serve as unique focal points)
- An old or new frame with a distinct border (the size will dictate your board’s dimensions)
- Bright craft paints in various colors: yellow, pink, white, light green, and blue (feel free to choose colors that match your decor)
- A quality paintbrush
- A paper plate (for mixing paints and easy cleanup)
- A pot for boiling water
- A clean cloth or sponge
- E6000 adhesive (for a strong, long-lasting bond)
- Hot glue gun and glue sticks (for instant tack and initial placement)
Having these materials ready will set you up for success in creating a durable and visually appealing cork board that you’ll cherish for years to come.
Step-by-Step Instructions: Crafting Your Wine Cork Board
Follow these detailed instructions carefully to ensure the best results for your DIY wine cork board. Each step is designed to guide you through the process, from preparing your corks to assembling the final decorative piece.
Step 1: Soften and Prepare Your Wine Corks
The first crucial step in this project is to prepare your wine corks for slicing. This process ensures they are pliable and easy to work with, preventing them from crumbling or breaking when cut. Fill a pot with enough water to fully submerge your wine corks and bring it to a rolling boil. Once the water is vigorously boiling, carefully place your wine corks into the pot. Allow them to simmer for approximately 10 minutes. This boiling process helps to rehydrate and soften the corks, making them much easier to slice cleanly in half. After 10 minutes, use tongs to carefully remove the corks from the hot water and place them on a heat-safe surface or a cloth to cool down slightly. They should still be warm and plump, but cool enough to handle safely without burning your fingers. This brief cooling period is essential for safe handling in the next step.
Step 2: Precisely Slice Your Wine Corks in Half
With your corks softened and still slightly warm and plump from the boiling process, it’s time to slice them. This condition is optimal as it prevents cracking and allows for a smoother cut. Place your fingers firmly on both sides of a wine cork to secure it, then, using a sharp craft knife or utility knife, carefully slice it down the middle, lengthwise. The goal is to create two equal halves, each with a flat side that will sit flush against your frame’s base. Exercise caution and always cut away from your body to prevent accidents. Repeat this process for all your wine corks. Having uniform halves is key to creating a neat and professional-looking cork board surface. Take your time with this step to ensure clean and even cuts.
Step 3: Prepare and Paint Your Frame Base
Now, let’s turn our attention to the foundation of your cork board: the frame. Begin by thoroughly cleaning the frame to ensure optimal paint adhesion. Take your chosen frame and prepare your craft paint. Pour a small amount of bright yellow craft paint onto your paper plate. Using your paintbrush, apply an even coat of yellow paint to the base and the inner edges of the frame’s border. This yellow serves as a vibrant and cheerful backdrop for your corks, creating a sunny disposition for your finished board. However, feel free to choose any base color that complements your intended design or existing home decor. Ensure complete coverage and allow the paint to dry thoroughly according to the manufacturer’s instructions before proceeding to the next step. A second coat might be necessary to achieve a perfectly opaque and smooth finish.
Step 4: Add Color to Your Corks
This is where your cork board truly begins to come to life with a splash of color! Dip a clean cloth or sponge into the yellow craft paint you used for the frame. Gently dab and paint the top (rounded) surface of a selection of your sliced wine corks. The cloth method creates a soft, textured finish. Continue this process with your other chosen colors—pink, white, light green, and blue—applying them to different batches of wine corks. It’s important not to paint all of them; leaving some natural or only painting specific areas will add variety and visual interest to your final design. Once you’ve painted your desired number of wine cork halves, set them aside to dry completely. Next, retrieve your three champagne corks. These will serve as special accents. Paint each one individually with blue, pink, and yellow paint, ensuring you only paint the sides and top, leaving the bottom flat part unpainted. This untouched bottom surface is crucial for strong adhesion to the frame.
Step 5: Assemble Your Decorative Cork Board Design
Now comes the most exciting part: assembling your unique cork board! This step allows for immense creativity and personal expression. Start by taking one of your painted champagne corks—let’s use the pink one as your initial focal point. Apply both E6000 adhesive (for its strong, permanent bond) and a dab of hot glue (for instant tack and secure initial placement) to its unpainted bottom. Carefully position and press it firmly onto the upper right side of your painted frame. This champagne cork will act as the anchor and center for a section of your design. Working outwards from this central cork, begin arranging your sliced wine corks. Start by placing some of the unpainted cork halves around the pink champagne cork, creating a natural contrast. Next, incorporate corks with the side stained by wine facing upwards, adding a touch of rustic charm and unique texture. Then, integrate your yellow-painted corks, followed by the other colored corks, allowing your pattern to emerge organically. Repeat this process for the remaining two champagne corks, positioning them strategically on the board to create additional focal points. You can experiment with various color combinations and arrangements—a radial pattern, a random mosaic, or even organized rows. Don’t be afraid to try different layouts before permanently gluing them down. As you fill the frame, you’ll inevitably encounter smaller gaps. For these spaces, simply take a wine cork half and trim it to size with your craft knife to ensure a snug and seamless fit. This attention to detail will give your cork board a polished, professional finish. Keep filling around each champagne cork and throughout the frame until the entire base is covered. Press each cork firmly into place, allowing adequate drying time, especially for the E6000, to ensure a lasting bond. Your custom-designed wine cork board is now taking shape!
The Benefits of Your New DIY Wine Cork Board
Congratulations! You’ve successfully created a unique and highly functional piece of art. Your new DIY wine cork board offers a multitude of benefits, making it more than just a decorative item:
- Sustainable & Eco-Friendly: By repurposing wine corks, you’re contributing to a greener planet, reducing waste, and giving new life to materials that would otherwise be discarded. It’s a fantastic example of upcycling at its best.
- Exceptional Organization: This board is perfect for pinning up notes, important reminders, shopping lists, or even small photos. It keeps your essential information visible and organized, decluttering your countertops and desks.
- Stylish Home Decor: The vibrant colors and unique texture of the corks add a rustic yet modern charm to any room. It’s a conversation starter and a true reflection of your personal style.
- Versatile Display: Beyond notes, you can use pushpins to hang lightweight jewelry like necklaces and bracelets, keeping them untangled and easily accessible. It also makes for a lovely display area for postcards or small art prints.
- Personalized & Unique: No two cork boards will ever be exactly alike. Your choice of colors, arrangement of corks, and frame style make this a truly one-of-a-kind creation that showcases your creativity.
- Wonderful Gift Idea: A handmade wine cork board makes for a thoughtful and personalized gift for friends, family, or teachers. It’s both practical and sentimental, perfect for housewarmings, birthdays, or holidays.
Pro Tips for Your DIY Wine Cork Board Project
To ensure your crafting experience is enjoyable and your finished board is perfect, consider these additional tips:
- Cork Collection: If you don’t have enough corks, ask friends and family to save them for you, or check with local wineries and restaurants, which often have an abundance of corks they’re willing to give away. You can also purchase bulk corks online.
- Safety First: Always use extreme caution when working with sharp knives and hot glue guns. Ensure your cutting surface is stable and always cut away from your body.
- Adhesive Drying Time: While hot glue provides instant adhesion, E6000 takes time to cure. Allow your assembled board to sit undisturbed for at least 24-72 hours to ensure the strongest possible bond before hanging or using it extensively.
- Experiment with Design: Don’t feel limited to the exact pattern shown. Try creating patterns like stripes, chevron, or even a mosaic. Mix and match painted and unpainted corks for different effects.
- Clean Your Corks: If your corks are particularly dirty or stained, a quick wash with mild soap and water, followed by thorough drying, can help them look their best before painting and gluing.
- Frame Choice: Consider the weight of your finished board. A sturdy frame will be essential to support the weight of the corks.
Your Creative Journey: From Corks to Canvas
Embarking on this DIY wine cork board project is more than just a craft; it’s an enjoyable journey that culminates in a functional and visually appealing masterpiece for your home. You’ve transformed simple, discarded wine corks into a practical organizing tool and a beautiful piece of art, all while embracing the principles of sustainability and creative reuse. The vibrant colors, unique textures, and personalized design of your new cork board will undoubtedly add character and charm to any space—be it your kitchen, home office, entryway, or craft room.
Kimo Craft’s ingenious idea provides endless possibilities for customization, allowing you to tailor the board to perfectly match your decor and personal taste. Whether you use it to display precious memories, keep track of daily tasks, or simply as a decorative accent, this wine cork board stands as a testament to your creativity and resourcefulness. So, gather your supplies, unleash your inner artist, and enjoy the immensely satisfying process of creating something truly special. We encourage you to share your unique creations with others and inspire a wave of eco-friendly crafting!