
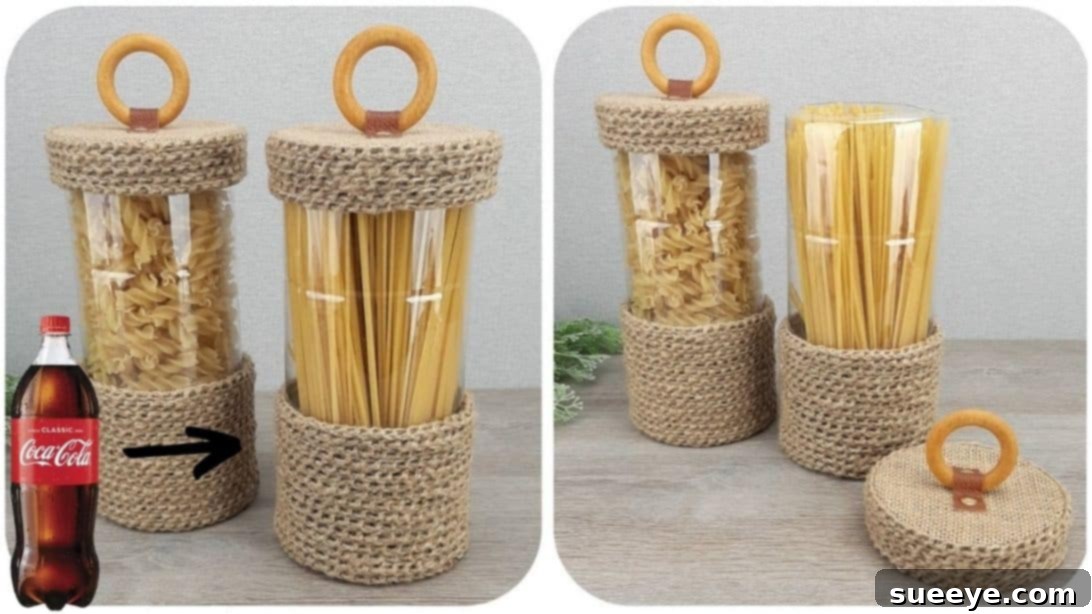
In a world increasingly focused on sustainability and mindful consumption, transforming discarded items into valuable household essentials has become a popular and rewarding endeavor. Why simply throw away old plastic bottles when they can be reimagined into stunning, practical, and eco-friendly storage solutions? This innovative DIY project guides you through the process of upcycling ordinary plastic bottles into chic, decorative containers that are virtually unrecognizable as recycled goods. Far from looking handmade, your finished creation will possess the elegance and appeal of a store-bought item, adding a touch of rustic charm and organized beauty to any space.
This ingenious crafting idea, inspired by the creative minds behind Супер Идейка on YouTube, offers a simple yet incredibly effective way to reduce waste while unleashing your inner artisan. It’s an accessible project perfect for crafters of all skill levels, providing a fulfilling experience and a beautiful end product that serves multiple purposes. Get ready to embark on a journey of transformation, turning potential trash into treasured décor with just a few readily available materials and a touch of creativity.
Materials for Your Upcycled Container:
- Large Plastic Bottles (e.g., 2 to 2.25 liters)
- Sturdy Cardboard (recycled boxes work great!)
- Water-based Acrylic Paint (brown or a color of your choice)
- Jute Twine (for decorative wrapping)
- Sackcloth (or similar rustic fabric)
- Sharp Scissors or Craft Knife
- Double-Sided Tape
- Wooden Rings (for the lid handle)
- Leather Strips (small pieces for handle attachment)
- Thumbtacks (decorative or for reinforcement)
- Glue Gun and Hot Glue Sticks
- Wet Cloth or Sponge (for cleaning and painting)
- Cloth Iron (for smoothing edges)
- Pencil or Marker (for tracing)
Step-by-Step Guide to Crafting Your Chic Container:
Step 1: Preparing the Bottle and Crafting the Base Structure
Begin by thoroughly preparing your plastic bottle. Remove all labels, then use a wet cloth or sponge to scrub away any lingering sticky residue, ensuring the surface is clean and smooth for subsequent steps. Precision is key here: carefully cut and remove the upper curved section of the bottle, leaving a straight, even cylinder. To ensure safety and a professional finish, gently heat the newly cut raw edges of the bottle’s opening by pressing them against the warm soleplate of a cloth iron. This slight melting will smooth and slightly curl the plastic, preventing sharp edges.
Next, prepare the cardboard base that will give your container its solid structure and unique aesthetic. Measure and cut a piece of sturdy cardboard. This strip should be long enough to wrap completely around the circumference of your bottle and approximately 4 inches wide. Apply strips of double-sided tape horizontally along the bottom, middle, and top edges of one side of the cardboard. Carefully attach this cardboard strip to the bottom section of the plastic bottle, wrapping it tightly and evenly. Once secured, use scissors or a craft knife to trim away any excess cardboard protruding from the bottom, creating a flush base.
To create the container’s lid, flip the removed top portion of your plastic bottle and place its rim onto a piece of cardboard. Trace around the rim with a pencil or marker to get a perfect circle, then carefully cut it out. This will form the top surface of your lid. Now, cut another cardboard strip, approximately 2 inches thick. Attach this strip around the outer edges of the round cardboard lid piece using hot glue, forming a raised lip. Trim any excess cardboard and securely join the ends of the strip with hot glue, ensuring a neat, sturdy lid frame.
Before proceeding with painting, prepare your jute twine. You can either intricately crochet the twine into a desired pattern for a more elaborate look or simply braid several strands together for a rustic, robust cord. Set this aside for later use. Now, using a sponge, apply water-based brown acrylic paint (or your chosen color) to all the cardboard-covered areas of the bottle and the entire cardboard lid structure. The sponge technique helps create a textured, opaque finish, effectively disguising the cardboard beneath. Allow the paint to dry completely before moving on.
Step 2: Adding Texture, Embellishments, and the Finishing Touches
With the painted cardboard dry, it’s time to add the tactile elegance of sackcloth. Apply a generous amount of hot glue to the bottom cardboard surface of the bottle. Carefully place a piece of sackcloth on top, pressing it firmly to adhere. Once secured, trim the excess sackcloth around the base, leaving a neat seam allowance of about half an inch. Make small notches or cuts around this allowance, then fold the notched edges down and secure them firmly to the bottle’s side with hot glue. This creates a clean, finished bottom edge.
Now, take your pre-prepared braided or crocheted jute twine. Starting from the very bottom edge of the cardboard-covered section, apply a thin line of hot glue and carefully press the twine onto it. Continue to wrap the twine horizontally around the bottle, applying small amounts of glue as you go, ensuring each successive strand sits snugly against the previous one. Maintain even tension and spacing until you reach the top edge of the cardboard, creating a beautifully textured and cohesive exterior.
Replicate this exact process for the lid: first, cover the top surface with sackcloth, trimming and folding the edges neatly. Then, meticulously wrap the sides of the lid with the jute twine, ensuring the pattern aligns seamlessly with the bottle’s base for a unified appearance. This attention to detail will elevate the overall aesthetic of your container.
To create the functional and decorative handle, position a wooden ring at the exact top and center of the lid. To secure it, thread a small leather strip through the wooden ring, bringing both ends of the leather strip down onto the lid’s surface. Secure these ends firmly with hot glue. For an added touch of rustic authenticity and reinforcement, take two thumbtacks. Carefully cut their pointy ends in half for safety and easier application. Insert the blunted thumbtacks onto each end of the leather strip, pressing them into the lid and securing them with additional hot glue. This detail not only strengthens the handle but also adds a charming, handcrafted element.
Transforming Waste into Treasure: The Benefits of Your DIY Chic Container
This DIY project goes beyond simply crafting; it embodies a commitment to sustainability and creative expression. By upcycling plastic bottles, you’re directly contributing to reducing plastic waste, a significant environmental challenge. Every bottle you transform means one less item ending up in a landfill or polluting our oceans. This act of conscious crafting not only benefits the planet but also empowers you to create functional and beautiful pieces for your home without the need for expensive store-bought alternatives.
The versatility of these chic containers is truly remarkable. They can serve a myriad of purposes throughout your home. Imagine them as stylish storage for craft supplies, sewing notions, or office stationery. In the kitchen, they can hold dry goods like pasta, rice, or even tea bags. In the bathroom, they’re perfect for cotton balls, hair ties, or small toiletries. Their elegant design also makes them ideal decorative accents, whether holding faux flowers, acting as a centerpiece, or simply enhancing the aesthetic of a shelf or tabletop. The rustic charm of jute, sackcloth, and wood adds a touch of warmth and organic beauty to any interior décor style, from farmhouse to bohemian to contemporary.
Moreover, this project offers immense opportunities for personalization. While the tutorial suggests a natural, rustic aesthetic, you are limited only by your imagination. Experiment with different colors of acrylic paint to match your room’s palette. Instead of jute twine, consider using colorful yarn, ribbon, or even fabric strips for a varied texture. The sackcloth can be replaced with burlap, linen, or even patterned fabric scraps to introduce different visual elements. The wooden rings can be stained, painted, or swapped for metal handles. These customizations ensure that your upcycled container is not just a storage solution but a unique reflection of your personal style and creativity.
Tips for a Flawless Finish and Extended Durability:
- Cleanliness is Key: Ensure your plastic bottles are impeccably clean and dry before you begin. Any residue can affect paint adhesion and glue bonds.
- Sharp Tools: Use very sharp scissors or a craft knife for clean cuts on both plastic and cardboard to achieve precise edges.
- Patience with Paint: Apply acrylic paint in thin, even coats, allowing each layer to dry completely before adding the next. This prevents streaking and ensures a durable finish.
- Hot Glue Control: Use hot glue sparingly but effectively. A small bead is often enough. For areas requiring stronger bonds, apply glue to both surfaces, press together, and hold firmly until set.
- Even Wrapping: When applying twine, aim for consistent tension and minimal gaps between strands for a professional, seamless look.
- Safety First: When using the hot iron or hot glue gun, exercise caution to prevent burns. If working with children, supervise closely or perform these steps yourself.
- Consider a Sealant: For added durability and to protect against moisture, you might consider applying a clear, water-based sealant or varnish over the painted and wrapped surfaces once the project is fully dry.
This project is more than just a craft; it’s an opportunity to transform overlooked materials into something truly special and functional. The sense of accomplishment you’ll feel upon completing this chic container, knowing you’ve created a beautiful and useful item from recycled materials, is incredibly rewarding. So gather your supplies, unleash your creativity, and give those old plastic bottles a stylish second life. Your home, and the planet, will thank you for it!