
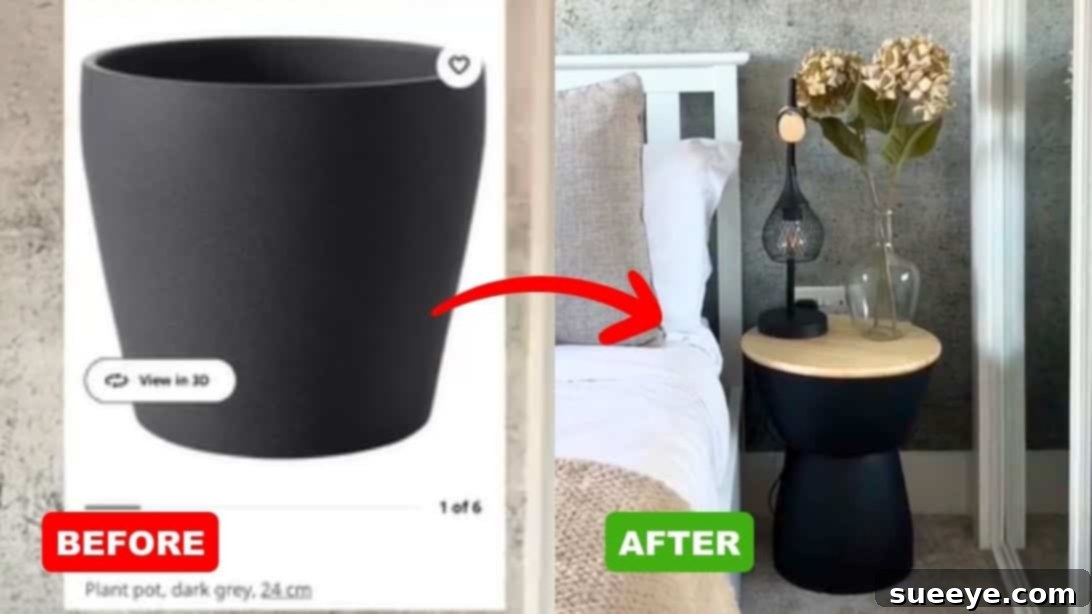
In an age where creativity flourishes, transforming everyday objects into stunning home decor pieces has become a beloved pursuit for many. The beauty of DIY lies in its ability to marry imagination with basic craftsmanship, allowing individuals to craft bespoke furniture and accents without the hefty price tag often associated with designer products. This innovative spirit is perfectly captured by a trending project: a stylish and functional side table ingeniously fashioned from simple flower pots, an inspiring example of how resourcefulness can lead to breathtaking results.
The burgeoning world of social media, particularly platforms like TikTok, serves as a fertile ground for sharing such brilliant DIY revelations. It’s where individuals discover ingenious hacks and draw inspiration from a global community of makers. TikToker @our_home_style_ recently captivated her audience with a viral clip showcasing what she proudly proclaimed as “My best IKEA hack yet.” This simple yet elegant side table, crafted from humble IKEA flower pots, resonated deeply with viewers seeking budget-friendly and aesthetically pleasing home solutions. Her project not only demonstrates remarkable ingenuity but also highlights the accessibility of creating personalized furniture that seamlessly integrates into various interior styles, proving that luxury and uniqueness don’t always demand a premium.
@our_home_style_ My BEST ikea hack yet! I love it so much i’m doing a third for the balcony. #hometok #diyproject #ikeahack #ikeahacks #ikeatok #ikeafinds #interiordecor
♬ original sound – OurHomeStyle
Why Embrace DIY Home Decor? The Allure of Handmade Furniture
The movement towards do-it-yourself home decor is fueled by a multitude of compelling reasons that extend beyond mere cost savings. While the budget-friendly aspect is undeniably attractive, particularly when transforming inexpensive items from stores like IKEA into high-end looking pieces, the value of DIY runs much deeper. Crafting your own furniture allows for unparalleled personalization, ensuring that each piece perfectly reflects your unique aesthetic and fits precisely into your living space. Unlike mass-produced items, a DIY side table crafted from flower pots becomes a conversation starter, imbued with a story and the pride of creation. It’s an opportunity to experiment with colors, textures, and finishes that may not be available in commercial offerings, resulting in truly one-of-a-kind treasures.
Moreover, DIY projects foster a profound sense of accomplishment. The journey from conceptualization to completion, overcoming minor challenges along the way, culminates in the satisfaction of stepping back and admiring something beautiful you’ve made with your own hands. This sense of ownership and connection to your home environment is invaluable. Beyond the personal benefits, embracing DIY, especially through upcycling and repurposing materials like flower pots, contributes to sustainability efforts. It’s an eco-conscious way to decorate, reducing waste and giving new life to items that might otherwise be discarded. In essence, DIY home decor offers a holistic approach to creating a home that is not just aesthetically pleasing but also personal, meaningful, and environmentally responsible.
Crafting Your Own Flower Pot Side Table: A Detailed Guide to This Innovative IKEA Hack
Inspired by the viral success of @our_home_style_, replicating this ingenious flower pot side table is a straightforward and rewarding project. The beauty of this hack lies in its simplicity and the readily available materials, often found at your local IKEA or hardware store. This guide will walk you through each step, ensuring you have all the tips and tricks to create a stunning piece for your home.
Gathering Your Materials – The IKEA Advantage (and Beyond)
The foundation of this DIY masterpiece relies on a few key components. The TikToker sourced her primary materials from IKEA, which is an excellent starting point due to their consistent availability and often minimalist designs that lend themselves well to customization. Here’s what you’ll need:
- One Lazy Susan: This will serve as the rotating tabletop. IKEA offers various sizes and materials, typically wood or plastic. Choose one that you feel complements the size of your chosen flower pots and offers the desired tabletop surface area. Consider its diameter for stability and aesthetic balance.
- Two Grey Plant Pots: The original project utilized two distinct shapes: one resembling a tall bucket and the other a large bowl. This combination creates an interesting silhouette and functional stability. When selecting your pots, consider the following:
- Material: Ceramic, terracotta, or sturdy plastic pots work best. Ensure they are strong enough to support the weight of the lazy Susan and any items you plan to place on the table.
- Size and Shape: The “bucket” pot will form the base, so it needs to be tall enough to act as a side table. The “bowl” pot will sit on top of the inverted base, adding height and another layer to the design. Ensure the opening of the bowl-shaped pot is narrower than the base of the bucket pot when inverted, allowing for a secure and visually pleasing connection.
- Stability: Choose pots with flat, stable bases to prevent wobbling once assembled.
- Strong Adhesive: A robust, all-purpose construction adhesive or epoxy is crucial for securely bonding the two pots together. Look for adhesives designed for ceramics, plastics, or multiple materials, ensuring a strong, lasting hold.
- Spray Paint: While the original project used black spray paint for a sleek, modern finish, the color choice is entirely yours! Consider your existing decor and personal style. You might opt for a crisp white, a vibrant pop of color, or even a metallic finish for a more glamorous look.
- Protective Covering: Old newspapers, a tarp, or a drop cloth are essential to protect your flooring or workspace from glue and paint.
- Optional: Sandpaper (fine-grit), primer (especially if painting plastic or dark surfaces a lighter color), clear sealant (for added durability, especially if used outdoors).
The Step-by-Step Process – Transforming Simple Items into a Statement Piece
Once you’ve gathered all your materials, the assembly process is surprisingly straightforward, allowing you to quickly bring your vision to life.
Step 1: Preparation is Key
Begin by preparing your workspace. Lay down your protective covering on the floor or work surface in a well-ventilated area, preferably outdoors or in a garage, especially for the painting stage. Ensure both plant pots are clean, dry, and free of any dust or debris. A quick wipe-down with a damp cloth and then thoroughly drying them will help the adhesive bond effectively and the paint adhere smoothly. If your pots have a glossy finish and you plan to paint them, a light sanding with fine-grit sandpaper can help the paint grip better.
Step 2: The Foundation – Assembling the Base
Take the taller, bucket-shaped plant pot and place it upside down on your protected surface. This will form the sturdy base of your side table. Next, apply a generous amount of your chosen strong adhesive to the bottom of this inverted pot. Aim for a continuous bead around the rim and a few dots in the center to ensure maximum contact and adhesion. Carefully take the second, bowl-shaped pot and place it right side up directly on top of the adhesive, ensuring it is perfectly centered on the base. Apply gentle, even pressure to secure the bond. It’s crucial to ensure it’s perfectly aligned and centered at this stage, as adjustments will be difficult once the glue begins to set. Allow the adhesive to cure completely according to the manufacturer’s instructions. This might take several hours or even overnight. Patience here is key to a durable and stable table.
Continuing the Transformation – The Artistic Touches
With the structure firmly in place, it’s time to add the aesthetic appeal that truly transforms these functional pots into a chic piece of furniture.
Step 3: The Artistic Touch – Painting Your Masterpiece
Once the adhesive has fully dried and the two pots are securely joined, move your assembled base to a well-ventilated outdoor area or a designated spray painting zone. If you opted for a primer, apply it first according to the product’s instructions and let it dry completely. Then, it’s time for the color. The TikToker chose a sleek black, which offers a sophisticated and versatile look, contrasting beautifully with lighter interiors. Hold the spray can about 6-12 inches from the surface and apply the paint in light, even coats, moving in a sweeping motion. Avoid applying too much paint at once to prevent drips and uneven coverage. Allow each coat to dry to the touch before applying the next, typically 15-30 minutes. You’ll likely need two to three coats to achieve full, opaque coverage. Don’t forget to paint all visible surfaces, including the inside lip of the top pot and the edges of the base. For those considering a different aesthetic, think about a crisp matte white for a minimalist vibe, a bold emerald green or navy blue for a vibrant statement, or a warm terracotta shade to blend with natural elements. A clear sealant can be applied after the paint has fully cured (usually 24-48 hours) for extra protection and durability, especially if the table will be exposed to the elements or frequent use.
The Grand Finale – Adding the Functional Top
The final step brings both function and design together seamlessly.
Step 4: Securing the Lazy Susan
After your paint has completely dried and cured, it’s time to add the tabletop. Simply place your lazy Susan on top of the inverted, painted pot structure. The beauty of this design is that the lazy Susan often sits snugly on the base without needing additional adhesive, allowing for easy rotation. However, if you desire extra security, you can apply a few small dots of hot glue or a non-permanent adhesive to the bottom of the lazy Susan before placing it, ensuring it stays centered while still allowing for gentle rotation. Your beautiful, custom-made DIY side table is now complete and ready to elevate your home decor!
Styling Your New DIY Creation: Beyond the Bedroom
The finished side table from @our_home_style_ perfectly illustrates the potential of this simple hack. Placed beside her elegant white-framed bed, adorned with a stylish lamp and a delicate flower vase, the black table creates a stunning contrast against the neutral wall and bedding. This thoughtful styling highlights how a DIY piece can seamlessly integrate into and even enhance a sophisticated bedroom theme, proving that handmade items can possess an upscale aesthetic.
The versatility of this flower pot side table extends far beyond the bedroom. Its compact size and stylish design make it suitable for various spaces throughout your home, and even outdoors, as the TikToker herself mentioned, planning a third one for her balcony. Here are some inspiring ideas for placement and styling:
- Living Room Accent: Position it next to a sofa or armchair as a convenient spot for remotes, a cup of coffee, or a small stack of magazines. Its rotating top makes it particularly useful for shared spaces.
- Entryway Catch-All: In a foyer or entryway, it can serve as a chic station for keys, mail, or a small decorative plant, welcoming guests with a touch of personal style.
- Balcony or Patio Retreat: For outdoor use, ensure you’ve used weather-resistant paint and sealant. It’s perfect for holding a book, a refreshing drink, or a small potted plant, adding a touch of charm to your outdoor oasis.
- Plant Stand: Embrace its origins by using it as an elegant pedestal for a cherished houseplant, bringing natural elements into your living space. The lazy Susan can even make it easier to rotate plants for even sunlight exposure.
- Kids’ Room Fun: Paint it in a playful color and use it in a child’s room as a small table for drawing, reading, or displaying beloved toys. The rotating top adds an element of fun.
When styling, remember to consider balance and proportion. A single statement piece, like a unique lamp, a stack of aesthetically pleasing books, or a small sculpture, can truly elevate the table. For a cohesive look, choose items that complement the table’s color and the overall theme of your room. The contrast created by @our_home_style_’s black table against her light bedroom is a testament to the power of color in interior design. Don’t be afraid to experiment with different textures and materials to add depth and interest to your display.
Tips for Success & Troubleshooting Common Issues
While this DIY project is relatively simple, a few pointers can ensure an even smoother process and a lasting result:
- Ventilation is Key: Always work in a well-ventilated area when using spray paint and strong adhesives to ensure safety and proper drying.
- Cleanliness: Dust and grease are enemies of good adhesion and paint finish. Ensure all surfaces are pristine before applying glue or paint.
- Patience with Drying Times: Rushing the drying process for glue or paint can compromise the structural integrity and finish of your table. Always follow manufacturer recommendations.
- Stability Check: Before placing heavy items, gently test the stability of your assembled table. If there’s any wobbling, reinforce the adhesive connection or consider adding felt pads to the bottom of the base pot for minor adjustments.
- Outdoor Protection: If your table is destined for outdoor use, invest in exterior-grade paint and a clear, UV-resistant sealant to protect it from the elements.
- Personalize Boldly: Don’t limit yourself to the original design. Consider adding decorative stencils, a textured finish, or even combining multiple colors to truly make it your own.
Your Next DIY Adventure Awaits
This ingenious DIY side table crafted from IKEA flower pots is more than just a piece of furniture; it’s a celebration of creativity, affordability, and personal expression. As demonstrated by @our_home_style_’s viral hack, with a dash of imagination and a few simple steps, you can transform ordinary items into extraordinary home decor. It’s an accessible project that promises both a functional addition to your home and the immense satisfaction of creating something beautiful with your own hands. So, gather your materials, embrace your inner designer, and get ready to craft a custom side table that will undoubtedly become a cherished part of your home story. Your next DIY adventure is just a few flower pots away!