
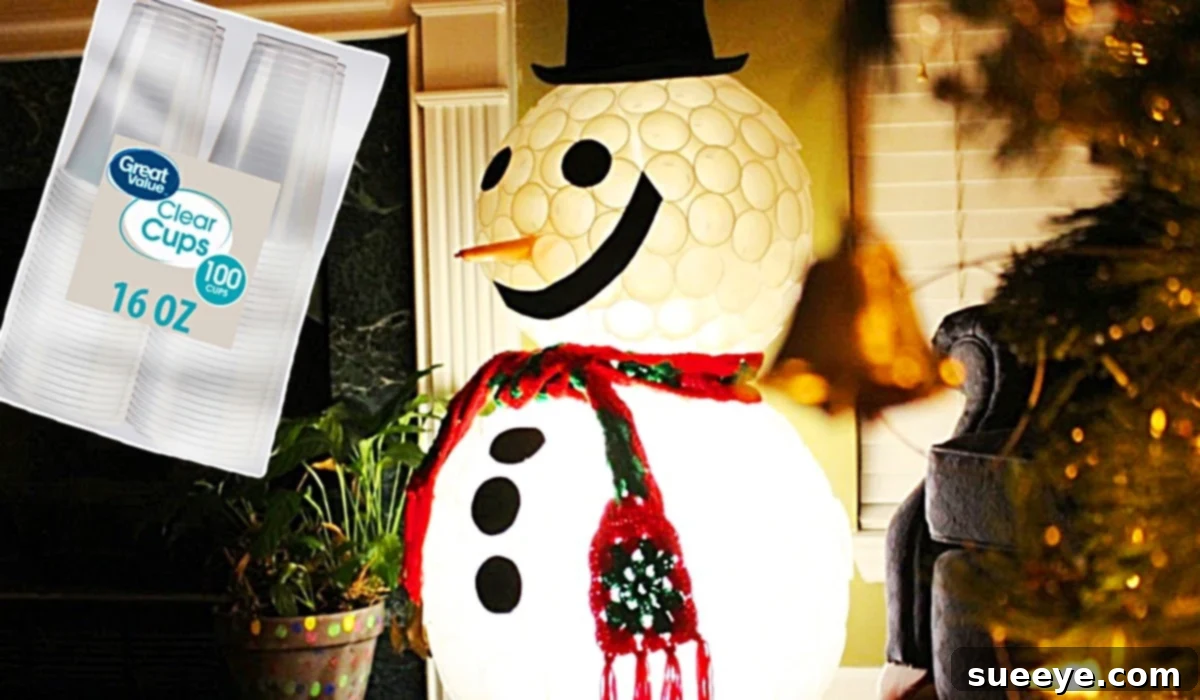
DIY Plastic Cup Lighted Snowman: A Step-by-Step Guide to Festive Winter Decor
As the days grow shorter and the air turns crisp, there’s nothing quite like transforming your home into a winter wonderland. While many decorations can be expensive, the joy of crafting your own unique pieces is truly unmatched. That’s why, when I stumbled upon this brilliant DIY plastic cup snowman tutorial by Fentertainment on YouTube, I was instantly captivated. This ingenious project offers a delightful way to create stunning, illuminated outdoor or indoor decor without breaking the bank. Imagine a whimsical snowman greeting your guests with a warm, inviting glow – all crafted by your own hands and with a little help from the family!
This project isn’t just about making a decoration; it’s about creating memories. It’s an accessible craft for all ages, perfect for an afternoon of creative fun with children. The resulting lighted snowman is not only charming but also surprisingly sturdy, making it an ideal festive addition to your porch, entryway, or even a cozy corner inside your home. Get ready to embark on a creative journey that promises joy, affordability, and a truly magical end product.
Why Choose This DIY Plastic Cup Snowman Project?
In a world full of mass-produced decorations, crafting your own brings a unique sense of accomplishment and charm. Here are just a few reasons why this plastic cup snowman stands out:
Budget-Friendly Brilliance
One of the most attractive aspects of this DIY is its incredibly low cost. You’re primarily using plastic cups, which are readily available and inexpensive, especially when bought in bulk. Compared to purchasing large, pre-made lighted decorations, this project offers significant savings, allowing you to allocate your holiday budget to other festive treats.
Eco-Conscious Crafting
While plastic cups are often considered single-use, this project gives them a second life, transforming them into a beautiful, reusable decoration. It’s a fantastic example of upcycling, promoting creativity while being mindful of waste. When the season is over, you can carefully store your snowman for many winters to come, making it a sustainable choice for your holiday decor.
Fun for the Whole Family
This craft is perfect for involving everyone, from young children to adults. The simple, repetitive nature of stapling cups together is therapeutic and engaging. Kids can help with assembling the cups (with adult supervision for staplers) and certainly with decorating, choosing the snowman’s expression, hat, and accessories. It’s a wonderful opportunity for quality family time and creating cherished holiday traditions.
Dazzling Illumination
What truly sets this snowman apart is the magical glow it emits. By incorporating a simple light source inside, the translucent cups transform into a radiant beacon of winter cheer. Whether placed outdoors to welcome visitors or indoors to cast a warm ambiance, the lighted effect is undeniably captivating and adds a touch of enchantment to any space.
Essential Materials for Your Lighted Snowman Creation
Gathering your materials is the first exciting step in bringing your snowman to life. Most items are easy to find at your local grocery store, dollar store, or craft supply shop.
- Plastic Cups: You’ll need several packs of clear or white plastic cups. The exact quantity depends on the desired size of your snowman, but generally, expect to use between 300 to 500 cups for a medium-sized snowman (consisting of two spheres). Opt for sturdy, standard-sized cups for best results.
- Stapler and Staples: A reliable stapler is crucial. A heavy-duty stapler can make the job easier, but a standard office stapler will work perfectly fine. Ensure you have plenty of staples on hand, as you’ll be using quite a few!
- Hot Glue Gun and Glue Sticks: A hot glue gun is essential for securely joining the two snowman spheres and attaching decorations. Make sure you have a good supply of glue sticks. Always exercise caution when using a hot glue gun, especially if crafting with children.
- Black Craft Felt: This will be used to cut out the snowman’s eyes and mouth. A small sheet is usually sufficient. Alternatives include black construction paper, sturdy cardstock, or even painted plastic bottle caps for a more three-dimensional look.
- Carrot (Real or Craft): For the iconic snowman nose! A small fresh carrot works perfectly, but for a longer-lasting or weather-resistant option, consider crafting a nose from orange felt, craft foam, or even painting a small piece of wood.
- Internal Light Source: To create that enchanting glow, you’ll need battery-operated LED fairy lights or puck lights. Battery-operated options are highly recommended for safety, especially if the snowman will be outdoors or near children, as they eliminate the need for power cords and reduce electrical risks.
- Winter Hat and Scarf: These accessories add personality and charm to your snowman. You can use an old hat and scarf, purchase inexpensive ones, or even knit/crochet a custom set. Consider the size of your snowman’s head when choosing a hat.
- Optional Embellishments: Get creative! Consider adding buttons for extra detail, a dash of glitter for a sparkling effect, pipe cleaner arms, or even small twig branches for a more rustic look.
Step-by-Step Guide: Crafting Your Dazzling Lighted Snowman
Creating your plastic cup snowman is a surprisingly straightforward process that involves building two distinct spheres and then joining them. Follow these steps for a perfect festive display.
Step 1: Building the Base Sphere (The Snowman’s Body)
Begin by constructing the larger sphere, which will form the body of your snowman. Lay out your first circle of plastic cups on a flat surface. Each cup should be placed with its open end facing inwards, and its rim slightly overlapping the rim of the adjacent cup. Staple the rims of two adjoining cups together. Continue this process, stapling each cup to its neighbor until you complete a full circle. This initial circle will be the widest part of your snowman’s base.
For subsequent layers, you’ll place cups on top of and slightly offset from the cups in the layer below. The key is to slightly tuck the new cup’s rim just above the staple line of the previous layer, then staple it to the two cups underneath and to its immediate neighbors. As you add more layers, the sphere will naturally start to curve inwards, forming a dome shape. Continue building upwards and inwards, ensuring each cup is securely stapled, until you form a complete, enclosed sphere, leaving a small opening at the very top for the head attachment later.
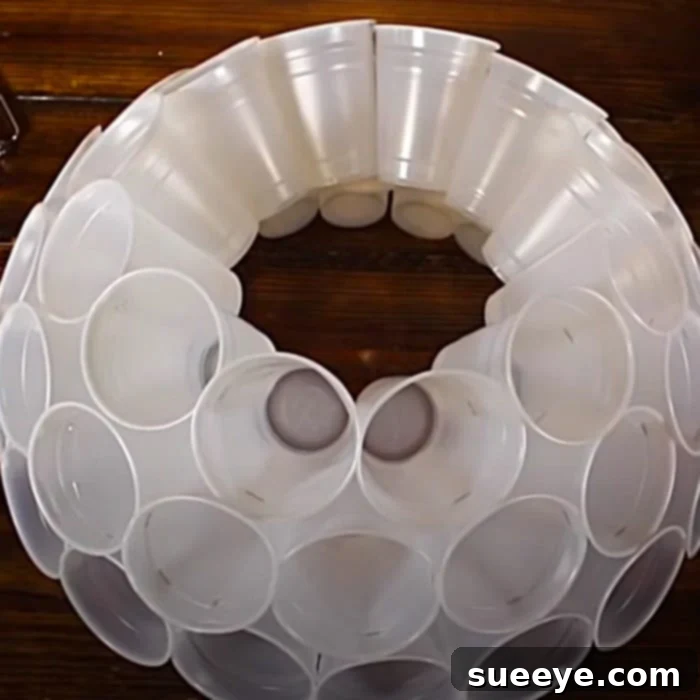
Step 2: Constructing the Head Sphere
The process for creating the head sphere is identical to building the body, but on a smaller scale. Start with a smaller initial circle of cups and follow the same stapling technique. The head should be proportionate to the body – typically about two-thirds to half the size of the base sphere. As with the body, continue stapling layers, allowing the sphere to curve inwards until it’s fully enclosed, again leaving a small, slightly flattened area where it will connect to the body.
Step 3: Joining the Spheres
Once you have your two completed spheres, it’s time to bring them together to form your snowman. Carefully position the smaller head sphere on top of the larger body sphere. Ensure they are centered and stable. Using your hot glue gun, apply a generous bead of hot glue along the rims where the two spheres meet. Press firmly for a few seconds to create a strong, secure bond. Allow the glue to cool and set completely before proceeding to the next step.
Step 4: Bringing Your Snowman to Life with Decorations
This is where your snowman truly gets its personality! Gather your decorative elements:
- Eyes and Mouth: Cut out two large black circles for the eyes from your craft felt. For the mouth, you can either cut several smaller circles for a dotted smile or a curved crescent shape. Use your hot glue gun to carefully attach these features to the head sphere, creating your desired expression.
- Nose: If using a real carrot, you might need to trim it to fit. For a craft foam or felt carrot nose, cut it into a cone shape. Securely attach it in the center of the face with hot glue.
- Accessorizing: Place the winter hat on your snowman’s head. If it’s a bit loose, a few dabs of hot glue can hold it in place. Drape the scarf around the “neck” where the two spheres meet, securing it with glue if necessary to prevent it from slipping.
- Optional Details: Now is the time to add any extra touches. Glue on buttons, sprinkle glitter, or attach small twig arms to complete your snowman’s look.
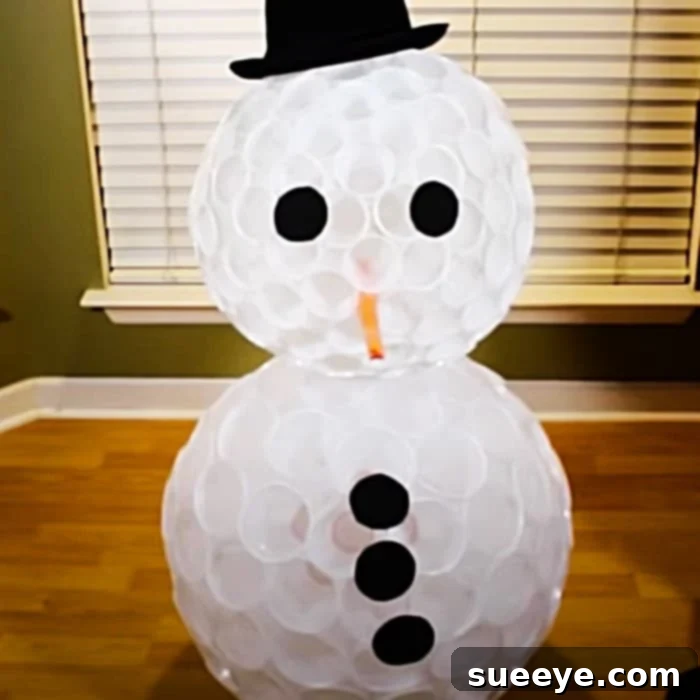
Step 5: Illuminating Your Creation
The final and most magical step is adding the lights. If using LED fairy lights, gently thread them into the snowman. You can either feed them through a small gap between the cups or carefully create an opening if needed. For optimal illumination, try to distribute the lights evenly within both the head and body spheres. If using LED puck lights, simply place one or two inside each sphere. Position the battery packs discreetly at the back or base of the snowman for easy access when you need to turn them on or replace batteries.
Once the lights are in place, step back and admire your brilliantly glowing plastic cup snowman! The translucent cups beautifully diffuse the light, creating a soft, inviting radiance perfect for winter evenings.
Tips for a Flawless DIY Plastic Cup Snowman
To ensure your crafting experience is smooth and your snowman turns out perfectly, keep these helpful tips in mind:
- Work Area: Set up a spacious and well-lit workspace. Having all your materials organized and within reach will make the process much more efficient.
- Staple Generously: Don’t be shy with staples. Each cup should be securely fastened to its neighbors and the cups in the layer below. This prevents your snowman from falling apart.
- Cup Consistency: Use the same brand and size of plastic cups for a uniform appearance. Variations in cup size can make it challenging to form smooth spheres.
- Hot Glue Safety: Always use a hot glue gun with caution. If children are involved, adult supervision is essential, or have an adult handle all gluing steps.
- Pre-Plan Decorations: Before gluing, arrange your felt eyes, mouth, and nose on the snowman to visualize the expression and placement. This allows for adjustments without committing to glue.
- Weather Considerations: If your snowman will be displayed outdoors, consider its exposure to elements. While plastic cups are somewhat water-resistant, heavy rain or strong winds could be an issue. You might want to spray it with a clear, waterproof sealant for added durability, or bring it indoors during severe weather.
- Patience is Key: While this is an easy DIY, creating the spheres can take some time. Don’t rush the stapling process; a little patience will result in a more robust and visually appealing snowman.
- Battery Check: Always ensure your battery-operated lights have fresh batteries before displaying your snowman, especially if it’s for an event or a special evening.
Displaying Your Festive Masterpiece
Now that your magnificent plastic cup snowman is complete, it’s time to find the perfect spot for it to shine! This versatile decoration can enhance various areas of your home:
- Front Porch or Entryway: Welcome guests with a festive glow. The lighted snowman creates a warm and inviting atmosphere right at your doorstep.
- Living Room or Family Room: Place it near your Christmas tree or in a cozy corner to add a unique decorative element and soft ambient lighting.
- Children’s Room: A lighted snowman can serve as a whimsical nightlight, bringing joy to younger family members.
- Window Display: Position your snowman near a window to share its cheer with passersby, casting a lovely silhouette against the winter night.
- Holiday Party Decor: Use it as a charming centerpiece or an accent piece for your holiday gatherings.
Remember to consider the environment where it will be displayed. If outdoors, place it in a sheltered area to protect it from harsh weather. The enchanting glow of your DIY plastic cup snowman is sure to be a conversation starter and a source of delight throughout the winter season.
Conclusion: Embrace the Joy of DIY Winter Decor
There’s immense satisfaction in crafting something beautiful and unique with your own hands, and this DIY plastic cup lighted snowman project is no exception. What starts as a simple stack of plastic cups transforms into a radiant beacon of holiday cheer, bringing a personalized touch to your winter decor. It’s an affirmation that creativity doesn’t require a hefty budget, just a clever idea and a willingness to get a little crafty.
As I reflect on making this snowman, I recall the laughter and shared moments with my family, and the pride we all felt seeing our creation light up. It was incredibly easy, immensely fun, and remarkably inexpensive – a true trifecta for any DIY enthusiast. So, gather your materials, invite your loved ones, and immerse yourselves in the joy of making. This winter, let your DIY plastic cup snowman be a shining testament to your creativity and a heartwarming symbol of the season’s magic. Happy crafting!