
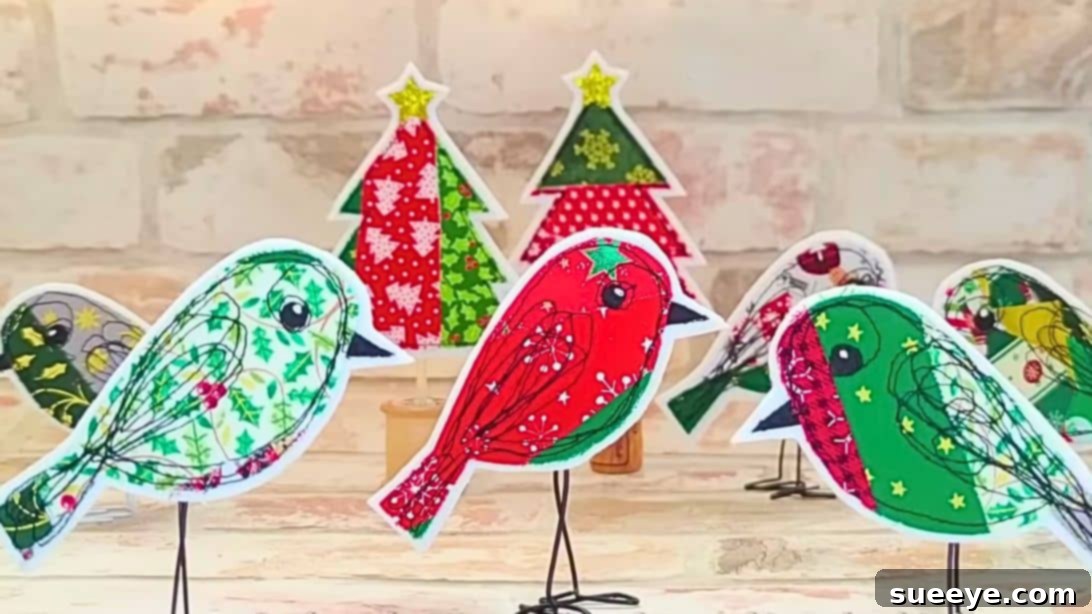
DIY Scrappy Fabric Birds: Charming Decor from Your Leftover Fabrics
Unleash your creativity and give new life to your fabric scraps with this utterly delightful and simple handmade bird project. Inspired by the brilliant tutorial from Bo-tique on YouTube, this craft allows you to create adorable fabric birds that can instantly brighten any space. It’s an incredibly satisfying way to utilize those piles of leftover fabric, turning them into beautiful, personalized home decor pieces in just a short amount of time.
Whether you’re a seasoned crafter or just starting your DIY journey, this project is designed for everyone. It’s not just about making birds; the foundational technique can be adapted to create a myriad of other shapes – from festive Christmas trees and cute bunnies to whimsical stars or any silhouette your heart desires. Dive into this tutorial and discover how easy it is to craft these charming fabric decorations!
RELATED: If you’re looking for more fabric bird inspiration, check out our guide on How To Sew A Fabric Bird for additional tips and tricks.
Why You’ll Love Making Scrappy Fabric Birds
This DIY project offers a wealth of benefits beyond just creating a pretty object. Here’s why it’s a craft worth trying:
- Eco-Friendly Crafting: It’s a fantastic way to upcycle and reduce waste by using fabric scraps that might otherwise be discarded. Give your textiles a second life!
- Budget-Friendly: Since the primary material is fabric scraps, this project is incredibly cost-effective. You’re likely to have most of the supplies on hand already, making it an accessible craft for all.
- Creative Expression: With endless possibilities for fabric combinations, patterns, and embellishments, each bird you create will be unique. It’s a wonderful outlet for personal artistic expression.
- Perfect for Beginners: The steps are straightforward and don’t require advanced sewing skills. It’s an excellent project for those new to sewing machines or even hand-stitching.
- Versatile Decor: These fabric birds can be used in countless ways: as standalone shelf decor, strung together as a garland, hung as Christmas ornaments, added to wreaths, or even as charming brooches or magnets.
- Thoughtful Handmade Gifts: A collection of handmade fabric birds makes a heartfelt and personalized gift for friends and family, perfect for birthdays, holidays, or housewarmings.
- Quick & Rewarding: You can complete one or several birds in a relatively short amount of time, offering immediate satisfaction and a tangible sense of accomplishment.
Essential Materials for Your DIY Scrappy Fabric Birds
Gathering your materials is the first exciting step in any crafting adventure. For this project, you’ll find that many items are likely already in your craft stash. Here’s what you’ll need to bring these charming fabric birds to life:
- Fabric Scraps: This is the star of the show! Dig into your collection for various colors, patterns, and textures. Small to medium-sized pieces work best. Cotton fabrics are easy to work with, but feel free to experiment with others.
- Paper Clips: Standard metal paper clips will be transformed into the bird’s delicate legs. Choose ones that are sturdy enough to hold their shape.
- Pen or Pencil: For tracing your bird template onto the Heat N Bond and fabric. A fabric marker or tailor’s chalk can also be useful.
- White Thick Felt: This will form the sturdy backing of your bird, giving it structure and shape. Choose a good quality, medium to thick felt for the best results.
- Heat N Bond (or similar fusible web): This indispensable material helps to fuse your fabric scraps together and to the felt, providing stability and preventing fraying. Look for “lite” or “ultra hold” depending on your desired stiffness.
- Scissors: A sharp pair of fabric scissors is crucial for clean cuts, especially when dealing with intricate bird shapes. You might also want a separate pair for paper.
- Iron: Essential for activating the Heat N Bond and fusing your fabric layers. Ensure your iron is clean and set to the appropriate temperature for your fabrics.
- Needle: A basic hand-sewing needle for adding small details and closing openings.
- Black and White Thread: Black thread for the beak and eyes, and white thread for accentuating details and closing seams. You can also choose colors that complement your fabric scraps.
- Sewing Machine: While some steps can be done by hand, a sewing machine will make the free-motion stitching quicker and more consistent. Ensure it’s threaded and ready to go.
- A Printed Bird Template: You can find countless free bird silhouettes online. Choose a simple, appealing shape. Remember, you can also design your own!
Step-by-Step Guide: Crafting Your Own Scrappy Fabric Birds
Follow these detailed steps to create your beautiful fabric birds. Take your time, enjoy the process, and don’t be afraid to add your personal touch!
Step 1: Preparing Your Bird Templates and Fabric Scraps
Begin by selecting your desired bird pattern. Print it out and carefully cut around the bird’s body, omitting the beak for now. This main body piece will be your template. Next, lay the template onto the paper side of your Heat N Bond. Trace the bird’s body onto the Heat N Bond, remembering to create a mirrored counterpart for the back of the bird. This ensures you’ll have a left and right side once fused. Now, take your chosen fabric scrap – the one you want for the bird’s main body – and iron it to the plastic (adhesive) side of the traced Heat N Bond. Apply even pressure and heat according to the Heat N Bond instructions. Once fused, turn the piece over and iron the other fabric side to ensure a strong bond and smooth finish. Repeat for the mirrored piece.
Step 2: Cutting, Fusing Details, and Adding Initial Stitches
With your fabric firmly fused to the Heat N Bond, carefully cut out the bird shape. Precision here will make a big difference in the final look of your bird. Next, take a small piece of black fabric, fuse it with Heat N Bond, and then cut out the bird’s beak and a small circular piece for the eye. These will be added separately. Now, gently tear off the paper backing from the main bird body piece. This exposes the adhesive. Position the bird body onto your thick white felt and iron it down firmly to fuse. This felt layer provides the necessary stability and body to your bird. Once the main body is fused, carefully position the bonded black beak and eye pieces onto the bird and iron them into place. Repeat these steps for any other birds you plan to make. To add character and definition, use your sewing machine for free-motion stitching around the edges of the bird. This not only secures the fabric layers further but also adds a lovely handcrafted aesthetic. For the eye, use white thread and a French knot stitch to create a tiny, detailed highlight, bringing your bird to life.
Step 3: Assembling the Bird’s Body and Preparing for Legs
Once your bird’s front is complete with its fused details and initial stitching, it’s time to prepare for its three-dimensional form. Carefully cut out the bird shape from the felt, but this time, leave a small seam allowance (about 1/8 to 1/4 inch) around the entire edge. This allowance will be important for the next step. Take your two bird pieces (front and back, if you made a mirrored pair, or just your main piece if you’re making a single-sided bird to be sewn onto something) and lay them together. Ensure their ‘wrong’ sides are facing each other, and they are perfectly lined up. Using white thread on your sewing machine, free-motion embroider or stitch along the outer edges of the bird’s shape. This stitching will join the two felt-backed fabric pieces together. Crucially, remember to leave a small opening of approximately 2cm (about 0.8 inches) at the belly area. This opening is where the paper clip legs will be inserted later, so make sure it’s accessible but not too large.
Step 4: Adding the Legs and Finishing Touches
With the main body stitched and the opening left, it’s time for the legs. Take your paper clips and carefully bend and shape them into bird legs, as demonstrated in the original video. The exact shape can vary, but typically it involves bending one end into a ‘foot’ and the other end into a straight piece that can be inserted into the bird’s body. Once your paper clip legs are shaped, gently insert the straight end of each leg into the 2cm opening you left on the belly of the bird. Push them in until they feel secure and are positioned correctly. You might need a pair of pliers for better bending and insertion. Finally, using your needle and white thread, hand-stitch the opening closed, carefully securing the paper clip legs in place. Make sure your stitches are neat and strong to hold the legs firmly. Trim any excess thread, and your charming scrappy fabric bird is complete!
Tips for Success and Creative Variations
To ensure your fabric birds turn out perfectly and to inspire even more creativity, consider these helpful tips and variations:
Choosing Your Fabric Scraps
- Variety is Key: Don’t be afraid to mix and match patterns, colors, and even subtle textures. A scrappy look often benefits from a diverse collection of fabrics.
- Fabric Type: While cotton is easy to work with, feel free to experiment. Linen, flannel, or even thin denim scraps can add interesting textures. Avoid very thick or stretchy fabrics for beginners.
- Pre-Wash Scraps: If you’re using scraps from different projects, it’s a good idea to pre-wash them to prevent any potential color bleeding, especially if your bird decor might get wet or need cleaning.
Template and Design Tips
- Symmetry: When tracing your bird template, remember to flip it for the mirrored side to ensure a symmetrical bird if you are making a two-sided piece.
- Custom Shapes: Don’t limit yourself to birds! This technique is perfect for making other shapes like stars, hearts, bunnies, or even simplified animal silhouettes. Consider seasonal designs for holidays.
- Sizes: Experiment with different sizes. A collection of birds in varying sizes can create a dynamic display.
Sewing and Finishing Pointers
- Free-Motion Stitching: If new to free-motion stitching, practice on scrap fabric first. It gives a lovely, organic look but takes a little getting used to. Alternatively, you can use a regular straight stitch or even a decorative zigzag stitch.
- Hand Sewing Alternatives: If you don’t have a sewing machine or prefer hand sewing, you can still achieve beautiful results. Use a running stitch or backstitch for joining the edges.
- Embellishments: Add extra charm with small buttons for eyes, tiny beads, sequins, or a little embroidery on the wings or tail. A touch of fabric paint can also add details.
- Stuffing: For a plumper bird, you could slightly stuff the body with poly-fil before fully closing the belly opening, turning your decor into a soft ornament.
Displaying Your Fabric Birds
- Garlands: String multiple birds together with twine or ribbon to create a charming garland for a nursery, mantelpiece, or window.
- Ornaments: Add a small loop of ribbon to the back to hang them as unique ornaments on a Christmas tree or decorative branches.
- Magnets/Brooches: Glue a small magnet or brooch pin to the back for wearable art or fridge decor.
- Gift Toppers: These birds make wonderful, reusable gift toppers that add a personal touch to any present.
- Wreaths: Attach them to a seasonal wreath for an adorable, handcrafted accent.