
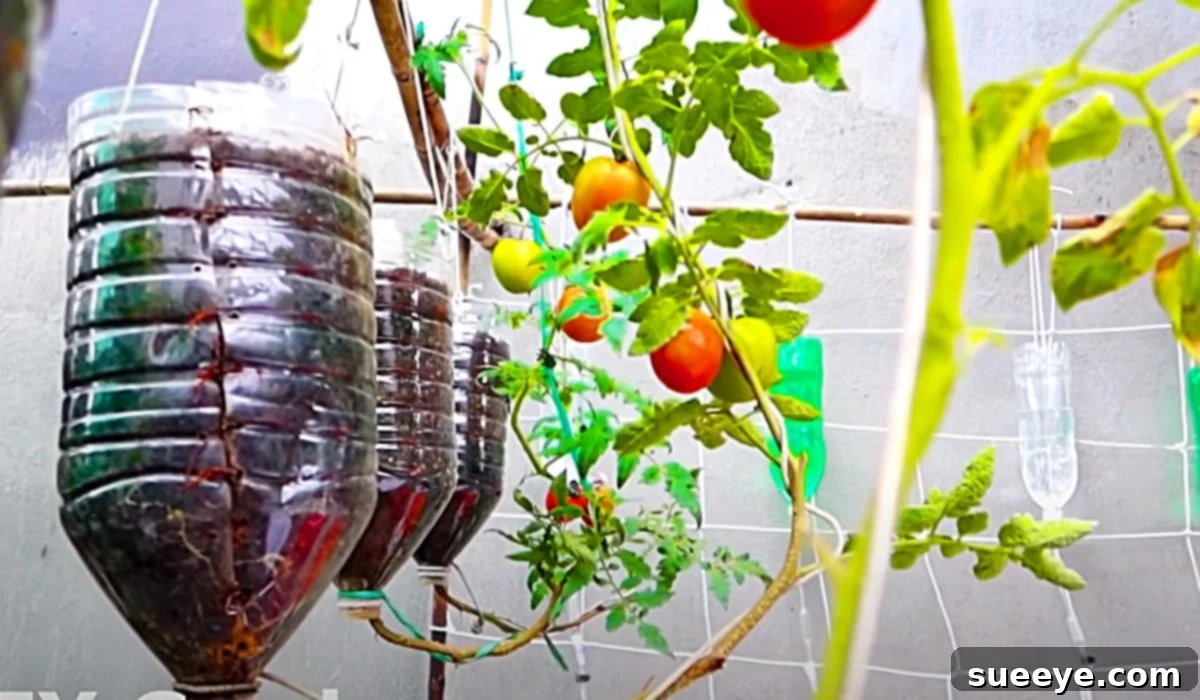
Are you yearning for the taste of fresh, sun-ripened tomatoes but limited by garden space? Or perhaps you’re looking for an innovative, eco-friendly way to cultivate your favorite fruit? Look no further! This comprehensive guide will show you how to transform discarded plastic water bottles into thriving hanging tomato planters, a brilliant idea we discovered through an inspiring video tutorial by DIY Garden Ideas on YouTube. This method is not only incredibly sustainable, utilizing recycled materials, but also incredibly effective, allowing you to grow an abundance of delicious tomatoes even in the smallest of spaces. Whether you’re an urban gardener, a sustainability enthusiast, or simply love the idea of homegrown produce, this project offers a rewarding and practical solution.
DIY Hanging Water Bottle Tomato Planters: Grow Fresh Tomatoes Anywhere
The journey to cultivating your own tomatoes begins with a simple concept: saving seeds. Many gardeners cherish the tradition of growing heirloom varieties, preserving unique flavors and characteristics through careful seed saving year after year. As it turns out, starting tomatoes from seed, especially directly from a ripe fruit, is remarkably straightforward and accessible to everyone. This particular technique takes ease to a new level, demonstrating how easily you can sprout tomato plants from mere slices of a tomato. Once your seedlings are established, you’ll embark on the creative process of crafting your recycled planters and setting up your very own vertical tomato garden. It’s an ingenious way to enjoy fresh produce while contributing to a greener planet.
Why Choose Recycled Water Bottle Planters for Your Tomatoes?
Embracing this DIY method offers a multitude of benefits, making it an attractive option for gardeners of all levels:
- Space Efficiency: Hanging planters are perfect for small patios, balconies, or even sunny windowsills. They utilize vertical space, allowing you to grow more plants in a confined area.
- Environmental Sustainability: By repurposing plastic water bottles, you’re actively reducing waste and giving a second life to materials that would otherwise end up in landfills. It’s a fantastic example of upcycling in action.
- Cost-Effectiveness: This project requires minimal investment. Most materials, like bottles and even seeds, can be sourced for free or at very low cost.
- Pest and Disease Control: Elevating your plants off the ground can help reduce contact with soil-borne pests and diseases, keeping your tomato plants healthier.
- Unique Aesthetic: A vertical garden of lush tomato plants cascading from recycled bottles adds a unique and charming aesthetic to any outdoor or indoor space.
- Easy Maintenance: The hanging design can make watering and harvesting more convenient, especially for those with mobility issues.
This approach transforms a simple gardening task into an exciting and sustainable endeavor.
Essential Materials for Your Hanging Water Bottle Tomato Garden:
Gathering your supplies is the first exciting step. You’ll find that most of these items are readily available, perhaps even lying around your home:
- Plastic Water Bottles: You’ll need a mix of gallon-sized bottles for the main planters and possibly a few single-serving bottles for initial seedling development. Ensure they are thoroughly cleaned.
- A Soldering Iron: This tool is ideal for creating clean, precise holes for drainage and hanging. If you don’t have one, alternatives include a drill with a small bit or a heated knife (use extreme caution and ventilation!).
- High-Quality Potting Soil: Choose a well-draining potting mix that is rich in nutrients. This will provide the best environment for your tomatoes to thrive.
- Fresh, Ripe Tomatoes: For seed saving, select a healthy, ripe tomato, ideally an heirloom variety for superior flavor and genetic consistency.
- A Sharp Knife: Essential for slicing your tomatoes and for cutting the plastic bottles.
- Small Pots or Seed Starting Trays: These are needed for the initial sprouting phase of your tomato plants.
- Durable Rope or Twine: Choose a weather-resistant material strong enough to support the weight of your planters once they are filled with soil and a growing tomato plant.
- Watering Can: A small watering can or spray bottle will be useful for delicate watering of seedlings and established plants.
Step-by-Step Guide to Creating Your DIY Hanging Tomato Garden:
Now, let’s dive into the practical steps of bringing your water bottle tomato garden to life, drawing inspiration from the clear instructions provided by DIY Garden Ideas.
Phase 1: Propagating Tomato Plants from Slices (The Easiest Method)
This ingenious technique simplifies seed starting, making it accessible even for novice gardeners.
- Select Your Tomato: Choose a healthy, ripe tomato. Organic heirloom varieties often yield the best results and ensure you’re getting true-to-type seeds.
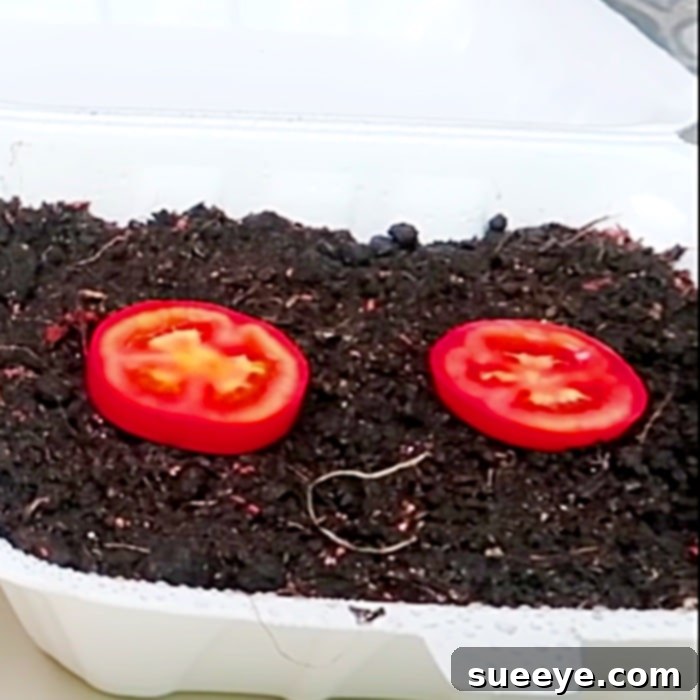
- Slice the Tomato: Using your sharp knife, cut the tomato into slices about 1/4 to 1/2 inch thick. Each slice will contain numerous seeds embedded in the flesh.
- Prepare a Shallow Container: Take a shallow container (like a plastic food container lid or a small pot) and ensure it has drainage holes at the bottom. Fill it with about an inch or two of potting soil.
- Plant the Slices: Lay the tomato slices flat on top of the soil in your prepared container, spacing them slightly apart. Gently cover them with a thin layer (about 1/4 inch) of additional potting soil.
- Water and Wait: Lightly water the soil, keeping it consistently moist but not waterlogged. Place the container in a warm spot with indirect sunlight. Within approximately 5 to 7 days, you should start to see tiny green sprouts emerging from the soil. This is where the magic begins!
Phase 2: Nurturing Your Tomato Seedlings
Once your tomato seeds have sprouted, it’s time to give them individual attention to ensure they grow into strong, healthy plants.
- Pricking Out Seedlings: When the seedlings have developed their first set of true leaves (which appear after the initial round, or cotyledons), they are ready to be transplanted. Gently separate the strongest seedlings, handling them by their leaves rather than their delicate stems.
- Replant into Individual Pots: Carefully replant each selected seedling into its own small pot (about 3-4 inches in diameter) filled with fresh potting soil. Bury the seedling deeper than it was in the initial container, up to its first set of true leaves. Tomatoes are unique in that they can grow roots along their buried stems, leading to a stronger root system.
- Provide Ideal Conditions: Place the newly potted seedlings in a location with plenty of bright, indirect sunlight for at least 6-8 hours a day. Keep the soil consistently moist. As they grow, you can gradually introduce them to more direct sunlight, “hardening them off” before they go into their final planters.
Phase 3: Crafting Your Recycled Water Bottle Planters
Now for the creative part – transforming your plastic bottles into functional planters. The design for these hanging planters is ingeniously simple, allowing for easy watering and maximizing space.
- Prepare the Gallon Bottles: Take your clean gallon-sized plastic water bottles. About 4-5 inches from the bottom, use a sharp knife or strong scissors to cut the bottle horizontally, separating the bottom section from the rest. You will primarily use the top section (with the opening) for your planter, and the bottom section can serve as a water reservoir or discarded.
- Create Drainage and Hanging Holes: This is where the soldering iron comes in handy.
- Drainage Holes: In the cap of the bottle (which will become the bottom of your hanging planter when inverted), use the soldering iron to create several small drainage holes. These are crucial to prevent waterlogging and root rot.
- Hanging Holes: Near the newly cut edge of the bottle (the wider opening that was originally at the bottom), create three equally spaced holes around the circumference. These holes will be used to thread your rope for hanging.
Safety Note: If using a soldering iron, always work in a well-ventilated area, wear protective gloves, and be mindful of hot surfaces. If using a drill, ensure the bottle is stable to prevent slipping. A heated knife can also be used, but extreme care is necessary.
- Consider the Inverted Design: The beauty of this design is that the bottle is hung upside down. The original bottle opening (with the cap and drainage holes) will point downwards, allowing the plant to grow downwards and water to drain efficiently.
Phase 4: Transplanting Your Young Tomatoes into Bottle Planters
Once your tomato plants are fairly mature, typically when they are about 6-8 inches tall and have several sets of true leaves, they are ready for their new home.
- Prepare the Plant: Gently remove your tomato seedling from its small pot, taking care not to damage the roots. If the plant is tall, you can carefully remove some of the lower leaves.
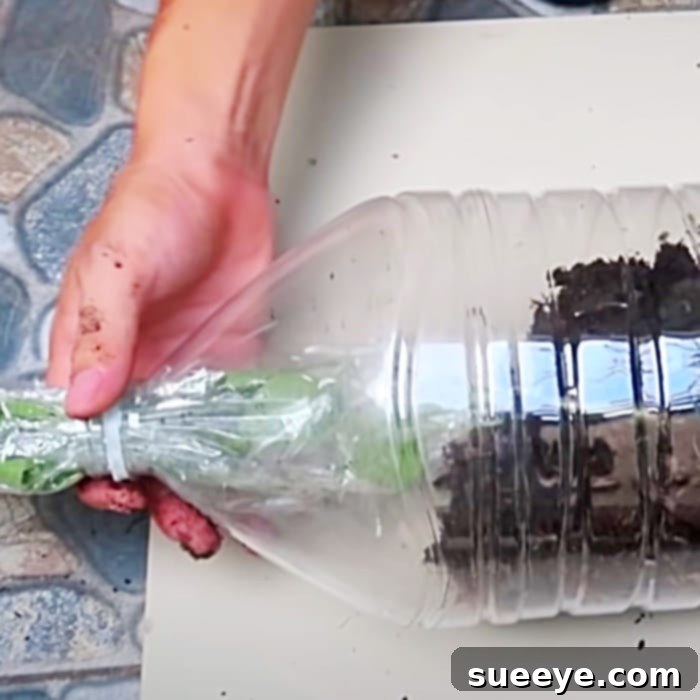
- Position the Plant: Thread the root ball and main stem of the tomato plant through the cap opening of your inverted water bottle. The stem will emerge from the original bottle opening, and the root ball will sit inside the bottle.
- Add Potting Soil: Carefully fill the inverted bottle with potting soil, surrounding the root ball and gently compacting it to remove air pockets. Fill until the soil level is a few inches below the cut edge of the bottle.
- Initial Watering: Water the newly transplanted tomato thoroughly. The water will drain from the holes in the cap, indicating good drainage.
Phase 5: Hanging and Maintaining Your Vertical Tomato Garden
With your tomato plants nestled in their new bottle homes, it’s time to hang them and ensure they receive the care they need to flourish.
- Thread the Rope: Cut three equal lengths of your durable rope or twine. Thread one end of each rope through one of the three hanging holes you created at the top (cut edge) of the bottle. Tie a secure knot inside the bottle to hold the rope in place.
- Create a Hanger: Gather the three free ends of the rope together above the planter and tie them into a single, strong knot. This will form the hanger for your planter.
- Choose the Right Location: Select a sunny spot that receives at least 6-8 hours of direct sunlight per day. A sturdy hook on a patio, balcony, or even a robust window frame would work well. Ensure the location can safely bear the weight of the planter, which will increase as the plant grows and the soil gets wet.
- Watering and Feeding: Hanging planters can dry out faster than traditional garden beds. Check the soil moisture daily, especially during hot weather, and water as needed. Since the nutrients in the limited soil volume will be depleted over time, consider feeding your plants with a balanced liquid fertilizer every 2-3 weeks to ensure a continuous supply of essential nutrients for robust growth and fruit production.
- Pruning (Optional but Recommended): For determinate varieties, little pruning is needed. For indeterminate (vining) tomatoes, you may want to pinch off “suckers” (small shoots that emerge in the crotch between the main stem and a branch) to direct the plant’s energy towards fruit production rather than excessive foliage.
- Pest and Disease Monitoring: Regularly inspect your plants for any signs of pests or diseases. Early detection allows for easier and more effective intervention using organic pest control methods if necessary.
Advanced Tips for a Bountiful Tomato Harvest:
To maximize your yield and ensure the healthiest plants, consider these additional tips:
- Choose the Right Tomato Varieties: While most tomato varieties can be grown this way, determinate (bush) varieties are often preferred for containers as they are more compact and produce their fruit within a shorter period. Cherry tomatoes also do exceptionally well in hanging planters due to their smaller fruit size.
- Consistent Watering: Irregular watering can lead to problems like blossom end rot. Strive for consistent moisture, but avoid overwatering, which can lead to root issues.
- Air Circulation: Ensure good air circulation around your hanging plants to prevent fungal diseases. Avoid overcrowding your planters.
- Pollination Assistance (if needed): If growing indoors or in an area with limited natural pollinators, you might need to gently shake the plants or lightly tap the flowers to aid in pollination for better fruit set.
- Succession Planting: For a continuous harvest, consider starting new seedlings every few weeks. This ensures that as one plant finishes its fruiting cycle, another is ready to take its place.
Troubleshooting Common Tomato Challenges in Hanging Planters:
Even with the best care, gardeners sometimes encounter challenges. Here are a few common issues and how to address them:
- Yellowing Leaves: This can indicate a nutrient deficiency (often nitrogen), overwatering, or underwatering. Assess your watering schedule and consider a balanced liquid fertilizer.
- Blossom End Rot: Characterized by a dark, sunken spot on the bottom of the fruit. This is typically caused by inconsistent watering or a calcium deficiency in the plant, often due to irregular water uptake. Ensure consistent moisture.
- Lack of Fruit Set: If flowers are forming but not producing fruit, it could be due to extreme temperatures (too hot or too cold) or insufficient pollination. Provide some shade during heat waves and consider manual pollination if necessary.
- Pests: Common pests like aphids or spider mites can be a nuisance. Inspect regularly and use organic solutions like neem oil spray or insecticidal soap at the first sign of trouble.
Growing tomatoes in recycled water bottle planters is a truly rewarding experience. It’s a testament to ingenuity, sustainability, and the simple joy of growing your own food. By following these steps and applying a little patience and care, you’ll soon be enjoying the unparalleled taste of homegrown tomatoes right from your very own DIY vertical garden. This project not only yields delicious produce but also empowers you with sustainable gardening skills and contributes positively to the environment. Get started today and watch your plastic bottles transform into a vibrant, fruitful display!