
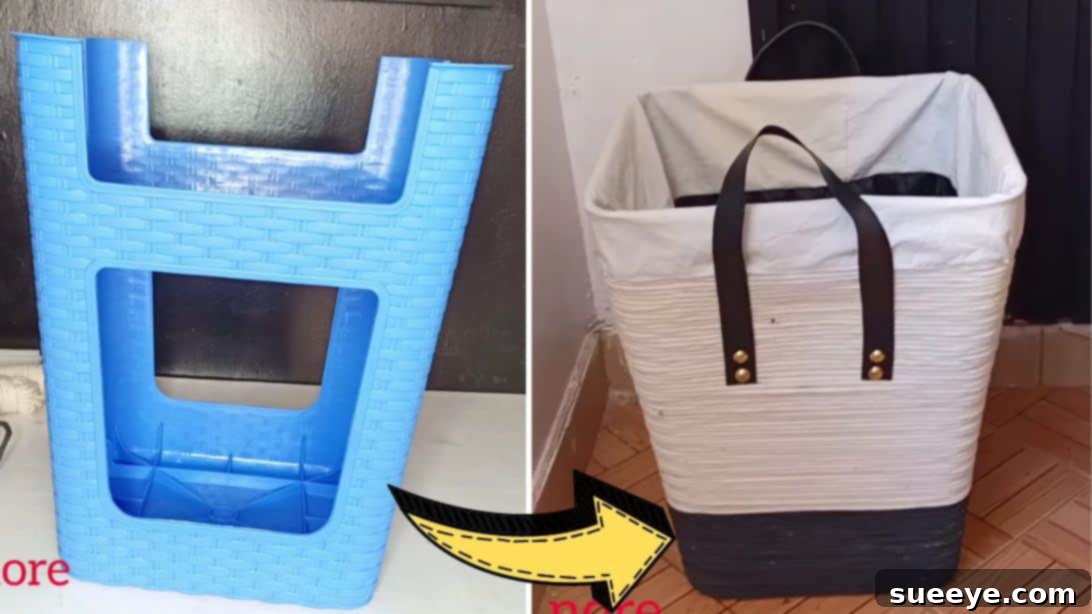
How to Transform a Plastic Stool into a Chic DIY Laundry Basket
Have you ever stumbled upon a beautiful home decor item online, only to be deterred by its hefty price tag? That’s exactly what happened to me recently. I spotted an elegant laundry basket that would have been perfect for my home, but the cost was simply too high. Instead of giving up, I decided to embark on a creative journey to find an affordable alternative. This quest led me to an inspiring video tutorial by Christine Nore #Teamforever20 on YouTube. Her ingenious method of repurposing a simple plastic stool into a stylish laundry basket using just a few ropes immediately captured my attention.
This DIY project isn’t just about saving money; it’s also incredibly fun, relaxing, and surprisingly straightforward. You can create a stunning, custom laundry hamper that rivals expensive store-bought versions, all while enjoying the satisfaction of crafting something beautiful with your own hands. Plus, upcycling a plastic stool gives it a new lease on life, contributing to a more sustainable lifestyle. If you’re looking for a budget-friendly, customizable, and enjoyable home improvement project, this is definitely one you should try! Let’s dive into transforming an ordinary stool into an extraordinary piece of functional decor.
Why Choose a DIY Upcycled Laundry Solution?
In an age where sustainability and personal expression are highly valued, DIY projects like this one offer numerous benefits. Firstly, the cost savings are substantial. A designer laundry basket can easily cost upwards of $50-$100, while the materials for this project are typically under $20, especially if you already own a plastic stool. Secondly, it’s an excellent way to practice upcycling, reducing waste by giving new purpose to items that might otherwise be discarded. A simple plastic stool, often found inexpensively or even free, becomes a chic and functional piece.
Beyond the practical advantages, there’s immense satisfaction in creating something unique for your home. You get to choose the colors, textures, and finishes, ensuring your laundry basket perfectly complements your interior design. This project is not just about a laundry basket; it’s about crafting a statement piece that reflects your personal style, all while being eco-conscious and kind to your wallet. It’s also a fantastic way to spend an afternoon, resulting in a beautiful and practical item you’ll be proud to display.
Essential Materials for Your Stylish Rope Laundry Hamper
Gathering your materials is the first exciting step in any DIY project. For this charming laundry basket, you’ll need a few common items. The beauty of this craft lies in its simplicity and the accessibility of its components. Here’s a detailed list to get you started, along with some tips for selection:
- Ropes: You’ll need a combination of ropes to achieve the multi-tone look, specifically one black and two white ropes. The length will depend on the size of your stool, but generally, having ample rope is better than running short. Look for cotton or jute ropes for a natural, rustic, or bohemian feel. Synthetic ropes can also be used for a more modern, durable finish. Ensure the ropes are of a consistent thickness for an even wrap. If you can’t find black rope, don’t worry – that’s where the optional paint comes in!
- Plastic Stool: The core of our project! Almost any sturdy plastic stool will work, but consider its shape and size. A cylindrical stool is easiest to wrap, but square or rectangular stools can also be transformed with a little more care. Ensure it’s clean and free of any major cracks or damage. This is your foundation, so a stable stool is key.
- Laundry Bag: Choose a washable fabric laundry bag that will fit snugly inside your stool once it’s wrapped. Cotton, canvas, or mesh bags are excellent choices. Consider a bag with a drawstring for easy removal and washing. The color can either blend with your rope scheme or provide a contrasting pop!
- Hot Glue Gun and Glue Sticks: Your primary adhesive! A reliable hot glue gun is crucial for securing the rope firmly to the stool and to itself. Stock up on plenty of glue sticks – you’ll use more than you think to ensure every layer is perfectly adhered. Safety first: always be cautious when using a hot glue gun.
- Scissors: A sturdy pair of scissors will be needed for cutting both the rope and the leather straps. Good quality, sharp scissors will make clean cuts and prevent fraying.
- Leather Straps: These will form the elegant handles for your laundry basket. You’ll need two straps of equal length. You can purchase pre-cut leather straps from craft stores or repurpose old belts. For a cruelty-free option, faux leather or durable canvas straps work just as well. Aim for straps that are comfortable to grip and strong enough to bear the weight of full laundry.
- Leather Screws or Pins: To provide extra security for your handles. While hot glue offers initial adhesion, screws or rivets will make the handles much more robust and long-lasting, especially important for an item that will be frequently carried. Ensure they are suitable for the thickness of your straps and the plastic of your stool.
- Paint (Optional): If you couldn’t find black rope or wish to customize the color of your rope, paint is your solution. Acrylic or fabric paint diluted with water works well for soaking ropes. Choose a color that matches your aesthetic.
Step-by-Step Guide: Crafting Your Upcycled Laundry Basket
Now that you have all your materials, let’s get into the exciting part – building your beautiful, custom laundry basket! Follow these detailed steps carefully for the best results.
Step 1: Prepare and Wrap the Rope Around Your Stool
This initial step focuses on preparing your rope and establishing the sturdy base of your basket by wrapping the stool.
- Rope Preparation (If Painting): If you’re using paint to color your rope, start by mixing your chosen paint with some water in a bucket or large basin. The water helps the paint fully saturate the rope and achieve an even color. Submerge the rope completely, ensuring no white or unpainted sections are visible. Allow it to soak for a few minutes, then remove it and let it dry thoroughly. This might take several hours or even overnight, depending on the rope material and humidity. Ensure it’s completely dry before proceeding, as wet rope won’t adhere well with hot glue.
- Initial Rope Adhesion: Once your rope is prepared and dry, grab your plastic stool and lay it upside down. This position makes it easier to start the wrapping process from the bottom. Apply a generous dab of hot glue to the very bottom edge of the stool. Press the end of your black rope (or your first chosen color) firmly onto the glue, holding it in place until the glue sets. This is your starting point, so make sure it’s secure.
- First Layer Wrap: Begin to pull the rope tightly around the base of the stool. As you go, apply hot glue in small sections along the stool’s surface, pressing the rope firmly into the glue. Work in manageable sections to prevent the glue from cooling before you’ve adhered the rope. Maintain consistent tension on the rope to ensure a smooth, tight wrap without any gaps. The key here is uniformity.
- Building Layers: Continue wrapping the rope upwards, layer by layer, until you’ve reached the end of your black rope. For each subsequent layer, it’s crucial to dab hot glue not only onto the stool but also along the top edge of the previous rope layer. This technique ensures that each rope coil adheres tightly to the one below it, preventing any sagging or separation over time and creating a robust structure.
- Transitioning Colors: When you reach the end of your black rope, or whenever you want to introduce a new color (like the white rope in this project), apply a final dab of hot glue to secure the end of the current rope. Then, immediately adhere the beginning of the next colored rope (e.g., the white rope) directly to the end of the previous one. Ensure a seamless transition by pressing the ends together firmly. Continue the wrapping and gluing process with the new rope, following the same technique of adhering to the stool and the previous rope layer, until all your ropes are used or you reach your desired height for the basket.
Step 2: Add Handles and the Laundry Bag for Finishing Touches
With the main body of your basket wrapped, it’s time to add the functional elements – the handles and the laundry bag.
- Finishing the Rope Wrap: Continue wrapping the rope until you are approximately 2 inches (about 5 cm) away from the very top edge of the stool’s legs. This gap allows for the laundry bag to be neatly folded over. Once you’ve reached this point, cut off any excess rope. Apply a generous amount of hot glue to the cut end and press it firmly against the last wrapped layer to seal it. This prevents the rope from unraveling over time. Ensure this end is very secure.
- Preparing the Handles: Take your leather straps. You’ll need two equal lengths for your handles. Hold them up to your basket to determine the ideal length for comfortable carrying. Once you’ve decided, cut them cleanly with your scissors.
- Attaching the Handles with Glue: Position one leather strap on one side of the basket, ensuring it’s centered and aligned vertically. Apply hot glue liberally to the ends of the strap and press them firmly onto the wrapped rope surface. Hold them in place until the glue cools and sets. Repeat this process for the second handle on the opposite side, ensuring both handles are directly across from each other for balance.
- Securing the Handles with Screws/Pins: To give your handles maximum durability and security, especially since laundry baskets can get heavy, use leather screws or pins. Carefully pierce through the leather strap and the rope layers into the plastic stool structure beneath. Screw or pin them in place. This reinforcement will ensure your handles withstand repeated use.
- Inserting the Laundry Bag: Finally, take your chosen laundry bag and insert it into the newly transformed stool. Gently fold the edges of the laundry bag over the exposed top edges of the stool’s legs. You have two options here: you can either adhere these folded edges with hot glue for a permanent, neat finish, or you can leave them as is. Leaving them unglued allows you to easily remove the laundry bag for washing or replacement, which is often a more practical approach for a functional laundry basket.
Pro Tips for a Flawless DIY Laundry Basket
To ensure your project turns out perfectly and lasts for years, consider these expert tips:
- Hot Glue Gun Safety: Always use your hot glue gun in a well-ventilated area and on a protected surface. Be mindful of the hot nozzle and molten glue to avoid burns. Keep a bowl of cold water or a damp cloth nearby for quick relief if you accidentally touch hot glue.
- Consistent Rope Tension: The key to a professional-looking finish is maintaining even tension on the rope as you wrap. Too loose, and it will look messy; too tight, and it might deform the stool. Practice a bit to find the right balance.
- Ample Glue Application: Don’t be stingy with the hot glue! Apply enough to create a strong bond between layers and to the stool itself. However, avoid excessive globs that might show through the rope. Work quickly in small sections.
- Drying Time for Paint: If you painted your rope, patience is a virtue. Ensure the rope is completely dry before gluing. Any residual moisture can hinder adhesion and potentially lead to mold over time.
- Material Quality: Investing in good quality rope and sturdy leather straps will significantly impact the final look and durability of your basket. While this is a budget-friendly project, choosing slightly better materials can make a big difference.
- Cleaning Your Basket: For general cleaning, simply wipe down the rope exterior with a damp cloth. If you opted for a removable laundry bag, you can easily take it out and machine wash it as needed. For glued-in bags, spot cleaning is recommended.
Customization Ideas to Make It Truly Yours
One of the greatest joys of DIY is the ability to personalize your creations. Here are some ideas to make your laundry basket uniquely yours:
- Color Palette: Experiment with different rope colors to match your room’s decor. Ombre effects, stripes, or alternating solid colors can create striking visual interest. You could even dye parts of the rope yourself.
- Handle Alternatives: Instead of leather, consider sturdy fabric straps, thick canvas, or even braided rope handles for a different texture and aesthetic.
- Embellishments: Add decorative elements like tassels, beads, small charms, or even a personalized tag. Just ensure they don’t interfere with the basket’s function.
- Base Variations: If you find different shaped stools (square, rectangular), adapt the wrapping technique. For square stools, you might need to make sharper turns or use thicker rope to cover corners effectively.
- Functionality Boost: Think about adding small felt pads to the bottom of the stool to protect your floors, or even attach small caster wheels if you want a movable laundry cart.
The Rewards of Upcycling and Crafting
Beyond the immediate benefit of a new, functional laundry basket, this project taps into the wider movement of upcycling and sustainable living. By transforming an item destined for the landfill into something beautiful and useful, you’re contributing positively to the environment. Moreover, engaging in crafting can be incredibly therapeutic, offering a creative outlet and a sense of accomplishment. The pride you’ll feel every time you use your handmade laundry basket, knowing you created it from scratch, is truly priceless. It’s a testament to how creativity and resourcefulness can lead to stunning results without breaking the bank.
This project is a fantastic reminder that with a little imagination and effort, ordinary household items can be transformed into extraordinary pieces of home decor. Inspired by the brilliant tutorial from Christine Nore #Teamforever20, you too can craft a stylish, durable, and budget-friendly laundry basket that perfectly suits your needs and aesthetic. So, grab your materials, unleash your inner crafter, and get ready to enjoy your beautiful, handmade creation!
*All image credit belongs to Christine Nore #Teamforever20 via YouTube. Follow and subscribe to her channel for more inspiring DIY projects!