
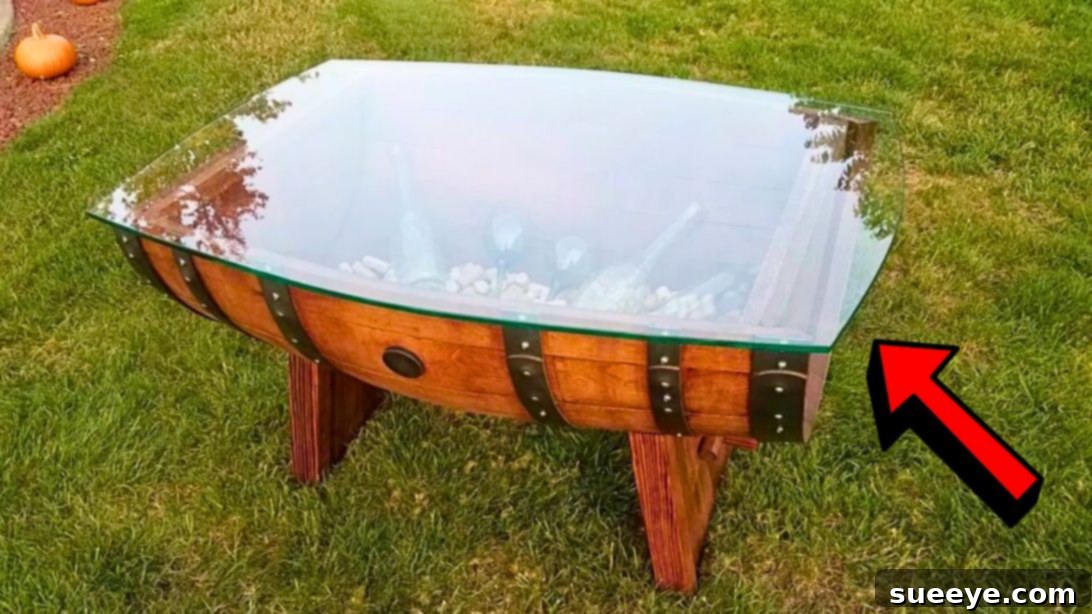
Crafting Elegance: Your Comprehensive Guide to a Repurposed DIY Wine Barrel Coffee Table
Imagine a centerpiece that tells a story, a functional piece of art that instantly elevates the ambiance of any room. This is precisely what you can achieve by transforming an old wine barrel into a stunning coffee table. This unique DIY project, inspired by the innovative work of Colbe Pease Woodworking on YouTube, is more than just a woodworking task; it’s an opportunity to create a bespoke item that blends rustic charm with modern versatility. I was incredibly impressed by the creative potential of an old wine barrel, realizing it could become not just a table, but a captivating display case for treasured items, themed decor, or even a mini indoor garden.
Repurposing materials is a wonderful way to embrace sustainability, add character to your home, and express your personal style. This guide will walk you through every step of crafting your very own wine barrel coffee table, ensuring a smooth and rewarding experience. From selecting your barrel to applying the final touches, we’ll cover everything you need to know to build a functional and beautiful piece that will undoubtedly become a focal point and a conversation starter in your living space. Get ready to embark on a creative journey that yields a truly extraordinary result!
Why Choose a Repurposed Wine Barrel Coffee Table?
In a market saturated with mass-produced furniture, a handcrafted wine barrel coffee table stands out as a beacon of individuality and thoughtful design. Beyond its distinctive aesthetic, there are compelling reasons why this project is an excellent choice for any DIY enthusiast looking to infuse their home with character and sustainability.
- Unrivaled Aesthetic Appeal: Each wine barrel bears the marks of its unique history – the rich hues of aged oak, the subtle curves, and the sturdy metal bands. This inherent character is transferred directly to your coffee table, resulting in a piece that exudes rustic elegance and timeless charm. It seamlessly blends with various interior styles, from farmhouse and industrial to bohemian and even contemporary, adding a warm, earthy element.
- A Sustainable and Eco-Friendly Choice: Upcycling an old wine barrel is a significant step towards sustainable living. Instead of contributing to landfill waste, you are giving a discarded item a beautiful and functional second life. This eco-conscious approach not only reduces your environmental footprint but also promotes a mindset of resourcefulness and creativity.
- An Engaging Conversation Starter: Be prepared for compliments and curious inquiries! Your wine barrel coffee table is far more than just a surface for drinks; it’s a fascinating piece of art with a story. Guests will be captivated by its origin and the ingenuity involved in its transformation, making it a natural focal point for discussion.
- Unique Customizable Display Space: One of the most enchanting features of this particular design is the integrated display area within the barrel’s half-shell. Protected by a clear glass top, this space offers an incredible opportunity for personalization. Showcase cherished keepsakes, a curated collection of objects, seasonal decorations, books, or even create a miniature terrarium. This ability to change the interior display means your coffee table can evolve with your moods, seasons, or personal interests, keeping it fresh and engaging.
- Exceptional Durability and Craftsmanship: Wine barrels are engineered for strength and longevity, designed to hold hundreds of liters of liquid under pressure for years. This inherent durability translates into a robust coffee table. With proper construction and finishing, your repurposed barrel will provide a sturdy and reliable surface for decades, becoming a cherished heirloom.
Opting for this DIY project is an investment in creating a piece that is not only highly functional but also deeply personal, environmentally responsible, and aesthetically inspiring.
Essential Materials and Tools for Your Project
Before diving into the construction phase, a thorough preparation of all necessary materials and tools is paramount. Having everything on hand will ensure a seamless workflow, enhance safety, and contribute significantly to the quality of your finished coffee table. Here’s an expanded list with important considerations for each item:
- An Old Wine Barrel: This is the foundation of your project. Source a barrel that is in reasonably good condition, free from severe rot or excessive damage. Local wineries, distilleries, or even online marketplaces like Facebook Marketplace or specialty wood suppliers are good places to look. Ensure it has been properly cleaned and aired out to remove any lingering wine or spirit residue.
- Grinder (with Metal Cutting & Grinding Discs): An angle grinder fitted with a metal cutting disc will be essential for making precise cuts through the barrel’s metal bands, if necessary, and for smoothing any rough edges. A grinding disc can then be used to deburr sharp edges and prepare metal surfaces.
- Drill (Cordless recommended with various bits): A powerful drill is crucial for pre-drilling pilot holes into the wood and metal bands, and for driving screws efficiently. Have a selection of wood bits and metal drilling bits ready.
- Screws (Wood and Self-Tapping Metal Screws): You’ll need an assortment. Use strong wood screws to assemble the internal base and attach the legs. Self-tapping metal screws (or small bolts with nuts and washers) are vital for securing the metal bands to the wooden staves, preventing them from shifting or falling off once the barrel is cut.
- Lumber (for Base, Stretcher, and Legs): Choose sturdy hardwood like oak, maple, or poplar for exceptional durability and stability. You’ll need pieces to construct the internal support structure (the wooden disc halves) that form the bottom of your display area, a central stretcher to bridge the barrel halves, and four robust legs. Dimensions will vary based on your barrel size and desired table height.
- Tempered Glass Sheet: For safety, this must be tempered glass, cut precisely to the outer diameter of your barrel’s top opening. Tempered glass is significantly stronger than regular glass and shatters into small, less dangerous pieces if broken. Aim for a thickness of at least 1/4 inch (6mm) to 3/8 inch (10mm) for durability. Request polished edges for a refined finish and safety.
- Wood Stain or Sealer: To protect the wood from moisture, enhance its natural grain, and achieve your desired aesthetic. Consider a clear sealer for a natural look, or a rich stain for a darker, more aged appearance. If the table might be exposed to the elements, opt for an outdoor-grade finish.
- Circular Saw (or Jigsaw/Bandsaw): This power tool is critical for making the long, straight cut to divide the barrel precisely in half lengthwise. A straight edge guide or jig will help ensure accuracy. A jigsaw or bandsaw might be useful for cutting the wooden disc, but a circular saw is usually best for the barrel itself.
- Measuring Tape, Pencil, and Marking Tools: Accuracy is key in woodworking. Ensure you have reliable measuring tools and a pencil or marker for precise layout.
- Safety Gear: Never compromise on safety. Essential PPE includes safety glasses (or goggles), hearing protection (earmuffs or earplugs), sturdy work gloves, and a dust mask (especially when cutting or sanding).
- Wood Clamps: Indispensable for securing the barrel during cutting, drilling, and assembly. Clamps prevent movement, ensuring accuracy and safety.
- Sandpaper (various grits): From coarse to fine, sandpaper will be needed to smooth rough edges, prepare the wood for staining, and achieve a professional finish.
- Paintbrushes or Rags: For applying your chosen stain or sealer evenly.
- Ratchet Strap or Strong Rope: To wrap around the barrel before cutting, preventing the staves from separating prematurely.
By gathering all these items beforehand, you’ll create an efficient and safer working environment, allowing you to focus on the craftsmanship.
Step-by-Step Guide: Building Your Wine Barrel Coffee Table
Constructing this unique coffee table involves careful planning and execution. Follow these detailed instructions, breaking down the project into manageable stages, to ensure a beautiful and sturdy result.
Step 1: Preparing the Barrel and Constructing the Base
The initial phase is critical, involving the careful preparation of the barrel and the robust construction of its foundational support. Precision here lays the groundwork for the entire project.
A. Secure the Metal Bands
Wine barrels are held together by the tension of their metal hoops. Before making any cuts, it’s absolutely crucial to secure these bands permanently to the wooden staves. Use your drill to create small pilot holes through each metal band and into the oak staves beneath. Then, firmly drive self-tapping metal screws through these holes, spacing them approximately every 4 to 6 inches around each band. This prevents the barrel from collapsing or the staves separating once you begin cutting.
B. Mark and Carefully Cut the Barrel
Determine the exact desired height for your coffee table. Typically, this project uses half a barrel. Measure and carefully mark a perfectly straight line lengthwise along the barrel where you intend to cut it in half. Accuracy at this stage is vital for an aesthetically pleasing and stable table. Before cutting, wrap a strong ratchet strap or heavy-duty rope tightly around the barrel, just above or along your marked cutting line. This provides additional support to the staves, ensuring they remain together during the cutting process. Using your circular saw, make a slow, steady, and precise cut along your marked line. Take your time to ensure the cut is as clean and straight as possible. You will only need one half of the barrel for the coffee table.
C. Prepare the Internal Wooden Disc and Base Components
Next, you’ll need to create the internal base that will form the bottom of your display area and provide support for the legs. Measure the inside diameter of your barrel’s opening and cut a wooden disc to match this size from your chosen lumber. This disc will effectively seal the bottom of your display cavity. Now, cut this wooden disc in half. These two half-discs will be installed inside the barrel. Simultaneously, cut the lumber for your central stretcher (a horizontal support beam) and the four legs. The stretcher should be long enough to span the inside width of the barrel and connect the two half-discs, providing a robust anchor point for the legs. Ensure all lumber pieces are cut cleanly and to the correct dimensions for optimal stability.
D. Assemble the Barrel Base and Legs
With the barrel cut and the wooden components prepared, it’s time for assembly. Position the two half-discs inside the barrel half, ensuring they fit snugly and create a level floor for your display. Secure these half-discs to the barrel staves using wood screws, pre-drilling pilot holes to prevent splitting. Next, attach the central stretcher firmly to the two half-discs or directly to the reinforced internal staves of the barrel. This stretcher is crucial for the overall structural integrity. Finally, attach the four prepared legs to this central stretcher or to reinforced points on the barrel’s internal base. Ensure the legs are evenly spaced and securely fastened, creating a stable and balanced foundation for your coffee table. Double-check for any wobbling and make adjustments as needed.
Step 2: Finishing, Final Assembly, and Personalization
Once the structural elements are in place, this phase focuses on refining the aesthetics, securing the final components, and personalizing your table to make it truly yours.
A. Stain, Seal, and Protect the Wood
Before the final assembly of the top, it’s advisable to apply your chosen wood stain or sealer. This step is crucial for both aesthetic enhancement and long-term protection. Apply the stain evenly with a brush or rag, working along the grain of the wood. Allow it to penetrate for the recommended time, then wipe off any excess. If desired, apply multiple coats for a deeper color or enhanced protection, allowing ample drying time between each application. Once the stain is dry, apply a durable sealer to protect the wood from moisture, spills, and daily wear and tear. Ensure the barrel is completely dry and cured according to the product instructions before proceeding.
B. Final Structural Assembly
With the barrel half stained and sealed, securely attach it to the assembled leg and base structure. Use strong wood screws or bolts, pre-drilling pilot holes to prevent splitting, to ensure the barrel is firmly mounted to its new foundation. Double-check all connections to confirm there is absolutely no wobbling or instability. This step firmly marries the barrel’s character with the strength of your handcrafted base, creating a cohesive and sturdy furniture piece.
C. Curate Your Interior Display
This is where your creativity truly shines! With the barrel half securely mounted and its internal base ready, you can now artfully arrange any objects, decor pieces, or themed displays that you wish to showcase. The interior of the barrel is a unique, protected cavity perfect for personalization. Consider a collection of vintage items, natural elements like stones or dried flowers, seasonal decorations that change throughout the year, or even a mini terrarium. Ensure any items placed inside are stable and won’t shift or break easily when the table is in use. This display transforms your coffee table into a dynamic, living showcase.
D. Install and Secure the Glass Sheet Top
Finally, carefully position the tempered glass sheet on top of the barrel opening. The glass should fit perfectly, resting securely on the barrel’s rim. To prevent the glass from sliding and ensure safety, you can use small, clear silicone bumpers or low-profile glass retainers. Place these evenly around the rim of the barrel before setting the glass in place. These will provide grip and slight cushioning, keeping the glass top stable and secure for everyday use. With the glass top installed, your unique, handcrafted wine barrel coffee table is now complete and ready to be admired and enjoyed!
Safety First: Important Considerations During Your Project
Working with power tools and heavy, often unwieldy materials like wine barrels necessitates a strong emphasis on safety. Adhering to these guidelines will help prevent accidents and ensure a smooth, enjoyable building process.
- Personal Protective Equipment (PPE): Always wear appropriate PPE. This includes safety glasses or goggles to shield your eyes from flying debris, hearing protection (earmuffs or earplugs) when operating loud machinery, sturdy work gloves to protect your hands from splinters and sharp edges, and a dust mask to avoid inhaling sawdust and fumes.
- Tool Familiarity and Safety: Before using any power tool, take time to understand its operation, safety features, and potential hazards. Ensure blades and discs are sharp and correctly installed. Always unplug tools when making adjustments, changing accessories, or when not in use. Keep all body parts, especially hands and fingers, clear of cutting paths and moving parts.
- Secure Your Workpiece: The wine barrel and any lumber you are cutting or drilling must be firmly secured with clamps. A workpiece that shifts unexpectedly can lead to inaccurate cuts, tool kickback, and serious injury. Work on a stable, level surface.
- Ventilation: When applying stains, sealers, or working in dusty conditions, ensure your workspace is well-ventilated to minimize the inhalation of fumes or airborne particles. Work outdoors if possible, or use fans and open windows.
- Proper Lifting Techniques: Wine barrels can be surprisingly heavy and awkward to maneuver. Always lift with your legs, not your back, and ask for assistance when moving or positioning the barrel to prevent muscle strains or injuries.
- Electrical Safety: Inspect all power cords for damage before use. Avoid operating electrical tools in wet or damp environments to prevent electrical shock.
- First Aid Preparedness: Keep a well-stocked first-aid kit easily accessible in your workspace in case of minor cuts or scrapes.
Unleash Your Creativity: Customization and Styling Ideas
The true beauty of a DIY project lies in its potential for personalization, and your wine barrel coffee table is an exceptional canvas for your unique style. The integrated display cavity and the barrel’s robust structure offer numerous avenues for customization:
- Thematic Interior Displays: The glass-covered interior is a perfect stage for creativity:
- Wine Connoisseur: Showcase a collection of vintage corks, unique wine stoppers, miniature wine bottles, or a beautifully arranged set of wine accessories.
- Nautical or Coastal Retreat: Fill with clean sand, an assortment of seashells, dried starfish, small decorative fishing nets, or miniature boat models to evoke a serene seaside vibe.
- Seasonal & Holiday Themes: Easily change out the decor with the seasons. Think vibrant autumn leaves and small pumpkins for fall, twinkling fairy lights and ornaments for winter holidays, fresh spring blooms (artificial or preserved) for spring, or bright, summery elements for warmer months.
- Miniature Garden or Terrarium: Create a lush, low-maintenance display with succulents, air plants, moss, and decorative pebbles. Ensure proper ventilation if using live plants.
- Hobby & Collection Showcase: Display items related to your hobbies, such as vintage cameras, antique books, a collection of unique stones, or even small art pieces.
- Integrated Lighting: Enhance your display by installing LED strip lights around the inner rim of the barrel or beneath the display items. This creates a warm, inviting glow, especially captivating in the evening, highlighting your curated collection.
- Base and Leg Variations: Don’t limit yourself to simple wooden legs. Consider industrial-style metal pipe legs for a modern, edgy look, or custom-carved wooden legs for a more ornate, traditional feel. You could also incorporate hidden castor wheels for easy mobility.
- Exterior Finish Enhancements: Beyond standard wood stains, experiment with different finishes. Apply a grey wash for a weathered, coastal look, or a darker, richer stain for a more formal appearance. You could also paint the barrel exterior in a solid color to match your decor, or add stenciled patterns or bespoke artwork for a truly unique statement.
- Functional Additions: If you prefer hidden storage over an open display, you could design a hinged wooden lid for the barrel’s interior, turning it into a discreet compartment for blankets, magazines, or remote controls.
- Top Surface Alternatives: While glass is classic, consider other materials if they suit your style, such as a custom-cut piece of clear acrylic (lighter and less fragile) or a fitted wooden top for a more traditional, solid surface.
This coffee table is more than just furniture; it’s a dynamic design element waiting for your personal touch. Let your imagination be your guide in making it truly your own.
Maintenance and Care for Your Wine Barrel Coffee Table
To ensure your handcrafted wine barrel coffee table remains a beautiful and functional centerpiece for many years, proper care and maintenance are essential. Following these simple tips will help preserve its beauty and structural integrity:
- Regular Cleaning: For the glass top, use a standard glass cleaner and a microfiber cloth to maintain a streak-free shine. For the wooden surfaces, dust regularly with a soft, dry cloth. For spills, wipe immediately with a slightly damp cloth, then dry thoroughly. Avoid harsh chemical cleaners on the wood, as they can damage the finish.
- Protect the Wood Surface: Always use coasters under glasses, mugs, and hot dishes to prevent water rings, heat marks, and stains. While the wood is sealed, excessive moisture or heat can still cause damage over time.
- Reapply Finish as Needed: Depending on the wear and tear, and the type of finish originally applied, you may need to reapply a coat of wood stain or sealant every few years. This will refresh its appearance and restore its protective layer, especially if the table is exposed to sunlight or humidity.
- Inspect and Tighten: Periodically check all screws, bolts, and joints to ensure they remain tight and secure. Wood can expand and contract with temperature and humidity changes, potentially loosening fasteners. Tighten any loose connections to maintain stability.
- Consider Placement: While wine barrels are durable, prolonged direct sunlight can cause the wood to dry out, fade, or even crack over many years. Extreme humidity fluctuations can also affect the wood. If using the table outdoors, ensure it has an outdoor-grade finish and consider covering it during harsh weather or non-use periods.
With a little care, your unique wine barrel coffee table will continue to be a source of pride and beauty in your home for decades.
Your New Centerpiece: A Testament to DIY Craftsmanship
Congratulations on completing your journey from an old wine barrel to a spectacular, custom-built coffee table! This project is far more than just constructing a piece of furniture; it’s about embracing the art of repurposing, showcasing your creativity, and adding a unique, story-filled element to your home. Each curve of the aged oak, every sturdy metal band, and especially the thoughtfully curated display within its heart, will serve as a constant reminder of your skill, vision, and dedication to sustainable design.
We hope this comprehensive guide has empowered you with the knowledge and confidence to bring this magnificent project to life. The satisfaction of crafting something beautiful and functional with your own hands is truly unparalleled. May your new wine barrel coffee table bring joy, spark conversations, and become a cherished focal point in your living space for many years to come. Enjoy your stunning, handcrafted masterpiece!
Special thanks to Colbe Pease Woodworking via YouTube for inspiring this incredible DIY project and for the fantastic visual references used throughout this guide. His innovative approach to woodworking continues to inspire countless DIY enthusiasts. If you loved this project idea and are eager for more creative endeavors, we highly recommend visiting his channel for more innovative ideas and detailed tutorials. Give his channel a visit and subscribe to support his amazing work!
Frequently Asked Questions (FAQs) About Your Wine Barrel Coffee Table
- Q: Where is the best place to source an old wine barrel?
- A: Excellent sources include local wineries, breweries, distilleries, or even cideries. You can also check online marketplaces like Craigslist, Facebook Marketplace, or specialty antique and salvage yards. Sometimes, garden centers or landscaping suppliers also carry them.
- Q: How do I properly clean a used wine barrel before starting the project?
- A: Start by rinsing the barrel thoroughly with water to remove any loose debris or residue. For deeper cleaning or to neutralize odors, you can use a solution of baking soda and water, or a specialized barrel cleaning solution. Allow the barrel to air dry completely in a well-ventilated area for several days to prevent mold or mildew formation.
- Q: What type of wood is typically used for wine barrels, and why is it suitable for furniture?
- A: Most wine barrels are crafted from high-quality oak, primarily French or American oak. This wood is incredibly dense, durable, and naturally resistant to decay, making it an excellent choice for furniture that will last for many years. Its distinct grain and aging process also add to its unique aesthetic appeal.
- Q: Is using tempered glass for the tabletop absolutely necessary, or can I use regular glass?
- A: Tempered glass is highly recommended and, for safety, often considered necessary. Unlike regular glass, tempered glass is specially treated to be much stronger and more resistant to impacts. If it does break, it shatters into small, blunt, pebble-like pieces, significantly reducing the risk of serious injury compared to the sharp shards of regular glass.
- Q: Can I use my wine barrel coffee table outdoors?
- A: Yes, but with proper protection. If you plan to use it outdoors, ensure you apply an outdoor-grade wood stain and sealer that offers robust protection against UV rays, moisture, and temperature fluctuations. It’s also advisable to cover the table during harsh weather conditions or prolonged periods of non-use to extend its lifespan and maintain its appearance.
- Q: What steps can I take to prevent the barrel staves from splitting further after I cut the barrel in half?
- A: The most critical step is to firmly secure all metal bands to the wooden staves with screws *before* making any cuts. Additionally, ensure your internal wooden base and stretcher components are robustly constructed and securely fastened to the staves of the barrel half. This provides continuous structural integrity and prevents the staves from separating or warping.
- Q: What if I don’t own all the listed power tools? Are there alternatives?
- A: While power tools like a circular saw make the process much easier, faster, and more precise, some cuts can be made with hand tools (e.g., a handsaw for lumber, although cutting the barrel with one would be very challenging). For expensive or specialized tools, consider renting them for a day or utilizing local makerspaces or woodworking shops that offer access to equipment and expert guidance. This can be a cost-effective solution.
- Q: How can I ensure the glass top doesn’t slide off?
- A: To secure the glass, place small, clear silicone bumpers (often found at hardware stores or online) evenly around the rim of the barrel before setting the glass in place. These bumpers create friction and slightly lift the glass, preventing it from sliding. For added security, you can also use low-profile glass retainers, which are small clips designed to hold glass tops firmly in place.