
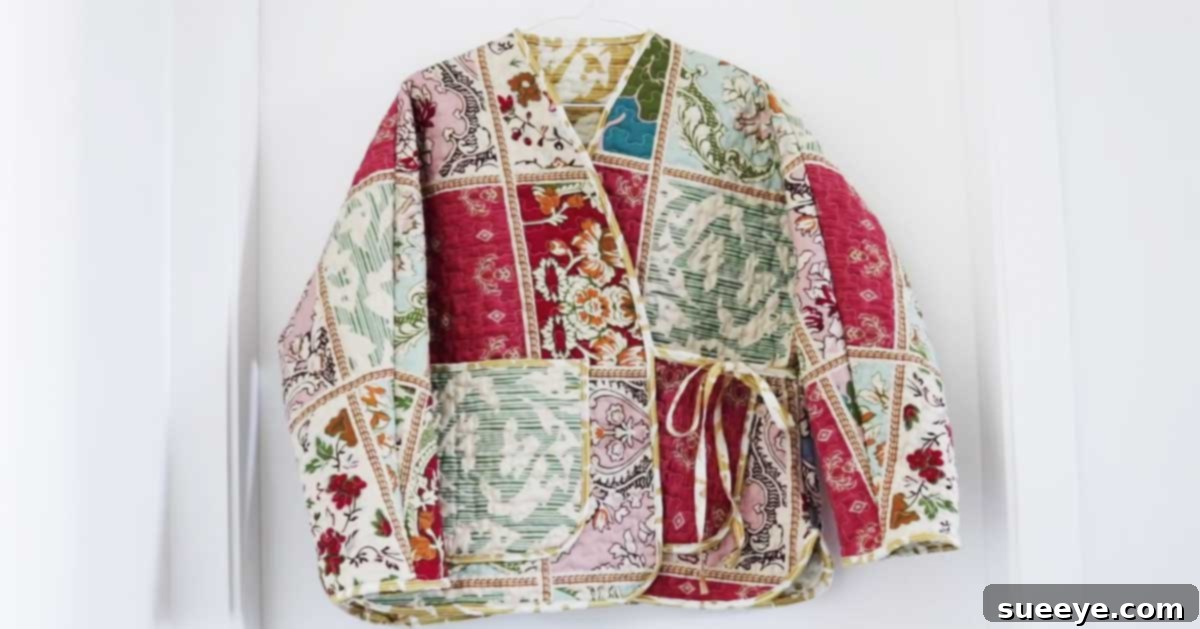
Embark on a delightful sewing adventure that combines sustainability with personal style! This jacket, crafted from a repurposed quilt, has quickly become my latest obsession, and I’m thrilled to share the detailed journey with you. Inspired by the brilliant creativity of Emily Lightly, this project transforms an often-overlooked household item into a unique fashion statement. The most compelling aspect of this DIY is its accessibility and affordability: you can often find beautiful, forgotten quilts at local thrift stores for a minimal cost, ready to be given a brand-new life as your next favorite outerwear.
Beyond the simple joy of creating something with your own hands, crafting a quilted jacket taps into the growing trend of upcycling and sustainable fashion. Instead of contributing to textile waste, you’re giving a cherished textile a second chance, imbuing it with new purpose and personality. Each stitch you make adds to the story of the quilt, blending its history with your modern touch. Whether you’re a seasoned seamstress or just beginning your sewing journey, this guide will walk you through every step, ensuring a rewarding experience and a stunning finished product that’s truly one-of-a-kind.
Essential Materials for Your DIY Quilted Jacket
Before diving into the sewing process, gather all your supplies. Having everything ready will make the project smoother and more enjoyable. Here’s what you’ll need, along with some tips for selection:
- A Quilt: This is the star of your project! Look for a quilt that’s in good condition, without major tears or stains, especially in the areas you plan to use for the main body of the jacket. Thrift stores, vintage shops, or even your own linen closet are great places to find unique patterns and colors. Consider the thickness; a thinner quilt will be easier to sew, while a thicker one will offer more warmth. Pre-wash your quilt to ensure it’s clean and pre-shrunk before cutting.
- Jacket Pattern: Choosing the right pattern is crucial. You can find countless options online (PDF patterns) or at fabric stores (paper patterns). Look for a simple, loose-fitting jacket style, such as a bomber jacket, chore coat, or a classic boxy silhouette. Ensure the pattern you select is suitable for woven, non-stretch fabrics. Pay close attention to the sizing chart to pick the best fit for your measurements, remembering that a quilt can add bulk.
- Sewing Machine: A standard sewing machine capable of a straight stitch and a zigzag stitch will suffice. For working with bulkier quilt fabric, a machine with a powerful motor or a “walking foot” attachment can make a significant difference in evenly feeding multiple layers of fabric.
- Fabric Scissors: Invest in a sharp pair of fabric-only scissors. Cutting through multiple layers of quilt can dull them quickly, so avoid using them for paper or other materials. A rotary cutter and a large cutting mat can also be incredibly useful for precise, clean cuts on straight edges.
- All-Purpose Thread: Select a high-quality polyester thread that matches the dominant color of your quilt or offers a pleasing contrast. Polyester thread is strong and durable, ideal for garments that will see regular wear.
- Sewing Pins: You’ll need plenty of pins, especially for holding together bulky quilt layers and attaching binding. Long, sharp pins are preferable.
- Measuring Tape or Ruler: Essential for accurate measurements and marking your fabric.
- Iron and Ironing Board: For pressing seams open or flat, which helps create a professional finish.
- Seam Ripper: Every sewist’s best friend! Mistakes happen, and a good seam ripper allows you to easily correct them without damaging your fabric.
- Optional: Serger/Overlocker: While not strictly necessary, a serger can provide a very clean and professional finish to the raw edges of your jacket seams, preventing fraying. If you don’t have one, your sewing machine’s zigzag stitch or a faux overlock stitch will work perfectly well for finishing seams.
Step-by-Step Guide to Crafting Your Quilted Jacket
Step One: Preparing Your Quilt and Pattern
Begin by laying your chosen quilt out on a large, flat, and even surface. This could be a clean floor or a large cutting table. Carefully inspect the quilt for any areas that are worn, torn, or stained, and plan your pattern layout to avoid these sections if possible. If your quilt is older or was found at a thrift store, it’s highly recommended to wash and dry it according to its fabric content before you start. This ensures it’s clean, fresh, and pre-shrunk, preventing any surprises after your jacket is complete. While the quilt is drying, thoroughly review your chosen jacket pattern. Familiarize yourself with all the pattern pieces, their names, and the general construction order. Read through the pattern instructions at least once or twice before you begin cutting.
Step Two: Removing the Quilt Binding
Carefully remove all existing binding from the edges of your quilt. The binding is typically a strip of fabric sewn around the perimeter of the quilt to finish the raw edges. Use a seam ripper to gently unpick the stitches holding the binding in place, taking care not to snip or damage the quilt fabric itself. Removing the binding creates a clean, raw edge that will be easier to work with when cutting your pattern pieces and applying your new binding later. This step also allows you to fully open up the quilt and lay it as flat as possible for precise cutting.
Step Three: Laying Out and Cutting Your Fabric Pieces
Once the quilt is flat and free of binding, it’s time to lay out your pattern pieces. Place them on the quilt according to your pattern’s grainline directions and layout suggestions. Strategic placement is key: consider the quilt’s original design and how it will translate onto your jacket. For example, you might want a specific block to be centered on the back, or a border design to run along the hem. Pin your pattern pieces securely to the quilt. Due to the thickness of the quilt, you may need more pins than usual to keep the pattern stable. Using sharp fabric scissors or a rotary cutter, carefully cut out all your jacket pieces, including the front panels, back panel, sleeves, collar (if applicable), and any pocket pieces. Cut slowly and deliberately to ensure accurate, smooth edges.
Image credit: Emily Lightly via YouTube video.
Step Four: Threading Your Machine and Test Stitches
Before you start sewing your actual jacket pieces, load your sewing machine with the chosen thread color. It’s always a good practice to test your machine’s tension and stitch length on a small scrap of your quilt fabric. This allows you to check if your thread color blends well or provides the desired contrast, and ensures your stitches are even and secure on the thick material. Adjust your machine’s tension or stitch length if necessary. For quilting fabric, a slightly longer stitch length (e.g., 3.0-3.5 mm) often works best, as it helps prevent puckering and creates a more aesthetically pleasing stitch line.
Step Five: Constructing the Shoulders and Side Seams
Take your front and back jacket pieces. With right sides together, align the shoulder seams. Pin them generously, making sure the layers don’t shift. Stitch these seams using a straight stitch, backstitching at the beginning and end for reinforcement. If you have a walking foot, this is an excellent time to use it, as it helps feed the multiple layers of quilt fabric evenly, preventing one layer from stretching more than the other. Once sewn, press the seams open or to one side, whichever is specified by your pattern or preferred. Then, finish the raw edges of these seams to prevent fraying. You can use a serger, a zigzag stitch on your sewing machine, or even a simple turned-under seam for a clean finish. Repeat this process for the side seams of your jacket, again pinning with right sides together, stitching, pressing, and finishing the raw edges.
Image credit: Emily Lightly via YouTube video.
Step Six: Attaching the Sleeves
Next, you’ll attach the sleeves to the armholes of your jacket. There are typically two ways to do this: sewing the sleeves flat before sewing the side seams of the jacket and sleeves, or sewing the sleeves “in the round” after the side seams are closed. Refer to your pattern instructions for the recommended method. Whichever approach you take, align the sleeve cap with the armhole, matching any notches or markings. Pin thoroughly, easing the fabric gently around curves. Stitch the sleeves in place, making sure to pivot smoothly around the curves of the armhole. Once sewn, press the seams and finish the raw edges as you did with the shoulder and side seams. After the sleeves and front/back panels are joined, it’s an excellent idea to try on the jacket. This allows you to assess the fit, sleeve length, and overall jacket length before adding the final binding. Make any necessary adjustments now, while it’s still relatively easy to alter.
Step Seven: Adding Binding to the Cuffs
Now, it’s time to add the finishing touch of binding to the edges of your jacket, starting with the sleeve cuffs. You can either make your own binding strips from complementary fabric (cut on the bias for flexibility around curves) or use pre-made bias tape. For the cuffs, fold your binding in half lengthwise and press. Align the raw edges of the binding with the raw edge of the cuff (typically on the wrong side of the fabric first). Pin the binding securely all around the cuff. Because you’re working with a thicker fabric and a curved edge, you will likely need a generous number of pins to keep the binding from shifting as you sew. Stitch the binding to the cuff, then fold it over to the right side of the fabric, encasing the raw edge, and topstitch it in place for a neat, durable finish.
Step Eight: Binding the Jacket’s Perimeter
Continue the binding process around the entire perimeter of your jacket, including the front opening, neckline, and bottom hem. This step requires patience and careful attention to detail, especially around corners and curves. Just like with the cuffs, align the raw edge of your binding with the raw edge of the jacket, pinning extensively to hold it firmly in place. When sewing, gently pull the fabric taut but do not stretch it, as this can distort the shape of your jacket. Go slowly, removing pins just before your needle reaches them. Pay extra attention to corners, mitering them neatly for a professional look. The goal is to encase all raw edges, creating a clean, finished appearance that also adds to the jacket’s durability and charm.
Step Nine: Optional Pockets and Final Embellishments
If your pattern includes pockets or if you wish to add them for functionality and style, now is the time to do so. Patch pockets are a popular and relatively simple option for quilted jackets, often made from the scrap fabric leftover from your quilt. Cut out your pocket pieces, hem the top edge, and press the side and bottom edges under. Position the pockets evenly on the front panels of your jacket, pin them securely, and topstitch them in place, reinforcing the top corners for strength. You might also consider adding other embellishments such as custom embroidery, fabric patches, or unique buttons or snaps for a front closure, if your pattern calls for one or if you desire extra customization. These final touches allow you to truly make the jacket your own.
Benefits of Crafting Your Own Quilted Jacket
Making a jacket from an old quilt offers numerous advantages beyond simply having a new piece of clothing. It’s a deeply satisfying creative endeavor that aligns with several contemporary values:
- Sustainability and Upcycling: You’re giving an existing item a new lease on life, diverting textiles from landfills, and reducing demand for new manufacturing. This is a truly eco-friendly fashion choice.
- Uniqueness and Personal Style: No two handmade quilted jackets are exactly alike. Your jacket will be a distinctive, one-of-a-kind garment that perfectly reflects your taste and tells a story, setting you apart from mass-produced clothing.
- Warmth and Comfort: Quilts are inherently designed for warmth and comfort. Translating this into a jacket means you’ll have a cozy, insulating layer perfect for cooler weather.
- Cost-Effectiveness: Sourcing an old quilt from a thrift store is typically far less expensive than buying new fabric of comparable quality or a designer quilted jacket. This project offers high-end style on a budget.
- Creative Expression: From choosing the quilt to selecting the pattern and adding embellishments, every step of this DIY project is an opportunity for personal expression and creative growth.
- Heirloom Quality: A well-made quilted jacket can become a cherished item, possibly even an heirloom, carrying memories and stories for years to come.
Tips for a Successful Quilted Jacket Project
- Pre-Wash Your Quilt: Always wash and dry your quilt before cutting. This ensures any shrinkage occurs before you cut your pattern pieces, and removes any odors or dirt from vintage finds.
- Use a Walking Foot: If your sewing machine has one or you can purchase one, a walking foot is invaluable for sewing through bulky layers like a quilt. It helps feed all layers evenly, preventing puckering and shifting.
- Go Slow: Don’t rush the process, especially when cutting and sewing thick seams or curves. Patience will result in a much higher quality finish.
- Press Seams Frequently: Pressing your seams after each major step helps flatten the bulk, create crisp lines, and give your jacket a more professional, finished appearance.
- Test Stitches on Scraps: Always test your stitch length and tension on a scrap of your quilt fabric before sewing on your actual jacket pieces.
- Don’t Fear the Seam Ripper: Mistakes happen. A seam ripper is your friend, not your enemy. It’s better to unpick a section and re-sew it neatly than to leave a mistake you’ll regret.
- Consider Quilt Thickness: If your chosen quilt is very thick, select a simpler pattern without too many intricate seams or details. Thicker quilts also benefit from larger seam allowances if you’re adapting a pattern.
Caring for Your New Quilted Jacket
Once your beautiful quilted jacket is complete, proper care will ensure its longevity. The best care method will depend largely on the original materials of your quilt. If it’s a vintage cotton quilt, machine washing on a gentle cycle with cold water and a mild detergent is usually safe. Avoid harsh chemicals or bleach. Tumble dry on a low heat setting or, even better, air dry flat to help maintain its shape and prevent damage to the quilting. If your quilt contains delicate embellishments, wool, or silk, hand washing or dry cleaning might be a safer option. Always check the care recommendations for the specific quilt fabric if known, and remember that gentle handling is key to preserving your handmade masterpiece.
Variations and Customization Ideas
The beauty of a DIY project lies in the ability to make it uniquely yours. Here are some ideas to further customize your quilted jacket:
- Lining: For extra warmth or a cleaner interior finish, consider adding a full lining to your jacket using a slippery fabric like rayon or a warm fleece.
- Closures: Experiment with different closures. Instead of just an open front, add a zipper for a modern touch, snap fasteners for ease, or a row of vintage buttons for a classic look.
- Collar Styles: Beyond a standard stand-up collar, you could add a cozy shawl collar, a dramatic pointed collar, or even a hood for extra protection against the elements.
- Embellishments: Hand embroidery, decorative patches, or even adding a personal label can elevate your jacket.
- Different Quilt Types: While this guide focuses on traditional quilts, consider using a patchwork throw, a vintage picnic blanket, or even piecing together smaller quilt blocks to create a truly bespoke fabric for your jacket.
Frequently Asked Questions About Quilted Jackets
Q: Can any quilt be used for a jacket?
A: Most quilts can be used, but generally, thinner to medium-weight quilts are easier to sew and drape better. Very thick, heavily batted quilts can be challenging to work with for beginners. Always inspect the quilt for condition and washability before you begin.
Q: What if my quilt is very thick?
A: If your quilt is thick, consider a simpler jacket pattern with fewer seams and details. Use a walking foot on your sewing machine, heavy-duty needles, and a longer stitch length to help your machine handle the bulk. Pressing seams open can also help reduce bulk.
Q: How do I choose the right pattern size?
A: Do not rely on ready-to-wear sizing. Always take your current body measurements and compare them to the pattern’s finished garment measurements or body measurement chart. Since quilts are bulky, you might choose a pattern size that allows for a bit more ease than you usually would for a regular fabric jacket.
Q: What is a walking foot, and do I really need one?
A: A walking foot is a special attachment for your sewing machine that has its own set of feed dogs. It helps to feed multiple layers of fabric through the machine evenly, preventing the top layer from shifting or stretching. While not strictly necessary, it is highly recommended for sewing with bulky or slippery fabrics like quilts, as it significantly improves stitch quality and ease of sewing.
Q: Can I hand sew a quilted jacket?
A: While theoretically possible, hand sewing an entire quilted jacket would be an incredibly time-consuming and physically demanding task due to the thickness and multiple layers of fabric. It is strongly recommended to use a sewing machine for this project.
There’s immense satisfaction in transforming an old quilt into a stylish, wearable art piece. Not only do you get a cozy, unique jacket, but you also contribute to a more sustainable fashion cycle. This project, while requiring patience and attention to detail, is incredibly rewarding. So grab that overlooked quilt, unleash your creativity, and get ready to stitch together a jacket that’s as unique as you are. We can’t wait to see your amazing quilted jacket creations!