
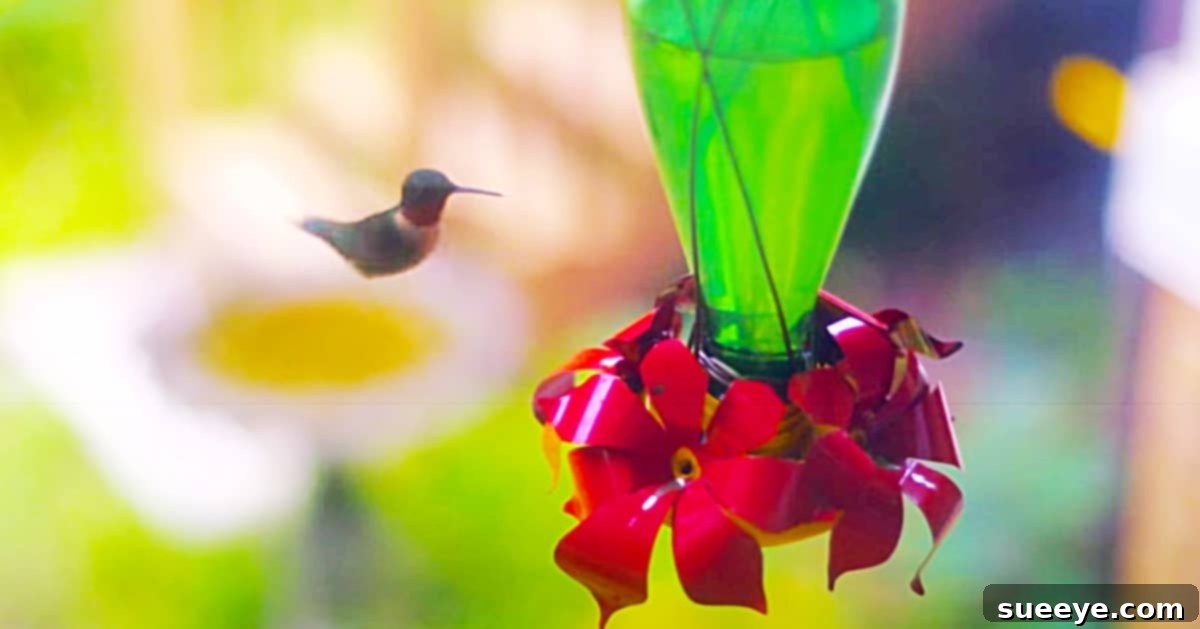
There’s an undeniable magic in observing hummingbirds. Their iridescent plumage, rapid wingbeats, and fearless approach to vibrant blooms captivate anyone lucky enough to witness them. For many, these tiny marvels represent joy, resilience, and the sheer beauty of nature. My own fascination began with an unforgettable encounter right on my porch. I was engrossed in a commemorative magazine, admiring images of Elvis Presley’s music room, complete with its stunning stained-glass peacocks, when suddenly, a magnificent hummingbird, mirroring the peacocks’ vibrant hues, landed softly on my leg. It seemed to gaze intently at the magazine, a moment so profound it felt like a whisper from the spirit world. From that day on, I’ve been driven to create a sanctuary for these exquisite creatures, transforming my outdoor space into a welcoming haven. This passion led me to discover the joy of crafting my own feeders, a journey that truly took flight after finding an inspiring hummingbird feeder video tutorial by ehullquist on YouTube. With a ready supply of Perrier bottles from my daily routine, I realized my hummingbird dreams were within reach.
DIY Hummingbird Feeder: Transform a Glass Bottle into a Backyard Oasis
Creating your own hummingbird feeder isn’t just a fun and rewarding craft project; it’s an invitation to nature’s most enchanting aerialists. This guide will walk you through transforming a simple glass bottle into a functional and beautiful feeder that will bring the dazzling display of hummingbirds right to your porch or garden. Not only is it an eco-friendly way to repurpose materials, but it also allows you to customize your feeder to perfectly complement your outdoor aesthetic.
Why Craft a Homemade Hummingbird Feeder?
There are numerous advantages to going the DIY route when it comes to attracting hummingbirds:
- Eco-Friendly & Sustainable: By reusing glass bottles and soda cans, you’re giving new life to items that would otherwise end up in landfill. This sustainable approach reduces waste and promotes responsible consumption.
- Cost-Effective: Commercial feeders can be pricey. Crafting your own saves money, using materials you likely already have or can acquire very cheaply.
- Customization & Personal Touch: Unlike mass-produced feeders, your homemade creation can be uniquely yours. Choose your favorite colors, embellishments, and designs to match your garden’s theme or your personal style.
- Educational & Engaging: It’s a fantastic project for all ages, fostering creativity and an appreciation for wildlife. Children especially love participating in the creation process and then watching their efforts pay off as hummingbirds visit.
- Sense of Accomplishment: There’s immense satisfaction in seeing hummingbirds flock to a feeder you’ve made with your own hands. It connects you more deeply with nature and provides a tangible reward for your efforts.
Understanding Hummingbirds: What Attracts Them?
To create the most effective feeder, it helps to understand what makes hummingbirds tick. These tiny birds have incredibly high metabolisms, requiring frequent feeding on nectar-rich flowers or feeders. They are primarily attracted by:
- Color: Red is their absolute favorite, often followed by orange, pink, and yellow. These bright colors signal the presence of nectar-rich flowers. Incorporating red into your feeder design is crucial.
- Nectar: A simple solution of sugar water mimics natural flower nectar. It’s vital to use the correct ratio and avoid harmful additives.
- Accessibility: Feeders should allow easy access for their long beaks and tongues, while deterring larger birds or insects.
- Placement: A feeder placed in a visible, safe location, offering some protection from predators and direct sun, will be more appealing.
Essential Materials for Your DIY Hummingbird Feeder:
Gathering all your supplies before you begin will make the crafting process smooth and enjoyable. Here’s what you’ll need for this specific project:
- A Perrier Bottle (or similar glass bottle): The unique shape and sturdy glass of Perrier bottles make them ideal, but any clean, clear glass bottle with a narrow neck can work. Ensure it’s thoroughly cleaned and dry.
- 2 Soda Cans (empty and cleaned): These will be transformed into the feeder ports and a decorative base. Any standard aluminum soda can will do.
- Bendable Wire (e.g., floral wire, craft wire, or galvanized wire): This is essential for creating a sturdy hanger. Choose a gauge that is strong enough to support the filled feeder but flexible enough to manipulate.
- A Section of Twine (optional, for decorative accents or alternative hanger): Natural twine can add a rustic touch or serve as a secondary hanging option.
- A Glue Gun: A reliable hot glue gun is critical for securely attaching components.
- Plenty of Glue Sticks: You’ll want extra to ensure you don’t run out mid-project. Look for all-purpose or outdoor-rated glue sticks for better durability.
- A Drill with Small Drill Bits: Needed to create holes in the soda cans for nectar access and potentially for securing the hanger. A 1/8 to 1/4 inch bit should suffice.
- Scissors (heavy-duty or tin snips): Standard craft scissors might struggle with aluminum cans; a pair of kitchen shears or tin snips will make cutting easier and safer.
- Spray Paint (red and yellow recommended): Focus on vibrant, bright colors that attract hummingbirds. Red is paramount. Ensure the paint is safe for outdoor use and allowed to cure completely.
Step-by-Step Directions: Crafting Your Hummingbird Feeder
This hummingbird feeder video tutorial by ehullquist on YouTube provides an excellent visual guide. Here, we break down the process into detailed steps to ensure your success:
Step 1: Prepare Your Materials
Begin by ensuring all your materials are clean and safe to work with. Thoroughly wash the Perrier bottle and soda cans with soap and water, then rinse well and allow them to dry completely. For the soda cans, carefully remove the tops and bottoms, then cut a straight line down the side to flatten them into sheets. Be extremely cautious when handling cut aluminum, as the edges can be very sharp. You might want to wear protective gloves.
Step 2: Design and Paint the Feeder Ports
From the flattened soda can sheets, cut out shapes that will form the “flowers” or feeding ports. You can freehand designs or create templates. Consider shapes with a central opening and petal-like structures around the edge to mimic a flower. You’ll need at least two of these for the main feeding ports and potentially more for decorative elements at the base of the bottle. Once cut, take your red and yellow spray paint. Lay out your aluminum shapes and bottle (if you wish to add decorative paint to the bottle, though clear glass is often preferred) in a well-ventilated area. Apply thin, even coats of paint. The key is vibrant red for the feeding ports, as this is the primary attractant for hummingbirds. Yellow can be used for accents. Allow ample drying time between coats and before proceeding to the next step, as paint fumes can be harmful to birds if not fully cured.
Step 3: Drill and Assemble the Feeder Components
Once your painted aluminum pieces are completely dry, it’s time to prepare them for assembly. Using your drill with a small drill bit (e.g., 1/8 inch), carefully make a central hole in each “flower” shape. This hole should be just large enough for a hummingbird’s beak to access the nectar from the bottle’s opening. If you’re adding additional decorative pieces to the bottle’s base, you might drill smaller holes around their edges to thread wire through later, if desired. Now, use your hot glue gun to attach the painted aluminum “flowers” around the neck of the Perrier bottle. Position them so that the central holes align perfectly with the bottle’s opening, allowing hummingbirds to feed easily. Ensure a strong, watertight seal with the hot glue around the edges of the aluminum pieces where they meet the glass bottle. This prevents nectar leakage and keeps insects out. If you’re adding a base, glue it securely to the bottom of the bottle.
Step 4: Create the Hanger
The original tutorial briefly mentions making a hanger, but let’s detail a robust method. Take your bendable wire. You can either wrap it securely around the neck of the Perrier bottle, just below the opening where you’ve attached your feeding ports, or create a more elaborate cradle. To make a simple yet strong hanger, wrap the wire several times around the bottle’s neck, twisting the ends together to secure it. Then, extend two lengths of wire upwards, twisting them together at the top to form a loop for hanging. Ensure the wire is evenly distributed to keep the feeder balanced. Alternatively, you can use the twine. If using twine, wrap it tightly around the bottle’s neck, tying secure knots, and then create a hanging loop. For added durability and to prevent slippage, you can apply a small dab of hot glue over the twine knots where they meet the glass, ensuring the hanger stays firmly in place. This step is critical for safe and secure placement of your feeder.
With these steps complete, your homemade hummingbird feeder is ready to be filled with delicious nectar and hung in a prime location. This feeder looks absolutely wonderful on my porch, and the hummingbirds are frequent and delighted visitors!
Homemade Hummingbird Nectar Recipe & Feeder Care
Crafting the Perfect Nectar:
Making your own hummingbird nectar is simple, safe, and cost-effective. The ideal ratio mimics natural flower nectar:
- Ingredients: 1 part granulated white sugar to 4 parts water.
- Instructions:
- Bring the water to a boil. This helps dissolve the sugar completely and purifies the water, making the nectar last longer.
- Remove from heat and stir in the sugar until it is fully dissolved.
- Allow the solution to cool completely to room temperature before filling your feeder.
- Important Notes:
- Do NOT use red dye: It is unnecessary and can be harmful to hummingbirds. The red elements on your feeder are sufficient to attract them.
- Avoid honey: Honey can ferment and promote the growth of dangerous bacteria and fungi that are deadly to hummingbirds.
- No artificial sweeteners: These offer no nutritional value and can be detrimental.
Maintaining Your Feeder for Hummingbird Health:
Regular cleaning is crucial to prevent the growth of harmful mold and bacteria, which can make hummingbirds sick. A clean feeder is a healthy feeder!
- Frequency: In warm weather (above 80°F or 27°C), change the nectar every 1-2 days. In cooler weather, every 3-5 days is generally sufficient. Even if the feeder isn’t empty, change the nectar regularly.
- Cleaning Process:
- Empty any remaining old nectar.
- Disassemble your feeder as much as possible.
- Wash all parts thoroughly with hot water and a bottle brush. You can use a mild solution of white vinegar and water (about 1 part vinegar to 4 parts water) for a deeper clean, but always rinse extensively with plain water afterward to remove any vinegar residue.
- Do NOT use soap unless it’s specifically designed for bird feeders and requires thorough rinsing, as residues can be harmful.
- Allow all parts to air dry completely before refilling with fresh nectar.
- Pest Control:
- Ants: Consider adding an ant moat above your feeder (a small cup of water that ants can’t cross).
- Bees/Wasps: If these become a nuisance, ensure your feeding ports are small enough to only accommodate hummingbird beaks and check for leaks in your feeder that might be attracting them.
Tips for Attracting Even More Hummingbirds
Beyond your new feeder, there are other ways to make your yard irresistible to hummingbirds:
- Plant Native Flowers: Incorporate tubular, red, orange, and pink flowers into your garden. Favorites include bee balm, cardinal flower, fuchsia, petunias, salvias, and trumpet vines. A diverse selection ensures a continuous food source.
- Provide Water Sources: Hummingbirds love to bathe. A shallow bird bath with a mister or a small fountain with a gentle spray can be a huge draw. They are particularly attracted to moving water.
- Offer Multiple Feeders: Hummingbirds are territorial. Placing several feeders out of sight from each other can reduce aggression and allow more birds to visit your yard.
- Provide Perching Spots: Small branches or clotheslines near your feeders offer convenient resting spots for these tiny birds.
- Avoid Pesticides: Hummingbirds also eat small insects for protein. Using pesticides can harm their food source and potentially the birds themselves.
- Be Patient: It might take some time for hummingbirds to discover a new feeder, especially if it’s the only one around. Once they find it, they’ll become regular visitors.
Watching hummingbirds dart and hover around your homemade feeder is an unparalleled experience, a vibrant dance of nature unfolding right outside your window. This DIY project offers a unique blend of creativity, sustainability, and connection to the natural world. With your beautifully crafted glass bottle feeder and a little care, you’ll soon be enjoying the company of these tiny, shimmering jewels, transforming your backyard into a lively and enchanting sanctuary. So gather your materials, embrace the joy of creation, and get ready to welcome these incredible birds into your life. Happy crafting, and happy bird watching!