
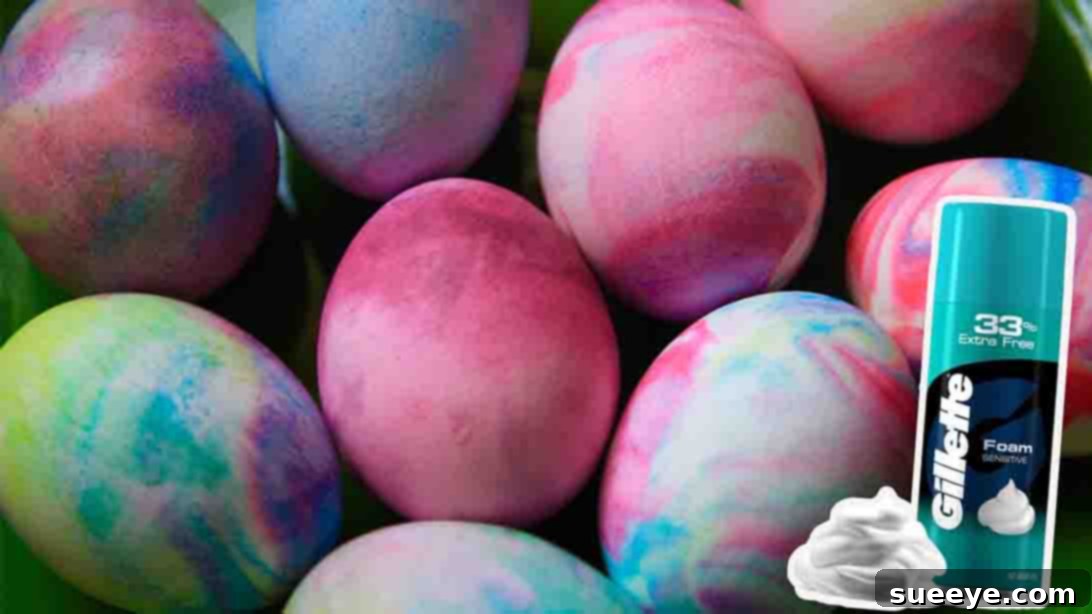
Unleash Creativity: The Ultimate Guide to Dyeing Easter Eggs with Shaving Cream for Stunning Marbled Effects
Are you searching for a fresh, vibrant, and incredibly fun way to add a splash of color to your Easter festivities this year? It’s time to step aside from traditional dye kits! We’re diving into the whimsical world of dyeing eggs using an unexpected household item: shaving cream. This innovative technique, popularized by creative minds like Everybody Craves on YouTube, promises stunning, marbled results that are as unique as they are beautiful. Get ready to transform ordinary hard-boiled eggs into extraordinary works of art with minimal effort and maximum fun!
This comprehensive guide will walk you through every step of this fascinating process. From perfectly preparing your eggs to mastering the swirl of colors, you’ll discover how simple it is to achieve breathtaking marbled patterns using just a few drops of food coloring and a fluffy canvas of shaving cream. Whether you’re a seasoned crafter or looking for a delightful family activity, this easy-to-master technique will elevate your egg-decorating game and create cherished memories for years to come. Prepare to be amazed by the vibrant, swirled masterpieces you’re about to create!
RELATED: Looking for more unique Easter projects? Enhance your holiday decor with this creative DIY Easter Egg Concrete Candles Tutorial for another captivating twist!
Why Choose the Shaving Cream Egg Dyeing Method?
While traditional methods of dyeing Easter eggs certainly have their timeless charm, the shaving cream technique offers a unique appeal that truly sets it apart. Here’s why this method is gaining so much popularity among families and crafters looking for fresh Easter egg ideas:
- Stunning Marbled Effects: Unlike the uniform, single colors achieved with simple dye baths, shaving cream allows food coloring to sit on the surface in distinct layers. This creates intricate, swirling patterns that resemble natural marble, tie-dye, or even abstract art. Each egg becomes a distinct, one-of-a-kind piece of art, making every creation a delightful surprise.
- Incredibly Easy and Fun for All Ages: This is a hands-on activity that’s perfect for the entire family. Children, in particular, adore the tactile experience of swirling colors in the fluffy shaving cream. The anticipation of revealing the final, unique design is always a thrilling moment, fostering creativity and wonder.
- Vibrant and Intense Colors: The concentrated nature of food coloring, when applied directly to shaving cream, often results in incredibly bright, vivid, and rich hues that truly pop. You can achieve deep, saturated colors or delicate pastels, depending on your preference and the amount of dye used.
- Minimal and Accessible Supplies: One of the greatest advantages is that you likely already have most of the necessary materials right in your pantry and bathroom cabinet. This makes it an accessible, budget-friendly, and spontaneous craft that requires no specialized purchases.
- Unique and Memorable Results: This method consistently produces visually striking eggs that stand out. They make fantastic decorative pieces, conversation starters, and memorable keepsakes from your Easter celebrations.
Materials You’ll Need for Your Marbled Masterpiece
Gathering your supplies is the exciting first step towards creating your beautifully marbled Easter eggs. The simplicity of this craft is a huge draw; you won’t need any specialized or hard-to-find items. Here’s a detailed look at what you’ll require, along with some helpful tips for selection:
- Hard-Boiled Eggs: Ensure your eggs are completely dry and cool before you begin the dyeing process. Dry shells allow for better dye adhesion. We highly recommend making a few extra eggs, as this process is so much fun, you’ll undoubtedly want to dye more than just a single dozen!
- Shaving Cream: Opt for a plain, inexpensive white foam shaving cream. It’s crucial to avoid gel varieties, as they typically do not work as well for creating defined marbled patterns. The simpler the ingredients and the whiter the foam, the better your results will be.
- Food Coloring: A vibrant variety of Easter hues will yield the most festive and appealing results. Liquid food coloring works perfectly, but gel food coloring can also be used for even more intense, concentrated colors and deeper saturation. Experiment with pastel blues, soft pinks, sunny yellows, and refreshing greens, or go bold with vibrant primary colors for a striking contrast.
- Straw or Knife (or popsicle stick, skewer, toothpick): These simple tools are essential for gently swirling your chosen food coloring into the shaving cream. They help create those captivating marbled patterns without overmixing the colors.
- Cookie Sheet (or a shallow baking dish, plastic bin, disposable tray): You’ll need a flat, rimmed surface to create your shaving cream “canvas.” A standard cookie sheet, a large, shallow baking dish, or even a plastic shoebox lid works wonderfully to contain the cream and colors, preventing spills.
- Paper Towels or Cold Water: These are for gently cleaning your dyed eggs after their shaving cream bath. Prepare a stack of paper towels or have a bowl of cold water nearby.
- Optional but Highly Recommended:
- Rubber Gloves: To keep your hands clean and protected from the potent food coloring, which can temporarily stain skin.
- Newspaper or Plastic Drop Cloth: Lay these down to protect your work surface from any potential spills, drips, or splatters, making cleanup significantly easier.
- Egg Carton or Wire Drying Rack: Essential for allowing your beautifully dyed eggs to air dry completely without touching other surfaces after they have been cleaned.
- Spoon or Spaghetti Scoop: A handy tool for carefully lifting the eggs out of the shaving cream mixture, helping to preserve the delicate patterns.
Step-by-Step Directions: Crafting Your Marbled Easter Eggs
Let’s dive into the exciting part! Follow these detailed instructions to create stunning, one-of-a-kind marbled Easter eggs that will impress everyone and become a highlight of your holiday decor.
Step 1: Prepare Your Hard-Boiled Eggs to Perfection
Achieving perfectly hard-boiled eggs is the foundational step for this project. Properly cooked eggs are durable enough to handle during the dyeing process, and their shells are ideal for dye absorption.
- Initial Boil: Place your eggs in a large pot and cover them with at least an inch of cold water. Bring the water to a full, rolling boil over medium-high heat. Starting with cold water helps prevent the shells from cracking when they’re introduced to heat.
- Simmer and Cook: Once the water reaches a vigorous boil, immediately reduce the heat to a gentle simmer. Cover the pot and allow the eggs to cook for precisely three minutes. This technique ensures the yolks are cooked through and firm, making the eggs easier to handle without breakage.
- Rapid Cooling with an Ice Bath: After the three minutes of simmering, carefully remove the pot from the heat. Using a slotted spoon, gently transfer the hot eggs directly into a large bowl filled generously with ice cubes and cold water. Let them sit completely submerged in this ice bath for fifteen minutes. The rapid cooling stops the cooking process, preventing the dreaded greenish ring around the yolk, and also makes the eggs much easier to peel later (though for dyeing, peeling isn’t immediately necessary).
- Thorough Drying: Once thoroughly chilled, remove the eggs from the ice bath and dry them completely with a clean towel. Any residual moisture on the eggshells can prevent the dye from adhering properly and might lead to blotchy results, so ensure they are bone dry. Set them aside while you prepare your vibrant dye station.
Step 2: Prepare Your Vibrant Shaving Cream Dye Bath
This is where the magic truly begins! Creating your colorful shaving cream canvas is an exciting step that sets the stage for your breathtaking marbled designs.
- Protect Your Workspace: Lay down newspaper, an old towel, or a plastic drop cloth to thoroughly protect your table or counter from any potential spills. This makes cleanup significantly easier. Don’t forget to put on your rubber gloves now – this will save you from colorful hands!
- Spread the Shaving Cream: Generously spray a thick, even layer of white foam shaving cream onto your cookie sheet or chosen shallow dish. Aim for a depth of approximately 1/2 inch to ensure there’s enough cream to fully coat your eggs and create distinct patterns. Ensure the surface is as smooth as possible.
- Add Food Coloring: Randomly drop various colors of liquid or gel food coloring onto the shaving cream. Be creative with your color choices and spacing. You can use single colors spaced apart, or experiment with complementary hues placed closer together for unique blends. Think about where you want your primary colors to be to achieve your desired effect.
- Swirl for Marbling: Using a straw, a knife, a skewer, or even a popsicle stick, gently swirl the food coloring into the shaving cream. Use light, deliberate motions to create intricate marbled patterns and distinct veins of color. The key is to avoid over-mixing, as this can cause the colors to blend too much, resulting in a muddy or less defined appearance. The goal is clear, vibrant swirls.
Step 3: Immersing and Dyeing Your Eggs
Now it’s time to immerse your perfectly prepared hard-boiled eggs into the vibrant color bath and let the magic unfold.
- Place the Eggs: Carefully place your dry, cool hard-boiled eggs into the colored shaving cream. You can gently roll them across the surface to pick up the colors, or submerge them partially, depending on whether you desire full coverage or a more artistic, partial dye effect. Ensure that all the areas you wish to dye are completely covered by the richly colored cream.
- Allow to Sit and Absorb: Leave the eggs nestled in the colored shaving cream for at least 20 minutes. For more intense and deeply vibrant colors, you can extend this time up to 30 minutes, or even slightly longer. The longer the eggs sit, the more deeply the colors will penetrate and set into the shell, resulting in bolder patterns.
- Experiment with Patterns: For varied effects, consider rotating the eggs halfway through the dyeing time to expose different sides to the color. Alternatively, you can carefully remove one egg and place another in a fresh, untouched part of the cream to pick up new and exciting color combinations.
Step 4: Reveal and Clean Your Marbled Masterpieces
The moment of truth! This step is always incredibly exciting as you gently uncover your unique and beautiful designs.
- Carefully Scoop the Eggs: Once the desired dyeing time has passed, use a spaghetti scoop or a large spoon to carefully lift each egg out of the shaving cream mixture. Try to get as much excess cream off as possible during this lift without touching the egg’s surface directly.
- Gentle Cleaning is Key: Transfer each egg onto a clean stack of paper towels. The most crucial part here is *gentle* cleaning. Gently pat dry each egg, or rinse them very lightly under cold running water. The goal is to remove the shaving cream but leave the vibrant dye on the shell. Do NOT rub harshly, as this can easily smudge or wipe off your intricate marbled patterns. If rinsing, do it quickly and with minimal pressure to preserve the design.
- Final Drying: Once clean and the excess cream is removed, place your beautifully marbled eggs in an egg carton or on a wire drying rack. Allow them to air dry completely. As they dry, the colors will often intensify and fully set, revealing the intricate patterns in all their glory. Handle them minimally until fully dry.
Expert Tips for Perfect Marbled Easter Eggs
To ensure your egg dyeing experience is as smooth, successful, and vibrant as possible, consider these helpful tips and tricks from experienced crafters:
- Always Use White Foam Shaving Cream: Stick to plain, inexpensive white foam shaving cream. Scented or gel varieties may contain ingredients that interfere with dye absorption, create less defined patterns, or leave an unwanted residue on your eggs.
- Don’t Over-Mix Colors: When swirling the food coloring into the shaving cream, use light, deliberate strokes. Too much mixing will cause the individual colors to blend excessively, leading to a single, muddy shade rather than distinct, eye-catching marble patterns.
- Wear Protective Gloves: Food coloring is potent and can temporarily stain your skin. Protect your hands with rubber or latex gloves throughout the entire process, especially when handling the dyed cream and cleaning the eggs.
- Prepare and Protect Your Workspace: Before you begin, lay down newspaper, old towels, or a plastic tablecloth to prevent accidental staining of your tables or countertops. A well-prepared workspace makes cleanup a breeze.
- Experiment with Color Combinations: Don’t limit yourself to traditional Easter pastels. Unleash your creativity by trying bold primary colors, elegant monochromatic schemes, or even vibrant rainbow combinations for diverse and striking effects.
- Adjust Dyeing Time for Intensity: For lighter, more subtle patterns and softer hues, you can reduce the soaking time to 10-15 minutes. For super vibrant, deep, and intense colors, leave the eggs in the cream for 30 minutes or even a bit longer.
- Try Multiple Dips for Layered Patterns: For multi-layered or more complex patterns, you can gently rinse an egg after its first dye, then place it into a *fresh* section of shaving cream with different colors for a second dip. This creates incredible depth and unique designs.
- Clean Eggs with Utmost Gentleness: This is arguably the most crucial step for preserving your design! When removing the cream, pat gently or rinse very lightly under cold water. Avoid any harsh rubbing, which will unfortunately wipe off your intricate, hard-earned designs.
- Are They Edible? Considerations for Consumption: If you’ve used food-grade shaving cream (many are just soap and air, always check the ingredients list) and food coloring, the eggs are generally considered safe to eat after thorough rinsing and peeling. However, due to the extensive handling and the potential for a very subtle residual shaving cream taste or texture, many prefer to use these beautifully dyed eggs purely for decorative purposes. If you do plan to eat them, ensure they are peeled before consuming.
Beyond Easter: Creative Uses for Your Marbled Eggs
Your beautifully marbled eggs aren’t just for a quick Easter hunt or a temporary display! Their unique designs and vibrant colors make them versatile decorative pieces that can enhance various aspects of your holiday celebration and continue to bring joy throughout the spring season.
- Stunning Centerpieces: Arrange your dyed eggs artfully in a decorative bowl, a clear glass vase, or on a bed of faux grass, straw, or moss for an eye-catching and festive Easter centerpiece that will surely draw compliments.
- Festive Table Settings: Elevate your Easter brunch or dinner by placing one exquisitely marbled egg at each place setting. This adds a personalized, colorful, and elegant touch to your holiday table.
- Unique Gifts and Favors: Package a few exquisitely marbled eggs in a small, clear box, a delicate organza bag, or a miniature basket. These make thoughtful, handmade gifts for friends, family, or as unique party favors for your Easter gathering.
- Charming Spring Decor: Don’t limit these beauties just to Easter weekend. These colorful and unique eggs can serve as charming spring decor throughout the season, bringing a touch of whimsy, color, and homemade warmth to any room in your home.
- Photography Props: The vibrant, swirled patterns and rich textures make these eggs fantastic props for spring-themed photography. Use them to add visual interest, color, and a festive touch to your flat lays or holiday snapshots.
- Engaging Learning Activity: Beyond just crafting, the process of creating these marbled eggs can be a fun and educational science and art lesson for children, exploring concepts of color mixing, pattern creation, and the properties of different materials.
Conclusion: Embrace the Art of Marbled Egg Dyeing
Dyeing Easter eggs with shaving cream is far more than just a simple craft; it’s an opportunity to unleash your inner artist, experiment with vibrant colors, and create truly unique works of art. This simple, engaging, and incredibly rewarding technique transforms ordinary hard-boiled eggs into extraordinary marbled masterpieces, perfect for adding a breathtaking, vibrant touch to your holiday decorations.
We sincerely hope this comprehensive guide inspires you to embrace this fun, innovative, and family-friendly method this Easter. Say goodbye to plain, single-color eggs and confidently say hello to a spectrum of swirling patterns and breathtaking hues. Gather your materials, invite your family and friends to join in the fun, and prepare to embark on a delightful crafting adventure. Don’t forget to share your stunning creations with us and your loved ones, and let the marbled magic of shaving cream transform your Easter into an unforgettable celebration of color, creativity, and cherished memories!