
The Ultimate Guide to Effortlessly Opening Stubborn Jar Lids
We’ve all been there: staring down a jar of deliciousness, only to be met with the unyielding resistance of a stubbornly tight lid. Picture this – you’ve just finished a long, demanding day. Hunger pangs are setting in, and all you crave is a simple, satisfying snack. You reach for the peanut butter and jelly, ready to assemble a quick sandwich. But as you try to twist open that grape jelly, it refuses to budge. You try drying your hands, using a towel for extra grip – nothing works. Frustration mounts, hunger intensifies, and eventually, you concede, eating plain bread, feeling utterly defeated. It’s a common kitchen nightmare, and it certainly was a sad day for me.
This exasperating scenario is a universal experience, sparking annoyance in kitchens worldwide. But why do jar lids become so incredibly stubborn? Understanding the culprit is the first step towards conquering the challenge. Don’t worry, you’re not alone, and more importantly, there are numerous ingenious methods to free that precious content from its glass prison. Let’s delve into the common reasons behind this culinary conundrum and then explore some highly effective, tried-and-true solutions.
RELATED: Easiest Way to Remove Labels from Jars
Why Do Jar Lids Get So Stuck? Understanding the Science
Before we dive into the solutions, it’s helpful to understand the common adversaries we’re up against when a lid refuses to turn. Knowing the “why” can often inform the “how.”
- The Vacuum Seal: This is arguably the most common and formidable opponent. During the canning and sealing process, hot food is placed into jars, and as it cools, the air inside contracts, creating a powerful vacuum. This vacuum seal is essential for preserving food and keeping it fresh, but it also creates immense pressure that holds the lid firmly in place. Breaking this seal is key to opening many jars.
- Dried Food Residue: Sometimes, it’s not a vacuum seal but rather sticky food residue that has dried and hardened between the lid and the rim of the jar. Sauces, jams, syrups, or even just general kitchen splatter can act like a powerful adhesive, gluing the lid shut.
- Slippery Hands or Lids: Simple but effective. Grease, oil, water, or even lotion on your hands can drastically reduce your grip, making it impossible to twist even a moderately tight lid. Similarly, smooth, metallic lids can be inherently slippery, especially when wet or oily.
- Thermal Expansion and Contraction: Materials expand when heated and contract when cooled. If a jar was sealed tightly while still warm and then cooled, the lid (often metal) might have contracted more than the glass jar, creating an even tighter fit. Conversely, sudden temperature changes can sometimes cause things to seize up.
- Overtightening: While factories use precise machinery, sometimes human error or just a very strong person tightening a jar can make it excessively difficult to open later.
Understanding these underlying issues empowers you to choose the right technique for the job. Often, a combination of methods might be necessary, but with a little patience and the right approach, no jar lid is truly unbeatable.
For more kitchen tips and tricks to make your culinary life easier, don’t miss these: 46 Cool Cooking Tips and DIY Kitchen Hacks.
Proven Techniques to Conquer Stubborn Jar Lids
When faced with a defiant jar, it’s time to equip yourself with the knowledge of various simple yet effective kitchen hacks. These four brilliant tips, championed by experts like America’s Test Kitchen, are renowned for their ability to liberate even the most stubborn lids. Let’s explore each one in detail, understanding the mechanics behind their success.
1 – The Plastic Wrap Method: Enhancing Your Grip
This method focuses on significantly improving your grip on a smooth, potentially slippery lid. The principle is simple: increase friction to allow your hands to apply maximum torque.
How It Works:
Plastic wrap, or cling film, is inherently tacky and provides excellent surface friction. By placing it over the lid, you create an irregular surface that your hand can more easily grasp, making it less likely to slip as you twist.
Steps:
- Take a small square of plastic wrap, roughly 6-8 inches (15-20 cm) on each side.
- Center the plastic wrap directly over the top of the jar lid.
- Firmly press the plastic wrap onto the lid, ensuring it adheres well, especially around the edges.
- With one hand firmly holding the jar body, use your other hand to grasp the lid (now covered with plastic wrap). Apply firm, upward pressure and twist counter-clockwise.
- The added friction from the plastic wrap should provide the extra grip needed to break the seal and open the lid.
This technique is particularly effective for lids that are smooth, wet, or have a thin layer of grease, making them hard to grip directly.
2 – The Rubber Band or Rubber Glove Method: Superior Friction
Similar to plastic wrap, this method is all about maximizing friction, but it takes it a step further by utilizing the superior gripping properties of rubber. Rubber is an excellent material for increasing friction, making it a go-to for many tight-lid situations.
How It Works:
Rubber materials, whether a thick band or a glove, create a high-friction surface between your hand and the lid. This allows you to apply more twisting force without your hand slipping, giving you the leverage needed to overcome even a strong vacuum seal or dried residue.
Steps:
- Using a Rubber Band:
- Find a thick, sturdy rubber band (a thin one might snap).
- Wrap the rubber band securely around the outside edge of the jar lid. Ensure it’s snug and doesn’t easily slide.
- Grip the lid firmly, ensuring your fingers are over the rubber band for maximum purchase.
- Twist the lid counter-clockwise with a steady, strong motion. The rubber band should prevent your hand from slipping.
- Using a Rubber Glove:
- Don a standard rubber dishwashing glove or a work glove with a rubberized palm.
- Grip the jar lid firmly with your gloved hand.
- The superior grip of the rubber glove will significantly reduce slippage, allowing you to apply more direct force to the lid.
- Twist counter-clockwise until the lid loosens.
Many kitchen stores also sell dedicated rubber jar openers, which are essentially thick, textured rubber pads designed specifically for this purpose. These can be incredibly effective for chronic lid-strugglers.
3 – The Wooden Spoon Tapping Method: Breaking the Vacuum
This technique directly addresses the vacuum seal, aiming to disrupt it with a gentle yet targeted shock. It’s often surprisingly effective and can save your wrists from excessive twisting.
How It Works:
Tapping the edge of the lid with a blunt object, like a wooden spoon, creates a small, localized impact. This impact can slightly deform the lid, introduce a tiny bit of air into the seal, or simply disrupt the vacuum pressure, weakening its hold. Think of it as a subtle shockwave that loosens things up.
Steps:
- Take a sturdy wooden spoon (or a similar blunt, non-marring object like the handle of a butter knife). Avoid using metal objects that could dent or damage the lid, making it harder to open, or shatter the glass.
- Hold the jar firmly on a stable surface or with your non-dominant hand.
- Gently but firmly tap the edge of the jar lid several times. Focus on tapping around the circumference of the lid, especially where it meets the glass. You might hear a small “pop” or “hiss” as the vacuum seal is broken.
- After tapping all around, try twisting the lid counter-clockwise. It should now turn much more easily.
This method works wonders for jars with a strong vacuum seal that just needs a little persuasion to release.
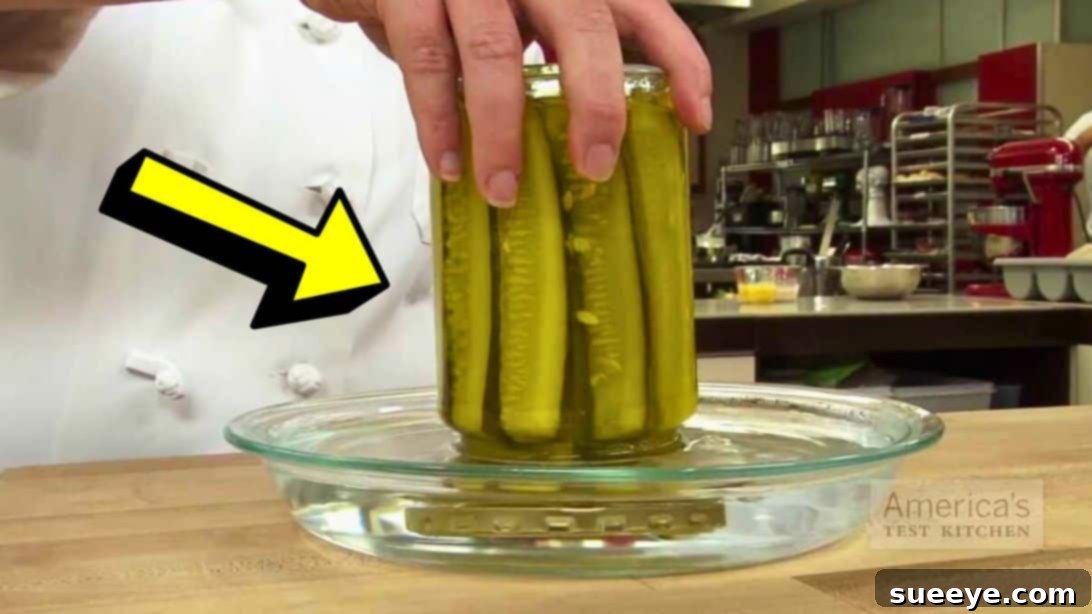
4 – The Hot Water Method: Thermal Expansion at Play
This method leverages the principle of thermal expansion. Different materials expand at different rates when heated, and we can use this to our advantage to loosen a metal lid from a glass jar.
How It Works:
Metal lids typically expand faster than glass jars when exposed to heat. By applying hot water specifically to the lid, you cause the lid to expand ever so slightly, creating a tiny gap between the lid and the jar’s rim, which can break the vacuum seal and free the lid.
Steps:
- Find a shallow dish, such as a pie plate, a bowl, or even a small pot.
- Fill the dish with hot tap water. It should be hot enough to feel uncomfortable to the touch, but not boiling, as extreme temperature changes can sometimes crack glass jars.
- Invert the jar and place it lid-down into the hot water, ensuring only the lid is submerged. The water should cover the lid but ideally not reach the glass jar itself, or at least minimize contact with the glass.
- Let the jar sit in the hot water for approximately 30-60 seconds. This allows the metal lid sufficient time to expand.
- Carefully remove the jar from the hot water, using a towel or oven mitts if needed. Dry the lid and jar thoroughly to improve your grip.
- Immediately attempt to twist open the lid counter-clockwise. The seal should now be significantly loosened, and the lid should turn with ease for most jars.
Important Safety Note: While rare, exposing very cold glass to very hot water too quickly can cause thermal shock and potentially crack the jar. Always use hot (not boiling) tap water and exercise caution. If you’re concerned, you can also run hot water directly over the lid from the faucet for a similar effect.
Preventative Measures: Avoiding the Jar Jam in the First Place
While these tips are excellent for rescuing a stuck lid, wouldn’t it be even better to prevent the problem from occurring? A little foresight can save you a lot of frustration.
- Wipe Rims Clean: After using a jar of jam, sauce, or pickles, always take a moment to wipe the rim clean with a damp cloth or paper towel. This prevents dried food residue from gluing the lid shut.
- Don’t Overtighten: When closing a jar, tighten the lid until it’s snug and secure, but avoid applying excessive force. There’s no need to strain yourself; a good seal doesn’t require Herculean strength.
- Store Properly: Ensure jars are stored in a cool, consistent environment if possible. Extreme temperature fluctuations can contribute to lids seizing.
- Use Plastic Seals for Long-Term Storage: For items like sugar or flour, consider using jars with plastic seals or rubber gaskets, which are generally easier to open than traditional metal screw-top lids.
Advanced Tools and Techniques for the Truly Stubborn
If the above methods, brilliant as they are, still leave you struggling, there are a few more advanced options or dedicated tools to consider:
- Dedicated Jar Openers: Many kitchen gadget companies sell specialized jar openers. These range from simple rubber grippers to more elaborate lever-action devices that clamp onto the lid and provide significant leverage. They are a worthwhile investment for those who frequently encounter stubborn jars or have limited hand strength.
- Prying with a Butter Knife (Use with Extreme Caution): For a truly desperate situation, some people carefully use the edge of a butter knife or a bottle opener to gently pry up the rim of the lid, attempting to break the vacuum seal. This technique should be used with extreme caution, as it can easily dent the lid (making it harder to reuse) or, more importantly, cause the knife to slip and lead to injury. It also carries a small risk of chipping the glass. Aim to just barely lift the edge to allow air in, rather than trying to force the lid off.
Conclusion: Empowering Your Kitchen Experience
A stubborn jar lid doesn’t have to be a source of unending frustration. With the right knowledge and a few simple tools, you can easily conquer this common kitchen challenge. Whether it’s enhancing your grip with plastic wrap, breaking the vacuum seal with a gentle tap, or leveraging the power of thermal expansion with hot water, there’s a solution for every defiant lid. Remember these tips, keep them in your culinary arsenal, and never again let a jar stand between you and your delicious desires.
Next time you face a tightly sealed jar, take a deep breath, pick your method, and open it with confidence. Happy cooking and hassle-free opening!