
There’s a universally frustrating moment for every home baker: you’re ready to start a recipe, only to realize the butter, a crucial ingredient, is rock-hard in the refrigerator. The clock ticks, and the thought of waiting hours for it to soften naturally, or risking disaster with a microwave, can be truly disheartening. Perfectly softened butter isn’t just a suggestion in many recipes; it’s often the key to achieving the ideal texture, rise, and flavor in your baked goods. For years, I struggled with this common kitchen dilemma, either forgetting to take the butter out in advance or resorting to impatient, often unsuccessful, methods.
That all changed when I discovered an ingenious and incredibly simple hack that softens butter in as little as one minute, without any risk of melting it into an oily mess. This technique, which involves nothing more than a warm glass, has become an indispensable part of my baking routine. Ever since learning this revolutionary method through the OnePotChefShow on YouTube, my baking prep has been transformed. It’s fast, effective, and so straightforward that you’ll wonder how you ever baked without it. Say goodbye to last-minute panic and hello to perfectly softened butter, every time. Let’s dive into this game-changing kitchen secret that will undoubtedly become your go-to method.
The Indispensable Role of Softened Butter in Baking
Many baking recipes, from cookies and cakes to pastries and frostings, specifically call for “room temperature” or “softened” butter. This isn’t just a trivial instruction; it’s fundamental to the success of your final product. When butter is softened, it means it’s pliable enough to yield with gentle pressure, but still holds its shape without melting. This texture is critical for several reasons:
- Creaming Method: Softened butter is essential for the creaming method, where butter and sugar are beaten together. The sharp edges of sugar crystals cut into the butter, creating tiny air pockets. These air pockets are vital for leavening, contributing to a light, airy texture and a delicate crumb in baked goods. Cold butter won’t cream properly, and melted butter will simply coat the sugar, failing to incorporate air.
- Emulsion and Structure: In recipes that involve adding eggs gradually to creamed butter and sugar, softened butter helps create a stable emulsion. This allows for a smoother, more uniform batter or dough. It also contributes to the overall structure and tenderness of the finished product, ensuring a consistent texture throughout.
- Flavor and Spread: Softened butter mixes more evenly with other ingredients, distributing flavor throughout the batter. In cookies, it helps them spread properly during baking, preventing dense, cake-like centers. For frostings, softened butter whips up into a smooth, fluffy, and spreadable consistency, making it easy to decorate.
- Avoiding Over-mixing: When butter is already at the right consistency, you spend less time mixing, which reduces the risk of over-developing gluten in flour-based recipes, leading to a tough result.
Understanding why softened butter is so important highlights the value of having a reliable, quick method to achieve it, and that’s precisely what the warm glass hack delivers.
Common Pitfalls: Why Other Butter Softening Methods Fall Short
Before discovering the warm glass method, many of us have tried various techniques, often with mixed results. While these alternatives might seem convenient, they often come with significant drawbacks that can compromise your baking:
- Leaving it Out on the Counter: The most natural method, simply leaving butter at room temperature, is ideal but requires foresight. Depending on your kitchen’s temperature and the size of the butter stick, this can take anywhere from 30 minutes to several hours, a luxury not always afforded when spontaneous baking strikes.
- Microwave Heating: The microwave is a tempting quick fix, but it’s notoriously difficult to control. Butter has a very narrow window between softened and melted. Even a few extra seconds in the microwave can turn a stick of butter into a pool of oil, which will negatively impact the texture and rise of your baked goods. Once butter melts, its fat and water components separate, making it impossible to cream effectively.
- Grating or Chopping: Some suggest grating cold butter or chopping it into small pieces to increase surface area and speed up softening. While this can work, it’s often messy, tedious, and still requires some waiting time. Moreover, grating can sometimes incorporate too much air too early, affecting the final texture.
- Pounding or Rolling: Attempting to soften butter by pounding it with a rolling pin or rolling it flat between parchment paper can be effective for some applications, but it requires physical effort and can be inconsistent, potentially warming the butter too much through friction.
These methods highlight the need for a technique that is both fast and gentle, ensuring the butter reaches that perfect pliable consistency without any melting. This is where the warm glass method truly shines.
Introducing the One-Minute Warm Glass Butter Softening Hack
Imagine effortlessly transforming a cold, rigid stick of butter into a soft, workable block in mere minutes, ready for your most delicate baking endeavors. This isn’t a dream; it’s the reality offered by the warm glass butter softening hack. It’s a brilliant, low-tech solution that leverages basic thermodynamics to create a miniature warming chamber for your butter, ensuring gentle, even softening without any risk of accidental melting. This method is praised for its reliability, simplicity, and the consistent results it delivers, making it a favorite among experienced bakers and novices alike.
What makes this hack so effective is its ability to create a controlled environment where the butter is exposed to a mild, even heat. Unlike the harsh, uneven heat of a microwave or the slow, unpredictable pace of ambient room temperature, the warm glass method provides just enough warmth to relax the butter’s structure, bringing it to that perfect pliable state quickly and safely. You don’t need any special gadgets or complex techniques; just a few common kitchen items and a minute or two of your time. This method is truly a testament to how simple solutions can often be the most profound, saving you time, frustration, and the integrity of your precious baking ingredients.
What You’ll Need:
- A sturdy, heat-resistant Glass (a drinking glass or mug works perfectly)
- A small Plate or bowl
- Your cold Butter (straight from the fridge)
- Hot water (from the tap is usually sufficient)
Step-by-Step Guide to Perfectly Softened Butter
Here’s how to execute this brilliant butter-softening hack with precision, ensuring your butter is perfectly prepared for any recipe:
The beauty of this method lies in its simplicity. You’re creating a warm, humid environment that gently coaxes the butter to soften. Start by ensuring you have all your components ready: your cold butter, a small plate, a sturdy glass, and access to hot tap water. This preparation will make the process seamless and efficient.
- Prepare Your Glass: Take your glass and fill it with hot water from the tap. You want the water to be hot enough to warm the glass thoroughly, but it doesn’t need to be boiling. Let the hot water sit in the glass for approximately one minute, or until the glass feels distinctly warm to the touch. This step is crucial as it’s the residual heat in the glass that will do all the work.
- Position Your Butter: While your glass is warming, place the cold stick of butter on a small plate. Ensure the plate is large enough to comfortably hold the butter and allow the glass to cover it without touching the sides of the plate. If you have a larger block of butter, you might want to cut it into smaller, more manageable pieces for quicker and more even softening.
- Create the Warm Chamber: Once your glass is thoroughly warmed, carefully pour out the hot water. Immediately and thoroughly dry the inside and outside of the glass with a clean towel. This prevents any condensation from dripping onto your butter and ensures a dry, warm environment.
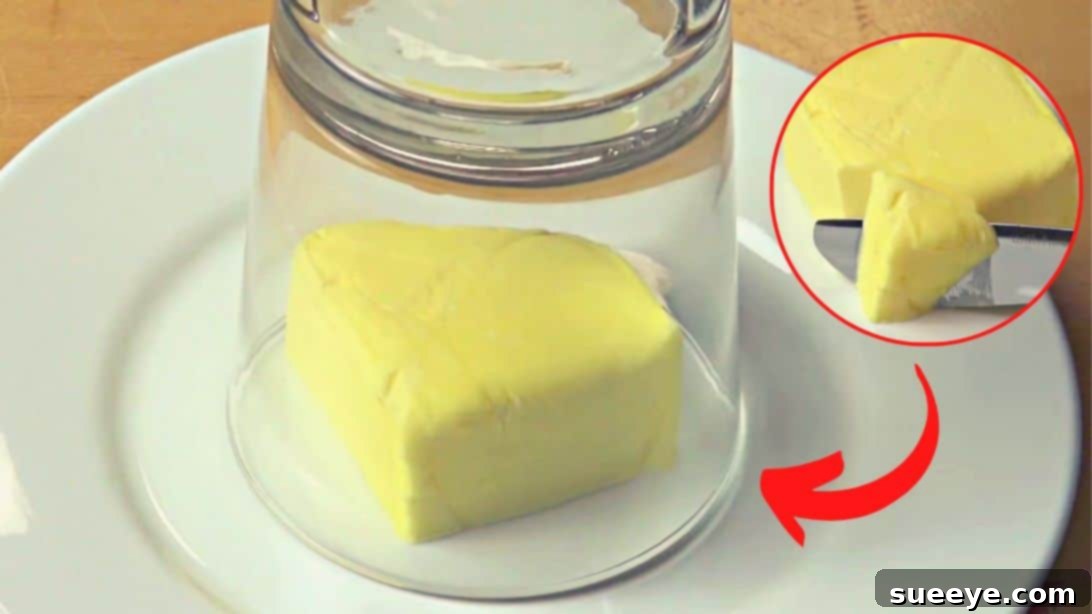
- The Waiting Game: Quickly invert the warm, dry glass and place it over the butter, completely covering it on the plate. Ensure the rim of the glass creates a seal with the plate, trapping the warm air inside. Let the covered butter sit undisturbed for about one to two minutes. The trapped warm air will begin to work its magic, gently warming the butter from all sides.
- The Reveal: After one to two minutes, carefully lift the glass. Gently press a finger onto the butter. It should now be perfectly softened – pliable and yielding to pressure, but still holding its shape without any signs of melting. If it needs a few more seconds, simply replace the warm glass and wait a little longer. Your butter is now ready to be incorporated into your recipe!
The Simple Science Behind the Warm Glass Method
The warm glass butter softening technique isn’t magic; it’s a clever application of basic physics, primarily heat transfer and insulation. When you fill the glass with hot water, the glass itself absorbs thermal energy. Glass is a good conductor of heat, and as it warms up, it stores this energy. Once the water is poured out, the glass retains a significant amount of latent heat.
When this warm glass is then inverted over the cold butter on a plate, it creates a small, insulated micro-environment. The trapped air inside the glass is warmed by the residual heat radiating from the glass walls. This warm air then gently envelops the butter, gradually raising its temperature from all sides. Because the air inside the chamber is contained, the heat is distributed evenly and consistently around the butter. This slow, gentle transfer of heat from the warm air to the butter is crucial. It prevents the rapid, uneven heating that often leads to melting in methods like microwaving. Instead, the butter’s fats soften uniformly, allowing it to reach that perfect pliable consistency without separating or turning liquid.
Furthermore, the enclosed space helps retain any minimal moisture released by the butter as it softens, creating a slightly humid environment that further aids in gentle softening. This controlled, radiant heat system ensures that the butter’s internal structure remains intact, making it ideal for creaming and other baking processes where melted butter would be detrimental.
Expert Tips for Mastering Your Butter Softening Technique
While the warm glass method is incredibly simple, a few extra tips can help you perfect the technique and adapt it to various baking scenarios:
- Choosing the Right Glass: Opt for a sturdy glass or ceramic mug that is heat-resistant. Thicker glass will retain heat better and provide a more stable warming environment. Ensure the glass is wide enough to comfortably fit over your stick of butter without touching it, allowing for ample air circulation.
- Optimal Water Temperature: Hot tap water is usually sufficient for warming the glass. You don’t need boiling water, as excessively hot glass might soften the butter too quickly or create too much condensation. The goal is warm, not scalding.
- Handling Large Quantities: If your recipe calls for multiple sticks of butter, you can either soften them one by one, or use multiple glasses simultaneously. For very large blocks, consider cutting them into standard stick sizes before softening to ensure even results. Alternatively, if you have a large heat-resistant bowl, you can heat it with water and invert it over a larger butter portion on a serving platter.
- What if it’s Still Cold? If after 1-2 minutes your butter isn’t quite soft enough, don’t fret. Simply re-warm your glass with hot water for another minute, dry it thoroughly, and place it back over the butter for an additional 30 seconds to a minute. Repeat as needed until it reaches the desired consistency. Avoid leaving it under the glass for too long initially, as it’s easier to add more heat than to cool down over-softened butter.
- Storage of Softened Butter: Butter softened using this method should ideally be used immediately in your recipe. If you soften more than you need, or if your plans change, you can refrigerate the softened butter. It will firm up again, but it won’t revert to its rock-hard state as quickly. For best results, however, soften only what you plan to use right away.
- Beyond Butter: This concept of creating a warm, humid micro-environment can also be gently applied to other ingredients that benefit from being at room temperature, like cream cheese for cheesecakes or even eggs, though eggs require less direct heat.
Why This Butter Hack Will Change Your Baking Game
Adopting the warm glass method for softening butter isn’t just about saving time; it’s about elevating your entire baking experience and the quality of your finished products. This simple trick brings a multitude of benefits that any baker, from beginner to expert, will appreciate:
- Unmatched Speed and Efficiency: No more waiting hours for butter to come to room temperature, and no more last-minute grocery runs because you forgot to plan ahead. This hack gets your butter ready in 60-120 seconds, allowing you to bake spontaneously and efficiently.
- Consistent, Perfect Results: Unlike the unpredictable nature of microwaves, this method consistently delivers butter that is perfectly pliable and uniformly softened, never melted. This consistency is vital for achieving the correct texture and rise in your baked goods, ensuring reliable outcomes every time.
- Elimination of Guesswork: You don’t need to guess if your butter is “soft enough” or worry about it becoming too warm. The gentle, contained heat allows for controlled softening, giving you confidence in your ingredient prep.
- No Special Equipment Required: All you need are items already found in almost every kitchen – a glass, a plate, and hot water. There’s no need for expensive gadgets or single-purpose appliances, making it accessible to everyone.
- Stress Reduction: Baking should be enjoyable, not stressful. This hack removes a common point of frustration, allowing you to focus on the creative aspects of your recipe rather than battling with stubborn, cold butter.
- Enhanced Baking Quality: When butter is softened correctly, it creams better with sugar, incorporates air more effectively, and forms a more stable emulsion with other ingredients. This directly translates to lighter, fluffier cakes, chewier cookies, and smoother frostings – ultimately, better tasting baked goods.
This simple technique truly is a game-changer. It streamlines your baking process, improves the quality of your ingredients, and helps you achieve superior results with minimal effort. Once you try it, you’ll wonder how you ever managed without it.
Elevate Your Baking: A Final Word
The journey to becoming a confident and skilled baker is often paved with discovering clever shortcuts and effective techniques that simplify complex processes. The warm glass butter softening hack is precisely one of those discoveries. It’s a testament to the power of simple ingenuity, turning a common kitchen frustration into a moment of effortless preparation. This method ensures your butter is always perfectly pliable, ready to be transformed into culinary masterpieces.
We owe a debt of gratitude to creators like OnePotChefShow via YouTube for sharing such invaluable kitchen wisdom. Their demonstration of this hack has undoubtedly saved countless baking projects and inspired many to embrace a more efficient approach in the kitchen. If you found this butter-softening tip revolutionary, we highly recommend exploring their other videos; you’re sure to find more inspiring and practical kitchen hacks to add to your repertoire. So, go ahead, give this trick a try, and prepare to elevate your baking game to new heights. Happy baking!