
Imagine enjoying crisp, fresh apples from your own harvest, not just for a few weeks, but for an entire year! This might sound like a dream, but with the right techniques, it’s an incredibly achievable reality. Many people face the common dilemma of an abundant apple harvest quickly turning into soft, bruised, or even rotten fruit. The good news is, you don’t need expensive equipment or a specialized root cellar to keep your apples perfectly edible and delicious for months on end. The secret lies in a careful, step-by-step approach that anyone can master. This comprehensive guide, inspired by the practical wisdom shared by Whole-Fed Homestead on YouTube, will walk you through everything you need to know about long-term apple storage. It’s an easy, low-cost method that focuses on meticulous handling and proper conditions, transforming your apple storage strategy from temporary to year-long success. Dive in to discover how you can significantly extend the life of your fresh apples, reduce food waste, and savor the taste of autumn well into the next season.
How to Store Apples and Keep Them Fresh For a Year
Achieving year-long apple freshness begins long before the apples ever reach your storage bags. It starts with careful selection and preparation, ensuring that only the best fruit makes it into your long-term supply. Follow these detailed instructions to maximize the longevity of your apple harvest.
Step 1: Optimal Harvesting for Longevity
The first and most critical step in preserving apples for extended periods is ensuring they are harvested at their absolute peak ripeness. This isn’t just about taste; it’s about the apple’s internal structure and chemical composition, which greatly influence its storage potential. When picking apples yourself, look for those that have developed their full color, firm texture, and characteristic aroma. A truly ripe apple will detach easily from the branch with a slight twist, rather than requiring a hard pull. Avoid apples that are under-ripe, as they won’t develop full flavor in storage, or over-ripe, which will quickly become soft and susceptible to spoilage.
Gentle handling during this stage is paramount. Any bruise or break in the skin, no matter how small, can become an entry point for bacteria and fungi, drastically shortening the apple’s shelf life. Carefully place each picked apple into your container; do not drop them. Consider harvesting sturdy, thick-skinned varieties known for good storage capabilities, such as Honeycrisp, Fuji, Granny Smith, Gala, or Red Delicious, as these generally perform best over long periods. Taking your time and being selective here will pay dividends in the months to come.
Step 2: Trim the Stem Immediately
As soon as you’ve picked an apple, it’s crucial to address its stem. While it might seem counter-intuitive to alter a freshly picked fruit, cutting the stem precisely and immediately after harvest is a vital step in preventing premature spoilage. The stem, if left long or jagged, can puncture the delicate skin of neighboring apples during transport or storage, creating vulnerabilities. More importantly, the natural protective barrier of the apple is weakest at the stem end. A clean-cut stem minimizes moisture loss from this point and reduces the chances of decay-causing microorganisms entering the fruit.
Use clean, sharp shears or a dedicated stem cutter to make a neat, flush cut, leaving no protruding parts. Avoid tearing the stem off, as this can create a larger, open wound. This small, precise action seals one of the most common entry points for rot and helps to maintain the apple’s internal moisture, which is essential for preserving its crispness and flavor over many months. This simple detail is often overlooked but plays a significant role in the overall success of your long-term storage efforts.
Step 3: Gentle Transport in Appropriate Containers
Once your apples are picked and their stems are trimmed, the method of transport from the orchard or garden to your home is another critical factor. The goal is to minimize any further damage or environmental stress. Placing your freshly prepared apples in a doubled-paper grocery bag is an excellent strategy. The paper material offers a breathable environment, preventing the build-up of excessive moisture that can encourage mold, while the double layer provides sufficient cushioning against minor bumps. This method allows for a slight exchange of air, which is better than fully sealed conditions at this initial stage.
Conversely, it’s strongly advised to avoid wooden crates for initial transport. Wooden crates, while seemingly rustic and natural, can harbor splinters that easily scratch apple skins. They also tend to be less forgiving if apples shift during transit, potentially leading to more bruising. Furthermore, wooden crates often allow for too much air circulation, which can lead to faster dehydration of the fruit. During transport, keep your apples in a cool, shaded area to prevent them from heating up, which can accelerate the ripening process and compromise their storage potential.
Step 4: Meticulous Sorting and Categorization
Upon arriving home, the next crucial step is a thorough sorting process. This is perhaps the most time-consuming yet essential part of long-term apple storage, as it directly addresses the age-old adage: “one bad apple spoils the bunch.” You will need to carefully categorize your apples into three distinct groups to ensure maximum storage success and prevent widespread spoilage.
- Absolutely Perfect Apples with No Blemishes: These are your prime candidates for year-long storage. Each apple in this category should be entirely free of any visible marks, bruises, soft spots, punctures, or insect damage. Their skin should be smooth, firm, and intact. These pristine apples possess the highest chance of surviving extended storage without compromising their quality or affecting other apples. Devote extra attention to inspecting every inch of these fruits.
- Apples with Little Marks on the Skin but Not Open Wounds: This category includes apples with minor, superficial blemishes such as small scuffs, light rubbing marks, or very slight, surface-level bruises that have not broken the skin. While these apples are still perfectly good, their minor imperfections make them more susceptible to decay over very long periods compared to the perfect ones. These should be designated for consumption within a few weeks to a couple of months. Do not mix them with your “perfect” apples for long-term storage.
- Apples with Open Wounds, Soft Spots, or Signs of Rot: Any apple exhibiting broken skin, deep bruises, soft or mushy areas, or any visible signs of rot or insect infestation must be immediately removed from the storage candidates. These apples produce significantly higher levels of ethylene gas – a natural plant hormone that accelerates ripening and spoilage – and can quickly contaminate your entire batch. They also provide easy entry points for mold and bacteria to proliferate and spread. These apples should be consumed immediately, processed into sauces, pies, or juice, or discarded if severely damaged. Under no circumstances should they be stored with other apples.
This meticulous sorting prevents the spread of rot and ethylene gas, ensuring that your perfectly healthy apples remain so for as long as possible.
Step 5: Secure Packaging and Refrigerated Storage
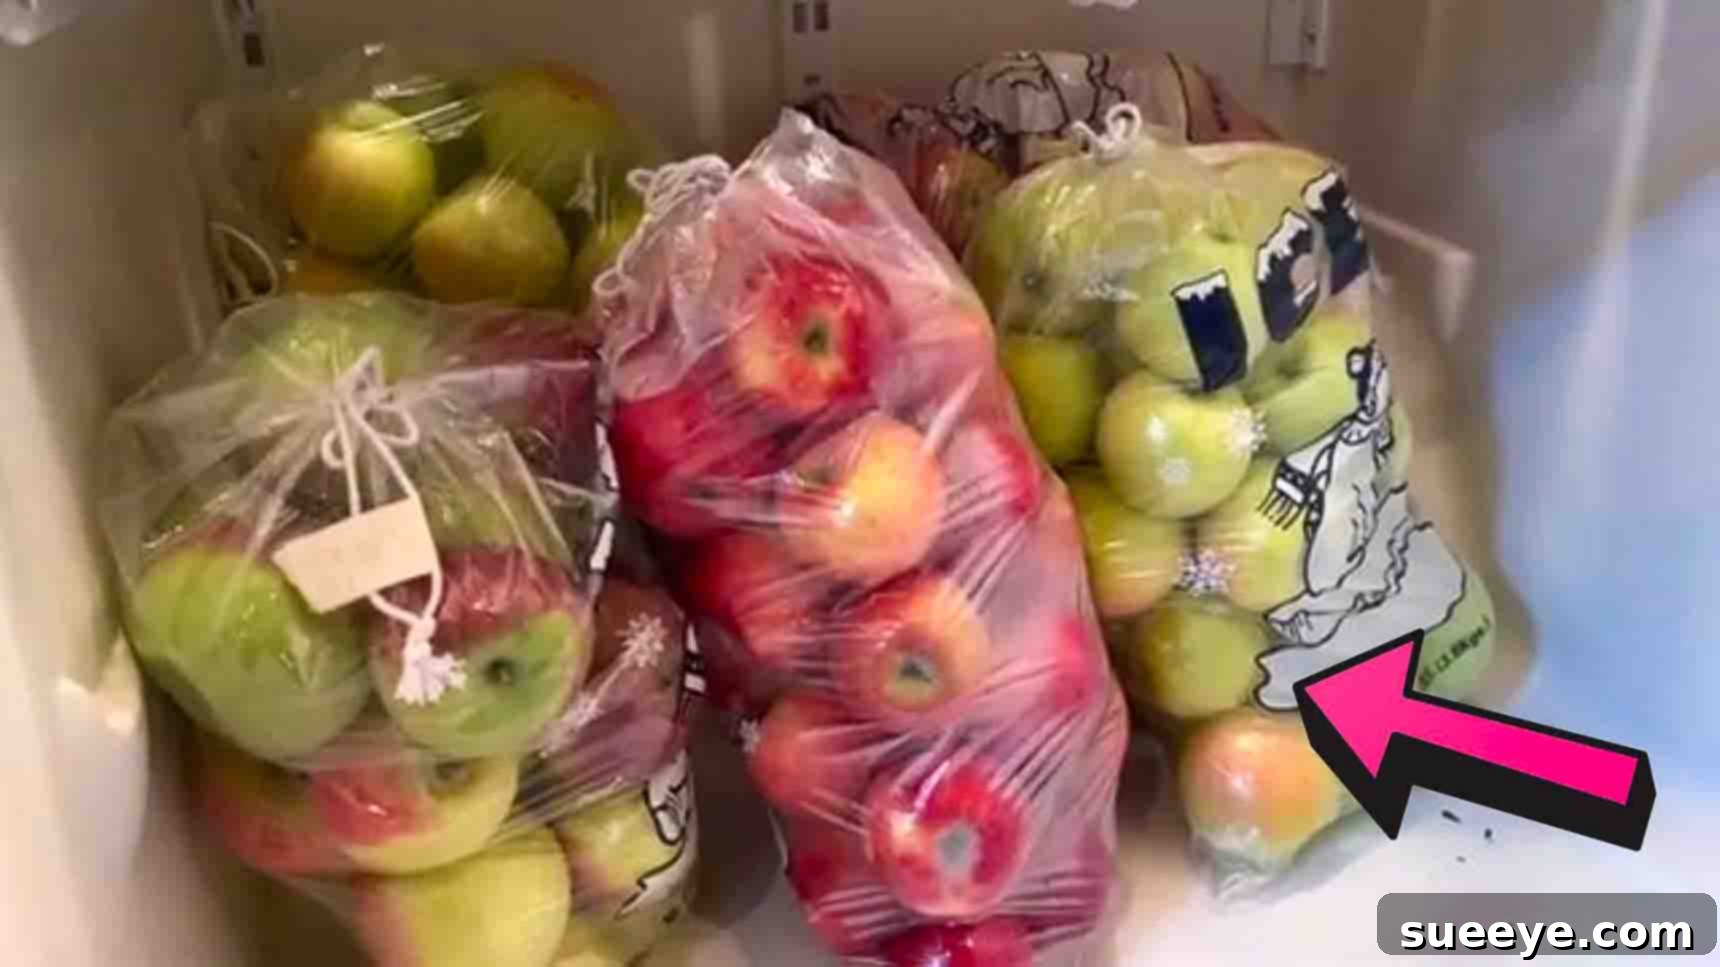
With your apples carefully sorted, it’s time for their final preparation before long-term storage. The choice of packaging and storage environment are crucial for maintaining freshness for up to a year. According to their sorted category, store the apples in heavy-duty ice bags. These specific bags are ideal because their thick plastic construction provides a robust barrier against moisture loss and helps to contain ethylene gas produced by the apples themselves. This self-contained micro-environment is key to slowing down the ripening process.
Place only apples from the “absolutely perfect” category into these bags for year-long storage. You might consider placing similar varieties together. Once filled (don’t overpack; allow some space), carefully squeeze out as much air as possible without bruising the apples, then tie the bag shut securely. A double knot or twist tie ensures a tight seal. Immediately after sealing, label each bag clearly with the date of storage and the apple variety. This simple step is invaluable for managing your inventory, allowing you to implement a “first-in, first-out” system and track which varieties hold up best.
Finally, store these sealed and labeled bags in the coldest part of your refrigerator, typically the crisper drawers if space allows, or on a shelf where temperatures are consistently low (ideally between 30-35°F or -1 to 2°C) with high humidity. The cold temperature significantly slows down the metabolic processes of the apples, while the sealed bag maintains a high-humidity environment, preventing dehydration and keeping the apples crisp. Avoid storing apples with other fruits and vegetables that produce high amounts of ethylene gas (like bananas, tomatoes, or avocados), even in separate bags, as the gas can still permeate the refrigerator environment. For those with extremely large harvests, a dedicated cold room or root cellar with consistent temperatures and high humidity would be an alternative, but for most home growers, a properly utilized refrigerator is perfectly adequate for year-long apple storage.
Benefits and Common Mistakes to Avoid
Mastering the art of long-term apple storage offers numerous benefits. It dramatically reduces food waste, allowing you to enjoy your harvest for an extended period, saving money on grocery bills, and ensuring a year-round supply of fresh, nutritious fruit. Stored apples can be used for snacking, baking delicious pies and crisps, making homemade apple sauce, or even pressing fresh cider long after the traditional apple season has passed. This method empowers you to take full advantage of seasonal abundance.
However, several common mistakes can undermine your efforts. Firstly, avoid washing apples before storage. The natural waxy coating on an apple acts as a protective barrier; washing it off can make the fruit more susceptible to moisture loss and decay. Secondly, never store damaged apples with perfect ones. As emphasized in the sorting step, just one compromised apple can release ethylene gas and pathogens that spoil an entire batch. Thirdly, improper temperature and humidity are critical failure points. Room temperature storage will quickly lead to soft, mealy apples, while insufficient humidity will cause them to shrivel. Lastly, avoid storing apples near other ethylene-producing fruits and vegetables like bananas, pears, or potatoes, even if your apples are bagged, as the gas can still impact them over time.
Conclusion
Storing apples for an entire year is not just a myth for dedicated farmers; it’s an accessible skill for anyone with a love for fresh produce. By meticulously following these steps – from careful harvesting and stem trimming to precise sorting, appropriate packaging, and correct refrigeration – you can successfully preserve your apple harvest for months on end. This simple yet effective method, championed by experts like Whole-Fed Homestead, eliminates the need for complex equipment and instead relies on careful attention to detail. Embrace these techniques to transform your approach to apple preservation, ensuring you have a steady supply of crisp, flavorful apples ready for any occasion, all year round. Share this invaluable knowledge with your friends and family so they too can enjoy the incredible bounty of a year-long apple harvest.