
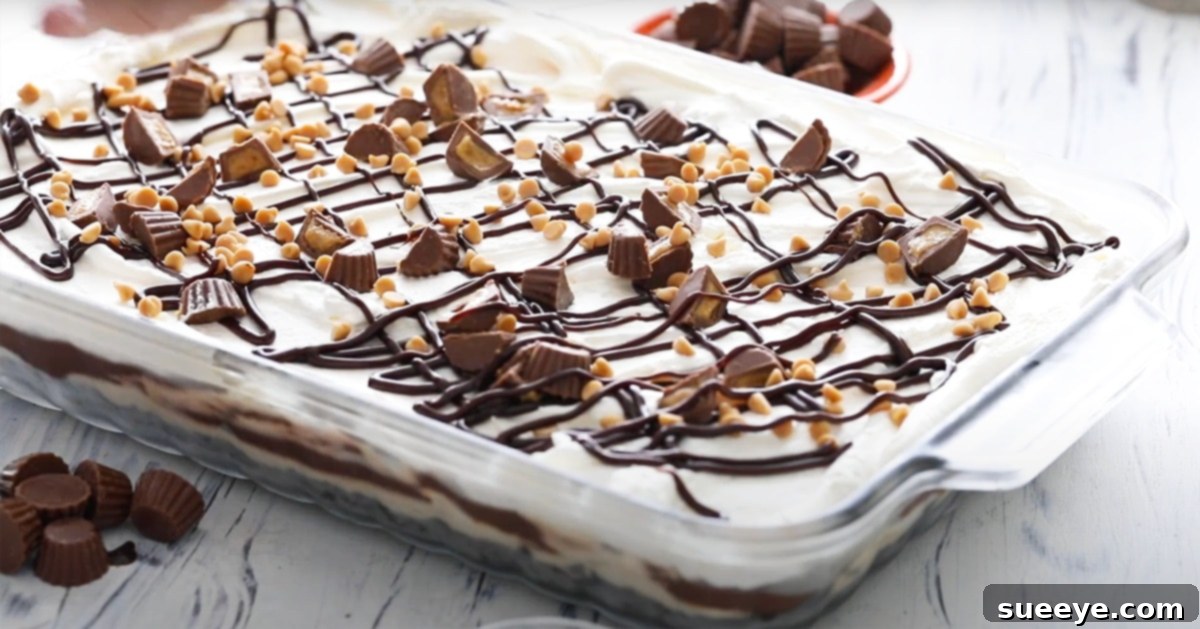
The Ultimate No-Bake Peanut Butter Lasagna: Your Go-To Easy Dessert
Imagine a dessert that combines the irresistible flavors of creamy peanut butter and rich chocolate, requires no baking, and comes together with minimal effort, yet looks absolutely magnificent. Welcome to the world of the No-Bake Peanut Butter Lasagna! This layered masterpiece, famously inspired by delightful recipes such as the one shared by Spend With Pennies on YouTube, is an absolute game-changer for anyone seeking a show-stopping dessert without the fuss of an oven.
This dessert isn’t just easy; it’s a symphony of textures and tastes. Each forkful delivers a delightful contrast: a crunchy Oreo cookie crust, a velvety smooth and tangy peanut butter cream cheese filling, a decadent layer of rich chocolate pudding, all crowned with a fluffy whipped topping and an array of delectable candies. The interplay between the sweet and slightly salty components is what makes this dessert universally adored and undeniably addictive.
Whether you’re planning a casual family dinner, hosting a potluck, or looking for a refreshing treat for a summer gathering, this peanut butter lasagna fits every occasion. Its make-ahead convenience means you can prepare it hours, or even a day, in advance, allowing the flavors to meld beautifully and the layers to set perfectly. The final presentation, with its distinct and vibrant layers, is guaranteed to garner compliments and leave a lasting impression on your friends and family. Get ready to create a dessert that will undoubtedly steal the show and become a cherished recipe in your culinary repertoire.
Why This No-Bake Peanut Butter Lasagna Will Be Your New Favorite
Beyond its incredible taste, there are numerous reasons why this no-bake peanut butter lasagna stands out as an exceptional dessert choice:
- Effortless Preparation: Say goodbye to complex baking steps. This recipe simplifies dessert making by eliminating the oven entirely. It’s perfect for novice cooks and seasoned bakers alike, offering a stress-free path to a gourmet-looking treat.
- Irresistible Flavor Combination: The timeless pairing of chocolate and peanut butter is a crowd-pleaser that rarely disappoints. This lasagna amplifies that classic duo, delivering a harmonious balance of sweetness and nutty richness in every bite.
- Ideal for Any Gathering: Its impressive appearance and universally loved flavors make it suitable for any event, from a casual backyard BBQ to a more formal holiday meal. It’s especially refreshing during warmer months when heavy baked goods aren’t desired.
- Perfect Make-Ahead Dessert: The required chilling time is a built-in advantage, allowing you to prepare the dessert well in advance of your event. This frees up your time on the day of serving, making entertaining much more relaxed.
- Stunning Visual Appeal: The clear, distinct layers create an elegant and appealing presentation. Each slice is a work of art, showcasing the vibrant colors and varied textures that make up this dessert.
- Customizable Potential: While delicious as is, the recipe offers fantastic opportunities for personalization. You can easily adapt the crust, pudding flavors, or toppings to suit individual preferences or seasonal themes.
Essential Ingredients for Your Decadent No-Bake Masterpiece
Creating this multi-layered delight begins with a thoughtful selection of fresh, quality ingredients. Each component plays a vital role in building the dessert’s signature taste and texture. Ensure your ingredients are at the recommended temperatures for optimal results.
The Crispy Chocolate Oreo Crust
The foundation of our lasagna is a rich, chocolatey, and perfectly crunchy crust that holds all the subsequent layers beautifully.
- 36 Oreo Cookies: Opt for classic Oreo cookies, including their creamy filling. The filling contributes to the richness of the crust and helps bind it together. For an extra intense chocolate flavor, you might even consider using a ‘dark chocolate’ or ‘fudge’ variation of Oreos.
- 1/3 cup Unsalted Butter, Melted: The melted butter is crucial for creating a firm crust. It coats the cookie crumbs, allowing them to compact and hold their shape once chilled. Using unsalted butter gives you control over the overall salt content, though a tiny pinch of salt can actually enhance the chocolate flavor.
The Velvety Smooth Peanut Butter Cream Cheese Layer
This is arguably the star of the show, delivering that iconic peanut butter flavor in a light, airy, and wonderfully creamy form.
- 8 oz Cream Cheese, Softened: It is paramount that your cream cheese is at room temperature. Softened cream cheese blends smoothly, preventing lumps and ensuring a consistently silky texture in your filling. Full-fat cream cheese provides the best richness and stability.
- 1 cup Smooth Peanut Butter: Choose a conventional, creamy peanut butter (like Jif or Skippy) over natural peanut butter. Natural peanut butter can sometimes separate or have a different texture that may not combine as smoothly in this no-bake application.
- 1 cup Powdered Sugar (Confectioners’ Sugar): Powdered sugar dissolves easily, contributing to the filling’s smooth consistency and providing the perfect level of sweetness without any grittiness.
- 1/4 cup Milk: A small amount of milk helps to achieve the ideal spreadable consistency for the peanut butter mixture. Any type of dairy milk works well here, but whole milk will lend a slightly richer taste.
- 1 1/2 cups Whipped Topping (such as Cool Whip), Thawed: Thawed whipped topping is folded into the mixture to lighten it, creating that desirable fluffy and airy texture that balances the density of the cream cheese and peanut butter. Ensure it’s thawed in the refrigerator, not at room temperature.
The Decadent Instant Chocolate Pudding Layer
This layer adds a classic, rich chocolate element that complements the peanut butter beautifully and provides another contrast in texture.
- 2 boxes (3.9 oz each) Instant Chocolate Pudding Mix: Be sure to purchase “instant” pudding mix, not the “cook-and-serve” variety. Instant pudding sets quickly and perfectly for this no-bake recipe. You can opt for milk chocolate, dark chocolate, or fudge flavors based on your preference for chocolate intensity.
- 2 3/4 cups Cold Milk: The colder the milk, the faster and more effectively the instant pudding will set. Using very cold milk is a critical step for a firm and well-set pudding layer.
Irresistible Finishing Toppings
The toppings are where you add the final flourish, enhancing both the visual appeal and the flavor profile of your peanut butter lasagna.
- Additional Whipped Topping: A final generous layer provides a soft, cloud-like finish, serving as the perfect canvas for your decorative elements.
- 1 bag of Reese’s Mini Peanut Butter Cups, Chopped: These miniature candies are the ultimate garnish, echoing the peanut butter and chocolate theme with an added chew and burst of flavor.
- Peanut Butter Chips: Sprinkling these over the top intensifies the peanut butter experience and adds another delightful textural element.
- Chocolate Syrup, Optional: A artistic drizzle of chocolate syrup can elevate the presentation, adding a professional touch and an extra layer of chocolatey goodness. You can also melt chocolate chips for a more sophisticated drizzle.
Step-by-Step Guide to Assembling Your Peanut Butter Lasagna
Creating this beautiful layered dessert is a straightforward process when you follow these detailed instructions. Precision in each step ensures perfectly set layers and an exquisite final product.
Step 1: Prepare and Chill the Oreo Crust
- Crush the Oreos: Begin by crushing all 36 Oreo cookies. The easiest method is to use a food processor, pulsing until very fine, uniform crumbs are formed. If you don’t have a food processor, place the cookies in a large, heavy-duty Ziploc bag, remove the air, and crush them with a rolling pin or the bottom of a sturdy glass until they are finely ground.
- Melt the Butter: Melt 1/3 cup of unsalted butter. You can do this in a microwave-safe bowl in 15-second intervals, stirring in between, or in a small saucepan over low heat until fully liquid.
- Combine and Press: In a medium mixing bowl, pour the melted butter over the crushed Oreo crumbs. Stir well with a spoon until all the crumbs are thoroughly moistened and resemble wet sand. Transfer this mixture into a 9×13 inch baking dish. Using the back of a spoon, a flat-bottomed measuring cup, or your clean hands, press the crumb mixture firmly and evenly across the bottom of the pan to create a compact crust.
- Pre-chill the Crust: Place the pan with the formed crust into the freezer for at least 15-20 minutes. This crucial step helps the crust set quickly and prevents it from breaking apart when you spread the next layers.
Step 2: Create and Layer the Creamy Peanut Butter Filling
- Prepare the Cream Cheese Base: In a large mixing bowl, using an electric mixer, beat the 8 oz softened cream cheese on medium speed for 1-2 minutes until it is incredibly smooth and light, with no lumps remaining.
- Incorporate Peanut Butter and Sugar: Add 1 cup of smooth peanut butter and 1 cup of powdered sugar to the cream cheese. Continue beating on medium speed until the mixture is fully combined, creamy, and appears light and fluffy. Make sure to scrape down the sides of the bowl periodically to ensure everything is well-incorporated.
- Add Milk: Gradually add the 1/4 cup of milk, beating until the mixture reaches a smooth, spreadable consistency. It should be thick but easy to spread.
- Fold in Whipped Topping: Gently fold in 1 1/2 cups of thawed whipped topping (Cool Whip). Use a spatula and fold until just combined, being careful not to overmix, as this can deflate the whipped topping and reduce the lightness of your layer.
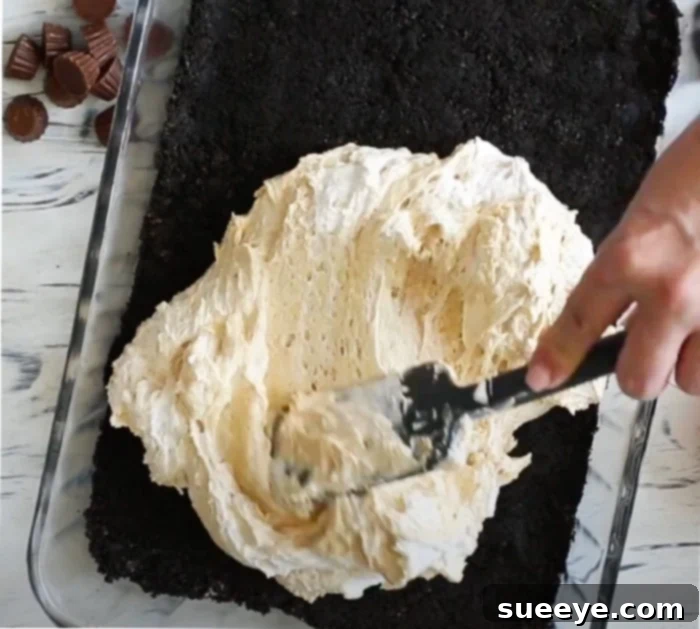
- Spread the Layer: Retrieve the chilled Oreo crust from the freezer. Carefully and evenly spread the peanut butter cream cheese mixture over the crust. An offset spatula works wonderfully for achieving a smooth, uniform layer.
- Chill Again: Return the dish to the freezer for another 15-20 minutes, or to the refrigerator for at least 30 minutes. This allows the peanut butter layer to firm up, preventing it from mixing with the liquid pudding layer.
Step 3: Mix and Add the Rich Chocolate Pudding
- Prepare the Pudding: In a separate large bowl, combine the two boxes of instant chocolate pudding mix with 2 3/4 cups of very cold milk. Whisk vigorously with a wire whisk for a full 2 minutes. You’ll notice the mixture thickening considerably. It’s crucial to whisk for the full duration and use cold milk for proper setting.
- Layer the Pudding: Carefully pour the thickened chocolate pudding mixture over the chilled peanut butter layer. Gently spread it out evenly with an offset spatula, ensuring it covers the entire surface.
- Final Initial Chill: Place the dessert back into the refrigerator for at least 30 minutes, or until the chocolate pudding layer is fully set and firm to the touch. This step is essential before adding the final whipped topping.
Step 4: Top, Garnish, and Set
- Add Remaining Whipped Topping: Once the chocolate pudding layer is firm, spread the remaining whipped topping evenly over the surface. This creates a beautiful, fluffy top layer.
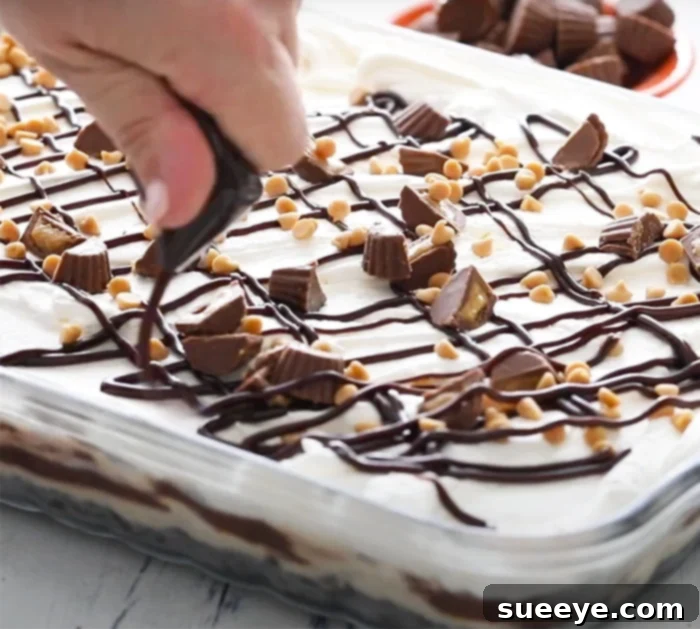
- Garnish Generously: Now for the fun part! Sprinkle generously with chopped Reese’s Mini Peanut Butter Cups and peanut butter chips. If desired, artfully drizzle chocolate syrup over the top for an extra touch of decadence and visual appeal.
- Refrigerate for Final Setting: This is the most critical chilling phase. Cover the dish lightly with plastic wrap and refrigerate for a minimum of 3 hours. For the best possible results, including firm layers and effortless slicing, chilling overnight (8+ hours) is highly recommended. The longer it chills, the better the layers will meld and set.
Pro Tips for a Flawless No-Bake Lasagna
Achieving perfection with your peanut butter lasagna is simple with a few expert tips:
- Ensure Softened Cream Cheese: Always allow your cream cheese to come to room temperature for at least 30 minutes to an hour before mixing. This guarantees a smooth, lump-free peanut butter layer.
- Gentle Folding: When incorporating the whipped topping into the peanut butter mixture, use a gentle folding motion. Overmixing can deflate the whipped topping, resulting in a denser, less airy layer.
- Very Cold Milk for Pudding: The temperature of the milk for the instant pudding is critical. Use milk straight from the refrigerator to ensure the pudding sets quickly and firmly.
- Patience with Chilling: The chilling periods between layers, and especially the final chill, are non-negotiable. Rushing this process will result in runny or messy layers. The longer the final chill, the cleaner and more defined your slices will be.
- Clean Slices Every Time: For beautifully neat slices, dip a sharp knife into hot water, wipe it dry, and then make each cut. Clean the knife blade between every slice to prevent dragging crumbs or mixing layers.
- Consider Parchment Paper: For extremely easy removal and serving, line your 9×13 inch pan with parchment paper, leaving an overhang on the sides. This allows you to lift the entire dessert out of the pan before slicing.
Customizations and Variations to Make It Your Own
While the classic no-bake peanut butter lasagna is undeniably delicious, don’t hesitate to get creative and personalize it. Here are some ideas to inspire your variations:
- Alternative Crusts: Replace Oreos with Graham cracker crumbs, Nilla Wafers, shortbread cookies, or even pretzel crumbs for a sweet and salty twist. Each will offer a distinct flavor and texture.
- Different Nut Butter Fillings: Experiment with almond butter, cashew butter, or even a sunflower seed butter for a nut-allergy-friendly option. Adjust sweetness as needed, as different nut butters vary in flavor intensity.
- Pudding Flavor Swaps: Instead of chocolate, try instant vanilla pudding, banana pudding, white chocolate pudding, or even butterscotch for a completely different flavor profile.
- Creative Topping Ideas: Beyond Reese’s cups and peanut butter chips, consider mini chocolate chips, chopped roasted peanuts, Butterfinger candy bars, crushed toffee bits, a sprinkle of sea salt flakes, or a homemade caramel sauce drizzle.
- Individual Portions: For elegant individual desserts, layer the ingredients in small glass jars, ramekins, or dessert cups. This is perfect for parties and makes serving a breeze.
- Gluten-Free Option: Easily adapt this recipe by using gluten-free chocolate sandwich cookies for the crust and ensuring all other packaged ingredients (like pudding mix) are certified gluten-free.
Storage and Make-Ahead Strategies
The make-ahead nature of this dessert is one of its most appealing features, simplifying your event planning.
- Make-Ahead: This peanut butter lasagna can be fully assembled and stored, covered, in the refrigerator for up to 24 hours before serving. In fact, many believe it tastes even better the next day as the flavors have more time to fully develop and meld together.
- Storage: Any leftover peanut butter lasagna should be stored tightly covered with plastic wrap or in an airtight container in the refrigerator. It will remain delicious and fresh for 3-4 days. The crust might soften slightly over time, but the overall quality will still be excellent.
- Freezing (with caution): While generally not recommended for optimal texture due to the dairy-based layers, this dessert can be frozen. To do so, freeze the lasagna (uncovered) for about an hour until it’s firm. Then, wrap it tightly in plastic wrap, followed by a layer of aluminum foil. It can be frozen for up to 1 month. Thaw it completely in the refrigerator overnight before serving. Be aware that the texture of the whipped topping and pudding might change slightly upon thawing.
Frequently Asked Questions About This Decadent Dessert
Here are answers to some common questions that arise when making this peanut butter lasagna:
- Can I use crunchy peanut butter? You can, but it will significantly alter the texture of the peanut butter layer, making it less smooth and creamy. For a classic, silky lasagna, smooth peanut butter is highly recommended.
- Can I make my own whipped cream instead of using Cool Whip? Absolutely! For a richer, homemade taste, whip heavy cream with a little powdered sugar and vanilla extract until stiff peaks form. However, keep in mind that Cool Whip is generally more stable and holds its shape longer, which is beneficial for a layered, make-ahead dessert.
- Why isn’t my pudding setting properly? The most common culprits are using warm milk, not whisking vigorously enough for the full 2 minutes, or mistakenly using “cook-and-serve” pudding mix instead of “instant.” Always ensure your milk is very cold and follow the whisking instructions carefully.
- What if I don’t have a 9×13 inch pan? You can use a slightly smaller square pan (like 8×8 or 9×9 inches) for thicker layers, or a larger pan for thinner layers. Just be aware that the layer thickness and serving sizes will vary.
- Can this recipe be made sugar-free? Yes, with some modifications. You would need to use sugar-free Oreos (or a sugar-free alternative for the crust), sugar-free powdered sugar, and sugar-free instant pudding mix. Ensure all other ingredients are also sugar-free or low-sugar.
Conclusion: Your New Favorite No-Bake Masterpiece Awaits!
The No-Bake Peanut Butter Lasagna is more than just a recipe; it’s a testament to how simple ingredients, when thoughtfully combined, can create an extraordinary dessert experience. Its ease of preparation, combined with the universal appeal of chocolate and peanut butter, makes it an undeniable winner for any occasion.
Whether you’re a seasoned baker looking for a quick yet impressive dessert or a beginner venturing into the world of sweet treats, this recipe offers a foolproof path to success. The layers of crunchy cookie, creamy peanut butter, rich chocolate, and fluffy whipped topping create a symphony of flavors and textures that will have everyone asking for seconds. So, go ahead, gather your ingredients, clear some space in your refrigerator, and prepare to indulge in this utterly decadent and delightfully easy no-bake peanut butter lasagna. Enjoy every luscious bite!