
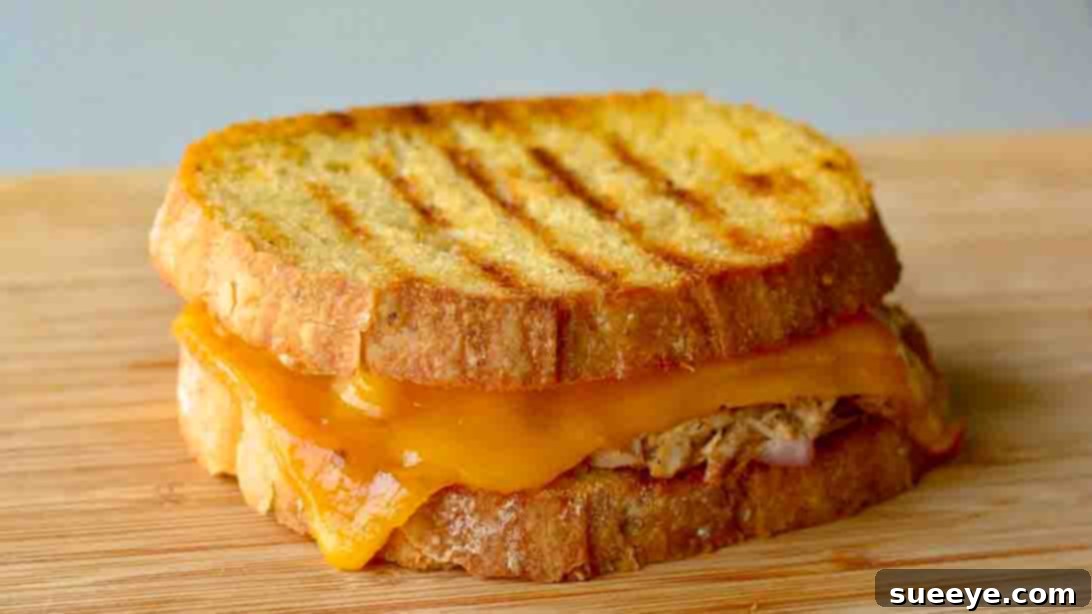
The Ultimate Cheesy Tuna Melt Sandwich: A Quick, Easy, and Delicious Recipe
There are few comfort foods as universally beloved and deeply satisfying as a classic tuna melt sandwich. It’s that perfect blend of creamy, savory tuna, gooey melted cheese, and perfectly toasted bread that brings a smile to anyone’s face. If you’re searching for an incredibly simple, budget-friendly, and consistently delicious recipe that your entire family will adore, look no further! This fantastic cheesy tuna melt recipe, inspired by the culinary experts at Cooking Satisfaction on YouTube, has quickly become our absolute go-to for a multitude of reasons. It’s not just a lunch staple; it’s frequently requested for snacks, light dinners, or anytime hunger strikes. Get ready to transform humble ingredients into a truly unforgettable meal that’s perfect for any occasion. Prepare to master the art of the perfect tuna melt, and see for yourself why this recipe is destined to become a cherished household favorite.
The Irresistible Allure of a Classic Tuna Melt
The tuna melt sandwich holds a special place in the pantheon of comfort foods. Its exact origins might be debated, but its global impact is undeniable. A staple in diners, delis, and homes across the globe, it stands as a testament to how simple ingredients, when combined with a little care, can create something truly extraordinary. The enduring beauty of a tuna melt lies in its incredible versatility and its ability to deliver a deeply satisfying meal with minimal effort and cost. It’s more than just a sandwich; it’s a warm embrace on a plate, a nostalgic bite that transports many back to simpler, happier times. Whether you’re a student looking for an economical yet hearty meal, a busy parent needing a quick and family-friendly option, or simply someone craving a hearty and delicious snack, the cheesy tuna melt delivers every single time. This particular recipe elevates the classic by focusing on fresh, accessible ingredients and a foolproof technique, ensuring a crispy exterior and a wonderfully moist, richly flavorful interior with every bite. It’s the kind of meal that promises warmth and satisfaction, making it an ideal choice year-round.
Essential Ingredients for Your Perfect Tuna Melt
Crafting the perfect tuna melt starts with selecting quality ingredients that work in harmony to achieve that signature blend of flavors and textures. Each component plays a vital role in creating this ultimate comfort sandwich. Here’s a detailed look at what you’ll need for this incredibly satisfying cheesy tuna melt sandwich:
- 1 can of drained tuna in water (or oil): The foundation of our sandwich. While tuna packed in water is often preferred for a lighter flavor profile, tuna in oil can offer a richer, more robust taste. Regardless of your choice, ensure the tuna is very thoroughly drained. Excess liquid is the arch-nemesis of a crispy sandwich, as it can lead to sogginess. Tuna is also an excellent source of lean protein and beneficial omega-3 fatty acids, adding a nutritious boost to your delicious meal.
- 1/2 small-sized red onion, finely diced: Red onion is a crucial addition, bringing a delightful crunch and a pungent, slightly sweet flavor that perfectly cuts through the richness of the tuna and mayonnaise. Dicing it finely ensures that the flavor is evenly distributed throughout the mixture without any single bite being overwhelmed by too much raw onion.
- 1/4 lemon or 1/2 tbsp fresh lemon juice: A squeeze of fresh lemon juice is a true game-changer in this recipe. Its bright, zesty acidity elevates the entire tuna mixture, adding a refreshing tang that beautifully balances the creamy textures and rich flavors, preventing the sandwich from tasting heavy.
- 2 tbsp mayonnaise: The creamy backbone of any exceptional tuna salad, mayonnaise binds all the ingredients together, providing that signature luscious texture. Feel free to use your favorite brand, whether it’s a classic full-fat, a lighter version, or one made with alternative oils like avocado oil.
- Salt and freshly ground black pepper, to taste: These essential seasonings are non-negotiable for bringing out the best in all the ingredients. Start with a conservative pinch and adjust gradually until the flavor is perfectly balanced and seasoned to your liking. Don’t underestimate their power to transform the taste.
- 1 tsp sugar (optional): This might seem like an unexpected ingredient in a savory sandwich, but a tiny hint of sugar can work wonders. It subtly enhances the natural sweetness of the onion and helps to balance the acidity from the lemon, adding another layer of complex flavor to the tuna salad that makes it truly exceptional.
- Sourdough bread: The choice of bread is absolutely paramount for a superior tuna melt experience. Sourdough offers a fantastic tangy flavor, a sturdy crumb that holds up beautifully to the substantial filling, and toasts magnificently, creating a wonderfully crisp, golden-brown exterior. We recommend using medium-thick slices for the best results.
- Butter: Essential for achieving that coveted golden-brown, irresistibly crispy crust. Butter not only aids in developing a gorgeous color but also infuses the bread with a rich, savory depth that enhances every bite.
- Cheddar cheese (2 slices per sandwich): For the ultimate cheesy experience, medium or sharp cheddar cheese is ideal. It melts wonderfully, creating that irresistible gooey, stretchy texture that every tuna melt aficionado craves, and its robust flavor perfectly complements the savory tuna. Other excellent melting cheeses like Gruyere, Provolone, Swiss, or Monterey Jack can also be used if you prefer a different flavor profile.
Step-by-Step Directions for Your Perfect Cheesy Tuna Melt
Follow these simple yet precise steps to create a cheesy tuna melt sandwich that will rival any diner classic. Attention to detail at each stage will ensure a truly delectable and satisfying result.
Step 1: Preparing the Flavorful Tuna Salad
Begin by meticulously preparing your tuna mixture, which is the heart of this sandwich. Open your can of tuna and drain it exceptionally well. This step is critical; any excess water or oil can lead to a soggy sandwich, undermining the crispy texture we’re aiming for. Press down firmly on the tuna with the lid or a fork to expel as much liquid as possible. Transfer the thoroughly drained tuna to a medium-sized mixing bowl. Next, take your small red onion and dice it very finely. The goal here is to integrate the onion’s pungent flavor and pleasant crunch without encountering large, overpowering chunks in your bite. Add the finely diced red onion to the tuna. Now, it’s time to season and bind the mixture: squeeze in 1/2 tablespoon of fresh lemon juice – this brightens the flavor considerably and adds a crucial tangy note. Incorporate 2 tablespoons of creamy mayonnaise, along with salt and freshly ground black pepper to taste. If you’re keen on experiencing a touch of sweetness that beautifully balances the acidity and other savory notes, add 1 teaspoon of sugar (this is optional but highly recommended by many tuna melt enthusiasts for that extra depth). Mix all the ingredients together thoroughly with a fork until they are well combined, uniform, and creamy. Take a small taste and adjust the seasonings as needed, ensuring it’s perfectly balanced to your palate. Once perfected, set this delicious tuna salad aside while you prepare your bread for grilling.
Step 2: Assembling and Grilling Your Cheesy Masterpiece
Now for the truly exciting part – assembling and grilling your sandwich to golden, cheesy perfection. First, slice two pieces of your chosen sourdough bread to a medium thickness. Take care to spread a generous, even layer of softened butter on one side of each bread slice. This buttered side will form the exterior of your sandwich, ensuring a beautiful golden-brown and delightfully crispy finish when grilled. Heat your grill pan or a sturdy, heavy-bottomed skillet over medium heat. A moderate temperature is absolutely key; it allows the bread to toast slowly and evenly, while giving the cheese ample time to melt into gooey perfection without prematurely burning the bread. Once the pan is sufficiently hot, place one slice of your buttered bread into the pan, butter-side down. Immediately spoon a generous portion of your perfectly prepared tuna mixture over the unbuttered side of this bread slice, spreading it evenly from edge to edge. Next, lay two slices of cheddar cheese (or your preferred melting cheese) directly on top of the tuna mixture, covering it completely. Carefully place the second slice of bread on top, with its buttered side facing upwards. Cook the sandwich for about 3-5 minutes per side, or until the bread achieves a beautiful golden-brown hue and is delightfully crispy, and the cheese has melted into a bubbly, irresistible layer. For quicker melting and even more gooeyness, you can cover the pan with a lid for a minute or two while the first side cooks. Gently press down on the sandwich with a spatula occasionally to ensure even contact with the pan and a nicely compacted, well-grilled result. Once both sides are gorgeously golden and the cheese is beautifully melted and bubbling, carefully remove the sandwich from the pan. For that classic diner presentation, slice it diagonally, and serve immediately. Prepare to indulge in a warm, crispy, and utterly delicious homemade cheesy tuna melt!
Tips for Crafting the Ultimate Cheesy Tuna Melt
While this recipe is straightforward and accessible for cooks of all levels, a few expert tips can truly elevate your tuna melt from merely good to absolutely phenomenal. Pay attention to these details for a consistently perfect result:
- Drain Tuna Thoroughly: This cannot be overemphasized. Excess moisture, whether from water or oil, is the enemy of a crispy sandwich. Take the time to squeeze out every last drop for a superior texture.
- Don’t Skimp on the Butter: A generous, even layer of softened butter on the outside of your bread is paramount for achieving that perfect golden-brown crust, delicious flavor, and satisfying crunch.
- Medium Heat is Your Best Friend: Resist the urge to crank up the heat to speed things along. Medium heat is ideal because it allows the bread to toast slowly and evenly, while simultaneously giving the cheese ample time to melt into gooey perfection without the risk of burning the bread. Patience here is rewarded.
- Choose the Right Cheese: While cheddar is a timeless and delicious classic, feel free to experiment with other good melting cheeses. Provolone, Swiss, Gruyere, Monterey Jack, or even a blend of cheeses can offer different flavor profiles and melting characteristics, tailoring the sandwich to your taste.
- Seasoning is Key: Always, always taste your tuna mixture before assembling the sandwich. This is your chance to adjust the salt, pepper, and lemon juice until the flavor is perfectly balanced and sings to your palate.
- Press Gently: A light, even press with your spatula while grilling helps to create uniform contact with the pan. This ensures even browning across the entire surface of the bread and results in a nicely compacted, cohesive sandwich.
- Consider Pre-warming the Tuna (Optional): If you prefer your tuna mixture to be warm throughout the sandwich from the first bite, you can briefly warm it in a separate pan over low heat before assembling. Just be careful not to overcook it.
Delicious Variations and Customizations
One of the most appealing aspects of a tuna melt is its incredible adaptability. It’s a fantastic canvas for culinary creativity, allowing you to easily customize it to your personal preferences or make use of whatever ingredients you have on hand. Don’t hesitate to get creative:
- Add More Veggies: Enhance the texture and nutritional value with finely diced celery for extra crunch, sweet bell peppers for a touch of freshness, or even a few briny capers for a burst of salty flavor. Pickles or sweet relish are also classic additions to tuna salad, offering a pleasant tang.
- Herbal Freshness: Incorporate finely chopped fresh herbs into your tuna salad for an aromatic lift. Fresh dill pairs exceptionally well with tuna, as do parsley or chives, adding a layer of sophisticated flavor.
- Spice It Up: For those who enjoy a bit of heat, a dash of your favorite hot sauce, a pinch of cayenne pepper, or a teaspoon of tangy Dijon mustard can add a delightful kick and a deeper layer of flavor complexity to the tuna mixture.
- Explore Different Breads: While sourdough offers a unique tang and sturdy texture, don’t limit yourself. Try hearty rye bread for a bolder flavor, wholesome whole wheat for added fiber, or even a rich, soft brioche for a more decadent experience.
- Open-Faced Option: For a lighter meal or a visually appealing presentation, consider making an open-faced tuna melt. Simply toast one slice of bread, pile on the tuna mixture and cheese, and then place it under the broiler until the cheese is bubbly and golden.
- Boost the Protein: For an even heartier and more robust sandwich, consider adding a slice of crispy cooked bacon or thin slices of deli ham to the assembly.
Serving Suggestions to Complete Your Meal
A cheesy tuna melt is undoubtedly satisfying on its own, but it pairs wonderfully with a variety of simple sides to transform it into a complete and comforting meal. Here are some classic and refreshing ideas to complement your perfect tuna melt:
- Classic Soup Pairing: A warm bowl of creamy tomato soup is the quintessential partner for a grilled cheese or tuna melt. The tangy, acidic notes of the soup beautifully cut through and complement the richness of the sandwich, creating a truly harmonious dining experience.
- Crisp Green Salad: A simple, fresh green salad tossed with a light vinaigrette provides a refreshing contrast to the warm, rich sandwich. It adds a welcome element of freshness and cuts through the richness, balancing your meal.
- Crunchy Sides: For that ultimate deli experience, serve your tuna melt with a side of crunchy potato chips, crisp dill pickles, or a creamy coleslaw. These additions provide a satisfying textural contrast and a nostalgic flavor pairing.
- Fresh Fruit: For a lighter touch or a sweet finish, a side of fresh fruit like crisp apple slices, juicy grapes, or melon cubes can be a delightful accompaniment.
Why This Cheesy Tuna Melt Recipe is a Family Favorite
This particular cheesy tuna melt recipe truly stands out as a family favorite for several compelling reasons, making it a staple in countless homes. Its inherent simplicity means you don’t need to be an experienced gourmet chef to achieve outstanding results; even novice cooks can create a masterpiece. The ingredients are readily available in any grocery store and incredibly budget-friendly, making it an economical and smart choice for feeding hungry crowds or simply enjoying a delicious meal without breaking the bank. Furthermore, tuna is a powerhouse of nutrition, offering lean protein and essential omega-3 fatty acids, making this comfort food a surprisingly healthy option when enjoyed in moderation. The thoughtful combination of savory tuna, tangy red onion, bright lemon, and a subtle hint of sweetness creates a flavor profile that appeals to a wide range of palates, including even the pickiest eaters. The sheer joy of biting into a sandwich with a perfectly crispy, golden-brown exterior and a warm, gooey, cheesy, and flavorful interior is an experience that resonates with everyone. It’s a quick fix for a satisfying lunch, a hearty snack that tides you over, and even a fuss-free dinner option when time is of the essence. This recipe isn’t just about making a sandwich; it’s about creating moments of delicious satisfaction and bringing people together over a meal that consistently delivers on taste, comfort, and ease.
Ready to Enjoy Your Homemade Cheesy Tuna Melt?
There you have it – a comprehensive guide to crafting the ultimate cheesy tuna melt sandwich. Forget dry, bland versions you might have encountered; this recipe promises a symphony of flavors and textures that will have you coming back for more, time and time again. It’s a testament to the power of simple, honest ingredients combined with a little care and attention in the kitchen. Whether you’re making it for yourself as a treat, preparing a quick and wholesome lunch for your kids, or entertaining guests with a comforting classic, this tuna melt is guaranteed to be a hit with everyone who tastes it. So, gather your ingredients, fire up your grill pan, and prepare to indulge in a truly spectacular homemade comfort food experience. Don’t just take our word for it; try this incredible recipe today and taste the delightful difference for yourself!