
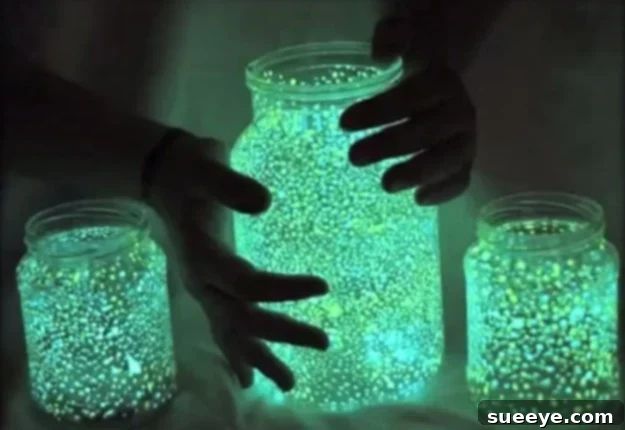
DIY Mason Jar Fairy Lights: Create Magical Glow-in-the-Dark Decor for Any Space
Step into a world of enchantment with DIY Mason Jar Fairy Lights – a remarkably simple yet profoundly captivating craft project that promises to transform ordinary jars into mesmerizing sources of light. Unlike many DIY endeavors that demand specialized tools or hard-to-find components, this magical creation relies on just a few basic materials: glow-in-the-dark paint, a sprinkle of glitter, and any clean glass jar you can get your hands on. It’s an accessible and affordable way to infuse your home, garden, or next celebration with a touch of whimsy and wonder. We recommend experimenting with an array of glow paint colors to elevate the “fairy cool” factor, but even a single hue can create a stunning effect. You’ll find these essential craft supplies readily available at any local craft store, big box retailer, or even online. This creative activity is not only fun and engaging but also incredibly forgiving – there’s no need for perfection, as the charm lies in the unique glow and sparkle of each jar. Best of all, it’s so budget-friendly that you can afford to craft several, experiment freely, and even gift them away when you’re ready for new creations.
What Are DIY Mason Jar Fairy Lights?
At its core, a DIY Mason Jar Fairy Light is a handmade decorative item that utilizes the unique properties of phosphorescent (glow-in-the-dark) paint to create an ethereal, luminous display within a glass jar. Imagine tiny, glowing speckles resembling trapped fireflies or magical dust dancing inside a jar, casting a soft, ambient light in the dark. These aren’t traditional fairy lights that use electric bulbs, but rather a charming illusion created by glow paint, often enhanced with glitter for added shimmer and sparkle. The beauty of this project lies in its simplicity: the paint absorbs light during the day or when exposed to a light source, and then slowly releases that stored energy as a gentle glow once the surroundings darken. The effect is surprisingly enchanting, providing a warm and inviting atmosphere without the need for batteries or electricity, making them perfect for creating a serene glow in various settings.
Why You’ll Love Crafting These Enchanting Glow Jars
The appeal of DIY Mason Jar Fairy Lights extends far beyond their aesthetic charm. This project offers a wealth of benefits, making it a favorite among crafters of all ages and skill levels:
- Unleash Creativity: There are no strict rules. Experiment with colors, patterns, and glitter types to make each jar uniquely yours. It’s a wonderful outlet for artistic expression.
- Budget-Friendly Decor: With just a few inexpensive supplies, you can create stunning decor pieces that look far more elaborate and costly than they truly are. It’s an excellent way to upcycle old jars.
- Engaging for All Ages: This is a fantastic project for kids, teens, and adults alike. Children adore the magical outcome and the hands-on process, while teens find it a cool way to personalize their spaces. Adults appreciate the relaxing nature of crafting and the beautiful results.
- Versatile Ambiance: These glow jars serve multiple decorative and practical purposes. They can add a whimsical touch to a child’s bedroom, create a serene atmosphere on a patio, or serve as captivating centerpieces for parties.
- Eco-Friendly Crafting: By repurposing old glass jars, you’re engaging in a sustainable craft that reduces waste and gives new life to items that might otherwise be discarded.
- Screen-Free Entertainment: In an age dominated by screens, this DIY project offers a hands-on, creative activity that can occupy kids during daylight hours and provide a source of calm entertainment once the sun sets. It sparks imagination and encourages interaction with tangible art.
- Instant Mood Setter: The soft, ethereal glow instantly transforms any space into something magical and cozy. They’re perfect for winding down after a long day or adding a mystical touch to an outdoor gathering.
Essential Supplies for Your Magical Glowing Jars
Gathering your materials is the first exciting step in bringing your Mason Jar Fairy Lights to life. The beauty of this project lies in its minimal and easily accessible supply list:
- Clean Glass Jars: While “Mason jars” are in the name, any clean, clear glass jar will work beautifully. Think pickle jars, spaghetti sauce jars, jam jars, or even old glass bottles. The size and shape will influence the final look, so experiment with a variety! Ensure they are thoroughly washed and dried to prevent any residue from affecting the paint adherence.
- Glow-in-the-Dark Paint: This is the star of the show. You’ll find various types:
- Acrylic Glow Paint: Most common and versatile. Available in many colors (green, blue, aqua are often the brightest).
- Fabric Glow Paint: Can be thicker, allowing for more textured dots.
- Puffy Glow Paint: Creates raised dots for a tactile effect.
For the best effect, opt for paints specifically labeled as “high-luminous” or “super glow.” Purchasing a few different colors will allow for vibrant, multi-dimensional results.
- Craft Glitter: A must-have for extra sparkle, even if it doesn’t glow. Fine glitter creates a subtle shimmer, while chunky glitter adds dramatic flair. Iridescent or holographic glitters can catch the light beautifully during the day.
- Small Paintbrushes, Sponges, or Cotton Swabs: These are your tools for applying the paint. Small brushes allow for delicate dots and swirls, while sponges can create a softer, diffused glow. Cotton swabs are perfect for uniform dots.
- Paper Plate or Palette: To dispense paint and mix colors if desired.
- Protective Surface: Newspaper, old towels, or a craft mat to protect your workspace from paint and glitter.
- Optional Additions:
- Mod Podge or Clear Sealant Spray: To seal in glitter and protect the paint, especially if the jars will be handled frequently or used outdoors.
- Small Fairy Figurines or Charms: For an extra touch of whimsy inside the jar.
- Twine, Ribbon, or Wire: To create handles for hanging your fairy lights.
- Stencils: To create specific shapes or patterns with the glow paint.
- UV Flashlight or Black Light: For quickly “charging” your jars and seeing their immediate glow.
Step-by-Step Guide: How to Make Your Mason Jar Fairy Lights
Creating your glowing fairy jars is a straightforward and enjoyable process. Follow these steps to bring your magical vision to life:
- Step 1: Prepare Your Jars. Begin by thoroughly washing your chosen glass jars with soap and warm water. Remove any labels completely, as adhesive residue can prevent paint from sticking. Rinse well and ensure the jars are completely dry, inside and out, before proceeding. Moisture can cause the paint to streak or peel.
- Step 2: Apply the Glow Paint. This is where the magic truly begins!
- Technique 1 (Dots): Using a paintbrush, cotton swab, or the end of a pencil, apply small, random dots of glow paint to the inside surface of the jar. Vary the size and spacing of the dots to mimic fireflies or distant stars. Start with a lighter hand; you can always add more.
- Technique 2 (Swirls/Streaks): For a more abstract or ethereal look, use a paintbrush to create gentle swirls or streaks of paint around the inner surface.
- Technique 3 (Splatter): For a truly random, starry effect, dilute the glow paint slightly with water (if it’s acrylic) and use a stiff brush to gently flick paint droplets onto the inside of the jar.
Apply several thin coats, allowing each layer to dry partially (about 15-20 minutes) before adding the next. Multiple layers of glow paint will result in a brighter and longer-lasting glow. Focus on the inner surface, leaving the outside clean unless you specifically want exterior embellishments.
- Step 3: Add a Touch of Glitter. While the final layer of glow paint is still slightly wet (this helps the glitter adhere without extra adhesive), carefully sprinkle your chosen glitter inside the jar. Gently swirl the jar around to distribute the glitter evenly, ensuring it sticks to the wet paint. You can tap out any excess glitter once the paint starts to set. If you prefer to add glitter after the paint is dry, you can apply a thin layer of Mod Podge inside the jar first, then sprinkle the glitter, and finally, seal it with another layer of Mod Podge once dry.
- Step 4: Allow to Dry and Cure. Once you are satisfied with your paint and glitter application, let the jars air dry completely. This can take several hours, or even overnight, depending on the thickness of your paint layers and humidity levels. Ensure the paint is fully cured and hardened to prevent smudging or flaking.
- Step 5: Charge Your Fairy Jars. Glow-in-the-dark paint needs to absorb light to work its magic. Place your finished jars in direct sunlight for several hours, under a bright artificial light, or expose them to a UV (black) light for a quicker charge. The longer they charge, the brighter and longer they will glow once the lights go out.
Pro Tips for Dazzling Results and Longevity
To ensure your DIY Mason Jar Fairy Lights shine their brightest and last for a long time, consider these expert tips:
- Choose High-Quality Glow Paint: Not all glow paints are created equal. Invest in paints specifically labeled for their high luminosity and duration. Brands like FolkArt Glow, Tulip Glow-in-the-Dark, or specific craft store brands often offer superior glow properties.
- Layering is Key: Don’t skimp on the paint. Apply at least 2-3 coats of glow paint, allowing each layer to dry partially between applications. Thicker, layered paint holds more light and glows brighter and longer.
- Focus on the Inside: While you can decorate the outside, focusing your glow paint on the inside of the jar creates a more captivating and protected effect, resembling fireflies trapped within.
- Experiment with Colors: While green and aqua glow paints are often the brightest, don’t shy away from other colors like blue, yellow, or even purple. Combining different hues can create a vibrant, multi-colored nocturnal display.
- Consider Sealing: If you plan to use your jars outdoors, handle them frequently, or want to prevent glitter fallout, consider applying a clear sealant. A clear acrylic spray sealant (make sure it’s non-yellowing) or a thin coat of Mod Podge can protect your artwork.
- Charge Thoroughly: The intensity and duration of the glow directly correlate with how well the paint has been charged. Placing them near a window with direct sunlight or under a strong lamp for several hours before dark will yield the best results. A UV flashlight can provide an instant, powerful charge for a quick boost.
- Think About Placement: Position your fairy jars in areas where they will receive ample light during the day, ensuring they’re ready to glow once evening arrives.
Creative Variations & Inspiring Ideas
The beauty of DIY Mason Jar Fairy Lights is their incredible versatility. Beyond the basic glowing jar, there are countless ways to customize and enhance your creations to fit any theme or occasion:
For Kids’ Rooms & Playtime
- Starry Night Jars: Use dark blue glow paint as a base and then add small, bright green or white glow dots for stars. You can even add glow-in-the-dark star stickers to the inside.
- Monster Repellent Jars: Empower children by creating “monster spray” or “boogie man repellent” jars. They’re fun to make and provide a comforting glow at night, helping kids feel safe.
- Fairy Garden Jars: Incorporate small plastic fairy figurines, moss, or pebbles inside the jar before painting to create a miniature glowing fairy garden.
- Themed Jars: Think outer space (planets, aliens), underwater scenes (fish, seaweed), or even dinosaur themes, all glowing in the dark.
For Outdoor Ambiance & Parties
- Patio & Garden Lights: Place several glowing jars along pathways, on patio tables, or hang them from tree branches (using wired handles) to create a magical outdoor atmosphere for summer evenings or BBQ parties.
- Camping Companions: Bring these lightweight, glow-only jars on camping trips for a gentle, whimsical light source around the tent or campfire, without the need for batteries or electricity.
- Wedding & Event Decor: Use them as unique, enchanting centerpieces or accent lights for outdoor weddings, garden parties, or bohemian-themed events.
- Poolside Glow: If sealed properly, these jars can provide a soft, ambient glow around a pool area for evening swims or parties, adding a touch of magic to the water.
Seasonal & Themed Decor
- Halloween Spookiness: Use orange, green, and purple glow paint to create spooky ghost jars, alien eyes, or glowing pumpkin faces. They make fantastic, safe Halloween decorations.
- Winter Wonderland: Blue and silver glitter with white or ice-blue glow paint can transform jars into frosted, glowing winter lanterns.
- Christmas Magic: Red and green glow paint with gold glitter can create festive glowing jars for the holiday season.
Thoughtful Gifts & Party Favors
- Personalized Gifts: Decorate jars with names, initials, or meaningful dates using glow paint for a truly personal and unique gift.
- Party Favors: Have guests make their own fairy jars as an activity during a party, and then they can take them home as a memorable favor.
- Teacher Appreciation: A handmade glowing jar filled with appreciation can be a heartwarming gift for teachers.
Caring for Your Glow-in-the-Dark Creations
Maintaining the magic of your DIY Mason Jar Fairy Lights is straightforward, ensuring they continue to enchant for many nights to come:
- Recharging the Glow: Remember that glow paint is not a permanent light source. To reactivate its glow, simply expose the jars to a strong light source (sunlight, bright room light, or a UV lamp) for a few hours. The glow will gradually fade over time in the dark but will recharge every time it’s exposed to light.
- Cleaning the Jars: For jars painted on the inside, use a dry, soft cloth or duster to remove any dust from the exterior. Avoid washing the inside with water, especially if the paint is not sealed, as this could damage the glow paint. If the exterior is painted, gently wipe it clean, avoiding harsh chemicals that might strip the paint or sealant.
- Storage: When not in use, store your jars in a cool, dry place away from direct sunlight if you want to preserve their “uncharged” state for later display. However, storing them near a window will ensure they are constantly charging and ready to glow when evening falls.
- Durability: While the glow paint itself is quite durable once cured, excessive scraping or impact can damage the painted surface. Handle your fairy jars with care, especially if they are not sealed.
Safety First: Important Considerations
While this project is generally safe and enjoyable, keeping these points in mind will ensure a smooth and worry-free crafting experience:
- Non-Toxic Paint: Always choose glow-in-the-dark paints that are clearly labeled as “non-toxic,” especially if children will be involved in the crafting process. This ensures that accidental ingestion or skin contact is harmless.
- Glass Handling: Supervise young children when working with glass jars to prevent accidental breakage and cuts. Ensure jars are sturdy and free of cracks before starting the project.
- Ventilation: When using spray sealants, work in a well-ventilated area to avoid inhaling fumes. Follow the manufacturer’s instructions for safe use.
- No Internal Lighting: These fairy lights rely on glow paint, not internal battery-operated lights. Do not place actual candles or other heat-generating lights inside the jars with glow paint, as this could be a fire hazard.
Ready to Light Up Your World?
DIY Mason Jar Fairy Lights offer a delightful escape into the world of handmade magic. Easy to create, inexpensive, and endlessly versatile, they provide a captivating glow that enhances any setting. Whether you’re looking for a fun activity with the kids, a unique piece of home decor, or a whimsical touch for your next outdoor gathering, these glowing jars are sure to spark joy and wonder. So, gather your supplies, let your creativity flow, and prepare to be mesmerized by the enchanting glow you’ve created. This project is a wonderful reminder that a little paint and imagination can truly illuminate your world.
Watch the Tutorial Video Below
Love these DIYs? Follow us on Twitter and Pinterest for more craft ideas.