
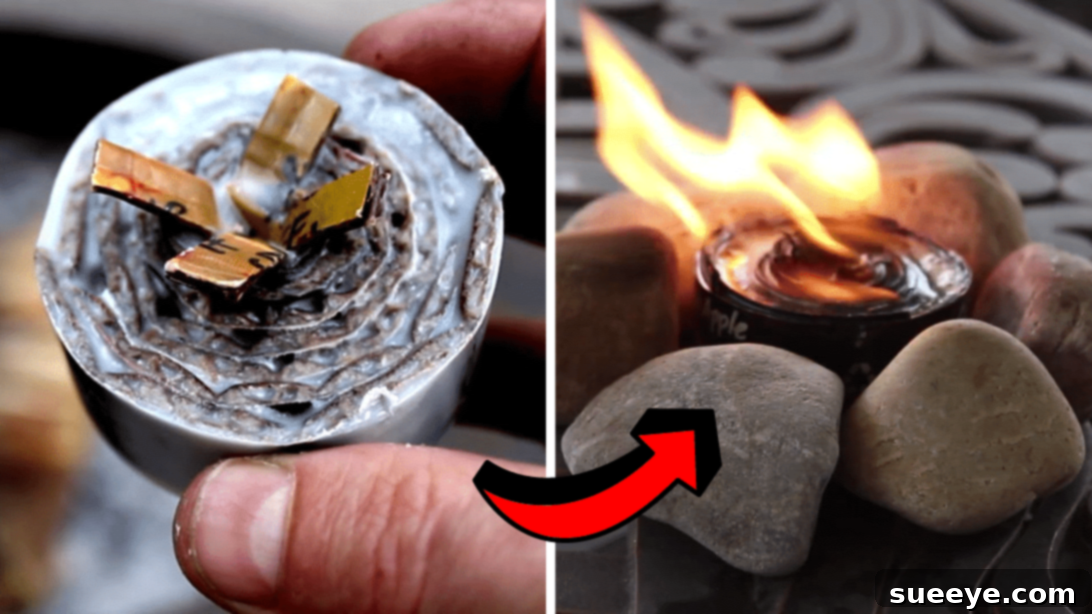
As the warmth of the sun beckons and the days grow longer, it signals the perfect time for cherished outdoor activities. Whether you’re planning an exhilarating camping trip, a cozy backyard BBQ, or simply a relaxed evening by a crackling fire pit, one essential element remains constant: the need for a reliable and efficient way to ignite your flame. While store-bought fire starters are readily available, there’s a unique satisfaction and benefit in crafting your own, especially when you can utilize common household items.
Imagine a fire starter that not only gets your fire roaring in minutes but also burns steadily for over an hour, ensuring your kindling catches effortlessly. This ingenious DIY fire starter, inspired by the creative minds at TKOR on YouTube, offers exactly that. It’s an exceptionally convenient item to have on hand, proving indispensable for any outdoor enthusiast. What makes it even more appealing is its incredibly low cost; all you need are empty beverage cans, corrugated cardboard, and a supply of old crayons or leftover candles. This project transforms potential waste into a powerful tool, embodying the spirit of sustainability and self-sufficiency.
RELATED: Explore Another DIY Fire Starter Method Using Dryer Lint!
Why Choose a DIY Recycled Fire Starter? Beyond Just Saving Money
Opting for a homemade fire starter, particularly one made from recycled materials, offers a multitude of advantages that extend far beyond simply cutting costs. In today’s world, where environmental consciousness is paramount, repurposing items like aluminum cans and cardboard aligns perfectly with sustainable living principles. Here’s why this DIY approach is a brilliant choice for your outdoor adventures:
- Unbeatable Cost-Effectiveness: Commercial fire starters can add up, especially if you enjoy frequent outdoor fires. This DIY version utilizes materials you likely already have around your home, making it virtually free to produce. Old crayons and candle stubs, often destined for the bin, find a new purpose as the fuel source, eliminating the need for new purchases.
- Eco-Friendly & Sustainable: By transforming empty soda cans, cardboard boxes, and used wax into a functional product, you’re actively reducing waste. This project exemplifies upcycling, giving new life to items that would otherwise contribute to landfills, making your outdoor activities a little greener and more responsible.
- Remarkable Efficiency & Long Burn Time: The unique design of this fire starter, combining a cardboard wick with a wax fuel source encased in a metal shell, allows it to burn for an impressive duration – often exceeding an hour. This extended burn time is crucial for ensuring even stubborn, damp kindling ignites properly, giving you ample time to build a robust and self-sustaining fire.
- Accessibility of Materials: The components for this fire starter are incredibly easy to acquire. Empty drink cans are ubiquitous, corrugated cardboard is found in almost every package delivery, and most households have a collection of old crayons or candles. This means you can whip up a batch of these fire starters whenever you need them, without a special trip to the store or specialized equipment.
- Empowerment Through DIY: There’s a deep sense of satisfaction that comes from creating something useful with your own hands. This project is simple enough for beginners but yields a genuinely effective product, fostering a sense of accomplishment and self-reliance that enhances any outdoor experience.
This ingenious design harnesses the power of capillary action, where the tightly rolled corrugated cardboard acts as a series of wicks, drawing up the melted wax to sustain a steady and robust flame. The can itself serves as a protective shell, containing the wax and concentrating the heat, making it an incredibly stable and reliable igniter even in less-than-ideal conditions.
Essential Materials for Your Long-Lasting DIY Fire Starter: Gathering Your Supplies
One of the best aspects of this DIY project is its reliance on readily available and often overlooked household items. Before you begin, gather the following simple materials, ensuring they are clean and ready for use:
- Empty Drink Cans (Aluminum): You’ll need at least two per fire starter. Standard soda or beer cans work perfectly due to their pliable yet sturdy aluminum construction. Ensure they are thoroughly rinsed and dried to remove any sticky residue that could cause issues during heating.
- Corrugated Cardboard: This is key for the internal structure and wick. Look for sturdy corrugated cardboard, often found in shipping boxes or packaging. The corrugations create essential air pockets and channels for the wax to be absorbed and burned efficiently, allowing for a longer, more consistent flame.
- Sharp Scissors or a Utility Knife: Essential for precise cutting of both the aluminum cans and the cardboard strips. If using a utility knife, always exercise extreme caution, use a cutting mat underneath, and cut away from your body to prevent accidents.
- Crayons or Old Candles (Wax Source): This provides the primary fuel for your fire starter. Any old crayons (paper wrappers removed), broken candle pieces, wax scraps, or even paraffin wax flakes will work perfectly. The more wax you have, the more fire starters you can produce, making this a great way to use up old supplies.
- Heat Source for Melting Wax: A double boiler setup (a heat-safe bowl over a pot of simmering water) is highly recommended for safety and even heating. Alternatively, a microwave can be used, but proceed with extreme caution: heat in short 30-second bursts, stirring in between, and never leave the wax unattended due to its flammability.
- Heat-Resistant Gloves or Pliers: Crucial for safely handling hot cans and pouring melted wax, preventing burns and allowing for steady manipulation.
- Newspaper or Protective Surface: Lay down newspaper, old cardboard, or a silicone mat to prevent wax drips from damaging your workbench or kitchen counter during the pouring process.
Step-by-Step Guide: Crafting Your Recycled Fire Starter
Follow these detailed instructions to create your own effective and long-burning fire starters. Remember to prioritize safety throughout the process, especially when handling sharp objects and hot wax. Adult supervision is recommended for younger participants.
Step 1: Preparing the Aluminum Cans
Begin by taking two clean, empty aluminum drink cans. For the first can, which will form the base of your fire starter, carefully cut off the bottom section, aiming for approximately one inch in height. You can start by scoring a line around the can with a utility knife (use light pressure to avoid cutting through too quickly), then switch to sturdy scissors to complete the cut, ensuring the edge is as clean and even as possible. This smaller piece will contain the cardboard wick. For the second can, cut off a slightly taller bottom section, around two to three inches in height. This taller piece will serve as your dedicated wax melting pot. Smooth any sharp edges on both cut cans with sandpaper, a file, or by carefully pressing them down with pliers to prevent accidental cuts during handling.
Step 2: Melting the Wax (Crayons or Candles)
Place the taller can (from Step 1) onto a heat-resistant surface, such as a trivet or an old cutting board. Fill this can with your chosen wax source – broken crayon pieces (ensure all paper wrappers are removed) or old candle stubs. The safest and most recommended method for melting wax is using a double boiler: place the can containing the wax into a larger pot with a few inches of water, and gently heat the water on a stovetop over medium-low heat. This indirect heat prevents the wax from scorching. Alternatively, you can use a microwave, but proceed with extreme caution: heat in short 30-second bursts, stirring in between each burst, and never leave it unattended, as wax can ignite if overheated. Continue heating until the wax is completely melted and fluid. Ensure good ventilation in your workspace during this process to dissipate any fumes.
Step 3: Constructing the Cardboard Core
While your wax is melting, prepare the cardboard core that will act as the wick. Take a piece of corrugated cardboard and cut it into several strips, each approximately one inch wide. The length of these strips should be sufficient to create a tightly wound roll that fits snugly inside the shorter can base (from Step 1). Begin rolling the cardboard strips together as tightly as possible, creating a dense spiral. The tighter the roll, the better it will absorb the wax and maintain a consistent, long-lasting flame. This tightly packed cardboard acts as an extended wick system, providing both structure and numerous capillaries for the molten wax to travel through and fuel the burn.
Step 4: Creating the “Petal” Wick Insert
For an enhanced wick design that aids in initial lighting and wax distribution, take another small piece of scrap corrugated cardboard. Fold it in half lengthwise, then carefully cut several slits down the folded middle, stopping about half an inch from the bottom edge. When unfolded, this piece should resemble a series of cardboard “petals” or fins. These slits create additional surface area. Gently push this “petal” insert into the exact center of your tightly rolled cardboard core from Step 3. This design helps increase the initial surface area for ignition and ensures that the wax is drawn up and distributed more evenly throughout the core, promoting a more reliable and complete burn from the very start.
Step 5: Saturating and Setting Your Fire Starter
Once the wax is fully melted and the cardboard core (with its petal insert) is prepared, it’s time for the final assembly. Carefully place the cardboard core into the smaller, one-inch high can base, ensuring it sits firmly at the bottom. Using heat-resistant gloves or pliers for safety, carefully pour the hot, melted wax over the cardboard roll. Make sure the cardboard is completely saturated, allowing the wax to seep into all the corrugations and tightly packed layers. Fill the can base with wax until the cardboard is fully submerged and the wax reaches the rim. Set the filled can aside in a safe, undisturbed location to cool and solidify. This usually takes several minutes to an hour, depending on the ambient temperature and volume of wax. Once the wax is fully set and hardened, your DIY recycled fire starter is ready for action!
Safety First: Important Considerations for DIY Fire Starters
While this project is relatively simple and incredibly rewarding, working with sharp tools and hot wax requires careful attention to safety. Always prioritize your well-being and that of others by adhering to these important guidelines:
- Adult Supervision: If children are involved in this craft, ensure close adult supervision at all times, especially during the cutting of cans and the wax melting stages. Sharp edges and hot liquids can cause serious injury.
- Adequate Ventilation: Melt wax in a well-ventilated area to avoid inhaling fumes, which can be irritating or harmful, especially if using scented candles or certain types of crayons. Open a window or use an exhaust fan.
- Heat Protection: Always use heat-resistant gloves, oven mitts, or sturdy pliers when handling hot cans, the wax melting pot, and when pouring the melted wax. Bare hands should never come into contact with hot surfaces or liquids.
- Stable and Protected Workspace: Work on a stable, flat, and heat-resistant surface. Cover your workspace with newspaper, old cardboard, or a silicone mat to protect it from accidental wax drips or spills, which can be difficult to clean once hardened.
- Fire Extinguisher or Safety Measures: Keep a fire extinguisher, a bucket of sand, or a large pot of water close by when melting wax, just in case of an accidental flare-up. Never use water directly on a wax fire, as it can spread the flames.
- Proper Storage: Store your finished fire starters in a cool, dry place, away from direct sunlight, heat sources (like radiators or hot garages), or open flames. Extreme heat can cause the wax to melt prematurely, making them messy and less effective.
- Responsible Use: Always use these fire starters in designated and controlled environments such as outdoor fire pits, grills, campfires, or wood-burning stoves. Never use them indoors without proper ventilation or near flammable materials. Ensure the area around your fire is clear of debris.
Tips for Optimizing Your DIY Fire Starter Experience
To get the most out of your homemade fire starters and ensure they perform flawlessly every time, consider incorporating these helpful tips:
- Experiment with Wax Types: While crayons and old candles work great and are excellent for recycling, you can also experiment with pure paraffin wax flakes. Paraffin often burns cleaner and can offer a slightly longer burn time. Blending different waxes can also yield unique results.
- Cardboard Density is Key: The more tightly and densely you roll the corrugated cardboard, the better it will perform. A compact core ensures maximum wax absorption and promotes a consistent, slow-burning flame. Loose rolls might burn too quickly or unevenly.
- Complete Saturation: Ensure the cardboard core is completely and thoroughly saturated with wax. Any dry spots within the cardboard could hinder the burn, cause an uneven flame, or lead to premature extinguishing. You want every fiber to be infused with fuel.
- Pre-Melted Wax Storage: If you have a large batch of old candles or crayons, consider melting them all at once. Once melted, you can pour the liquid wax into old milk cartons, paper cups, or muffin tins lined with paper. Once solidified, you can easily break off pieces as needed for future fire starter projects, saving time on subsequent batches.
- Storage for Longevity: To protect your finished fire starters from moisture and debris, store them in an airtight container or a zip-top bag. This will help preserve their effectiveness and ensure they’re ready whenever you need them, even after prolonged storage.
- Lighting Your Fire Starter: To light, simply ignite the exposed cardboard wick in the center (where you created the “petals”) with a lighter or match. The flame will slowly melt the surrounding wax, which then continuously fuels the cardboard, creating a long-lasting, steady burn that is perfect for igniting kindling.
- Optimal Placement in Your Fire: For best results, place the fire starter directly under your kindling (small, easily ignitable wood twigs, newspaper, or dryer lint) and smaller pieces of firewood. The sustained flame of the fire starter will effectively help ignite even slightly larger pieces of wood, making the fire-starting process much quicker and less frustrating than relying solely on kindling.
Conclusion: Ignite Your Adventures with Sustainable DIY
This DIY fire starter project is a testament to how simple ingenuity and a commitment to recycling can lead to incredibly practical and effective solutions. By transforming everyday waste into a powerful tool for your outdoor activities, you’re not only saving money but also contributing positively to a more sustainable lifestyle. The impressive long burn time, ease of creation, and eco-friendly nature of these fire starters make them an absolute must-have for anyone who enjoys the great outdoors.
So, the next time you’re about to discard an empty soda can or a used crayon, remember the incredible potential it holds. Grab your materials, follow these detailed steps, and empower yourself with a reliable, homemade fire starter that will effortlessly ignite your next camping bonfire, backyard BBQ, or cozy evening by the fire pit. Happy crafting, and happy adventuring!
*All image credit belongs to TKOR via YouTube. Follow and subscribe to their channel for more innovative DIY projects and tutorials!