
Master the Art of Reusing Frying Oil: Two Genius Methods to Save Money and Reduce Waste
Cooking oil is a staple in nearly every kitchen, essential for everything from pan-frying delicate vegetables to deep-frying crispy delights. However, the sheer volume of oil used, especially for deep frying, often leads to a common dilemma: what to do with the leftover oil? Many home cooks are quick to discard used oil after a single use, believing it’s too dirty or spent to be safely reused. This practice, while understandable, contributes to unnecessary waste and can be a drain on your wallet.
What if there was a simple, effective way to reclaim your used frying oil, allowing you to reuse it multiple times without compromising on taste or safety? Fortunately, there are brilliant hacks that can transform seemingly “spent” oil into a clean, reusable resource. We’re thrilled to share two ingenious methods, popularized by the culinary experts at America’s Test Kitchen on YouTube. These techniques will not only teach you how to clean frying oil but also empower you to reuse it up to three times, potentially saving you a significant amount of money and reducing your kitchen waste. Get ready to learn practical skills that will revolutionize your cooking habits!
Why Bother Reusing Cooking Oil? The Benefits Unveiled
Before diving into the “how-to,” let’s explore the compelling reasons why reusing cooking oil is a smart practice for any household:
- Economic Savings: Cooking oil can be expensive, especially specialty oils. Extending its life means fewer trips to the grocery store and more money in your pocket. Imagine the cumulative savings over a year!
- Environmental Responsibility: Improper disposal of cooking oil (e.g., pouring it down the drain) can wreak havoc on plumbing systems and the environment. By reusing oil, you significantly reduce the amount of waste generated in your kitchen, contributing to a more sustainable lifestyle.
- Enhanced Flavor Profile: Believe it or not, sometimes a batch of oil that has been used once for a specific type of food (like french fries) can impart a subtle, desirable flavor to subsequent batches of similar foods.
- Convenience: Having clean, ready-to-use oil on hand means less last-minute scrambling and a smoother cooking experience, especially when you’re preparing multiple batches of fried items.
However, it’s crucial to understand that not all oil can be endlessly reused. The type of food fried, the temperature, and the duration of cooking all impact the oil’s lifespan. We’ll delve into indicators for when oil should finally be discarded later in this guide.
Materials for Oil Purification:
- Coffee Filter: Ideal for fine straining, capturing even tiny particles.
- Cornstarch: The secret ingredient for the slurry method, known for its ability to bind impurities.
- Fine Mesh Strainer: Essential for both methods, providing a base for the coffee filter and for collecting the solidified cornstarch mixture.
- Large Heatproof Container: For safely collecting and heating oil.
- Slotted Spoon (Optional): Useful for removing larger gelled pieces from the cornstarch method.
- Airtight Storage Container: For storing your freshly cleaned oil.
Directions: Two Powerful Methods to Clean Frying Oil
Here are two distinct methods for cleaning your used frying oil, each with its own advantages. Depending on the level of impurities and your preferred approach, you can choose the one that best suits your needs.
Method 1: The Classic Coffee Filter Straining Method
This method is perhaps the most well-known and simplest approach to cleaning frying oil. It primarily relies on physical filtration to remove larger food particles and debris. While straightforward, it requires a bit of patience.
Steps for Coffee Filter Straining:
- Cool the Oil Completely: Always allow your used frying oil to cool down to room temperature before attempting to clean it. Hot oil is a safety hazard and can make the process difficult.
- Prepare Your Straining Setup: Place a fine-mesh strainer over a large, heatproof container or jar. Line the fine-mesh strainer with a coffee filter. For heavily used oil or faster straining, you can use two coffee filters. Ensure the setup is stable and won’t tip over.
- Slowly Pour the Oil: Carefully pour the cooled, used frying oil through the coffee filter. Do this slowly to prevent overflow and to allow the filter sufficient time to capture particles.
- Allow to Drain: This is where patience comes in. The oil will drain slowly through the fine pores of the coffee filter, leaving behind food debris. Depending on the amount of oil and its dirtiness, this process can take anywhere from a few minutes to an hour or more. You might need to gently stir the top layer of oil to dislodge particles and encourage flow.
- Discard Solids: Once all the oil has drained, carefully remove the coffee filter with the trapped solids and discard it responsibly.
Pros and Cons of the Coffee Filter Method:
- Pros: Extremely simple, requires minimal specialized ingredients, good for removing visible particles.
- Cons: Can be quite slow, may not remove microscopic impurities or strong odors, potentially leaving the oil with a slightly “used” taste. It’s best suited for lightly used oil that mainly contains larger crumbs.
Method 2: The Revolutionary Cornstarch Slurry Purification Method
If you’re looking for a method that not only strains but actively purifies the oil, removing smaller impurities and off-flavors, the cornstarch slurry technique is your go-to. This ingenious hack, celebrated by America’s Test Kitchen, is often considered the easiest and quickest way to achieve truly clean-tasting frying oil.
Steps for Cornstarch Slurry Method:
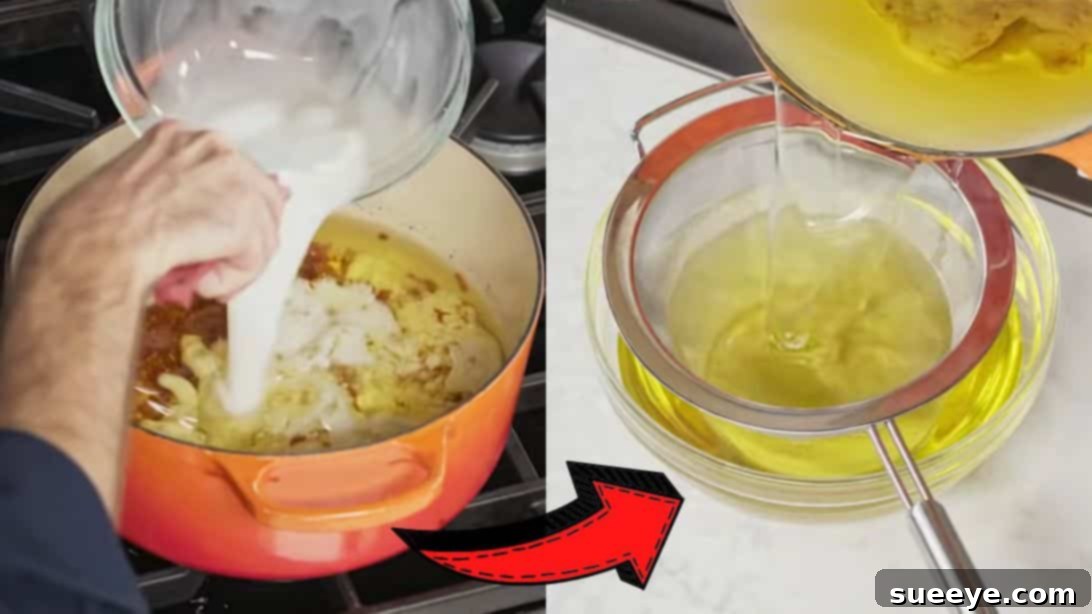
- Measure Your Oil: For every cup of frying oil you intend to clean, you’ll need ¼ cup of water and 1 tablespoon of cornstarch. This precise ratio is key to the method’s success.
- Prepare the Cornstarch Slurry: In a separate bowl, whisk together the measured water and cornstarch until a smooth, lump-free slurry is formed.
- Add Slurry to Oil: Pour the cornstarch slurry into your warm or cooled frying oil. It’s important that the oil is not boiling hot, as this can cause the cornstarch to cook too quickly or unevenly. Lukewarm oil is ideal.
- Gentle Heating and Stirring: Place the oil mixture over low heat on your stovetop. Stir it constantly and gently for about 10 to 12 minutes. The critical point here is to avoid letting the oil simmer or boil. The goal is to gradually heat the mixture, allowing the cornstarch to slowly bind with the impurities.
- Observe Solidification: As you stir, you’ll notice the cornstarch beginning to solidify, forming a gel-like substance that clumps together. This is the cornstarch absorbing and trapping the tiny food particles and other impurities present in the oil. It might look a bit like scrambled eggs or a loose gel.
- Remove from Heat and Strain: Once the starch has visibly solidified and collected the impurities, remove the oil from the heat. Carefully strain the oil through a fine-mesh strainer. Alternatively, you can use a slotted spoon to scoop out the gelled cornstarch mixture directly from the oil, which is often quicker and leaves less residue in the strainer.
Pros and Cons of the Cornstarch Slurry Method:
- Pros: Highly effective at removing both visible and microscopic impurities, neutralizes off-flavors, relatively quick compared to coffee filter straining, results in truly clean-tasting oil.
- Cons: Requires careful temperature control and continuous stirring to prevent scorching the cornstarch or boiling the water, involves an additional ingredient (cornstarch).
Once you’ve cleaned your oil using either of these methods, you’ll be amazed at its renewed clarity and freshness. Now, your oil is ready for its next culinary adventure!
Storing Your Cleaned Frying Oil for Maximum Longevity
Proper storage is just as crucial as proper cleaning to ensure your reused oil remains fresh and safe for future use. Follow these guidelines:
- Cool Completely: Always ensure the oil has cooled down to room temperature before storing it. Storing warm oil can create condensation, which promotes bacterial growth.
- Use an Airtight Container: Transfer the cleaned oil into a clean, airtight container. Glass jars or opaque plastic containers with tight-fitting lids are excellent choices. This prevents oxidation and keeps contaminants out.
- Store in a Cool, Dark Place: Light, heat, and air are oil’s enemies. Store your container in a cool, dark pantry or cupboard. For even longer shelf life, especially if you won’t be using it frequently, consider storing it in the refrigerator. Refrigerated oil might appear cloudy or solidify, but it will return to its normal state once it reaches room temperature.
- Label and Date: Always label your container with the date you cleaned the oil and what it was last used for (e.g., “cleaned oil – chicken fries – Aug 15”). This helps you track its usage and freshness.
- Maximum Reuse: While these methods extend oil life, it’s generally recommended to reuse oil no more than 3 to 4 times, depending on what was fried.
When to Finally Discard Your Frying Oil: Knowing the Signs
Even with meticulous cleaning and proper storage, there comes a point when oil must be retired. Recognizing these signs will help you maintain food quality and safety:
- Dark Color and Cloudiness: If the oil has become significantly darker, thick, or persistently cloudy even after cleaning, it’s time to let it go. This indicates a breakdown in its molecular structure.
- Strong, Unpleasant Odor: Fresh oil has a neutral smell. If your oil develops a rancid, fishy, acrid, or unusually strong burnt odor, it has gone bad.
- Persistent Foaming: Excessive foaming or continuous bubbling during heating, even before food is added, is a strong indicator that the oil’s smoke point has significantly lowered and it’s breaking down.
- Lower Smoke Point: If the oil starts smoking at a much lower temperature than usual, it means its chemical composition has changed, making it unsuitable for frying.
- Off-Taste: If foods fried in the cleaned oil start to acquire an undesirable or “off” taste, it’s a clear sign that the oil is no longer good.
When it’s time to discard oil, never pour it down the drain. This can clog pipes and harm the environment. Instead, let it cool, pour it back into its original container or a non-recyclable container, seal it, and dispose of it with your regular trash. Some communities also offer oil recycling programs.
Easiest Way To Clean & Reuse Frying Oil For Up To 3 Times: Conclusion
By implementing these clever techniques from America’s Test Kitchen, you can transform your approach to cooking oil management. Not only will you save money and reduce waste, but you’ll also gain confidence in making the most out of every drop. Whether you opt for the simple coffee filter method or the powerful cornstarch slurry purification, you now have the knowledge to extend the life of your frying oil and ensure your fried dishes always taste fresh and delicious.
We extend our sincere thanks to America’s Test Kitchen via YouTube for sharing these invaluable tips and for the inspiring images used in this guide. If you found these hacks beneficial, we highly recommend visiting their channel and subscribing for a wealth of other fantastic cooking videos and culinary wisdom!