
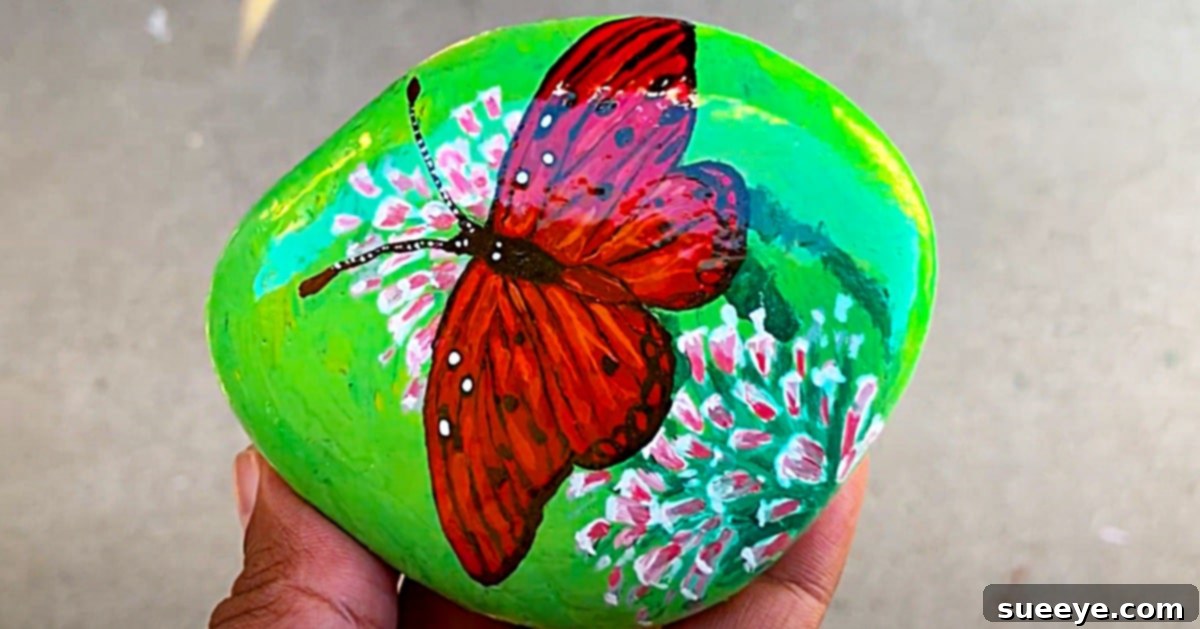
Transform Ordinary Stones into Art: The Joy of Butterfly Rock Painting
There’s something uniquely satisfying about taking an ordinary object from nature and transforming it into a vibrant piece of art. A few weeks ago, our family embarked on a delightful adventure to the serene Blanco River, where we spent a wonderful afternoon collecting an abundance of smooth, beautiful river rocks. We returned home with three buckets brimming with these natural treasures, and almost immediately, my mind began buzzing with creative possibilities. The internet became my go-to resource, and I quickly immersed myself in searching for inspiring river rock project ideas.
It wasn’t long before I stumbled upon an absolutely captivating butterfly rock painting tutorial by Chojje Adventures on Youtube. The moment I saw the intricate yet approachable design, I knew this was the perfect project for our entire family to enjoy together. Rock painting has always held a special place in my heart; I often find peace in creating hand-painted mandala rocks, which are incredibly simple to make, requiring just a pencil and a few cotton swabs. The meditative process and beautiful results make them such a joy to create.
This particular butterfly idea, however, resonated with me on an even deeper level. It instantly transported me back to my grandmother’s sprawling farm, a place filled with cherished childhood memories. Her garden was a riot of color and life, brimming with an astonishing array of flowers that attracted countless beautiful butterflies. My sister and I would spend hours running through that magical garden, chasing and observing these graceful creatures, utterly captivated by their delicate wings and vibrant patterns. What was truly remarkable was how closely the butterfly design in the tutorial resembled those enchanting creatures from my grandma’s garden. It felt as if I was about to paint characters I already knew and loved, making the prospect of this craft even more exciting and personal.
Engaging in creative projects like rock painting offers more than just a beautiful end product; it provides a wonderful opportunity for families to connect, for individuals to express their artistic side, and to find a moment of mindfulness in a busy world. This guide will walk you through the journey of creating your own stunning butterfly painted rocks, inspired by nature and infused with personal meaning.
Why Choose Butterfly Rock Painting?
Butterfly rock painting is an incredibly rewarding hobby that combines art, nature, and personal expression. Beyond the aesthetic appeal, there are numerous reasons why this particular craft is a fantastic choice for all ages:
- Nostalgic Connection: As demonstrated by my own experience, butterflies often evoke fond memories of childhood, nature, and loved ones. Painting them can be a beautiful way to honor these connections.
- Accessible to All Skill Levels: Whether you’re a seasoned artist or a complete beginner, rock painting is highly forgiving. Simple designs can be just as charming as complex ones, and the process itself is more about enjoyment than perfection.
- Affordable and Sustainable: The primary material – rocks – can often be found for free in nature, making this a very economical craft. A few basic paints and brushes are usually all you need.
- Mindful and Relaxing: The focused act of painting can be incredibly therapeutic. It allows you to slow down, concentrate on the present moment, and engage in a calming activity.
- Unique Gifts and Decor: Finished butterfly rocks make charming garden decorations, unique paperweights, thoughtful handmade gifts, or even “kindness rocks” to hide for others to find, spreading joy within your community.
- Family Bonding: It’s an excellent activity for families to do together, encouraging creativity, conversation, and shared experiences. Everyone can contribute their unique style to their rock masterpiece.
Materials For Butterfly Rock Painting:
Gathering your supplies is the first exciting step in any creative project. For butterfly rock painting, you’ll find that you likely already have many of these items around the house. The key is to choose quality materials that will ensure your art stands the test of time and outdoor elements.
- A Smooth Stone (like a river rock): The foundation of your artwork! Look for rocks that have a relatively flat and smooth surface, free from too many bumps or divots. River rocks are ideal because their natural tumbling in water makes them smooth and easy to paint on. The size can vary depending on your preference and the complexity of the butterfly you envision.
- Craft Paint: Acrylic craft paints are perfect for rock painting. They are water-based, dry quickly, and offer a wide range of vibrant colors. They adhere well to porous surfaces like stone and are generally inexpensive. You’ll want a variety of colors for your butterfly, including a base color, body color, and wing detailing colors.
- A Paintbrush: A selection of brushes will be helpful. A flat brush is great for applying base coats, while smaller, finer-tipped brushes (like a detail brush or a round brush) are essential for sketching the butterfly outline and adding intricate details to the wings and body.
- A Pencil: An ordinary pencil (HB or 2B) is indispensable for sketching your butterfly design onto the rock before you commit with paint. It allows you to refine your drawing, ensure symmetry, and plan your color placement, all without leaving permanent marks.
- Some Clear Gloss (optional, but highly recommended): This is your finished artwork’s protective shield! A clear gloss sealant (such as a spray or brush-on acrylic sealer) will protect your painted butterfly from the elements, preventing fading from UV light, chipping, and water damage. It also gives your rock a beautiful, polished finish that enhances the vibrancy of the colors.
Directions: Sketching and Painting Your Butterfly Masterpiece
Now that you have all your materials ready, it’s time to bring your butterfly to life! The beauty of this project lies in its simplicity and the ability to customize each rock with your unique flair. While we highly recommend following the detailed visual guidance in this awesome butterfly rock painting tutorial by Chojje Adventures on Youtube for step-by-step instructions, we can outline the general process here to give you a clear understanding of the journey from a simple stone to a vibrant work of art.
Step 1: Preparing Your Rock Canvas
Before any paint touches your stone, it’s crucial to prepare your “canvas.” Start by thoroughly cleaning your collected river rocks. Wash them with warm water and a scrub brush to remove any dirt, dust, or loose debris. Allow them to dry completely. A clean, dry surface ensures that your paint adheres properly and smoothly. Once dry, you might choose to apply a thin, even base coat of a solid color to your rock. This creates a uniform background and can make your butterfly colors pop, especially if your rock is naturally very dark or multi-colored.
Step 2: Sketching Your Butterfly Design
With your base coat dry (if you applied one), it’s time to bring out your pencil. Gently sketch the outline of your butterfly onto the rock. You can start with the central body, then add the large upper wings and smaller lower wings. Don’t worry about making it perfect; the pencil allows for easy corrections. Focus on the general shape and placement. You can even sketch in some basic patterns or veins on the wings at this stage. This preliminary sketch is a fantastic way to plan your design and ensure your butterfly fits beautifully on the rock’s unique shape.
Step 3: Bringing Your Butterfly to Life with Paint
Once your sketch is complete, you can begin painting! Chojje Adventures’ tutorial provides excellent guidance for this stage. Typically, you’ll start by filling in the larger areas first. Paint the butterfly’s body in a solid color, then move on to the main colors of the wings. Allow each layer of paint to dry thoroughly before adding subsequent layers or details. This prevents colors from blending unintentionally and creates crisp lines. Once the main colors are down, use your finer brushes to add intricate details: antennae, veins on the wings, spots, stripes, or any other decorative elements that make your butterfly unique. Think about the colors you observed in real butterflies or let your imagination guide you to create fantastical designs.
Step 4: Sealing Your Art for Longevity
After your butterfly is fully painted and the paint is completely dry (this might take several hours, especially if you’ve applied multiple layers), it’s time for the final, crucial step: sealing. Apply a clear gloss sealant according to the product’s instructions. This protective layer will not only enhance the colors and give your butterfly a beautiful sheen but, more importantly, it will protect your artwork from the elements, especially if you plan to place your rocks outdoors. A good sealant prevents fading from sun exposure and damage from moisture, ensuring your painted rocks remain vibrant and beautiful for years to come.
Creative Ideas for Your Butterfly Rocks
These adorable butterfly rocks are not just fun to create; they also serve many wonderful purposes. Here are a few ideas for what you can do with your finished masterpieces:
- Garden Decor: Place them among your flowers, along pathways, or in planters to add a whimsical and personal touch to your outdoor space. They blend seamlessly with nature while offering a pop of color.
- Thoughtful Handmade Gifts: Hand-painted rocks make incredibly personal and heartwarming gifts for birthdays, holidays, or just to show someone you care. They are especially perfect as unique Christmas presents.
- Paperweights: A practical and beautiful addition to any desk or workspace.
- Story Stones: Use them as props for storytelling with children, encouraging imagination and creativity.
- Kindness Rocks: Paint a positive message or simply the butterfly itself and leave it in a public place for someone else to find, brightening their day and spreading a little joy.
- Home Decor Accents: Display them on shelves, mantels, or in decorative bowls to bring a touch of nature-inspired art indoors.
Tips for Aspiring Rock Artists
- Start Simple: Don’t feel pressured to create a complex design right away. Begin with simple butterfly shapes and basic color schemes. Your skills will naturally improve with practice.
- Embrace Imperfections: Handmade art has character. Don’t stress over minor wobbles or uneven lines. These unique quirks make your rock truly yours.
- Experiment with Colors: Butterflies come in an incredible array of colors. Don’t be afraid to experiment with bold, unusual, or iridescent paints to create truly unique creatures.
- Gather Inspiration: Look at photos of real butterflies, consult nature books, or browse online galleries for endless inspiration for colors, patterns, and shapes.
- Work in a Well-Ventilated Area: Especially when using spray sealants, ensure you have good ventilation.
- Clean Brushes Promptly: Rinse your brushes immediately after use to prevent paint from drying on them, extending their lifespan.
Creating butterfly painted rocks is more than just a craft; it’s an opportunity to tap into your creativity, share a meaningful experience with loved ones, and transform ordinary objects into extraordinary works of art. The memory of my grandma’s garden and the joy of creating these beautiful characters from simple river stones has made this one of my favorite projects. We encourage you to gather your supplies, find your inspiration, and embark on your own rock painting adventure. Happy painting!