
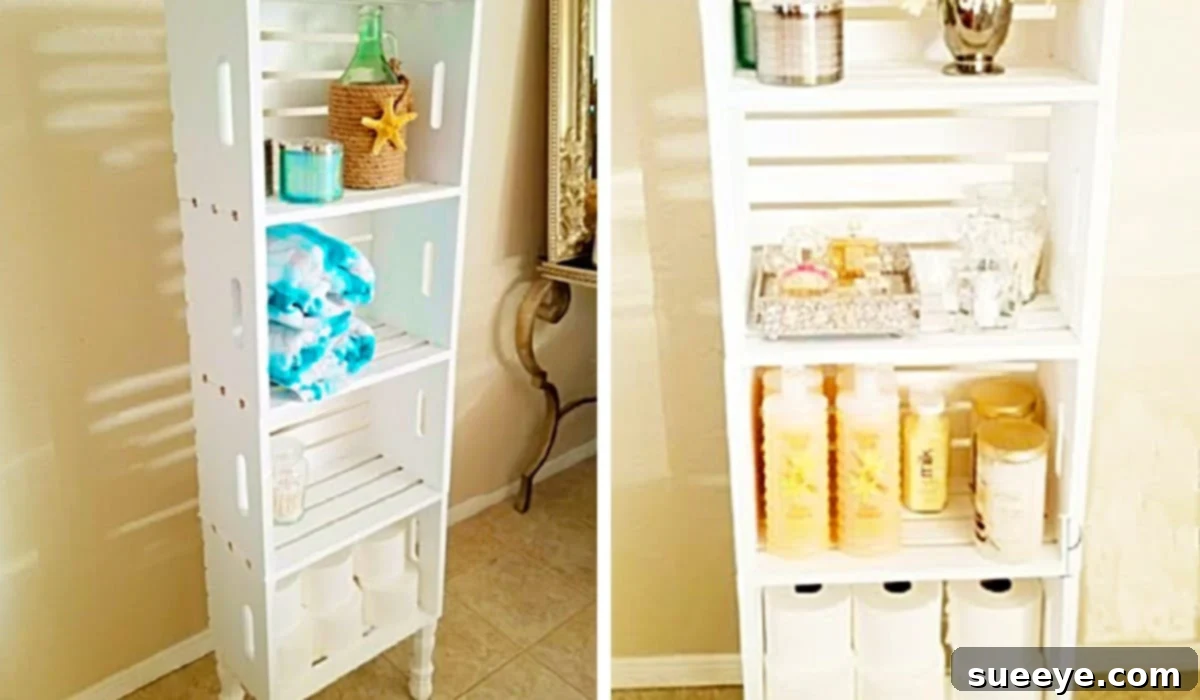
Transforming your home decor doesn’t have to break the bank. With a little creativity and a few affordable materials, you can craft stunning pieces that rival high-end store offerings. This holds true for the exquisite farmhouse-style hutch made from wooden crates, a brilliant DIY project that caught my eye thanks to the fantastic video tutorial by Elegance On A Budget, on YouTube. As a long-time admirer of crafting with wooden crates, I can attest to their incredible versatility, sturdiness, and cost-effectiveness. They truly are a blank canvas for countless DIY adventures. This particular bathroom storage unit, or indeed any room storage solution, transcends its humble origins, emerging as an elegant and sophisticated piece that looks like it belongs in a catalog from Pottery Barn or a similar upscale retailer. What’s even better is that this project stands out as one of the most straightforward furniture DIYs I’ve ever encountered, yet the final result is absolutely breathtaking.
Creating functional and beautiful furniture doesn’t require advanced carpentry skills or a massive budget. This project is a testament to the power of simple materials and clever design. Imagine adding a touch of rustic charm and organized elegance to your living space with a custom-built hutch, tailored to your style, all while saving a significant amount of money. The satisfaction of building something so attractive and useful with your own hands is truly unparalleled. Let’s dive into how you can replicate this amazing wooden crate farmhouse hutch and elevate your home decor.
Why Wooden Crates Are a DIY Dream for Furniture Projects
Wooden crates are more than just humble containers; they are a DIY enthusiast’s secret weapon. Their inherent qualities make them perfect for a vast array of home improvement and decor projects, especially for building furniture like this farmhouse hutch. Here’s why they are so beloved:
- Affordability: Compared to pre-built furniture or raw lumber, wooden crates are incredibly inexpensive. You can often find them at craft stores, sometimes even used, at very budget-friendly prices. With smart shopping and coupons, as we’ll discuss, the cost becomes even more negligible.
- Natural Aesthetic: The raw, unfinished wood of crates provides a beautiful, rustic, and timeless appeal. This natural texture and grain are perfect for farmhouse, bohemian, industrial, or even minimalist decor styles. They can be painted, stained, distressed, or left natural to match any interior design.
- Sturdiness and Durability: Despite their simple construction, wooden crates are surprisingly robust. When properly joined and reinforced, they can support a significant amount of weight, making them ideal for storage and display. They are designed to hold goods, so they are built to last.
- Versatility: This is perhaps their greatest strength. Crates can be stacked, turned, mounted, and combined in endless configurations. They can become bookshelves, nightstands, coffee tables, wall shelves, pet beds, and, as we see here, elegant hutches. Their modular nature allows for creative freedom.
- Ease of Modification: Wooden crates are easy to cut, sand, paint, and assemble. You don’t need specialized tools or extensive woodworking experience to transform them into something spectacular. This makes them perfect for beginners and seasoned DIYers alike.
- Sustainability: Repurposing wooden crates is an environmentally friendly choice, giving new life to materials that might otherwise be discarded. It’s a small but meaningful way to contribute to sustainable living.
Gathering Your Essential Supplies for the Farmhouse Hutch
One of the beauties of this project is its minimal material list. You won’t need a workshop full of expensive tools or obscure items. Here’s a detailed look at what you’ll need and some tips for sourcing them:
- 3 Wooden Crates: The foundation of your hutch.
- Sourcing: You can find a fantastic selection at craft stores like JoAnn’s or Michael’s. These stores frequently offer generous online coupons (often 40-50% off a single item or your entire purchase), which can lead to significant savings. Keep an eye out for sales as well. Ensure the crates are of a consistent size and relatively sturdy. While craft store crates are often smooth enough, a quick check for rough edges or splinters is wise.
- Size Consideration: Standard crate sizes work well for a versatile hutch. Consider the dimensions of the space where you intend to place your hutch and choose crates that will fit comfortably once stacked.
- Some White Spray Paint: For that classic farmhouse aesthetic.
- Type: A good quality all-purpose spray paint will work wonders. Look for brands that offer good coverage and a durable finish. White is quintessential for the farmhouse look, but feel free to explore other colors like cream, light gray, or even a soft pastel if it better suits your decor. You could also opt for chalk paint for a matte, distressed finish, or a semi-gloss for a more polished look.
- Quantity: Depending on the coverage of your chosen paint and the size of your crates, you might need 1-2 cans. It’s always better to have a little extra than to run out mid-project.
- Some Wood Glue (Gorilla is good): For a strong, lasting bond.
- Brand: A reputable wood glue like Gorilla Wood Glue or Titebond provides an incredibly strong bond for wood-to-wood applications. This is crucial for the structural integrity of your hutch.
- Application: Ensure the surfaces you are gluing are clean and dry for optimal adhesion.
- Clamps (for the wood): Essential for a secure cure.
- Importance: Clamps are non-negotiable for this project. They hold the glued pieces firmly together, ensuring tight contact while the wood glue dries and cures, creating an unshakeable bond.
- Types: Bar clamps, C-clamps, or even heavy-duty spring clamps can work. You’ll want enough to secure all three crates together along their contact points.
- Some Wooden Screw-in Legs: To elevate your hutch and add a refined touch.
- Sourcing: These are readily available at most home improvement stores like Home Depot or Lowe’s, as well as online retailers.
- Style and Height: Screw-in legs come in various styles (tapered, bun feet, straight) and heights. Choose a style that complements the farmhouse aesthetic and a height that gives your hutch the desired elevation. They often come with pre-attached mounting plates or simply screw directly into the wood.
- Optional but Recommended:
- Sandpaper (fine-grit): For smoothing any rough spots on the crates before painting, ensuring a professional finish.
- Drop Cloth or Plastic Sheeting: To protect your work area from paint.
- Safety Gear: Gloves and a mask if working with spray paint in a poorly ventilated area.
- Drill/Screwdriver: For attaching the legs, especially if you want to pre-drill pilot holes for easier and more secure attachment.
Directions: Crafting Your Elegant Crate Hutch Step by Step
The beauty of this project, as highlighted in the excellent video tutorial by Elegance On A Budget, on YouTube, lies in its simplicity. You don’t need to be a seasoned carpenter to achieve a stunning result. Follow these easy steps to build your magnificent wooden crate farmhouse hutch:
Step 1: Prepare Your Crates
Before assembly, take a moment to prepare your wooden crates. Unpack them and inspect for any rough patches or splinters. If present, a light sanding with fine-grit sandpaper will create a smoother surface, which is essential for a professional-looking paint finish. Wipe down the crates with a damp cloth to remove any dust or debris, ensuring optimal adhesion for the glue and paint. Allow them to dry completely.
Step 2: Assemble the Crate Structure and Clamp
This is the most critical step for the hutch’s stability.
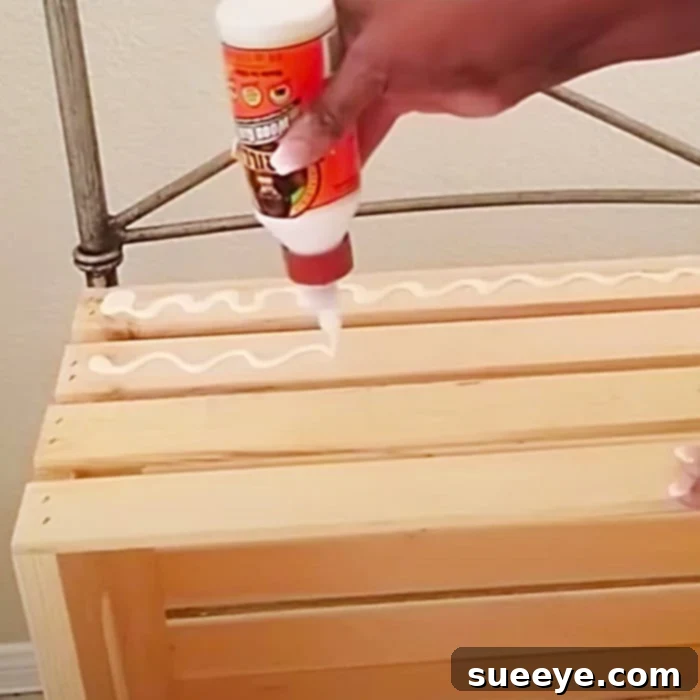
First, decide on your stacking orientation. For a typical hutch look, you’ll want to stack them vertically. Position your first crate on a flat, stable surface. Apply a generous, even bead of wood glue along the top edges where the second crate will sit. Carefully place the second crate directly on top, aligning its edges perfectly with the first. Press down firmly.
Next, apply another bead of wood glue along the top edges of the second crate. Place the third crate on top, again ensuring perfect alignment. Once all three crates are stacked, immediately apply your wood clamps. Use multiple clamps along the contact points of all crates to ensure consistent, strong pressure. Tighten them securely, but not so much that you dent the wood. The goal is to create tight, seamless joints. Allow the glue to dry and cure for at least 24 hours, or as recommended by your glue manufacturer. Do not rush this process; a proper cure is vital for durability. While the glue dries, you can wipe away any excess glue that squeezes out with a damp cloth.
Step 3: Attach the Legs
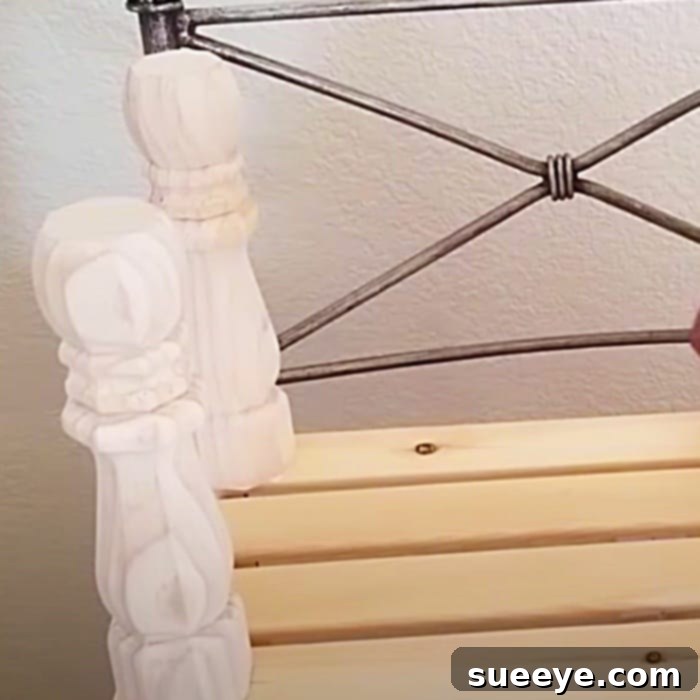
Once the glue has fully cured and you’ve removed the clamps, it’s time to add the legs. Carefully turn your assembled crate structure upside down. Determine the ideal placement for each of your four screw-in legs – typically one at each corner. You can use a ruler or measuring tape to ensure they are evenly spaced and positioned a short distance in from the edges for stability. If your legs require a pilot hole, use a drill bit slightly smaller than the leg’s screw thread to pre-drill shallow holes. This prevents the wood from splitting. Then, simply screw in each leg firmly until it is secure. Ensure they are all tightened equally for a level hutch.
Step 4: Paint Your Gorgeous Shelves
With the structure complete and the legs attached, the final step is to bring your farmhouse vision to life with paint. Move your hutch to a well-ventilated area, preferably outdoors or in a garage with open doors, and lay down a drop cloth or old newspaper to protect your surroundings. If your crates are particularly raw or you want an ultra-smooth finish, you might consider applying a wood primer first. Once dry, proceed with your white spray paint. Apply the paint in thin, even coats, moving the can steadily back and forth. It’s better to apply several thin coats than one thick coat, as this prevents drips and ensures a smooth, professional finish. Allow each coat to dry to the touch before applying the next. Make sure to get into all the nooks and crannies, both inside and outside the crates. Once you’re satisfied with the coverage, allow the hutch to dry and cure completely, which might take several hours or even overnight, depending on humidity and paint type. And just like that, you will have a truly amazing, custom-built piece of furniture!
Personalizing Your Farmhouse Hutch: Customization Ideas
While the classic white farmhouse look is undoubtedly charming, this wooden crate hutch offers a fantastic canvas for personalization. Don’t be afraid to make it uniquely yours:
- Color and Finish Variations: Instead of pure white, consider an antique white, a soft cream, or even a light gray for a slightly different take on farmhouse style. You could also stain the crates for a rich, natural wood finish, or paint them a bold accent color to match a specific room’s palette. Experiment with distressing techniques (sanding down edges after painting) for a shabby chic or aged look.
- Decorative Backing: For a more finished appearance, consider adding a thin piece of plywood, beadboard, or even decorative wallpaper to the back of the hutch. This can hide wall imperfections and add an extra layer of style.
- Hardware Enhancements: Small decorative knobs or pulls on the front slats of the crates (if applicable) can add a touch of elegance or rustic charm. You could even add small hinges and a front panel to create a cabinet door for one of the sections.
- Shelf Liners: To protect the wood and add a soft touch, line the inside of the crate shelves with pretty contact paper, fabric, or even a simple piece of cut felt.
- Leg Styles: Explore different leg styles! Beyond simple wooden bun feet, you could use tapered legs, hairpin metal legs for a more industrial look, or even forgo legs entirely and mount the hutch on a sturdy base or directly to the wall.
Styling and Functionality: Where Your Hutch Shines
The versatility of this wooden crate hutch extends far beyond its initial construction. Its modular design and charming aesthetic make it suitable for almost any room in your home, providing both practical storage and a beautiful display area:
- Bathroom Elegance: This hutch is perfect for storing towels, toiletries, extra toilet paper, or decorative items like small plants, candles, and framed pictures. Its vertical design helps maximize storage in often-small bathroom spaces.
- Living Room Charm: Use it to display your favorite books, small potted plants, decorative vases, family photos, or cherished trinkets. It can serve as a stylish side table or an accent piece next to a sofa or armchair.
- Entryway Organizer: Keep your entryway clutter-free by using the hutch to hold keys, mail, small bags, or dog leashes. The shelves provide quick access to essentials as you come and go.
- Kids’ Room Helper: A fantastic solution for organizing toys, books, art supplies, or small stuffed animals in a child’s bedroom or playroom. The open shelves make it easy for kids to access their belongings.
- Kitchen or Pantry Assistant: In the kitchen, it can hold cookbooks, spices, small appliances, or decorative dishware. In a pantry, it can organize canned goods, jars, or cooking essentials.
- Bedroom Nightstand/Side Table: A unique alternative to a traditional nightstand, offering open storage for books, a reading lamp, or your nightly essentials.
The open design of the crates allows for easy access and visibility of your stored items, making it not just a piece of furniture, but a dynamic part of your home’s organization and aesthetic. Arrange items by color, size, or function to create a visually appealing and highly functional display.
Conclusion: Your Next Must-Try DIY Project
This fantastic wooden crate farmhouse hutch project is a true gem from start to finish. It embodies the perfect blend of affordability, simplicity, and stunning aesthetic appeal. You begin with basic, inexpensive wooden crates and, with just a few easy steps, transform them into a piece of furniture that looks professionally crafted and effortlessly stylish. The inspiration from Elegance On A Budget’s video tutorial truly showcases how accessible beautiful home decor can be, even on a tight budget. Whether you’re a seasoned DIY enthusiast or just starting your journey into home crafting, this hutch offers a rewarding experience with an impressive outcome.
The versatility of its design means it can find a functional and beautiful home in virtually any room, bringing that sought-after farmhouse charm and much-needed organization. The ability to customize its finish and styling ensures it will seamlessly integrate with your existing decor, or even become a focal point itself. I wholeheartedly recommend taking on this project. It’s an opportunity to create something truly special, save money, and add a personal touch to your living space. Get your crates, grab your paint, and prepare to be amazed by what you can achieve!