
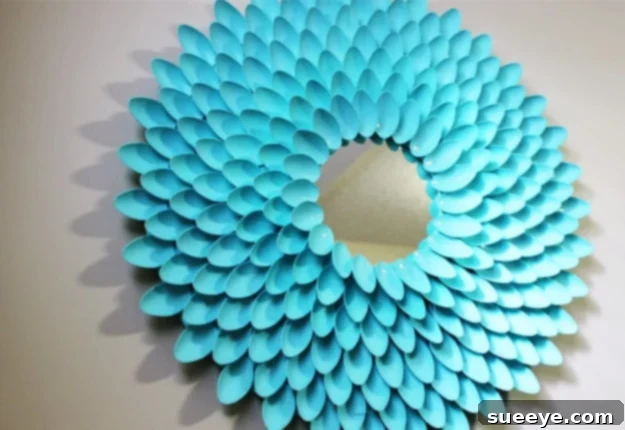
DIY Upcycled Plastic Spoon Mirror Frame: A Stunning Eco-Friendly Craft for Your Home
In an era where personal expression meets environmental consciousness, upcycling has become a powerful trend, allowing us to transform discarded items into beautiful, functional pieces. This particular craft project invites you to reimagine the humble plastic spoon, elevating it from single-use waste to a central element of stunning home decor. Imagine creating a bespoke mirror frame that not only captivates the eye but also tells a story of sustainable artistry. This comprehensive guide will show you how to construct an elegant and personalized DIY mirror frame using upcycled plastic spoons, perfect for adding a touch of unique charm to any room.
This creative endeavor is more than just a craft; it’s a statement. By following this easy DIY tutorial, you’ll embark on a rewarding journey of creative upcycling, turning what would typically end up in a landfill into an exquisite handmade mirror. Whether you envision a frame painted in a vibrant solid color to perfectly complement your existing decor or desire to experiment with a sophisticated ombre effect, the possibilities for customization are endless. Prepare to infuse your living space with a distinct piece of unique wall art that reflects both your style and your commitment to a greener planet.
Why Choose an Upcycled Plastic Spoon Mirror Frame?
Opting for an upcycled mirror frame made from plastic spoons offers a multitude of benefits that extend beyond its striking appearance. It’s a choice that aligns with modern values of sustainability, creativity, and personal flair. Here are several compelling reasons why this sustainable craft project is an excellent addition to your crafting repertoire:
- Environmental Impact: Every plastic spoon you intercept from the waste stream and repurpose for this project directly contributes to reducing plastic pollution. It’s a small but significant step in promoting recycled materials use and fostering a more eco-friendly decor approach in your home.
- Exceptional Cost-Effectiveness: Plastic spoons are notoriously inexpensive, or you might even have a stash of unused ones from past events. This makes the entire project incredibly budget-friendly, especially when compared to purchasing high-end, custom-designed mirror frames.
- Distinctive Aesthetic Appeal: The inherent shape of the spoon heads, when artfully arranged and layered, creates a captivating texture reminiscent of scales, petals, or intricate floral patterns. Once painted, this texture transforms into a luxurious finish that is truly unique home decor and cannot be easily replicated by mass-produced items.
- Unlimited Personalization: This project offers unparalleled creative freedom. You are the designer, choosing everything from the mirror’s size and the frame’s density to the precise color palette. This allows for a finished product that is perfectly tailored to your personal taste and integrates seamlessly with your existing interior design scheme.
- Deep Sense of Accomplishment: There is an undeniable joy and satisfaction that comes from transforming something as commonplace as a plastic spoon into a beautiful, functional, and admired piece of art. The plastic spoon craft provides a rewarding experience from conception to completion.
Essential Materials for Your DIY Masterpiece
Before diving into the creative process, it’s crucial to gather all your materials. Having everything at hand will ensure a smooth, uninterrupted, and enjoyable crafting experience. Most of these items are readily available at craft stores, hardware stores, or even around your house. Here’s a detailed list of what you’ll need for your stunning DIY home decor project:
- Mirror: Select a plain mirror of your desired dimensions and shape. While round mirrors often lend themselves beautifully to the radiating spoon design, square, oval, or rectangular mirrors can also be creatively framed. Ensure the mirror’s surface is clean and free of smudges.
- Plastic Spoons: These are your star materials! The number required will vary significantly based on your mirror’s size and the desired density of your frame. For a medium-sized mirror (e.g., 20-24 inches in diameter), plan for approximately 300-500 spoons. Sturdier plastic spoons (often found in catering packs) are generally easier to cut and provide a more robust final product. Consider purchasing in bulk or collecting them over time.
- Cardboard or MDF Base: This will serve as the sturdy foundation for your frame and the backing for your mirror. Cut a piece of rigid cardboard (from an old appliance box is perfect for sustainable crafts) or a thin sheet of MDF (Medium-Density Fiberboard) from a hardware store. The base should be significantly larger than your mirror to create the desired frame border.
- Strong Adhesive: A high-temperature hot glue gun with ample glue sticks is highly recommended for its speed and strong hold. For increased durability and longevity, especially if the mirror will be in a high-traffic area or exposed to temperature fluctuations, consider an industrial-strength adhesive like E6000 or a specialized construction adhesive.
- Paints and Primer:
- Primer for Plastic: Absolutely essential for achieving a lasting, professional finish. A plastic-specific spray primer ensures that your chosen paint adheres properly to the slick plastic surface of the spoons, preventing chipping and flaking.
- Spray Paint: The most efficient way to achieve an even, smooth finish across numerous spoon heads. Opt for acrylic or enamel spray paints formulated for use on plastic. You can choose a single color, or select multiple shades for an ombre mirror effect (e.g., three gradients of blue, green, or even metallics).
- Acrylic Craft Paints (Optional): Useful for smaller touch-ups, hand-painting intricate details, or if you prefer a brush-on application over spray paint (though more time-consuming for large areas).
- Cutting Tools: A robust pair of sharp scissors or a utility knife (always used with a cutting mat for safety) will be needed to cleanly snip off the spoon handles.
- Protective Gear: Safety first! Wear disposable gloves to protect your hands from glue and paint, and a respirator mask when using spray paints, especially if working indoors. Always ensure your workspace is well-ventilated.
- Drop Cloth or Newspaper: To protect your work surface from paint overspray and glue drips.
- Pencil and Ruler/Compass: For precise marking and measuring the base and mirror placement.
- Hanging Hardware (Optional): If your chosen mirror or base doesn’t come with hanging capabilities, you’ll need suitable hardware such as picture wire, D-rings, or a sawtooth hanger, ensuring it can safely support the combined weight of the mirror and the framed spoons.
- Clear Sealant (Optional): A clear topcoat spray sealant (available in matte, satin, or gloss finishes) can provide an extra layer of protection, guarding your painted frame against dust, moisture, and general wear, thereby extending its lifespan.
Step-by-Step Tutorial: Crafting Your Spoon Mirror Frame
With all your materials neatly organized, it’s time to bring your upcycled craft project to life. This detailed, easy DIY craft guide will walk you through each phase, ensuring a satisfying and beautiful outcome for your plastic spoon mirror.
1. Prepare the Frame Base
- Trace and Mark Your Mirror: Place your mirror onto your cardboard or MDF base. Using a pencil, carefully trace around the mirror’s perimeter to mark its exact position.
- Define the Frame Border: Determine the desired width for your spoon frame. A common and visually appealing width ranges from 3 to 6 inches. From the traced mirror line, measure outwards and draw a larger, concentric circle (or corresponding shape) on your base. This outer line marks the ultimate edge of your finished frame.
- Cut the Base Shape: With a sturdy pair of scissors or a utility knife, meticulously cut out the larger, outer shape from your base material. You should now have a donut-shaped base (for a round mirror) or a larger frame-like piece (for square/rectangular mirrors) with an inner opening precisely sized for your mirror.
2. Prepare the Plastic Spoons
This is the most repetitive but essential step, as consistent spoon preparation ensures a polished final look.
- Snip the Handles: Take each plastic spoon individually. Using robust scissors or a utility knife, carefully cut off the handle just beneath the bowl (the scoop part). Aim for uniformity in the length of the remaining spoon heads; this consistency is crucial for creating an even, layered texture. Dispose of the handles responsibly.
- Clean Spoons (If Necessary): If you’re using salvaged spoons, a quick wash with soap and water, followed by thorough drying, will remove any grime or residue, ensuring optimal paint adhesion.
3. Attach the Spoons to the Base
This is where your mirror frame truly takes on its distinctive form. Precision and patience are key here to create the beautiful layered effect.
- Begin with the Outermost Layer: Start by applying a dab of hot glue (or your chosen adhesive) to the flat, cut end of a spoon head. Position the spoon head onto the outermost edge of your prepared base, ensuring the bowl of the spoon faces outwards, away from the mirror’s future center, and slightly upwards. Work your way around the entire outer perimeter, placing spoons closely together to form the first, dense layer.
- Create Subsequent Layers: As you move inwards towards the mirror’s intended position, each new row of spoons should slightly overlap the previous one. This overlapping technique is vital for concealing the cut ends of the spoons and building the rich, textured effect. Stagger the spoons in each new row so they don’t sit directly above those in the row beneath; this creates a more organic, petal-like pattern.
- Continue Inward: Methodically continue adding layers of spoons until you reach the inner boundary where your mirror will be placed. Ensure you leave sufficient clearance around the inner edge for the mirror to be securely glued down without any interference from the spoon heads. Allow all the spoon layers to set and dry completely according to your adhesive’s instructions.
- Secure the Mirror: Once the spoon framework is fully dry and stable, apply a generous amount of strong adhesive to the back of your mirror. Carefully center the mirror onto the designated inner space on your base. Press firmly and hold for a few moments to ensure good contact. Allow the adhesive to cure fully, which might take several hours or even overnight, depending on the product.
4. Prime and Paint Your Frame
This stage transforms the raw spoons into a vibrant, finished piece, bringing your unique home decor vision to life.
- Mask the Mirror: Meticulously cover the mirror surface with painter’s tape and newspaper or plastic sheeting to protect it completely from paint overspray.
- Apply Primer: In a very well-ventilated area or outdoors, apply a thin, even coat of plastic-specific spray primer to all the exposed spoon heads and any visible parts of the base. Allow the primer to dry thoroughly according to the manufacturer’s instructions. This step is non-negotiable for lasting paint adhesion.
- Paint – Solid Color: If you’ve chosen a solid color, apply several light, even coats of your chosen spray paint. Spray from different angles to ensure all nooks and crannies of the textured spoons are covered. Allow each coat to dry completely before applying the next to prevent drips and achieve a smooth, consistent finish.
- Paint – Ombre Effect: For a captivating ombre mirror, you’ll typically need at least three shades of your chosen color family (e.g., light blue, medium blue, dark blue).
- Begin by spraying the darkest shade onto the outermost row(s) of spoons.
- Transition to the medium shade for the middle rows, slightly overlapping and blending the edges with the darker color to create a soft gradient.
- Finish with the lightest shade on the inner rows closest to the mirror, blending seamlessly with the medium shade.
- Achieving a smooth blend might require applying very light, misty coats over the transition zones. Practice on spare spoons if you’re new to ombre techniques.
- Curing Time: Allow the painted frame to dry and cure for at least 24-48 hours, or as recommended by your paint product, before extensive handling or moving. This ensures maximum durability and prevents smudges.
5. The Finishing Touches
The final steps polish your creation and prepare it for display.
- Remove Masking: Carefully peel away the painter’s tape and newspaper from the mirror surface. Take your time to avoid marring the freshly painted frame.
- Apply Clear Sealant (Optional): For enhanced durability and to protect the paint from dust and moisture, apply one or two light, even coats of a clear spray sealant over the painted spoons. Choose a finish (matte, satin, or gloss) that complements your desired aesthetic.
- Attach Hanging Hardware: If your base or mirror lacks hanging hardware, securely attach D-rings, picture wire, or a sawtooth hanger to the back of your cardboard/MDF base. Ensure the hardware is robust enough to safely support the total weight of the mirror and the newly adorned frame.
- Final Clean: Give the mirror surface a final wipe with a glass cleaner to remove any dust or fingerprints.
Creative Variations and Personalization for Your Upcycled Frame
The true charm of this DIY craft project lies in its incredible versatility. Once you understand the basic technique, you can unleash your creativity to make a truly unique statement piece. Here are some inspiring ideas for personalizing your upcycled home decor:
- Monochromatic Elegance: Instead of a multi-color ombre, use several closely related shades of a single color (e.g., creams, off-whites, and subtle grays) for a sophisticated, minimalist, yet texturally rich effect that speaks volumes.
- Bold and Eclectic Color Schemes: Don’t limit yourself to gradients. Experiment with vibrant, contrasting colors for a pop-art inspired mirror, or alternate colors in distinct bands for a playful and energetic look.
- Metallic Opulence: Achieve a high-end, luxurious feel by spray painting the entire frame in a metallic finish – gold, silver, copper, or bronze. This technique can convincingly mimic expensive metal art, adding instant glamour to your space.
- Rustic or Distressed Charm: After applying your base coat of paint, lightly sand certain areas to expose the primer or even the plastic beneath. Alternatively, use a dry-brush technique with a complementary color to create a weathered, shabby-chic, or vintage aesthetic.
- Integrated Elements: While spoons are the focus, consider embedding other small, lightweight upcycled items (like bottle caps, small wooden beads, or even fabric scraps) among the spoon layers for added texture and visual intrigue.
- Alternative Spoon Arrangements: Beyond concentric circles, explore different patterns. You could try arranging spoons in a swirling spiral from the center outwards, or cluster them into distinct floral motifs at specific points around the mirror’s perimeter.
- Expand Beyond Mirrors: The brilliant spoon-layering technique isn’t confined to mirrors! Apply it to an old, plain lampshade base for a unique lighting fixture, cover a dull clock face, or even create standalone sculptural wall art panels for a truly immersive experience in creative upcycling.
Expert Tips for a Flawless Upcycling Journey
To ensure your sustainable home decor project not only looks fantastic but also stands the test of time, keep these practical tips in mind:
- Prioritize Ventilation: Always work in a well-ventilated area, especially when using spray paints, primers, and strong adhesives. Outdoors or a garage with open doors and windows are ideal. Use a mask when appropriate.
- Embrace Patience: Rushing any step, particularly drying times for glue and paint, can lead to a less durable and aesthetically compromised finish. Allow ample time for each layer to cure fully.
- Test Before Committing: If you’re experimenting with a new paint color, a different adhesive, or a unique blending technique for your ombre effect, test it on a spare spoon or a small, inconspicuous part of your base first.
- Light Coats are Key for Paint: When spray painting, always opt for multiple thin, even coats rather than one thick application. This prevents drips, ensures uniform coverage, and speeds up drying time, leading to a much smoother and more professional finish.
- Consider Spoon Quality: While any plastic spoon can be upcycled, sturdier, less flimsy spoons (often found in bulk restaurant supply packages) are generally easier to cut cleanly and offer a more substantial, robust final texture.
- Don’t Fear Imperfection: Crafting is a learning process. If a spoon doesn’t sit quite right, or a paint layer isn’t perfect, most issues can be carefully rectified. Enjoy the process and the unique character your handmade piece develops.
- Measure Twice, Cut Once: This old adage holds true, especially when cutting your base and determining spoon placement. Accuracy in the initial stages saves time and effort later on.
The Enduring Appeal of DIY and Upcycling
This upcycled craft project beautifully encapsulates the spirit of DIY – the satisfaction of creating something meaningful and beautiful with your own hands. It offers an accessible and enjoyable pathway into creative upcycling, transforming humble, everyday items into truly extraordinary unique home decor pieces. Beyond the tangible beauty, there’s an immense sense of pride and accomplishment that comes from crafting something that not only enhances your living space but also contributes positively to environmental sustainability.
Imagine the delight on your guests’ faces and the compliments you’ll receive on your stunning handmade wall art, all while knowing that it originated from simple, repurposed plastic spoons. This easy DIY craft not only elevates your home’s aesthetic but also serves as a powerful testament to mindful consumption, resourceful creativity, and the endless possibilities of transformation.
So, gather your supplies, ignite your imagination, and embark on this incredibly rewarding journey. Your newly adorned home, featuring a spectacular DIY mirror frame, will not only be a reflection of your impeccable style but also a beacon of sustainable living. Happy crafting!