
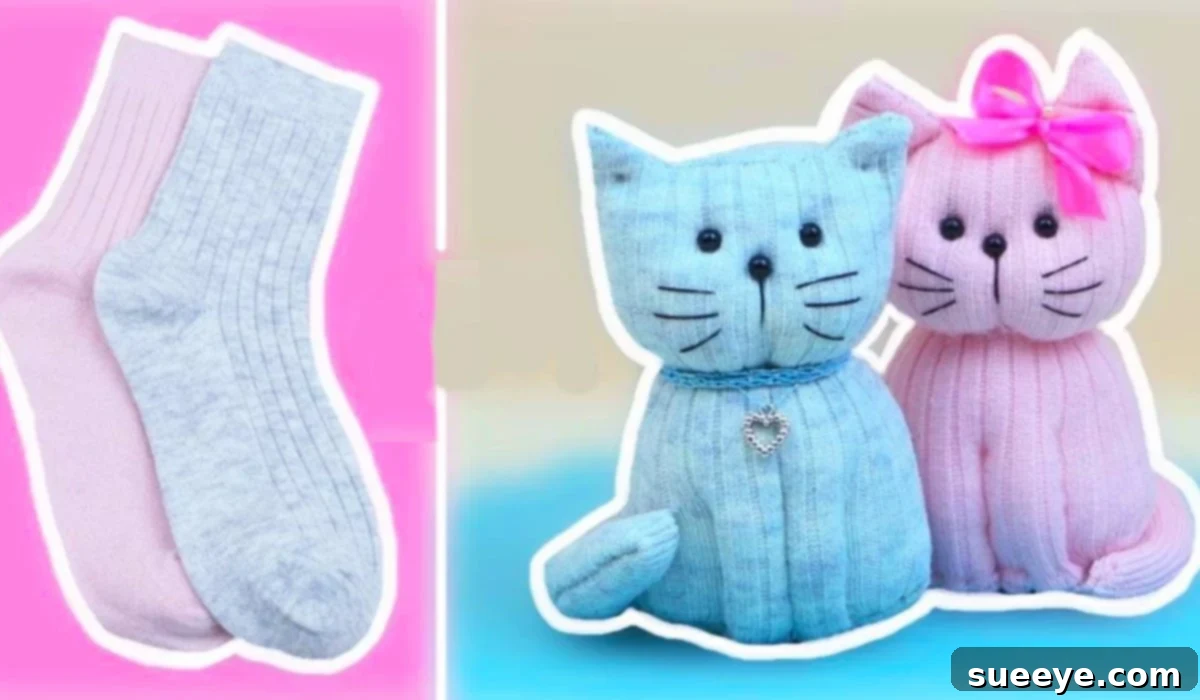
Unleash your creativity and embark on a delightful crafting adventure with this charming sock kitty project. Inspired by the fantastic tutorial from Natali Doma DIY on YouTube, this project is an absolute joy to create for crafters of all ages. It’s the perfect activity to gather the family around the table, focusing everyone’s attention on their own budding creative spirit. Imagine transforming a simple, orphaned sock into an adorable, huggable companion – it’s a craft that truly brings smiles!
This sock kitty isn’t just a toy; it’s a testament to imagination and the magic of upcycling. Whether you’re a seasoned crafter or looking for an easy entry into DIY projects, you’ll find this guide straightforward and rewarding. Bright children’s socks often yield the most vibrant and appealing kitties, but the beauty of this project lies in its versatility; any clean sock can be given a new life. Beyond the sock itself, you’ll need just a few basic supplies: a pair of scissors, a fabric marker (or pencil), some soft stuffing, a needle and thread, and a few buttons to bring your kitty’s personality to life. The process is surprisingly simple, involving a few strategic cuts, some hand-sewing, and the creative placement of facial features. Get ready to create a beloved handmade friend!
Why Create a DIY Sock Kitty? Endless Fun and Benefits!
Making a sock kitty is more than just a craft; it’s an experience packed with numerous benefits and endless fun. Here’s why this project is a fantastic choice for individuals and families alike:
- Eco-Friendly Upcycling: Give new life to old, mismatched, or worn-out socks that might otherwise end up in landfills. It’s a wonderful way to teach children about sustainability and resourcefulness.
- Budget-Friendly Fun: Most of the materials needed are likely already in your home, making this an incredibly economical craft. You don’t need expensive supplies to create something truly special.
- Boosts Creativity and Imagination: From choosing the perfect sock to designing the kitty’s unique face, every step allows for personal expression. Children (and adults!) can let their imaginations run wild, creating a character all their own.
- Develops Fine Motor Skills: The cutting, sewing, and stuffing processes are excellent for developing hand-eye coordination and fine motor skills, especially beneficial for younger crafters.
- Introduces Basic Sewing: For beginners, this project offers a gentle introduction to fundamental sewing techniques like basic stitching and attaching buttons. It’s a great way to build confidence with a needle and thread.
- Stress-Relieving Activity: Engaging in a focused, creative task can be incredibly therapeutic and relaxing. It’s a mindful activity that allows you to de-stress and enjoy the process of creation.
- Personalized Gift Idea: A handmade sock kitty makes a thoughtful and unique gift for birthdays, holidays, or just to show someone you care. The personal touch makes it truly special.
- Wonderful Family Bonding: This project is ideal for collaborative crafting. Parents, grandparents, and children can work together, sharing laughter, stories, and the joy of creating something as a team.
- Durable and Washable Toy: Once completed, these sock kitties are surprisingly durable and can often be gently hand-washed, ensuring your handmade friend can be enjoyed for years to come.
Materials For Your Adorable Sock Kitty Project:
Gathering your supplies is the first exciting step in bringing your sock kitty to life. Most items are easy to find, often already available in your home or at a local craft store. Here’s a detailed list:
- One Clean Sock:
- Children’s Socks: Brightly colored or patterned children’s socks work best for their fun aesthetic and manageability. They create a perfect palm-sized kitty.
- Larger Socks: An adult sock (like a knee-high or crew sock) will result in a larger, cuddlier kitty. Experiment with different sizes and textures!
- Consider: Look for socks without holes (unless you want to patch them!), and ensure they are clean. Novelty socks with stripes, polka dots, or subtle patterns can add character.
- A Pair of Sharp Scissors:
- Fabric Scissors: If available, dedicated fabric scissors will give cleaner cuts and make the process smoother.
- General Craft Scissors: Any sharp pair will do, especially for lighter sock fabrics.
- Embroidery Floss (Black or desired color):
- Facial Features: Essential for creating the mouth, nose, and whiskers. Black is traditional, but feel free to use pink, red, or any color that suits your kitty’s personality.
- Durability: Embroidery floss is thicker and more visible than regular sewing thread, making features stand out.
- Matching Sewing Thread:
- General Sewing: For stitching the sock body and attaching elements like the tail. Choose a color that closely matches your sock.
- A Hand-Sewing Needle:
- Size: A standard sewing needle (e.g., a “sharps” needle) with an eye large enough for embroidery floss but fine enough to pass through the sock fabric.
- Safety: Always use needles carefully, especially when crafting with children.
- Two Buttons for the Eyes:
- Variety: Small to medium-sized buttons work well. Black buttons offer a classic look, but colored buttons can add whimsy.
- Safety Note: For toys intended for very young children, consider embroidering the eyes with floss instead of using buttons, as buttons can be a choking hazard.
- A Fabric Marker or Pencil:
- Marking: For drawing the cutting and sewing lines on the sock. A washable fabric marker is ideal, but a regular pencil can also work on lighter-colored socks.
- Stuffing Material:
- Polyester Fiberfill (Dacron): This is the most common and ideal stuffing, providing a soft, resilient, and hypoallergenic fill.
- Cotton Stuffing: Another good option, offering a slightly denser feel.
- Upcycled Materials: You can also use scraps of old fabric, yarn remnants, or even rice/beans (for a weighted toy, ensuring they are securely sealed in a pouch inside the kitty).
Step-by-Step Directions to Craft Your Sock Kitty:
Follow these detailed steps, inspired by Natali Doma DIY’s tutorial, to create your very own charming sock kitty. Take your time with each stage, and enjoy the creative process!
Step 1: Preparing Your Sock and Drawing the Pattern
- Choose Your Sock: Select a clean sock that you wish to transform. Consider its color, pattern, and texture, as these will define your kitty’s unique look.
- Turn Inside Out: Lay the sock flat on your workspace, ensuring it’s smooth and free of wrinkles.
- Draw the Kitty Outline: Using your fabric marker or pencil, carefully draw the basic shape of your kitty onto the inside-out sock.
- Head & Ears: At the toe end of the sock, draw an inverted “V” or gentle curve for the ears, ensuring they are symmetrical.
- Body: From the base of the ears, draw a curved line down each side of the sock, narrowing slightly towards the heel. This will form the body.
- Tail: At the heel end of the sock, draw a rounded, elongated shape for the tail. Ensure it’s thick enough to stuff.
- Important: Leave a gap (about 1-2 inches) on one side of the body outline. This will be your opening for stuffing. Clearly mark this section.
Step 2: Sewing the Body and Tail
- Sew Along Your Lines:
- Needle and Thread: Thread your needle with the matching sewing thread (double-threaded for extra strength is recommended) and tie a knot at the end.
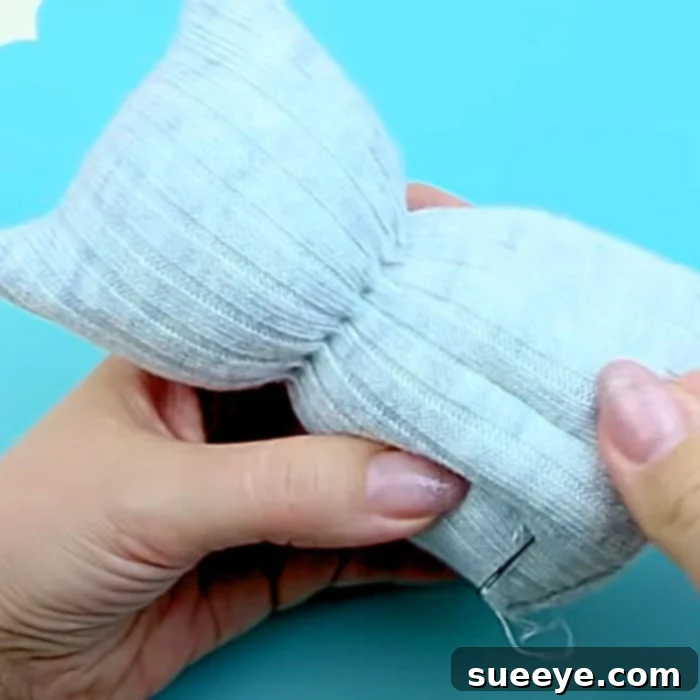
- Stitching: Begin sewing along the lines you drew for the ears, head, and body. Use a small, secure stitch like a backstitch, which is durable and prevents stuffing from escaping. Remember to sew around the ear tips carefully.
- Leave Opening: Crucially, do NOT sew the entire outline. Leave the marked opening unsewn. This is essential for turning the sock right-side out and for stuffing.
- Sew the Tail: Separately, sew along the outline you drew for the tail. This can be done either before or after sewing the main body.
- Trim the Excess Fabric:
- Cut Carefully: Once all your sewing is complete, use your scissors to cut around the sewn lines. Leave a small seam allowance of about ¼ to ½ inch (0.5 to 1 cm) from your stitches. This prevents the fabric from fraying too close to the seam.
- Clip Curves: For the ears and any other curved sections, make small snips (clips) into the seam allowance, careful not to cut through your stitches. This helps the fabric lay smoothly when turned right-side out.
- Turn Right-Side Out:
- Gentle Turning: Carefully push the sock through the unsewn opening until it is right-side out. Use a blunt object (like the back of a pencil or a chopstick) to gently push out the ears and other small areas, ensuring they are fully shaped.
Step 3: Stuffing and Closing Your Kitty
- Stuff the Kitty:
- Even Distribution: Begin stuffing the kitty with your chosen material (fiberfill, cotton, etc.) through the opening. Start by pushing small tufts of stuffing into the ears and head, ensuring they are firm and well-shaped.
- Firmness: Continue stuffing the body, adding small amounts at a time and gently shaping the kitty. Stuff firmly but don’t overstuff, as this can strain the seams. Aim for a cuddly, squeezable feel.
- Stuff and Attach the Tail:
- Stuff the Tail: Stuff the tail section firmly but not overly stiff.
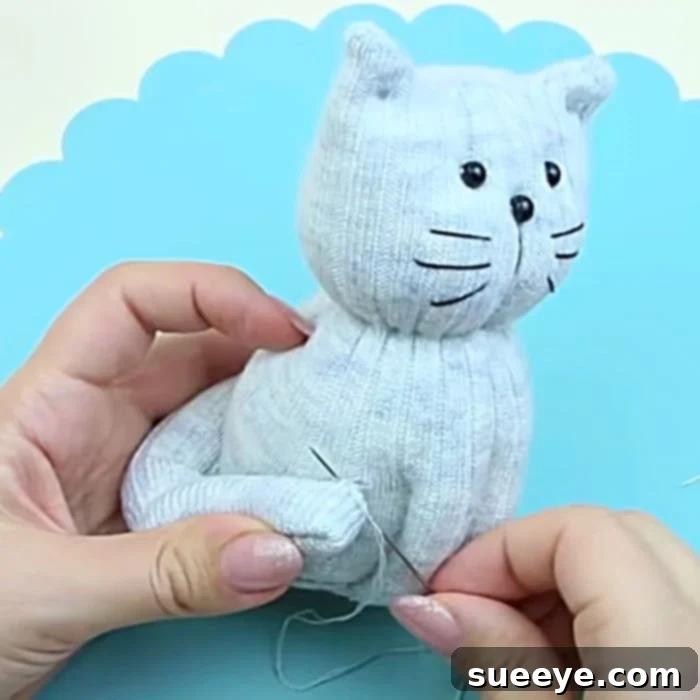
- Attach Tail: Position the stuffed tail onto the kitty’s back, near the bottom. Using a needle and matching thread, securely stitch the tail in place with small, strong stitches. You can use a ladder stitch or whipstitch to make the attachment look neat.
- Close the Opening:
- Invisible Stitch: Once the kitty is fully stuffed, close the opening using a ladder stitch (also known as an invisible or slip stitch). This stitch pulls the seam neatly together, making the closure almost invisible. Double-knot your thread securely once finished, and trim any excess.
Step 4: Adding Facial Features and Personalization
- Place the Eyes:
- Button Placement: Position your two chosen buttons on the face where you want the eyes to be. Pin them temporarily to ensure you like their placement and symmetry.
- Secure Buttons: Using a strong thread (or embroidery floss if desired) and your needle, securely sew the buttons in place. Make several passes through each buttonhole to ensure they are firmly attached. Remember the safety considerations for young children mentioned earlier.
- Embroider the Nose, Mouth, and Whiskers:
- Embroidery Floss: Thread your needle with black (or preferred color) embroidery floss. Tie a knot at one end.
- Nose: Start by stitching a small triangle or an inverted “Y” shape for the nose just below and between the eyes. Use a satin stitch for a fuller nose, or a simple outline stitch.
- Mouth: From the bottom of the nose, create a small inverted “V” or “Y” shape for the mouth.
- Whiskers: Stitch two or three short, straight lines on each side of the nose for whiskers. Keep them evenly spaced and proportionate to the kitty’s face.
- Secure Ends: When finishing each embroidered feature, carefully secure the floss with a small knot on the back or inside the kitty’s head, ensuring it’s hidden.
Step 5: Finishing Touches and Customization
- Final Adjustments: Gently knead and shape your sock kitty to ensure the stuffing is evenly distributed and all features are well-defined.
- Accessorize (Optional):
- Bow Tie/Collar: Add a small ribbon bow tie or a piece of felt for a collar.
- Embellishments: Consider sewing on small beads (again, with caution for young children), felt patches, or even a tiny bell.
- Names: Embroider a name on its paw or a small tag.
Tips for a Perfect Sock Kitty
- Use Quality Thread: While the project is simple, using good quality sewing thread will ensure your kitty is durable and withstands hugs and play.
- Safety First: When crafting with children, always supervise them closely, especially when using needles and scissors. For very young children, consider pre-sewing parts or using fabric glue for certain elements, and embroidering eyes instead of using buttons.
- Practice Your Stitches: If you’re new to sewing, practice a simple running stitch and backstitch on a scrap piece of fabric before working on your sock.
- Don’t Be Afraid to Experiment: There’s no single “right” way to make your kitty. Play with different sock types, stuffing textures, and facial expressions to create unique characters.
- Stuff Evenly: Take your time with stuffing. Small, consistent amounts will give your kitty a smooth, well-formed shape without lumps.
- Clean Your Work Area: A tidy workspace helps keep your materials organized and prevents losing small items like buttons or needles.
Variations and Creative Customization
The beauty of the sock kitty project lies in its adaptability. Once you’ve mastered the basic technique, you can unleash your creativity to make countless variations:
- Different Animals: Use the same basic pattern to create sock bunnies (longer ears), bears (round ears), or even dogs by altering the ear shape and snout.
- Sizes:
- Mini Kitties: Use baby socks or smaller children’s socks for tiny kitties perfect for keychains or doll companions.
- Giant Kitties: A knee-high sock or even an adult’s full-sized sock can create a large, cuddly bolster toy.
- Weighted Toys: For a sensory experience, fill a small, sealed pouch with rice, beans, or poly pellets and place it inside the kitty before stuffing with fiberfill. This creates a comforting weighted toy.
- Scrap Fabric Animals: Don’t limit yourself to socks! Use old sweaters, fleece scraps, or even denim remnants to create unique fabric animals, adjusting the pattern as needed.
- Clothing and Accessories:
- Tiny Outfits: Sew miniature clothes for your sock kitty, like vests, dresses, or hats, using fabric scraps.
- Collars & Bows: Add a fabric collar, a ribbon bow, or even a tiny bell.
- Wired Limbs: For advanced crafters, you could carefully insert wire into the limbs (before stuffing) to make them posable.
- Embroidered Details: Beyond the face, embroider paw pads, stripes, or spots onto your kitty for added character.
Bring Your Sock Kitty to Life Today!
There you have it – a comprehensive guide to creating your very own adorable sock kitty! This project, thanks to the wonderful inspiration from Natali Doma DIY, is a fantastic way to engage in a mindful, creative activity while transforming simple materials into cherished keepsakes. Whether you’re looking for a fun family craft, a thoughtful handmade gift, or simply a charming companion to brighten your day, the sock kitty delivers.
So, raid your sock drawer, gather your materials, and let your imagination soar. The joy of crafting something with your own hands is truly immeasurable, and seeing that old sock transform into a lovable character is incredibly rewarding. Share your creations, inspire others, and most importantly, have fun bringing your unique sock kitty to life!