
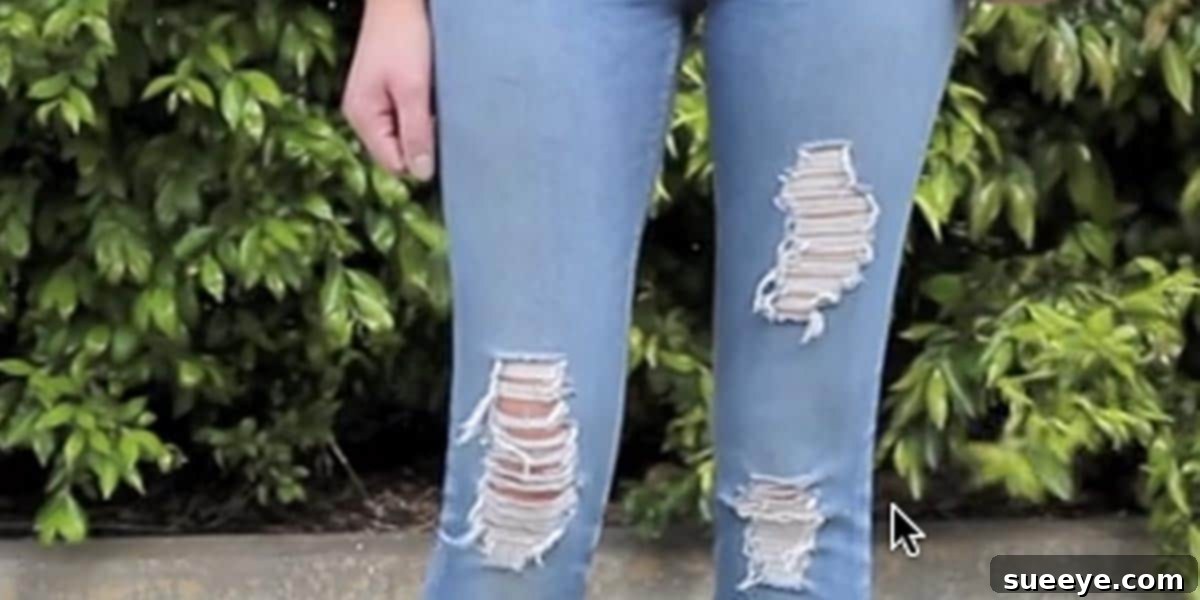
DIY Ripped Jeans: Craft Your Own Trendy Distressed Denim for Less
Have you ever found yourself admiring a pair of ripped jeans, only to be shocked by the price tag? It’s not uncommon to see them retail for upwards of $200-$300! The truth is, distressed denim is a fashion staple that has soared in popularity, becoming a must-have item in almost every wardrobe. But what if you could achieve that coveted look without spending a fortune? The good news is, you absolutely can! This comprehensive guide will empower you to transform your old, forgotten jeans into stylish, on-trend ripped denim. It’s a rewarding project that not only saves you money but also allows for endless personal expression, giving new life to your favorite pair of jeans.
Fashion is constantly evolving, and while some may question the trend of “holey” jeans, they are undeniably an “in” thing right now. As someone who embraces contemporary styles, even if I’m not a “spring chicken,” I proudly own several pairs. Beyond their undeniable style, there’s a practical side too – especially in warm climates. Those strategically placed rips act like natural air vents, providing much-needed comfort in the Texas heat! The versatility of ripped jeans is another major draw; they pair effortlessly with a casual t-shirt for a relaxed vibe or can be dressed up with a chic blouse and heels for a more sophisticated ensemble. You truly can’t go wrong when incorporating them into your daily outfits.
Why Ripped Jeans Are a Must-Have in Your Wardrobe
The appeal of ripped jeans goes beyond mere aesthetics; it’s about making a statement and embracing a certain lifestyle. They represent an effortless cool, a touch of rebellion, and an acknowledgment of fashion’s ever-changing landscape. Here’s why you should consider adding (or making!) a pair:
The Ultimate Fashion Statement
Ripped jeans are incredibly versatile. They can instantly elevate a simple outfit from mundane to captivating. Whether you’re aiming for a grunge look, a bohemian spirit, or a chic urban style, distressed denim adapts seamlessly. This adaptability makes them a valuable asset for creating diverse outfits without overhauling your entire wardrobe.
Unbeatable Comfort and Practicality
Beyond their visual appeal, ripped jeans often offer enhanced comfort. The distressing process can soften the denim, making it more pliable and comfortable against the skin. As mentioned, those “air vents” are a real blessing during warmer months, offering breathability that traditional denim simply can’t match. It’s a style that feels as good as it looks.
Embrace Sustainability Through Upcycling
One of the most compelling reasons to DIY your ripped jeans is the environmental benefit of upcycling. Instead of discarding old jeans or buying new ones, you’re giving existing garments a fresh purpose. This not only reduces waste but also encourages a more conscious approach to fashion consumption. It’s an eco-friendly way to stay stylish!
Express Your Unique Style
When you create your own ripped jeans, you’re not just following a trend; you’re personalizing it. Each rip, fray, and distress mark can be precisely where you want it, reflecting your individual taste. This level of customization is impossible with off-the-rack options, ensuring your jeans are truly one-of-a-kind and embody your personal style.
Debunking the “Holey” Myth: Understanding Distressed Denim
It’s common to encounter skepticism from those unfamiliar with the distressed denim trend. Remarks like, “Can’t you afford a pair of jeans without holes?” are often heard. However, these comments typically come from a place of misunderstanding rather than malice. Fashion, especially youth fashion, is constantly evolving, and what might seem unconventional to one generation is a celebrated style statement to another. The roots of distressed denim can be traced back to counter-culture movements like punk rock and grunge, where torn clothing symbolized rebellion and individuality. Today, it has transcended these origins to become a mainstream fashion staple, appreciated for its edgy aesthetic and relaxed vibe. It’s a reminder that style is subjective, personal, and a powerful form of self-expression.
Getting Started: Essential Tools for Your DIY Project
Before you dive into the exciting world of denim customization, gathering the right tools is crucial. Having everything on hand will make the process smooth and enjoyable. Here’s a closer look at what you’ll need:
-
A Pair of Old Jeans
This is your canvas! Opt for jeans that fit you well and that you don’t mind experimenting with. Different denim weights and washes will yield varying results. Thicker, sturdier denim (100% cotton) tends to hold distressing better, while stretchier blends might be more prone to creating larger holes if not handled carefully. Consider the wash too; lighter washes tend to show distressing more prominently than darker ones.
-
Sharp Fabric Scissors
Regular household scissors might struggle with the thick fabric of denim, leading to uneven or jagged cuts. Invest in a pair of sharp fabric scissors specifically designed for textiles. This will ensure clean, precise cuts, which are fundamental for creating the desired ripped effects.
-
Tweezers
These tiny tools are surprisingly mighty in the art of distressing. Tweezers are essential for meticulously pulling out the blue vertical threads of the denim, leaving behind the white horizontal threads that create the classic frayed, “see-through” ripped look. Precision tweezers can help achieve very fine and natural-looking fraying.
-
Chalk or Fabric Marker
Before making any permanent cuts, you’ll want to mark the exact locations and lengths of your desired rips. Tailor’s chalk or a washable fabric marker is perfect for this. They allow you to visualize the outcome and make adjustments before committing, ensuring your rips are exactly where you want them.
-
Cardboard or a Cutting Mat
Protect your work surface and the back of your jeans! Place a piece of thick cardboard or a cutting mat inside the leg of the jeans before you start cutting. This prevents you from accidentally cutting through both layers of denim or damaging your table.
Optional Tools for Enhanced Effects:
- Sandpaper or Grater: Great for creating a worn, faded, or scuffed look on areas like thighs, pockets, and hems, mimicking natural wear and tear.
- Razor or Exacto Knife: Can be used for creating small, precise slits or for more controlled fraying along edges.
- Wire Brush: Offers a more aggressive distressing effect, creating larger frayed areas.
Step-by-Step Guide to Crafting Your Perfect Ripped Jeans
Ready to transform your denim? Follow these detailed steps to achieve professional-looking ripped jeans at home:
Step 1: Preparation and Marking
Start by washing and drying your jeans. This will ensure the fabric is clean and pre-shrunk. Put on the jeans and stand in front of a mirror. Use your chalk or fabric marker to carefully mark the areas where you want the rips to be. Pay close attention to your knees, thighs, and pockets. Consider how the rips will look when you sit down. Start with smaller marks; you can always enlarge them later. Remember, less is often more initially.
Step 2: Protect Your Workspace
Lay your jeans flat on a sturdy surface. Insert your piece of cardboard or cutting mat inside the leg where you’ll be working. This is a crucial step to prevent unintended damage to the back of the denim or your work surface.
Step 3: Making the Initial Cuts
Using your sharp fabric scissors, carefully make horizontal cuts within the marked areas. For a classic ripped knee, make several parallel cuts, about 0.5 to 1 inch apart, covering the desired area. For smaller slits or distressed patches, a single cut or a few shorter cuts will suffice. Vary the length of your cuts to create a more natural, organic look. Avoid making cuts too close to the seams, as this can weaken the structure of the jeans.
Step 4: Fraying and Distressing
This is where the magic happens! Once you have your cuts, start using your tweezers to gently pull out the blue vertical threads of the denim. The white horizontal threads will remain, creating that signature frayed, translucent look. Be patient and methodical; this step takes time but yields the best results. For a more worn-out look, rub sandpaper or a grater over other areas like the edges of pockets, hems, or areas of the thighs. This will soften the denim and create a faded appearance. You can also use a razor blade carefully to create small, controlled frays or tears.
Step 5: Washing and Drying for Natural Finish
Once you’re satisfied with the distressing, give your jeans a wash. A cycle in the washing machine (preferably on a gentle setting) and then a tumble dry will further enhance the fraying and soften the edges of your rips, making them look more natural and lived-in. You might find that the rips open up slightly more after washing, which is part of the desired effect.
Step 6: Refinement and Customization
After washing and drying, inspect your jeans. Do you want more rips? Do certain areas need more fraying? Now is the time for any final touches. You can always go back and add more distressing or refine existing rips.
Beyond Basic Rips: Advanced Customization Techniques
My own experience with a “wrongly” ripped pair taught me that sometimes, accidents lead to even more beautiful creations. I fixed a horizontally ripped knee with clear thread and then added hot pink embroidery floss in X-patterns around the zipper and on another rip. The result was even cuter than before the “fix”! A friend, seeing my unique pair, entrusted me with her diagonally ripped jeans, and with her chosen embroidery thread, they transformed into something she loved even more than the original.
This illustrates that you can go beyond just rips and take your DIY distressed denim to the next level with creative additions:
- Embroidery: Hand-stitch intricate designs, simple crosses, or vibrant patterns around rips or on other parts of the jeans. Choose contrasting or complementary colors of embroidery floss to make a statement.
- Patchwork: Sew interesting fabric patches (denim, lace, patterned cotton) behind or over your rips. This can add a unique texture, cover larger holes, or introduce new colors and patterns.
- Bleaching/Dyeing: Experiment with localized bleaching to create faded spots or patterns, or try tie-dyeing sections of your jeans for a truly unique wash.
- Studs and Hardware: Add metal studs, eyelets, or small chains to give your jeans an edgy, punk-rock vibe.
- Fabric Paint: Hand-paint designs, quotes, or abstract art directly onto the denim for a personalized artistic touch.
Styling Your Newly Ripped Jeans
Now that you’ve crafted your perfect pair of distressed denim, it’s time to show them off! Ripped jeans are incredibly versatile and can be styled for almost any occasion:
- Casual Chic: Pair them with a simple white or graphic t-shirt, comfortable sneakers, and a denim jacket for an effortlessly cool, everyday look.
- Smart Casual: Elevate your ripped jeans by pairing them with a crisp button-down shirt, a tailored blazer, and loafers or ankle boots. This creates a sophisticated yet relaxed ensemble perfect for a casual Friday or dinner out.
- Edgy Vibe: Combine your distressed denim with a band tee, a leather jacket, and combat boots for a classic rock-and-roll or punk-inspired aesthetic.
- Boho Spirit: For a bohemian look, wear your ripped jeans with a flowy peasant top, an embroidered vest, and sandals or espadrilles.
- Seasonal Adaptations: In colder weather, layer thermal leggings under your rips for warmth and pair with oversized sweaters and chunky boots. In warmer climates, simple tank tops and sandals are perfect complements.
Caring for Your Distressed Denim
To ensure your DIY ripped jeans last and maintain their fabulous look, proper care is essential. The delicate nature of the rips requires a gentler approach:
- Wash Less Frequently: Denim naturally looks better with less washing. Spot clean whenever possible.
- Wash Inside Out: Turn your jeans inside out before washing to protect the rips and prevent further fraying or snagging on other clothes.
- Cold Water, Gentle Cycle: Use cold water and a delicate cycle in your washing machine. This helps preserve the denim’s color and integrity, and minimizes stress on the distressed areas.
- Air Dry: Avoid using a tumble dryer, as the heat and agitation can cause the rips to expand uncontrollably and potentially damage the denim further. Instead, lay your jeans flat or hang them to air dry.
- Repair When Needed: If a rip starts to get too large or tears in an undesirable direction, consider reinforcing it with a small patch of denim underneath, or stitch around the edges with clear or matching thread to prevent further damage, much like my own repair experience.
Unleash Your Inner Fashion Designer
Making your own ripped jeans is more than just a craft project; it’s an opportunity to save money, express your individuality, and give new life to old garments. There’s immense satisfaction in wearing something you’ve customized yourself, especially when it turns out even better than a store-bought version. So, gather your tools, unleash your creativity, and prepare to rock your uniquely styled, fabulous ripped jeans. Who knows what artistic accidents or thoughtful embellishments you might discover along the way?