
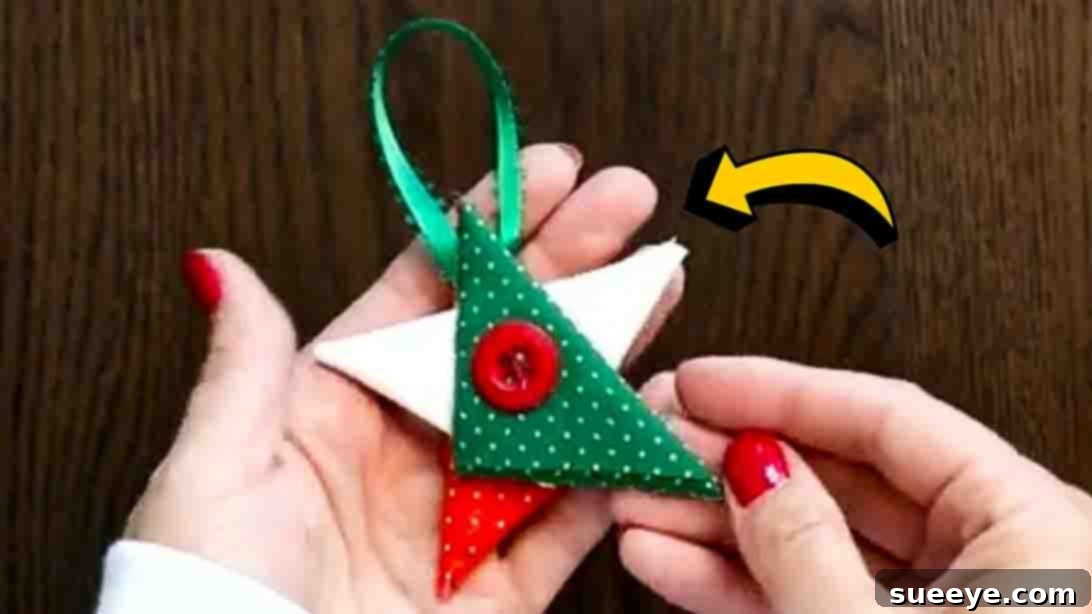
Discover the joy of handmade holiday decorations with this delightful No-Sew Fabric Star Ornament tutorial from Tamara’s Joy // Sewing Channel. Perfect for adding a personal touch to your Christmas tree, these charming stars are incredibly easy to make, requiring no needle or thread. Whether you’re a seasoned quilter with a treasure trove of fabric scraps or a beginner looking for a simple and rewarding craft project, this DIY is designed for everyone. Transform those leftover fabric pieces into beautiful, festive accents that will sparkle on your tree for years to come. Get ready to unleash your creativity and craft something truly special this holiday season!
RELATED: Easy DIY String Star Ornaments Tutorial
Why You’ll Love Crafting These No-Sew Fabric Star Ornaments
These folded fabric stars are more than just pretty ornaments; they’re a testament to easy, personalized crafting. Here’s why this DIY project is perfect for your holiday season:
- Effortless Elegance: The “no-sew” aspect makes this project accessible to crafters of all skill levels, from complete beginners to experienced DIY enthusiasts. Say goodbye to intricate stitching and hello to quick, beautiful results that look professionally made.
- Eco-Friendly Crafting: This project is a fantastic way to give new life to your fabric scraps. Instead of letting those beautiful remnants gather dust, transform them into charming ornaments, reducing waste and embracing sustainable crafting practices during the holidays.
- Personalized Holiday Decor: Choose fabrics that perfectly match your existing holiday theme or create a completely new aesthetic. The ability to select colors, patterns, and textures means each star can be uniquely yours, adding a truly personal and heartfelt touch to your festive display.
- Budget-Friendly Brilliance: Utilizing materials you likely already have on hand – fabric scraps, buttons, and ribbon – makes this an incredibly economical craft. Achieve stunning, high-quality decorations without breaking the bank, making holiday decorating accessible to everyone.
- Versatile Decoration: While perfect for the Christmas tree, these fabric stars are wonderfully versatile. Use them as charming gift toppers, incorporate them into a festive garland, adorn a holiday wreath, or even use them as unique party favors or small tokens of appreciation.
- Fun for the Whole Family: This simple project is an excellent activity to share with family members, especially older children (with adult supervision for the hot glue). Create lasting memories while crafting beautiful ornaments together, fostering a sense of togetherness and holiday spirit.
Materials You’ll Need for Your Festive Fabric Stars
Gathering your supplies is the first step to creating these adorable stars. You’ll be surprised at how few items are required for such a lovely outcome, proving that beautiful decor doesn’t have to be complicated or expensive.
- Fabric Scraps: You’ll need three pieces, each precisely cut to 2 inches by 7 1/2 inches (approximately 5 cm x 19 cm). Quilting cottons work wonderfully due to their stable weave and wide array of patterns, but any non-fraying, light to medium-weight fabric can be adapted. Consider festive prints, classic solids, or even a mix for visual interest and unique designs.
- Buttons: Two decorative buttons will add a lovely finishing touch to your star, securing the layers and providing a central focal point. Choose buttons that complement your fabric choices in terms of color, size, and style. You can opt for traditional holiday buttons or something more modern to match your aesthetic.
- Ribbon: A short length of ribbon (about 4-5 inches or 10-12 cm) is essential for creating the hanging loop for your ornament. Satin, grosgrain, or even rustic twine can work, depending on the look you’re aiming for. Ensure it’s sturdy enough to hold the ornament’s weight.
- Hot Glue Gun and Glue Sticks: This is the magic tool for our no-sew project! A reliable hot glue gun will quickly and securely bond your fabric layers and embellishments. Always exercise caution when using a hot glue gun, work in a well-ventilated area, and protect your work surface from drips.
Step-by-Step Directions: Crafting Your DIY Folded Fabric Star Ornament
Let’s transform those simple fabric strips into stunning star ornaments with these easy-to-follow instructions. You’ll be amazed at how quickly these come together!
Step 1: Preparing and Folding Your Fabric Strips
This initial step is crucial for achieving the classic folded star appearance. Precision here will lead to a beautifully symmetrical ornament.
- Cut Your Fabric: Begin by carefully cutting your chosen fabric scraps into three strips, each measuring 2 inches in width and 7 1/2 inches in length. Use a rotary cutter, ruler, and self-healing mat for the cleanest, straightest edges, which will greatly improve the final look of your star. If using fabric scissors, ensure they are sharp and make precise cuts. Consistency in size is key for a well-formed star.
- Start the First Fold: Take one fabric strip and lay it flat on your workspace. Fold one end diagonally, forming a precise triangle. Ensure the raw edges meet neatly to create a sharp point. This initial fold sets the foundation for the rest of the strip’s pattern.
- Continue Folding: Keep folding the fabric strip in a triangular fashion, working your way down its entire length. Each new fold should overlap the previous one slightly, creating a series of neat, overlapping triangles. Aim for even, crisp folds to maintain a uniform and attractive look for your star points.
- Secure the End: Once you reach the end of the strip, you’ll likely have a small excess piece of fabric. Tuck this piece neatly into the last fold, or secure it with a tiny dab of hot glue if needed, to create a clean, finished edge that won’t unravel.
- Repeat: Follow these exact steps for the remaining two fabric strips, ensuring all three folded pieces are consistent in shape and size. These three identical, neatly folded strips are the individual “points” that will form your star.
Step 2: Assembling and Finishing Your Star Ornament
Now it’s time to bring your folded fabric pieces together to form a beautiful star. This is where the magic happens and your ornament truly comes to life!
- Arrange into a Star Shape: Take your three neatly folded fabric strips. Experiment with their arrangement on a flat surface, rotating and positioning them to form a symmetrical three-pointed star. A common method is to lay the first strip horizontally, then place the other two at angles, ensuring the ends meet at a central point. Adjust until you are completely satisfied with the star’s shape and balance before gluing.
- Add the Hanging Ribbon: Before gluing the star layers together, prepare your hanging loop. Cut a small length of ribbon (about 4-5 inches or 10-12 cm) and fold it into a loop. Apply a small dot of hot glue to the end of one of the folded fabric triangles, near where the point will be, and press the raw ends of your ribbon loop onto it. This will be the top point of your star.
- Glue the Layers Together: With the ribbon secured, apply a thin line of hot glue along the edges of the first fabric triangle, particularly where it will overlap with the next piece. Carefully place the second folded fabric piece over the first, aligning its edges precisely to continue the star shape. Press firmly but gently to ensure a strong bond between the layers.
- Complete the Star: Repeat the gluing process with the third fabric triangle, ensuring it interlocks seamlessly with the first two to complete the star formation. Take your time to align all the points and edges for a clean, professional finish. Work quickly, as hot glue dries fast, but prioritize accuracy.
- Attach Decorative Buttons: To both secure the center and add a decorative flourish, attach a button to each side of the star. Apply a dot of hot glue to the center of one side of your assembled star and press a button firmly onto it. Repeat for the other side. This not only enhances the aesthetic but also helps to hold the fabric layers securely in place, preventing any shifting.
- Allow to Dry: Set your newly crafted fabric star aside in a safe place to allow the hot glue to cool and fully set. This usually takes only a few minutes, but ensuring a complete dry will prevent any accidental unraveling. Once dry, your charming, handmade, no-sew fabric star ornament is complete and ready to adorn your tree or be given as a thoughtful gift!
Pro Tips for Crafting Perfect Fabric Stars
Elevate your fabric star ornaments from charming to absolutely stunning with these expert tips and tricks. A little extra attention can make a big difference!
- Fabric Selection Matters: For the crispest folds and best results, opt for medium-weight cotton fabrics, such as quilting cottons. Fabrics that are too thin might fray easily or be difficult to handle, while very thick fabrics can be bulky and hard to fold neatly. Consider combining different patterns – a bold print with a coordinating solid, or three complementary holiday prints – for unique visual interest.
- Precision in Cutting: Accuracy in cutting your 2″ x 7.5″ strips is vital. Even slightly uneven strips can result in a less symmetrical or unbalanced star. Invest in a rotary cutter, a clear quilting ruler, and a self-healing mat for the most professional and accurate results. If using scissors, mark your lines lightly with a fabric marker first.
- Hot Glue Handling: Use hot glue sparingly. A little goes a long way, and too much can seep through the fabric, creating stiffness, visible residue, or even making the fabric too hot to handle. Apply thin lines or small dots only where needed. Work quickly as hot glue sets fast, but always prioritize safety and avoid contact with your skin.
- Achieving Symmetry: When arranging your three folded strips, take a moment to ensure all points are evenly spaced and the star appears balanced. Lay them out on a clear surface and adjust until you are completely happy with the star’s balance before applying glue. You can even draw a light guide on a piece of paper to help with alignment.
- Add Extra Embellishments: Don’t limit yourself to just buttons! Consider adding a touch of glitter glue along the edges for a sparkly effect, small self-adhesive rhinestones for a touch of bling, or even a tiny charm dangling from the bottom point of the star for added flair and personalization.
- Double-Sided Appeal: If your fabric has a plain reverse side and you want your ornament to look beautiful from any angle, consider making your folded strips with the pattern facing outwards on both sides. This can be achieved by folding slightly differently or by using double-sided fabric tape during the folding process to secure the layers.
Creative Ways to Use Your Fabric Star Ornaments
These charming no-sew fabric stars are incredibly versatile and can be used in numerous creative ways beyond just hanging on the Christmas tree. Let your imagination soar!
- Christmas Tree Decorations: The most obvious and beloved use! Hang them proudly on your tree alongside other cherished ornaments, creating a cohesive and handmade look.
- Gift Toppers: Replace traditional bows with a handmade fabric star for a unique and personal touch on holiday gifts. It’s like an extra little present that the recipient can cherish.
- Holiday Garlands: String multiple stars together with ribbon or twine to create a festive garland for your mantel, doorway, staircase railing, or window. Mix and match different fabrics for a vibrant display.
- Wreath Enhancements: Glue several stars onto a plain evergreen wreath or a rustic grapevine wreath to add a pop of color, texture, and handmade charm to your front door or wall decor.
- Table Centerpieces: Arrange a collection of different-sized fabric stars in a decorative bowl, scattered around a candle, or as part of a festive tablescape for a charming holiday centerpiece.
- Party Favors: Create small fabric stars as delightful take-home favors for your holiday guests or craft party attendees. They make a memorable keepsake.
- Bookmarks: A single folded fabric strip, perhaps with a smaller button or a decorative tassel, can make a beautiful and unique bookmark for the avid reader in your life.
- Kids’ Room Decor: Choose fun, bright fabrics and hang them in a child’s room as year-round decor, or as a special touch during the holiday season.
Frequently Asked Questions About No-Sew Fabric Star Ornaments
Got questions about making your fabric star ornaments? We’ve got answers to help you with your crafting journey and ensure your project is a success.
- Q: Can I use different types of fabric?
- A: While quilting cottons are ideal due to their stability and minimal fraying, you can experiment with other light to medium-weight fabrics like flannel, broadcloth, or even thin felt. Just be mindful of how easily they fray (you might need to use a fray-check product) and adjust your folding/gluing technique if necessary. Avoid very slippery or stretchy fabrics, as they can be challenging to fold neatly.
- Q: Is it possible to sew these stars instead of gluing?
- A: Absolutely! If you prefer sewing, you can certainly stitch the layers together by hand or machine. You would carefully tack down the folded layers and then secure the star points. However, the “no-sew” method is specifically designed for speed and ease, making it perfect for those without sewing skills or equipment, or when you need to make many ornaments quickly.
- Q: How do I make the stars more durable for long-term use?
- A: To enhance durability, you could lightly spray the finished stars with a fabric stiffener or sealant (always test on a scrap piece first to ensure it doesn’t discolor your fabric). Ensure all glue bonds are strong and allow ample drying time. Proper storage in a dry, protected container, such as a sturdy box with tissue paper between layers, will also significantly extend their life.
- Q: Can children participate in this craft?
- A: Yes, this is a wonderful project for older children (around 8 and up)! They can help with fabric selection, folding the strips, and arranging the star shape. Adult supervision is crucial, however, when using the hot glue gun to ensure safety and prevent burns. For younger children, adults can pre-fold the strips and let them assist with button placement using safer craft glue.
- Q: What if my fabric strips aren’t perfectly aligned during folding?
- A: Don’t worry if your first attempts aren’t flawless! The beauty of handmade items lies in their unique character. For better alignment, press each fold firmly with your fingers or a craft bone as you go. Practice makes perfect, and slight imperfections often add to the charm and rustic appeal of a handmade item.
Conclusion: Illuminate Your Holidays with Handmade Stars
Crafting these no-sew fabric star ornaments is more than just a DIY project; it’s an opportunity to infuse your home with warmth, creativity, and a touch of personal magic this holiday season. Easy, economical, and wonderfully adaptable, these stars are a testament to the charm and joy of handmade decor. Whether adorning your Christmas tree, accenting a special gift, or brightening a festive garland, each star you create will carry the joy of your effort and the unique spirit of your craftsmanship. So, gather your fabric scraps, unleash your inner crafter, and let these beautiful fabric stars illuminate your holidays with unique, heartfelt sparkle. Happy crafting!