
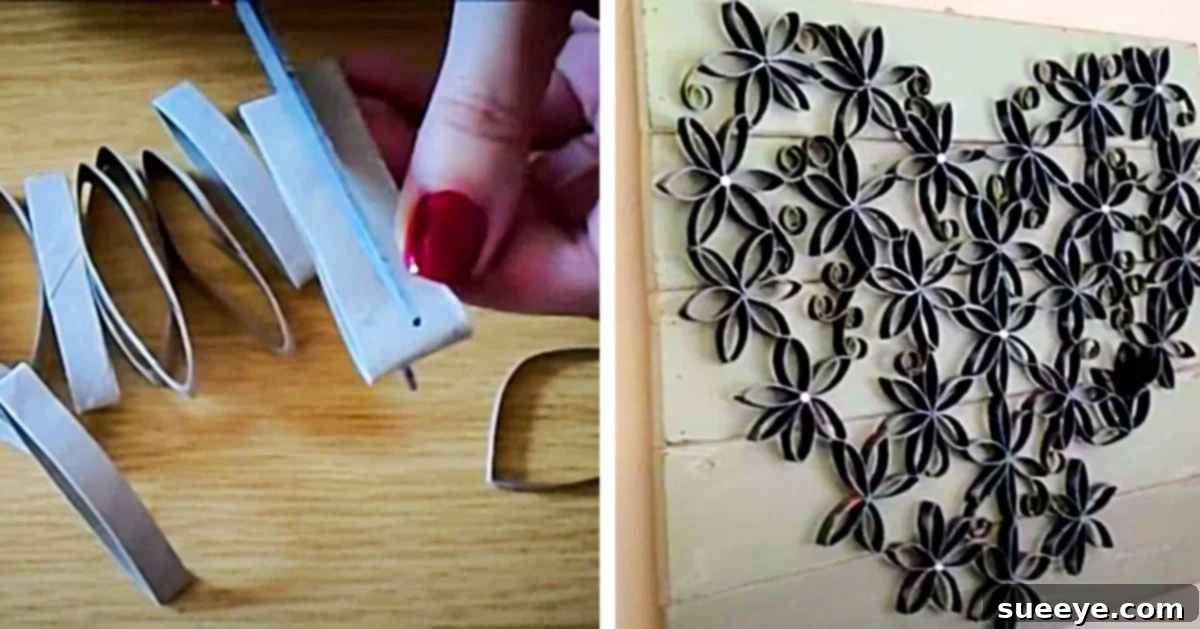
Transform Empty Toilet Paper Rolls into Stunning DIY Heart Wall Art: An Eco-Friendly Craft Guide
Who knew that a simple, everyday item like an empty toilet paper roll could be the foundation for truly breathtaking home decor? For many, these cardboard tubes are merely discards, destined for the recycling bin. Yet, with a touch of creativity and a few basic craft supplies, they can be transformed into elegant, unique wall art that adds character and charm to any room. This guide will walk you through creating a beautiful heart-shaped wall art piece, turning what would be waste into a captivating focal point in your home.
In an era where sustainability and mindful consumption are more important than ever, repurposing items like toilet paper rolls for crafting offers a double benefit. Not only do you reduce waste, but you also engage in a rewarding creative process that results in a personalized piece of art. The rising interest in DIY projects and eco-friendly solutions has brought these humble cardboard cylinders into the spotlight, proving that beautiful things don’t always require expensive materials. This particular heart wall art project is a testament to that philosophy, requiring only scissors, craft paint, and a trusty hot glue gun – materials often found readily available in most craft enthusiasts’ homes.
My own journey into this delightful craft began when I stumbled upon an inspiring tutorial by DA.DIY.4EVA on YouTube. The simplicity and elegance of their heart design immediately captivated me. As a devoted fan of heart motifs – my craft room walls proudly display numerous heart-themed decorations – I knew this project was a must-try. The idea of crafting such a beautiful addition using recycled materials resonated deeply, promising not just a lovely piece of art, but also a meaningful experience in sustainable creation. What followed was a wonderfully straightforward crafting session, resulting in a piece that perfectly complements my existing collection.
Why Choose Toilet Paper Rolls for Your Wall Art Project?
The appeal of using toilet paper rolls for crafting goes far beyond their availability. These often-overlooked items offer a wealth of advantages for the creative individual:
- Eco-Friendly & Sustainable: By repurposing toilet paper rolls, you actively participate in reducing waste and promoting a circular economy. It’s a fantastic way to give new life to materials that would otherwise be discarded, lessening your environmental footprint one craft at a time.
- Cost-Effective: You literally use something that would have been thrown away. This makes toilet paper roll crafts incredibly budget-friendly, allowing you to create stunning decor without breaking the bank. The only costs typically involve a few basic craft supplies like paint and glue.
- Versatile & Easy to Work With: Cardboard tubes are surprisingly pliable and easy to cut, shape, and paint. Their inherent cylindrical form, when flattened, naturally lends itself to creating petal-like shapes, making them ideal for floral or intricate designs.
- Accessible to All Skill Levels: Whether you’re a seasoned crafter or just starting, working with toilet paper rolls is forgiving and fun. The techniques involved are simple enough for beginners, yet offer enough scope for experienced crafters to explore complex designs.
- Unleash Creativity: Beyond the heart design, these rolls can be transformed into an endless array of objects – from miniature figures and organizational tools to elaborate decorative pieces. They serve as a blank canvas for imagination.
The Benefits of DIY Home Decor
Engaging in DIY home decor projects, such as this toilet paper roll wall art, brings a unique set of rewards that store-bought items simply cannot match:
- Personalization: Each DIY piece reflects your unique style and personality. You get to choose the colors, arrangement, and overall aesthetic, ensuring the final product perfectly matches your home’s decor and your personal taste.
- Sense of Accomplishment: There’s immense satisfaction in creating something beautiful with your own hands. Hanging a piece of art you crafted yourself instills a sense of pride and accomplishment.
- Unique & Original Pieces: Say goodbye to mass-produced decor. Your DIY wall art will be one-of-a-kind, a conversation starter that adds an exclusive touch to your living space.
- Therapeutic & Relaxing: Crafting can be a wonderful stress-reliever. The focused, repetitive motions involved in cutting, painting, and gluing can be incredibly meditative and a great way to unwind.
- Budget-Friendly Decorating: As highlighted with this project, DIY allows you to decorate your home stylishly without incurring significant expenses, making beautiful home aesthetics accessible to everyone.
Materials: Gathering Your Crafting Essentials
Before diving into the creative process, ensure you have all the necessary materials on hand. The beauty of this project lies in its simplicity and the common availability of its components.
- Empty toilet paper rolls (the more, the merrier – you’ll be surprised how many you’ll use!)
- A hot glue gun (essential for quick and strong adhesion)
- Glue sticks (plenty to keep your project flowing)
- Scissors (sharp and comfortable for repetitive cutting)
- A pencil (for marking and outlining)
- A ruler (for consistent measurements, though optional for a more organic look)
- Some craft paint (acrylic paint works wonderfully and comes in a vast array of colors)
- A paintbrush (suitable for the type of paint you choose)
- Some kind of backing like a piece of plywood, sturdy cardboard, or poster board (this provides a stable base for your art, especially if you plan to hang it)
Directions: Crafting Your Heart Wall Art
This project is divided into several straightforward steps, each building upon the last to transform simple cardboard tubes into an intricate work of art. Take your time, enjoy the process, and let your creativity shine.
Step 1: Preparing and Cutting Your Toilet Roll Sections
The first step involves preparing the “petals” or elements that will form your heart. Start by flattening your empty toilet paper rolls. This makes them easier to cut and provides a consistent base shape. Using your ruler and pencil, mark the rolls into sections, approximately 1/2 to 3/4 inch wide. The exact width can vary based on your preference; wider strips will result in larger, more prominent petals, while narrower strips will create a finer, more delicate look. Once marked, carefully cut along these lines with your scissors. You’ll need a significant number of these sections, so prepare a good batch before moving on. As you cut, the flattened strips will naturally curve slightly, forming an organic, petal-like shape – perfect for our design.
Step 2: Painting Your Cardboard Elements
This is where your wall art truly begins to take on its aesthetic appeal. Choose your craft paint colors carefully. You might opt for a single, striking color for a minimalist look, or a gradient of shades for an ombre effect, or even multiple contrasting colors for a vibrant, playful piece. Using your paintbrush, thoroughly paint each cardboard section. Ensure even coverage on all visible surfaces. Depending on the paint and desired intensity, you might need two coats. Allow ample drying time between coats and before proceeding to the assembly stage. This step not only adds color but also helps to stiffen the cardboard slightly, making it more durable.
Step 3: Assembling Individual Flower Units
The basic building block for your heart wall art will be small “flower” units, typically made of five to seven painted cardboard sections. To create a flower, take one painted section and use it as the center. Apply a small dab of hot glue to one end of another section and attach it to the side of the center piece, forming a petal. Continue adding sections around the central piece, overlapping slightly at their bases, until you’ve formed a complete flower-like shape. The hot glue gun is invaluable here for its quick drying time, allowing for rapid assembly. Create numerous these individual flower units – the more you have, the larger and fuller your heart will be.
Step 4: Designing and Gluing the Heart Structure on the Backing
Now it’s time to bring your heart to life. Place your backing material (plywood, poster board, or cardboard) on a flat, protected surface. If you’re using a pencil, you can lightly sketch a heart outline onto the backing as a guide. Alternatively, you can freehand the shape, allowing it to develop organically. Begin by taking your assembled flower units and arranging them along the outer edge of your desired heart shape. Use the hot glue gun to attach the units to each other and to the backing material. Work from the outside in, carefully building the outline of the heart. Once the outline is established, start filling in the interior of the heart, gluing more flower units and individual sections where needed to create a dense, continuous pattern. You can also glue individual sections directly into gaps to ensure there are no visible spaces, creating a truly intricate and solid piece.
Step 5: Final Touches and Hanging Your Art
Once all the sections are securely glued and the heart shape is complete, allow the glue to fully set for a few minutes. Inspect your artwork for any loose pieces or areas that might need a touch-up of paint. If you used a backing, you can attach a picture hanger to the back of it for easy display. If you opted for a freestanding piece without a full backing, consider adding a sturdy loop of string or wire to a few strategically placed sections at the top for hanging. Position your beautiful, eco-friendly heart wall art in a place where it can be admired and enjoyed, a testament to your creativity and commitment to sustainable living.
Tips for Personalization and Variations
This project is incredibly adaptable, allowing for endless customization to match your personal style and home decor. Here are some ideas to inspire your next creation:
- Explore Different Shapes: While a heart is classic, don’t limit yourself! Try creating circles, squares, stars, or even abstract patterns. You can also make individual “flower” arrangements without a backing for smaller decorative accents.
- Experiment with Color Palettes: Instead of a single color, consider an ombre effect by using shades that transition from light to dark. Or go bold with a rainbow of colors, or subtle with pastels. Metallic paints (gold, silver, copper) can add a sophisticated touch.
- Add Embellishments: Elevate your design with glitter, small beads, rhinestones, or even dried flowers glued into the centers of your “flower” units for added texture and sparkle.
- Vary the Size: Create a grand statement piece using dozens of rolls and a large backing, or craft a series of smaller hearts to hang together as a gallery wall.
- Textural Play: Instead of just painting, try wrapping some sections in twine or fabric scraps before gluing for a multi-textured look.
- Framing Options: For a more polished look, consider framing your finished wall art. A simple shadow box frame can add depth and protect your creation.
Caring for Your Toilet Roll Wall Art
While made from simple materials, your toilet roll wall art is a durable piece that will last for years with proper care. To keep it looking its best:
- Dust Gently: Use a soft brush, a feather duster, or a can of compressed air to gently remove dust from the intricate nooks and crannies. Avoid harsh chemicals or abrasive cloths.
- Avoid Moisture: Keep your artwork away from high-humidity areas or direct exposure to water, as this can warp the cardboard and damage the paint and glue.
- Protect from Direct Sunlight: Prolonged exposure to direct sunlight can cause colors to fade over time. Display your art in a spot where it’s not constantly exposed to harsh UV rays.
Conclusion: Embrace the Joy of Sustainable Crafting
This toilet paper roll heart wall art project is more than just a craft; it’s an invitation to see the potential in everyday objects, to embrace sustainability, and to unleash your inner artist. It proves that with a little imagination and effort, you can transform humble discarded items into something truly beautiful and meaningful for your home. The satisfaction of creating such a unique piece, knowing it’s made from recycled materials, is unparalleled. So, the next time you finish a roll of toilet paper, don’t just toss it – see it as the beginning of your next creative adventure!
Gather your materials, follow these simple steps, and embark on a rewarding journey of crafting. You’ll not only adorn your walls with a stunning piece of art but also contribute to a more sustainable lifestyle, proving that creativity and eco-consciousness can beautifully intertwine.