
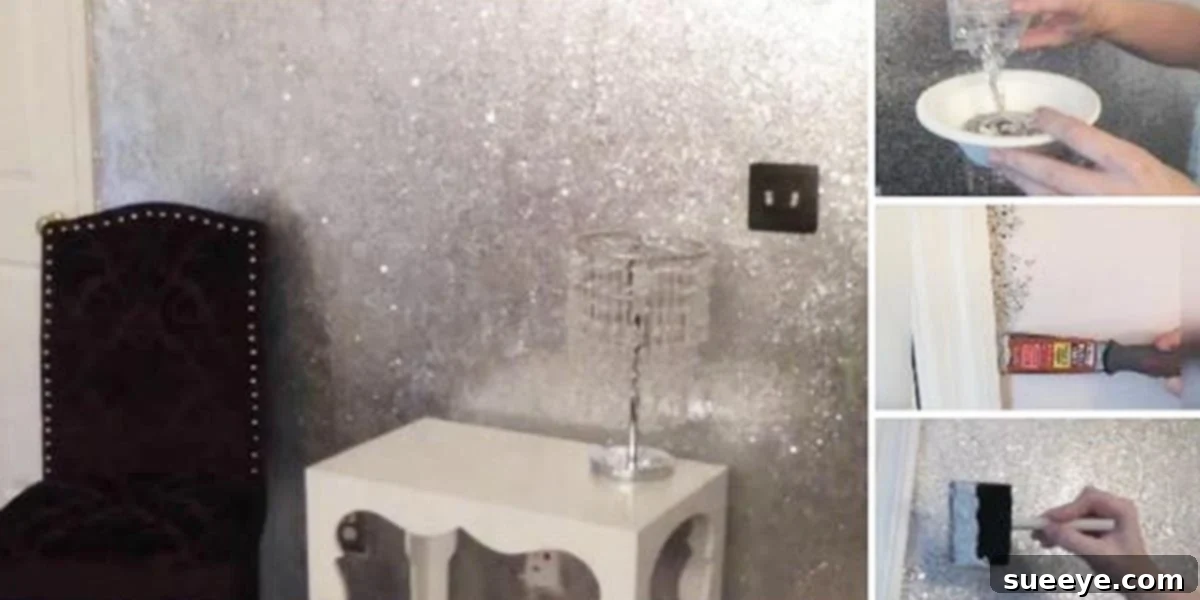
Unleash the Sparkle: Transform Your Home with Dazzling Glitter Paint
Are you searching for a unique and enchanting way to inject personality and magic into your living space? Look no further than the captivating world of glitter paint. This innovative DIY home decor trend, popularized by creative enthusiasts like JennBMakeupMagic, offers an exciting opportunity to add shimmer, depth, and undeniable glamour to virtually any room. Whether your vision is a whimsical accent wall, a sophisticated border, or a subtle sparkle that dances with the light, glitter paint serves as your ultimate tool for transforming mundane surfaces into extraordinary design statements. It’s more than just paint; it’s an invitation to express your creativity, elevate your interiors, and bring a touch of enchantment into your everyday environment, making your home truly shine with personalized brilliance.
What Exactly is Glitter Paint and How Can You Create Your Own Shimmering Wall?
Glitter paint isn’t merely a decorative fantasy; it’s a tangible design element made accessible through straightforward DIY methods. At its core, glitter paint involves suspending fine or chunky glitter particles within a clear adhesive medium that can then be applied to your walls. While several reputable brands now offer convenient pre-mixed glitter paints, many home improvement enthusiasts prefer the flexibility of creating their own custom blends. This DIY approach unlocks limitless possibilities for tailoring the color, texture, and intensity of your sparkle to perfectly match your desired aesthetic.
Essential Components: Selecting the Right Glitter and Clear Medium
The foundation of any successful glitter paint project lies in meticulously selecting the appropriate materials:
- The Glitter: The market boasts an incredible variety of glitter types. For wall applications, fine craft glitter or even cosmetic-grade glitter is often recommended. These types typically offer a smoother finish and are easier to apply evenly, resulting in a more refined shimmer. However, if you desire a dramatic, textured effect, chunky glitter can create a bolder statement. Consider iridescent, holographic, metallic (such as classic silver, opulent gold, or warm bronze), or vibrant colored glitter to seamlessly complement your existing decor. Always prioritize good quality glitter; cheaper alternatives may not adhere as effectively or maintain their brilliant sparkle over time, leading to disappointing results.
- The Clear Medium: This crucial component acts as the binder, allowing the glitter to adhere securely to your wall surface. Popular and effective choices include:
- Mod Podge: A highly versatile craft glue, sealer, and finish, Mod Podge is a favorite among DIYers due to its ease of use, quick drying time, and the durable, protective finish it provides.
- Clear Acrylic Glaze or Varnish: These options typically offer superior durability and a professional-grade finish. Being thicker in consistency, they may require a bit more effort to mix evenly with glitter, but the long-lasting results are often worth it.
- Clear Glue (e.g., PVA glue or school glue): This is an economical choice, especially suitable for lighter applications or intricate stenciling work. Ensure that the glue you select dries completely clear and is specifically designed for, or compatible with, wall application.
- Clear Paint Topcoat: Many paint manufacturers produce clear topcoats designed to protect painted surfaces. These can often be mixed with glitter, creating a uniform and cohesive finish that integrates well with your existing wall color. Always check for compatibility.
Achieving the Perfect Sparkle: Mixing Ratios and Techniques
Mastering the perfect glitter effect often involves a degree of creative experimentation. A practical starting point for mixing glitter with your chosen clear medium is a ratio of one part glitter to approximately two or three parts clear medium. However, you should adjust this ratio based on the specific density of your glitter and your desired level of sparkle intensity. For a subtle, delicate shimmer, use a lower glitter ratio. Conversely, for an intense, full-coverage sparkle, gradually increase the glitter ratio, always being mindful not to compromise the adhesive properties of your medium.
Crucial mixing tips for optimal results:
- Always mix your glitter paint in a separate, clean container, never directly into the original can of your clear medium.
- Stir the mixture thoroughly and continuously to ensure that the glitter particles are evenly distributed throughout the medium. Glitter naturally tends to settle at the bottom, so frequent stirring during the entire application process is absolutely essential for a consistent finish.
- It’s highly advisable to start with a small test batch. This allows you to evaluate the consistency, the sparkle level, and the drying appearance before committing to a larger quantity for your main project.
Beyond Aesthetics: Why Glitter Paint Should Be Your Next DIY Home Decor Choice
Incorporating glitter paint into your home offers far more than just surface-level beauty. It provides a myriad of benefits that elevate it from a simple decorative choice to a strategic and impactful design element.
Unrivaled Visual Impact and Ambiance
- Adds Dynamic Depth and Texture: Unlike flat, one-dimensional paint, glitter introduces a multi-faceted aspect to your walls. This creates intriguing visual interest that subtly shifts and changes with varying light conditions throughout the day.
- Enhances Light Reflection and Brightness: Glitter particles act like countless tiny mirrors, brilliantly reflecting both natural sunlight and artificial light sources. This optical effect can dramatically make a room feel brighter, more open, and significantly more inviting, especially beneficial in smaller or naturally dimly lit areas.
- Creates an Irresistible Focal Point: A strategically placed glitter accent wall immediately captures the eye, establishing a striking and memorable focal point that beautifully anchors your room’s overall design scheme.
Exceptional Personalization and Adaptability
- Express Your Unique Style: From enchantingly whimsical and playfully vibrant to profoundly sophisticated and overtly opulent, glitter paint is remarkably adaptable to an extensive range of interior design aesthetics. It empowers you to infuse your personal style and character directly onto your walls, creating a truly bespoke environment.
- Cost-Effective Transformation: When compared to the investment of expensive wallpapers or elaborate custom art installations, glitter paint offers a relatively affordable yet exceptionally impactful method to refresh and utterly transform the ambiance of any room.
- Instant Infusion of Glamour: Craving an immediate touch of luxury and high-end appeal? Glitter effortlessly delivers instant glamour, elevating the perceived value and sophistication of your space without the need for a hefty price tag.
Positive Emotional and Psychological Benefits
- Boosts Mood and Well-being: The inherent sparkle and shimmer of glitter often evoke feelings of joy, excitement, and childlike wonder. A glitter wall can genuinely contribute to creating a positive, uplifting, and energetically vibrant atmosphere within your home.
- Inspires Creativity and Imagination: The dynamic and ever-changing nature of glitter, particularly when interacting with diverse lighting conditions, can stimulate imagination, spark creativity, and cultivate a truly inspiring and stimulating environment for all who inhabit it.
Dazzling Applications: Strategic Placement of Glitter Paint for Maximum Effect
While painting an entire house in glitter might be an overwhelming endeavor for most, the true brilliance of glitter paint shines through when it’s applied strategically to highlight specific areas or create captivating, artful accents. Here are some of the most effective and popular ways to integrate glitter paint seamlessly into your home decor:
1. The Statement-Making Glitter Accent Wall
Without a doubt, an accent wall remains the most popular and impactful application for glitter paint. Carefully select a wall that naturally draws attention or one you specifically wish to designate as the room’s focal point. This could be the wall behind your headboard in a master bedroom, the primary wall in a sophisticated living room, or a dramatic statement wall in a formal dining area. The glitter on this wall will beautifully catch ambient light, creating a dynamic, ever-changing visual display that adds immense depth and unique character without overpowering the entire space. Consider a subtle champagne glitter on a neutral base for an understated, elegant shimmer, or opt for a bold, jewel-toned glitter for a truly dramatic and luxurious flair.
2. Whimsical Stenciling and Intricate Artistic Motifs
For those who prefer a more delicate, artistic touch, glitter paint proves to be absolutely perfect for stenciling. Use it to create intricate patterns, playful shapes, or personalized text directly onto your walls. This technique is particularly enchanting in children’s bedrooms or imaginative playrooms, where sparkling stars, graceful butterflies, or charming fairy tale motifs can magically bring a sense of wonder and fantasy to life. When stenciling, use high-quality painter’s tape to securely adhere your stencil, apply the glitter mixture with a dab brush or a small sponge, and then carefully peel away the stencil while the paint is still slightly wet to achieve crisp, clean lines.
3. Sparkling Borders, Trims, and Architectural Details
Are you tired of conventional wallpaper borders? Consider replacing them with a shimmering band of glitter paint! This can introduce an unexpected element of sophistication or inject a playful touch to your room. Utilize painter’s tape to meticulously create precise, clean lines for your border, whether you place it along the top, middle, or bottom of your wall. Extend this creative idea to architectural trim: imagine your crown molding, baseboards, window frames, or door frames subtly outlined with a delicate glitter finish. This elegant detail will beautifully catch and reflect light, emphasizing the room’s structural beauty and adding a layer of refined interest.
4. Highlighting Nooks, Alcoves, and Built-in Features
Transform often-overlooked architectural features into sparkling showcases. Built-in bookshelves, charming display alcoves, the grand surround of a fireplace, or even the back panel of a home bar can be significantly elevated and brought to life with a strategic coat of glitter paint. It serves as an exquisite, shimmering backdrop for your cherished art pieces, treasured books, decorative ornaments, or elegant mirrors, making them stand out with an added layer of visual interest and luxury. This clever technique effectively draws attention to these unique areas, turning them into captivating artistic installations in their own right.
5. The Unexpected Glitter Ceiling: The Fifth Wall
Often referred to as the “fifth wall,” the ceiling represents an exciting yet frequently overlooked canvas for creative expression. A glitter ceiling can create a breathtaking “starry night” effect in a romantic bedroom, introduce a playful and whimsical element in a child’s room, or add an opulent, grand touch in a formal dining area. While applying paint to a ceiling can be more challenging due to gravity and overhead work, the resulting effect is undeniably dramatic, unique, and truly memorable, especially when soft, strategically placed lighting is used to enhance the magnificent shimmer.
6. Elevating Formal Spaces with Understated Luxury
Glitter doesn’t always have to be overtly flashy or dazzling. In formal dining rooms, sophisticated living rooms, or elegant entryways, a medium-toned base paint subtly infused with very fine glitter can cultivate an atmosphere of refined luxury and quiet opulence. When paired thoughtfully with sophisticated furniture, rich textiles, and strategically placed, soft lighting elements, the fine glitter subtly reflects and refracts light, adding an ethereal glow that speaks volumes about exquisite taste and attention to detail. In these settings, less is often more, creating an ambiance of subtle glamour rather than overwhelming sparkle.
Choosing Your Palette: The Harmony of Glitter and Base Color
The overall success and visual impact of your glitter paint project heavily depend on the harmonious interplay between the glitter’s color and the underlying base wall color. Thoughtful and intentional selection in this area is crucial for achieving a cohesive, stunning, and aesthetically pleasing result.
Considerations for Glitter Color
- Complementing Your Decor: Always select glitter colors that naturally complement or enhance your existing furnishings, textiles, and artwork. Versatile neutral glitters like silver and gold are excellent choices as they tend to work beautifully with a wide spectrum of color palettes.
- Desired Aesthetic Effect: For a bold, high-impact statement, opt for a glitter color that offers a striking contrast to your base paint. Conversely, for a more blended, subtle shimmer, choose glitter that is either very close in hue to your base paint or select iridescent glitter, which has the magical ability to pick up and reflect the surrounding colors in the room.
- Chunky Versus Fine: Fine glitter typically offers a delicate, subtle shimmer, making it ideal for creating an elegant and refined look. Chunky glitter, on the other hand, creates a more dramatic, textured, and noticeably pronounced sparkle, perfect for making a bold statement.
The Influence of Base Paint Color
- Darker Base Colors: Deep, rich jewel tones such as navy blue, emerald green, or burgundy, along with sophisticated charcoal grays, provide a dramatic backdrop that makes glitter particles pop vividly. The strong contrast ensures the glitter stands out with exceptional brilliance.
- Lighter Base Colors: Whites, creams, soft pastels, or light grays create a delicate, ethereal shimmer. On these lighter bases, the glitter adds a dreamy, subtle quality rather than a stark contrast, making it perfect for cultivating a soft, inviting, and serene atmosphere.
- The Importance of Sheen: A matte or eggshell base paint finish generally provides the most effective contrast for glitter, allowing the sparkle to truly be the star of the show. If you opt for a satin or semi-gloss base, be aware that its inherent sheen might compete with the glitter’s reflective qualities, potentially diminishing its impact.
The Pivotal Role of Room Lighting
It is paramount to always consider the lighting conditions within the room – encompassing both natural daylight and all artificial light sources. Glitter interacts dynamically and beautifully with light. A wall that receives direct sunlight throughout the day will appear significantly more vibrant and sparklier than one located in a dimly lit corner. Experiment with different light sources, such as spotlights, ambient lamps, and dimmer switches, to observe how they enhance, alter, or bring out the various facets of your glitter’s mesmerizing effect. This experimentation can help you achieve the perfect glow for any mood or occasion.
Your Step-by-Step Guide to Achieving a Flawless Glitter Wall Finish
Ready to embark on your sparkling transformation? Follow these detailed steps to achieve a dazzling, durable, and professional-looking glitter paint finish, drawing inspiration from the meticulous approach often demonstrated by expert DIYers like JennBMakeupMagic.
1. Thoroughly Prepare Your Workspace and Wall Surface
- Immaculate Walls: Ensure your walls are completely free of any dust, dirt, grime, or grease. A light wash with a mild sugar soap solution, followed by a rinse with clean water and thorough drying, is highly recommended for optimal adhesion.
- Address Imperfections: Carefully fill any existing holes or cracks with spackle, sand them smooth once dry, and then prime these specific repaired areas to ensure a uniform surface.
- Mask and Protect: Use high-quality painter’s tape to precisely mask off adjacent walls, ceilings, all trim work (like baseboards and door frames), and electrical light switches and outlets. Lay down generous drop cloths to comprehensively protect your floors and any furniture from accidental drips or glitter fallout.
- Apply Primer (Optional but Advisable): If your existing walls are a dark color and you plan to use a lighter glitter mix, or if you simply want to ensure the absolute best adhesion and a uniform base, applying a coat of suitable wall primer is a wise preparatory step.
2. Expertly Mix Your Glitter Paint Batch
- Work in Small Batches: Always mix your glitter and clear medium in small, manageable quantities. This critical step prevents the glitter from settling excessively at the bottom of a large container and ensures a consistently even distribution throughout the application process.
- Continuous Stirring is Key: Utilize a dedicated stirring stick to thoroughly incorporate the glitter into the clear medium. It is absolutely crucial to stir the mixture frequently, ideally every few minutes, during the entire application process to keep the glitter suspended evenly and prevent it from clumping or settling.
3. Meticulously Apply the Glitter Mixture
- Optimal Tools: A high-density foam roller is often the preferred tool for achieving smooth, even glitter distribution across larger wall sections. For precise edges, intricate corners, and detailed areas, use a high-quality synthetic brush. Some individuals also find success with a sponge for creating a more textured or mottled glitter effect.
- Thin, Even Coats are Paramount: Always apply thin, even coats of the glitter mixture rather than attempting to apply one thick layer. This technique allows the glitter to disperse properly, adhere securely, and dry consistently. Overloading your roller or brush will inevitably lead to uneven patches, undesirable streaks, and excessive glitter fallout.
- Consistent Directional Application: For a uniform and cohesive look, roll or brush the glitter mixture in consistent, slightly overlapping strokes. If you’re aiming for a more random or organic sparkle, you can subtly vary the direction of your application.
- Multiple Coats for Intensity: Depending on your desired level of sparkle intensity, you will most likely need to apply between 2 to 4 coats. Allow each coat to dry completely – always refer to your specific product instructions, but typically this means 2 to 4 hours – before applying the subsequent layer. Patience during this stage is absolutely paramount for achieving a professional, dazzling finish.
4. Drying and Curing: The Waiting Game
Be aware that glitter paint, particularly due to its clear medium component, can take longer to fully dry and cure than conventional paint. Ensure the room has ample ventilation throughout this period and rigorously avoid touching the newly painted surface until it is completely dry to the touch and has fully hardened. This curing process can vary significantly, taking anywhere from 24 hours to several days depending on humidity and product type.
5. Sealing for Longevity (Optional but Highly Recommended)
To significantly minimize glitter fallout over time and substantially increase the durability and longevity of your glitter wall, strongly consider applying a final clear, non-yellowing topcoat or sealer. This protective layer effectively locks the glitter in place, safeguards the surface from wear and tear, and can even enhance its overall sheen and depth. Ensure that the chosen sealer is fully compatible with your glitter medium and allow it to dry and cure completely according to the manufacturer’s instructions.
Expert Tips for a Truly Stunning and Enduring Glitter Finish
To ensure your glitter paint project is a resounding success and lasts for years to come, keep these expert tips in mind:
- Always Test Patch: Before committing to your main wall, always apply a test patch in an inconspicuous area (or on a spare piece of cardboard). This allows you to evaluate the glitter-to-medium ratio, refine your application technique, and confirm the final drying effect.
- Work in Manageable Sections: Divide larger walls into smaller, manageable sections. This helps ensure that you maintain a wet edge during application, preventing unsightly visible seams and inconsistencies in sparkle.
- Ensure Excellent Ventilation: Work in a well-ventilated area to facilitate faster drying times, reduce potential odors from the paint medium, and ensure a comfortable working environment.
- Prompt Clean-Up: Keep a damp cloth readily available for immediate clean-up of any accidental drips or stray glitter particles. Clean your tools promptly according to the specific instructions for your clear medium (typically soap and water for water-based products).
- Addressing Glitter Fallout: A certain amount of glitter fallout during the application process is normal and to be expected. Once your paint is completely dry and cured, a powerful vacuum cleaner equipped with a brush attachment can effectively help clean up any residual glitter from surrounding surfaces.
- Future Removal Considerations: Should you ever decide to change your decor and remove the glitter paint, be prepared that you might need to lightly sand the wall surface to remove the textured glitter layer. Following this, a coat of primer and fresh paint will restore the wall to a smooth finish.
Conclusion: Embrace the Radiance and Joy of Glitter in Your Home
From the subtle, elegant shimmer that graces a sophisticated dining room to the vibrant, playful sparkle that ignites a child’s bedroom, glitter paint offers an unparalleled and exciting opportunity to inject unparalleled personality, reflective light, and a touch of luxurious enchantment into your cherished home. It stands as a versatile, enjoyable, and relatively straightforward DIY project that yields incredibly transformative and visually striking results, empowering you to create living spaces that truly mirror your unique style, inspire daily joy, and become memorable expressions of your creativity.
So, what are you waiting for? Why not unleash your inner decorator and embark on this dazzling journey? With thoughtful preparation, the right tools, and a generous dash of creativity, you can bring a touch of truly brilliant sparkle to your walls, much like the inspiring demonstrations by DIY experts such as JennBMakeupMagic. Embrace the radiance, dare to sparkle, and let your home shine brighter than ever before!